COUNTERTOP WATER FILTER SYSTEM
Quick Setup Guide

All systems are made with highest quality NSF approved high
performance parts.
Water Filter
System with LCD
display
Comes in:
- white &
chrome finish
With:
- 3, 5, or 7 stage
filter cartridges
Water Filter
System
Comes in:
- white & clear
finish
With:
- 1, 3, 5, 7, or 10
stage filter
cartridges
Anchor Countertop
Water Filter Systems
are attractively
designed units that
sit right on your
countertop and
complete the
filtration process
Just dispense the water you
need and enjoy the filtered
water’s refreshing taste.
These systems are:
• Perfect solution for
household of any size
• Easy to install
• Slim, portable, and
compact in design
• Designed to be used
in most standard sized
housings

Your box contains:
Filter System*
Adapter Ring +
Gasket
Wrench User Guide
Supported Countertop Water Filter System
The information in this guide applies only to the following products:
AF-3000 Single Stage Filter AF-3200-C 2-Stage Filter
AF-3300 3-Stage Filter AF-3200-W 2-Stage Filter
AF-3500 5-Stage Filter AF-9300-M 3-stage Filter w/LCD display
AF-3700 7-Stage Filter AF-9300-W 3-stage Filter w/LCD display
AF-3110 10-Stage Filter AF-9500 5-stage Filter with LCD display
AF-9700 7-stage Filter with LCD display
- installation steps for
all the Anchor
Countertop Filter
System Products
- replacement steps
for Anchor
countertop filter
cartridges
This Quick Setup
Guide provides:
* Filter color and cartridge will depend on the order.

Know your filter
Direction of flow of water:
Attribute Value
Temperature Range 39°F - 100°F (4°C - 38°C)
Service Flow 1 gpm (3.8L/min)
Rated Capacity 1500 gallons
Operating Pressure 20 psi - 125 psi
Shipping Dimensions 6" x 5" x 13" H
Shipping Weight Varies between 6-8 lbs based on filter cartridge
Specifications
Various parts of the filter:

We have made it easy for you to install the Anchor Countertop Water
Filter. The shipped unit comes pre-installed with filter cartridge, faucet,
diverter valve, and tube. The only thing you need to do is to connect the
diverter valve to your faucet and start enjoying the clean refreshing water.
OUTSIDE
INSIDE
- OR -
Note the threads in your faucet. If the threads are on the:
Installing your filter
This is the
diverter valve
Steps for installation:
1. Remove existing aerator from the faucet
Aerator
2. Based on your faucet threads described above, connect
the divertor on the faucet as shown in the image below:
Faucet with outside thread
- the diverter valve should
screw right on
a.

After setting up the faucet, do
the following:
1. Place the filter unit in a
convenient location with
the spout positioned over
your sink. The spout is
designed to swivel.
2. Turn on your cold water and
divert the water through the
filter by pulling out/turning
the knob on the diverter
valve. Water pressure
should hold it in the out
position.
3. Allow it to run for several
minutes to flush out the
normal carbon fines
(blackish specs). Initially, the
water may contain tiny air
bubbles and taste slightly
sweet - this is normal and
harmless, and will clear up
after flushing.
4. To stop the flow, turn off the
cold water at your faucet -
the diverter valve knob will
return automatically for
normal unfiltered water
flow through your kitchen
faucet.
Faucet with inside thread
- enclosed adapter ring and
gasket must be used
Countertop with filter installed
b.
If your faucet has non-standard
threads, you may need to
purchase a special adapter from
your local hardware store.

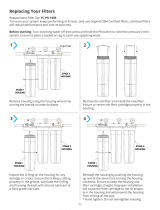
1. Turn off water.
2. Unscrew housing from its base.
Note: If the housing seems stuck, soak the base of the housing
for 10 minutes in a mixture of HOT water and a little vinegar.
3. Place Housing upside down on cabinet and remove used cartridge.
3. Check the O ring for wear and tear. (The O ring rests in a groove 1
“down in the housing).
a. If it is worn replace it.
b. If O ring is in good working order,
Note: lubricate it with petroleum jelly to ensure it lies flat
and prevents leaking.
Replacing Your Cartridge
6. Leave the housing on the counter, pick up the base, and screw it
back on tight enough to prevent any leakage. Doing it this way will
prevent the O- ring from slipping loose and causing the filter to
leak. Turn the housing/canister right side up.
Note: Before putting the housing back on, put some petroleum
jelly on the plastic threads this will make it easier to unscrew the
housing the next time you change your filter cartridge.
5. Unwrap filter cartridge
from the plastic wrap. With
your housing’s open end
facing up, place the new
filter into the housing

All rights reserved. No part of this user guide may be
reproduced, distributed, or transmitted in any form or
by any means, including photocopying, recording, or
other electronic or mechanical methods, without the
prior written permissionof Anchor USA.
Technical Support
At Anchor USA, we are always here to help you. With 24-hour access to
our company contact web page, you can drop a message or email us
directly anytime, and one of our representatives will respond to your
query in less than 24-hrs.
Web: https://www.anchorfilters.com/contact-us
Email: support@anchorfilters.com
IMPORTANT!
Run only cold water through the unit.
WARNING!
Do not use this filter for water that is microbiologically
unsafe or of unknown quality.
SN0010EN2019
/


