www.LifeIonizers.com/Support
19
75
M11/M11 UC NG
19
www.LifeIonizers.com/Support
PH TESTING WITH DROPS
To test and to determine the pH of your water, you will have to select the level
you are testing as well as combining the liquid reagent pH drops provided with
the purchase of your ionizer with a sample of water gathered from your ion-
izer. To begin this process, you will need a small clear glass of some sort. Turn
on your water ionizer and select the level of alkaline or acidic water you will
want to test, please wait 10 seconds before collecting the water. You will then
need to add 2-3 liquid reagent pH drops to the glass rst and collect 1 ounce
(2 tbsp) of water from your ionizer. After that you will need to compare the
water you tested with the color ph chart provided with the pH drops. You will
need to adjust the amperage levels depending on your source water to match
the pH readout on the display screen. To do this follow the F-20 steps.
AMPERAGE ADJUSTMENT (F20) - (help video on LifeIonizers.com/support)
To enter into the F20 you will need to do the following:
NOTE: The buttons must be pressed quickly as failure to do so will result
in booting you out of the program menu. The unit must be dispensing
water before pressing the buttons.
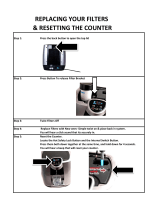
• Press and hold the “MENU” & “FILTER 1” buttons simultaneously for
5 seconds.
• F20 will appear on the display screen.
• Below the F20, the amperage number will display and start ashing.
These numbers will vary depending on the level of alkaline or acid you
are on.
• Scroll through the alkaline and acid levels by pressing the “ALKALINE” or
“ACID” button.
• Once you are on the level you want to adjust, the amperage number
will be ashing.
• To increase the amperage number, press and release the “FILTER 2” button.
• To decrease the amperage number, press and release the “FILTER 1”
button.
• Repeat the process to adjust the other levels of alkaline or acid.
• To save your adjustments, press the “PURIFY” button and the display
screen will go back to its normal operation.
NOTE: You cannot adjust the “PURIFY” selection.
• For optimum performance of the unit, you will need to clean your ion-
izer with the CITRIC ACID CLEANING FILTER also known as the SCALING
FILTER. We recommend using this cleaning cartridge 2-3 times a year
depending on the hardness of your water.
Set ow rate no higher than 2.5 liters per minute. Anything higher could cause internal damage.