Page is loading ...

APPAREIL PHOTO
NUMERIQUE
MANUEL D’INSTRUCTION
REFERENCE 811204, 811184

2
CARACTERISTIQUES DE L’APPAREIL PHOTO
.......................................................4
CONNAITRE VOTRE APPAREIL PHOTO..................................................................5
COMPOSANTS................................................................................................. 5
INSTALLER LES PILES.....................................................................................6
INSTALLER LA CARTE SD............................................................................... 6
ALLUMER L’APPAREIL PHOTO....................................................................... 7
MODESDE L’APPAREIL PHOTO...................................................................... 8
MODE PHOTO............................................................................................................8
PRENDRE UNE PHOTO................................................................................... 8
UTILISER LA FONCTION RETARDATEUR ET RAFALE................................10
MENU DE REGLAGES PHOTO......................................................................10
MODE VIDEO............................................................................................................12
ENREGISTRER UNE VIDEO.......................................................................... 12
MENU DE REGLAGES VIDEO....................................................................... 14
MODE AUDIO............................................................................................................16
ENREGISTRER UN FICHIER AUDIO............................................................. 16
MODE LECTURE ......................................................................................................17
VISIONNER LES FICHIERS SAUVEGARDES............................................... 17
VISIONNER LES FILMS..................................................................................18

4
CARACTERISTIQUES DE L’APPAREIL PHOTO
•
1.3 M ega pixel CMOS Sensor
• 1.8” TFT Ecran couleur
• Résolution de l’image : 5MP (2592 x 1944)/ 3MP (2048x1536) / 1MP
(1280x960)
• Résolution vidéo: 1280 x 720, 720 x 480, 640 x480, 320 x 240
• Emplacement pour cartes SD/MMC (non incluses)
• Flash – Auto/Force/Off
• Retardateur - 2sec/10sec
• Microphone
• Fonctionne avec Microsoft Windows XP, Vista, Windows 7, Windows 8
• Alimentation : Piles 2 x AAA
• Température ambiante : 5°C à 40°C

DIGITAL CAMERA
ENGLISH MANUAL
REFERENCE 811204,811184

2
Product Specification
...........................................................................................
4
Getting to Know your camera
.............................................................................
5
Device overview
..........................................................................................
5
Installing the Battery
...................................................................................
6
Installing the SD CARD
..............................................................................
7
Turning your Camera On
...........................................................................
7
Camera Modes
............................................................................................
8
Capture Mode
.......................................................................................................
8
Taki ng a PHOTO
.........................................................................................
8
USING SELF TIMER/BURST Function
.................................................
10
Photo Settings MENU
..............................................................................
10
Video Mode
.........................................................................................................
12
Taking a VIDEO CLIP
..............................................................................
12
VIDEO Settings MENU
............................................................................
14
Audio Mode
.........................................................................................................
16
Recording Audio Files
..............................................................................
16
Playback mode
...................................................................................................
17
Viewing Saved Files
.................................................................................
17
Playback Video Clips
...............................................................................
18

3
Playback Audio Clips
................................................................................
18
PLAYBACK Settings MENU
....................................................................
18
Camera Settings
................................................................................................
21
Camera Settings menu
............................................................................
21
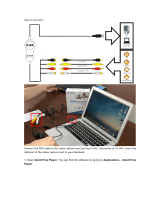
Downloading files to your Computer
......................................................
23
Driver / Software Installation
............................................................................
25
Driver/software Installation
......................................................................
25
Troubleshooting
.................................................................................................
27
Storage
................................................................................................................
28

4
PRODUCT SPECIFICATION
•
1.3 Mega pixel CMOS Sensor
•
1.8” TFT Display Screen
•
Still Image Resolution: 5MP ( 2592 x 1944)/ 3MP (2048x1536) / 1MP
(1280x960)
•
Video Clip Resolution: 1280 x 720, 720 x 480, 640 x480, 320 x 240
•
Supports SD/MMC Memory Slot up to 32GB
•
Flash Mode – Auto/Force/Off
•
Self Timer- 2sec/10sec
•
Built in Microphone
•
Works with Microsoft Windows XP, Vista, Windows 7,Windows 8
•
Power Source: 2 x AAA Batteries
•
Storage/Operation Temperature: 5°Cto40°C

5
GETTING TO KNOW YOUR CAMERA
DEVICE OVERVIEW
1 Power/Busy LED 12 Menu button
2 Zoom in button 13 Left/Self-timer
3 Zoom out button 14 SD Card s lot
4 Hand Strap Holder 15 LCD Screen
5 Power button 16 Shutter Button
6 Up/Display 17 Flash Light
7 Right/Flash 18 Lens
8 Battery Cover 19 Microphone
9 Ok Button 20 USB jack
10 Playback button 21 Self-timer LED
11 Down/Mode

6
INSTALLING THE BATTERY
1. Open the camera battery door by sliding the door downwards to release the
cover.
2. Insert 2 x AAA batteries as shown,
ensuring the +/- symbols on the
batteries are m atching +/- symbols
on the c amera.
3. Close the battery cover.

7
INSTALLING THE SD CARD
The camera has no internal memory, to be able to take i mages and video clips you
will need to insert a memory card. The camera accepts SD and MMC memory cards
up to 32GB. Turn off the camera before inserting or removing the SD/MMC card. Be
sure to insert the card the correct way. Never try to force the SD/MMC card into the
slot. The SD/MMC card has a write protect switch, which you can use to protect data
from accidental deletion. Therefore, whenever you want to record, format or delete
files in the SD/MMC card, disable the write protection beforehand.
To insert the memory card:
1. Turn off the camera.
2. Find the SD card slot on the bottom of the
camera.
3. Make sure the memory card is inserted as
illustrated.
TURNING YOUR CAMERA ON
To turn the camera on:
1. To turn on the camera, press the Power button, press the power button again to
turn the unit off.

8
NOTE: The camera will automatically turn itself off after a period of inactivity to save
power.
CAMERA MODES
The camera has 4 different types of modes Capture mode, Video mode, Audio
record mode and Playback mode. Press the MODE button to select between all the
modes.
CAPTURE MODE
TAKING A PHOTO
The Digital Camera allows you to take digital still photos. To take digital still photos:
1. Press the Mode button to set the camera to capture mode, the icon appears
on the LCD screen. The screen will look like below:
Display Title Description
Capture mode For taking still photos
Video mode For recording movie clips
Audio mode For recording audio files
Playback mode For viewing saved files

9
2. Use the LCD screen to view your subject.
3. Use the “Zoom in and Zoom Out” buttons to zoom in and out on your subject.
The value of magnification level appears on the screen.
4. Press the “Shutter” button to take a picture. After the picture has been taken the
LCD will display image for a brief second. The Memory capacity in the top right
of screen will decrease as each image is taken.

10
USING SELF TIMER/BURST FUNCTION
You can use the self-timer function when you wish to take a photograph of yourself
or when you wish to photograph an object where the camera must be as still as
possible. The burst function will allow you take continuous photos
1. Turn the power on, and set the camcorder to the Capture mode.
2. Press the “Left” button to change the self-timer Mode: each time the button is
pushed left, the icon on screen is changed.
2 seconds - The photo will be taken 2 seconds after the shutter is pressed.
10 Seconds - The photo will be taken 10 seconds after the shutter is pressed.
Burst - Hold the Shutter button to take pictures continuously. It will
automatically take three pictures in the interval of 1 second.
3. Press the Shutter button to take picture.
PHOTO SETTINGS MENU
There are various photo settings that can be changed on the camera.
1. Turn on the camera and set it to capture mode.
2. Press the “Menu” button to display the menu.
3. Press the “Up” or “Down ” buttons to select an item.
4. Push the “Ok” button to enter the submenu.

11
5. Press the “Up” or “Down ” buttons to select the desired item.
6. Press the “OK” button to confirm the setting.
7. Press the “Menu” button to close the menu.
Photo Settings are as follows:
Menu Function
Resolution Allows you to change the image resolution for taking still photos.
There 3 options for choice:
5MP (2592x1944) / 3MP (2048x1536) / 1.0MP (1280x960)
Quality Selecting lower image quality decreases the image size and allows
you to capture more images. There are three options for choice
Super Fine, Fine, Normal.
Metering Allows you to change the brightness of the picture. There are 3
Settings to choose from
Center: The exposure will be calculated based on light in the
center area and this is suitable for general use.
Multi: The exposure will be calculated based on the average light.
Spot: Only the spot in the center of the LCD screen will be
metered for light.
White
Balance
Allows you to adjust the white balance to suit different light
sources. There are five options to choose from:
Auto/Daylight/Cloudy/Fluorescent/Tungsten.
Exposure Allows you to set the exposure value manually to compensate for

12
unusual lighting conditions such as indirect indoor lighting, dark
backgrounds, and strong backlighting. The exposure value range
is –2.0 to 2.0.
Capture
Mode
Use this item to set the camera to different camera taking modes:
Off/ Self-timer 2s/ Self-timer 10s/ Burst
Effect This function allows you to change the image’s color tone for your
next image you will take. There are several options: [Normal]/
[B&W] / [Sepia] / [Negative]/ [Red]/ [Green]/ [Blue].
Photo
Frame
Use this function to add photo frame to images.
Date
Stamp
This function can be used to add a date to your pictures as you
take them. There are three items for option:
[Off]: Do not add the recording date & time to printed images.
[Date]: Only add the recording dateto printed images.
[Date&Time]: Add the recording date & time to printed images.
VIDEO MODE
TAKING A VIDEO CLIP
The Digital Camera allows you to take video clips. To take video clips:
1. Press the Mode button to set the camera to video mode, the icon appears

13
on the LCD screen. The screen will look like below:
2. Use the LCD screen to view your subject.
3. Use the “Zoom In” and “Zoom Out” buttons to zoom in and out on your subject.
The value of magnification level appears on the screen.
4. Press the “Shutter” button to start recording. While recording the top right of
the screen will display how long it has been recording for. You can pause the
recording by pressing the “Up” arrow and press again to resume recording.
5. Press the “Shutter” button again to stop recording or recording s tops when the
current SD/MMC card is full.

14
VIDEO SETTINGS MENU
There are various video settings that can be changed on the camera.
1. Turn on the camera and set it to video mode.
2. Press the “Menu” button to display the menu.
3. Press the “Up” or “Down ” buttons to select an item.
4. Push the “Ok” button to enter the submenu.
5. Press the “Up” or “Down ” buttons to select the desired item.
6. Press the OK button to confirm the setting.
7. Press the “Menu” button to close the menu.
Video Settings are as follows:
Menu Function
Movie Size Allows you to change the video resolution for for the recording.
You can choose from HD: 1280 x 720, D1 720 x 480, VGA 640 x
480 and QVGA 320 x 240.
Frame Rate Frame rate allows you to set how many frames per second are
recorded. There are 2 choices HIGH and LOW. High records at
30fps, low records at 15fps. The higher frame rate gives better
quality recording but also takes up extra memory.
Metering Allows you to change the brightness of the picture. There are 3
Settings to choose from

15
Center: The exposure will be calculated based on light in the
center area and this is suitable for general use.
Multi: The exposure will be calculated based on the average
light.
Spot: Only the spot in the center of the LCD screen will be
metered for light.
White
Balance
Allows you to adjust the white balance to suit different light
sources. There are five options to choose from:
Auto/Daylight/Cloudy/Fluorescent/Tungsten.
Effect This function allows you to change the image’s color tone for your
next image you will take. There are several options: [Normal]/
[B&W] / [Sepia] / [Negative]/ [Red]/ [Green]/ [Blue].
Date Stamp
This function can be used to add a date to your video as you
recorded them. There are three items for option:
[Off]: Do not add the recording date & time to printed images.
[Date]: Only add the recording dateto printed images.
[Date&Time]: Add the recording date & time to printed images.

16
AUDIO MODE
RECORDING AUDIO FILES
The digital camera allows you to record audio clips. Before recording audio clip,
make sure your SD/MMC card has adequate free space.
1. Set the camera to Audio mode. The icon will appear on the LCD screen with
a microphone.
2. Press the “Shutter” button to start recording. While recording the top right of the
screen will display how long left can be recorded. In the middle of the screen will
display how long this clip has been recording for. You can pause the recording
by pressing the UP button and press it again to resume recording.

17
3. Press the Shutter button again to stop recording or recording stops when the
current SD/MMC card is full.
PLAYBACK MODE
VIEWING SAVED FILES
Playback mode allows you to view all your saved files. To access the playback
menu:
1. Press the Playback button to set the c amera to playback mode, the icon
appears on the LCD screen. The screen will look like below:
The Screen will now display the files that have been saved. Use the Left and Right
buttons to browse through the files. The bottom left of the screen will display the file
type as per above diagram.
/