Page is loading ...

INSTALLATION AND USE
Solution 4
ARTICULATING ARM and
KEYBOARD PLATFORM
SOLUTION 4 Rev A 4/17
Model SOLUTION 4
SOLUTION 4

2
SOLUTION 4
PLEASE REVIEW these instructions before beginning the installation. Check that
all parts needed were provided with your order. Contact your supplier if any
operates to your satisfaction.
Solution 4 combines the AA370 articulating arm with the PLMAC keyboard
platform. In this instruction booklet, installation of the two products will be
explained in sequence, beginning with the AA370.
AA370 PARTS PROVIDED
Articulating Arm (1)
Front Stopper (1)
5
/8" Wood Screws (11) 1" Wood Screws (11)
CAUTION:
This install requires a power tool or cordless drill. This is not a handtool
install.
Track (1)
Rear
Stop
Peel Off
Backing
Press
Firmly
1
/4"
ADDITIONAL TOOLS REQUIRED
•
•
1
/8" drill bit
STEP 1: Adhere Track
• Peel the backing from the
adhesive strips on top
of the track.
• Adhere the track to the
underside of the work surface.
— Position the front edge of the
track
1
/4" from the front edge of
the work surface. The front of the
track is the end with three holes.
•
Drill (For Track Installation Only)
•
#2 Phillips drill bit

3
SOLUTION 4
Begin keyboard installation with STEP 5 on page 4.
STEP 2: Attach Track
• Drill
1
/8" pilot holes through
all 11 holes in the track.
— Drill the holes
5
/8" deep or
1" deep, depending on
which wood screws will be
used. (A minimum work surface
thickness of 1
1
/2" is recommended
for the 1" screws.)
CAUTION: Be careful not to drill through the
top of the work surface.
• Attach the track with screws through the eight rear
holes only, as shown.
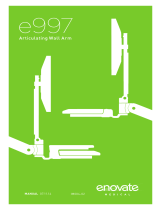
STEP 3: Install Articulating Arm
• Slide the articulating arm onto
the track. Position it back far
enough so that you have access
to the front three holes on the
track.
STEP 4: Attach Front Stop
• Position the front stop onto the
front of the track and secure it
with the nal three wood screws.
Front
Stop
Attach Through Rear
Eight Holes Only
Slide Back

4
Panhead
Screw
Mouse Guards
SOLUTION 4
The PLMAC keyboard features a reversible mouse forward platform.
PLMAC PARTS PROVIDED
Keyboard Platform (1) Palm Rest (2)
1 Each for
Keying and Mousing
Flathead Screw (4) Flange Nut (4) Cord Clips (2)Panhead Screw (4)
#8-32x
1
/2 #8x32
#8-32x
5
/8
CAUTION:
Hand-tighten screws only. Do not use power tools.
ADDITIONAL TOOLS REQUIRED
• Phillips screwdriver
STEP 5: Attach Palm Rest
• Attach the palm rests to the keyboard
platform. Use the #8-32x
5
/8 panhead
screws and a Phillips screwdriver.
— Attach each palm rest with two
screws, as shown.
NOTE: The keyboard platform
can be switched from right-side
mouse to left-side mouse. First,
before attaching the palm rests,
remove the mouse guards. Turn
the platform over and re-install
the mouse guards. Then install the
palm rests.

5
SOLUTION 4
STEP 6: Attach Keyboard Platform
• Attach the keyboard platform to the keyboard arm and track assembly
using the four athead screws and ange nuts.
— Be sure the ange on the nuts is facing upward.
IMPORTANT: The ange nuts must be fully tightened to ensure the nuts are
locked. Use a Phillips screwdriver.
Flathead
Screw
Flange
Nut
Flathead
Screw
Flange
Nut

SOLUTION 4
STEP 7: Manage Cables
• Adhere cord clips to the underside of
the keyboard platform as needed to
organize the keyboard and mouse
cables.
Cord Clip
OPERATION
To Raise or Lower:
• Tip the platform up to unlock.
• Move the arm to the desired height.
• Release the platform to lock it in place.
To Set Tilt Angle:
• Unlock the quick release handle on the right side of the arm.
• Adjust the tilt angle to the desired position.
• Lock the quick release knob.
800.833.3746 esiergo.com
© 2017 ESI Ergonomic Solutions. All rights reserved. SOLUTION 4 Rev A 4/17
/