Page is loading ...

INSTALLATION AND USE
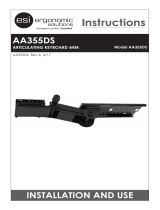
Solution 1
ARTICULATING ARM and
KEYBOARD PLATFORM
SOLUTION 1 Rev A 4/17
SOLUTION 1CCSOLUTION 1
Model SOLUTION 1
Model SOLUTION 1CC

2
SOLUTION 1 AA260 + PL003-25
Rear
Peel Off
Backing
Press
Firmly
1
/4"
PLEASE REVIEW these instructions before beginning the installation. Check that
all parts needed were provided with your order. Contact your supplier if any
operates to your satisfaction.
Solution 1 combines the AA260 articulating arm with the PL003-25 keyboard
platform. In this instruction booklet, installation of the two products will be
explained in sequence, beginning with the AA260.
AA260 PARTS PROVIDED
Articulating Arm (1)
Front Stop (1) 5
/8" Wood Screws (10) Rubber Bumper (1)
CAUTION:
This install requires power tool or Cordless Drill. This is not a hand tool
install.
Track (1)
ADDITIONAL TOOLS REQUIRED
•
•
STEP 1: Adhere Track
• Peel the backing from the adhesive strips
on top of the track.
• Adhere the track to the underside
of the work surface.
— Position the front edge of
the track 1
/4" from the front
edge of the work surface.
The front of the track is the
end with three holes.
•
Drill with 1
/8" bit
#2 Phillips Screw Driver Bit

3
AA260 SOLUTION 1
STEP 2: Attach Track
• Drill 1
/8" pilot holes through
all eight holes in the track.
— Drill the holes 5/8" deep.
CAUTION: Be careful not to
drill through the top of the work
surface.
• Attach the track with screws through the
six side holes rst.
• Attach the rubber bumper at the rear center hole.
• Do not screw through the front center hole at this time.
STEP 3: Install Articulating Arm
• Slide the articulating arm onto
the track. Position it back far
enough so that you have access
to the front center hole on the
track.
STEP 4: Attach Front Stop
• Position the front stop onto the
front of the track and secure it with
a screw through the center hole.
• Drill pilot holes for the two side
screws and attach the ends of
the front stop with two more
screws.
Proceed to STEP 5 on page 4.
Slide Back
Do Not Screw Through
Front Center Hole
Bumper
Front
Stop

4
SOLUTION 1 PL003-25
The keyboard platform for Solution 1 is PL003-25 (rectangle) or PL003-25CC
(cut corners). Although the appearance varies, installation procedures are
identical.
PL003-25 PARTS PROVIDED
Keyboard Platform (1) Palm Rest (1)
1 for Both Keying
and Mousing
Rectangle (Shown)
or Cut Corners
Flathead Screw (4) Flange Nut (4) Cord Clips (2)Panhead Screw (2)
#8-32x1
/2#8x32 #8-32x5
/8
(R-Series: #8-32x3
/4)
CAUTION:
Hand-tighten screws only. Do not use power tools.
ADDITIONAL TOOLS REQUIRED
• Phillips screwdriver
STEP 5: Attach Palm Rest(s)
• Attach the palm rest(s) to the keyboard platform. Use the #8-32x5
/8
panhead screws (#8-32x3
/4 with the R-Series) and a Phillips
screwdriver. Two screw holes are located in the
keyboard platform to accommodate a
variety of installation possibilities.
— With one palm rest, attach it with two
screws through the two end holes.
— With two separate palm rests,
attach each with two screws,
as shown.
— The mouse and keyboard
palm rests may be attached
on either the left or right sides
of the keyboard platform.
Panhead
Screw

5
Flathead
Screw
Flange
Nut
PL003-25 SOLUTION 1
STEP 6: Attach Keyboard Platform
• Attach the keyboard platform to the keyboard arm and track assembly
IMPORTANT:
locked. Use a Phillips screwdriver.
STEP 7: Manage Cables
• Adhere cord clips to the underside of
the keyboard platform as needed to
organize the keyboard and mouse
cables.
Cord Clip

SOLUTION 1 AA260 + PL003-25
OPERATION
To Raise or Lower:
• Use the handle to move the platform up or down.
To Set Tilt Angle:
• Loosen the handle and adjust the tilt angle to the desired position.
• Tighten the handle to lock the angle in position.
800.833.3746 esiergo.com
© 2017 ESI Ergonomic Solutions. All rights reserved. SOLUTION1 Rev A 4/17
/