
Copyright© 1996
Hewlett-Packard Co.
Printed in USA 10/96
ManualPartNo.
C3980-90968
*C3980-90968*
*C3980-90968*
C3980-90968
HP LaserJet 6P/6MP Printer User's Manual
Printedon
RecycledPaper
HP
True laser printing for your business.
Printer User's Manual
6P/6MP


Take a look at all HP Support has to offer.
Hewlett-Packard Supports You To Get The Job Done!
Thank you for your purchase. Along with your product, you receive a variety of support services from
Hewlett-Packard and our support partners designed to give you the results you need, anytime, anywhere, quickly and
professionally.
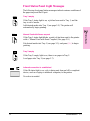
24 Hour Support Information
(800) 333-1917
Audio-Tips provides information on other resources within HP to get you the help you need, fast!
HP FIRST Fax will deliver detailed support information on common software applications, and troubleshooting tips
for your HP product. Call from any touch tone phone and request up to three documents per call. These documents
will be sent to the fax of your choice within minutes.
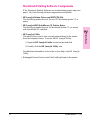
Electronic Information Services
For 24 hour access to information over your modem, we suggest these services:
• HP Bulletin Board Service - (208) 344-1691 - Our electronic download service provides convenient access to
HP printer drivers, updated HP printer software, product information, and troubleshooting hints. Set your
communication software to N,8,1. Baud rate is between 300 to 14,400.
• America On-Line - (800) 827-6364 - Printer drivers, updated HP printer software, and support documentation is
available to help you answer your HP product questions. To subscribe and receive 10 hours of free on-line time
call and ask for representative 1118. If you are already a member, type Keyword HP to start your tour.
• CompuServe - (800) 524-3388 - Printer drivers, updated HP printer software, and interactive sharing of technical
information with other members is available on CompuServe’s HP forum (GO HP). To subscribe and receive one
month of free access, call and ask for representative #51.
• Internet - Printer drivers, updated HP printer software, and product and support information may be obtained
from HP’s anonymous FTP site at 192.6.71.2 or ftp-boi.external.hp.com which is available to anyone with FTP
access to the Internet. Access through the World-Wide Web is available at URL http://www.hp.com.
Printer Drivers by Mail
(970) 339-7009
Printer drivers for your new Hewlett-Packard product should be obtained by contacting the manufacturer of your
software application. For your convenience, HP distributes printer drivers for a few of the most popular software
applications. Updates of Hewlett-Packard’s printer software are also available. Call six days a week, 24 hours a day
(closed Sundays). Shipping and handling charges apply.
Telephone Assistance- In Warranty
(208) 323-2551
Our highly skilled, responsive support staff is dedicated to helping you get your new product up and running. Our
support staff is available Monday - Friday 6am to 10pm (MT), Saturday 9am to 4pm (MT). This service is available at
no charge during the warranty of your product. Please have your serial number ready when calling.
Telephone Assistance - Out of Warranty
Post-warranty telephone assistance is available to answer your product questions. Available Monday - Friday 6am to
6pm (MT). Call (900) 555-1500 ($2.50* per minute, US only). Charges begin only when you connect with a support
technician. Or call (800) 999-1148 ($25* per call Visa or Master Card) (US and Canada). Please have the printer’s
serial number ready when calling. *Prices subject to change without notice.
Hardware Repair Services
Reseller and HP repair services are available in the US and Canada. To find a local authorized dealer or HP service
center, call (800) 243-9816 or (800) 387-3867 (Canada). Express Exchange is available in the US only. Call
(208) 323-2551 before 3 pm MST and HP will have a permanent remanufactured to new printer on your doorstep the
next working day.
Parts and Warranty Upgrades
Additional manuals or parts for your HP products may be obtained by calling HP’s Support Materials group at
(800) 227-8164 (US) or (800) 387-3154 (Canada). For service contracts, contact your local reseller or HP directly at
(800) 743-8308 (US) or (800) 268-1221 (Canada).

HP LaserJet 6P/6MP Printer
User’s Manual

© Copyright Hewlett-Packard
Company 1996
All Rights Reserved.
Reproduction, adaptation, or
translation without prior written
permission is prohibited, except
as allowed under the copyright
laws.
Publication number
C3980-90968
First edition, October 1996
Warranty
The information contained in
this document is subject to
change without notice.
Hewlett-Packard makes no
warranty of any kind with
regard to this material,
including, but not limited to,
the implied warranties or
merchantability and fitness for
a particular purpose.
Hewlett-Packard shall not be
liable for errors contained herein
or for incidental or consequential
damage in connection with the
furnishing, performance, or use
of this material.
Trademark Credits
HPLaserJet, Hewlett-Packard,
PCL, Resolution Enhancement,
Memory Enhancement,
EconoMode, HP-GL/2,
Bi-Tronics, and HP FontSmart
are trademarks of
Hewlett-Packard Company.
Microsoft is a U.S. registered
trademark and Windows is a
trademark of Microsoft Corp.
Adobe, PostScript, and the
PostScript Logo are trademarks
of Adobe Systems Incorporated
or it’s subsidiaries which may be
registered in certain
jurisdictions.
Apple, the Apple logo,
LocalTalk, TrueType,
LaserWriter, and Macintosh are
trademarks of Apple Computer,
Inc.
Hewlett-Packard Company
11311 Chinden Boulevard
Boise, Idaho 83714

Table of Contents
1 Printer Setup
Installation Checklist . . . . . . . . . . . . . . . . . . . . . . . . . . 1-1
Step 1. Review Printer Parts and Locations . . . . . . . . . . . . . . 1-2
Step 2. Prepare a Location for the Printer . . . . . . . . . . . . . . . 1-4
Step 3. Remove the Internal Packaging . . . . . . . . . . . . . . . . 1-5
Step 4. Install the Toner Cartridge . . . . . . . . . . . . . . . . . . . 1-6
Step 5. Load Paper into Tray 2 . . . . . . . . . . . . . . . . . . . . . 1-7
Step 6. Attach Printer Cables . . . . . . . . . . . . . . . . . . . . . 1-8
Choosing a Printer Connection . . . . . . . . . . . . . . . . . . . 1-9
Attaching a Parallel Printer Cable . . . . . . . . . . . . . . . . 1-10
Attaching a Macintosh Printer Cable . . . . . . . . . . . . . . . 1-11
Step 7. Attach the Power Cord . . . . . . . . . . . . . . . . . . . . 1-12
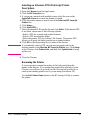
Step 8. Install Printer Software . . . . . . . . . . . . . . . . . . . 1-13
Installing the Windows Printing Software . . . . . . . . . . . . 1-14
Installing the DOS Printing Software . . . . . . . . . . . . . . 1-17
Installing the Macintosh Printing Software . . . . . . . . . . . . 1-18
2 Printer Basics
Getting to Know the Printer . . . . . . . . . . . . . . . . . . . . . . 2-1
Printer Features . . . . . . . . . . . . . . . . . . . . . . . . . . . . 2-2
Top and Front Status Panels . . . . . . . . . . . . . . . . . . . . . . 2-4
Button Usage . . . . . . . . . . . . . . . . . . . . . . . . . . . . . . 2-5
Light Patterns . . . . . . . . . . . . . . . . . . . . . . . . . . . . . 2-6
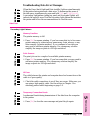
Top Status Panel Light Messages . . . . . . . . . . . . . . . . . . 2-6
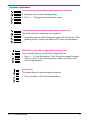
Front Status Panel Light Messages . . . . . . . . . . . . . . . . . 2-7
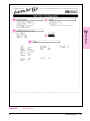
Printer Test Pages . . . . . . . . . . . . . . . . . . . . . . . . . . . 2-8
PCL Test Pages . . . . . . . . . . . . . . . . . . . . . . . . . . . 2-8
PostScript Test Pages . . . . . . . . . . . . . . . . . . . . . . . . 2-8
How to Print Test Pages . . . . . . . . . . . . . . . . . . . . . . 2-9
Example of a Self Test Page . . . . . . . . . . . . . . . . . . . 2-10
Example of a PostScript Configuration Page . . . . . . . . . . . 2-12
Printer Software . . . . . . . . . . . . . . . . . . . . . . . . . . . 2-14
Windows Printing System Components . . . . . . . . . . . . . 2-15
DOS Remote Control Panel . . . . . . . . . . . . . . . . . . . 2-18
Macintosh Printing Software Components . . . . . . . . . . . . 2-19
Accessories and Ordering Information . . . . . . . . . . . . . . . 2-20
EN Table of Contents-1

3 Printing Tasks
Overview . . . . . . . . . . . . . . . . . . . . . . . . . . . . . . . . 3-1
Preparing for Printing . . . . . . . . . . . . . . . . . . . . . . . . . 3-2
Purchasing Paper and Other Media . . . . . . . . . . . . . . . . 3-2
Media Input Options . . . . . . . . . . . . . . . . . . . . . . . . 3-3
Media Output Options . . . . . . . . . . . . . . . . . . . . . . . 3-4
Loading Media into Tray 1 . . . . . . . . . . . . . . . . . . . . . 3-5
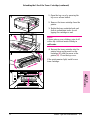
Changing Paper Size in Tray 2 . . . . . . . . . . . . . . . . . . . 3-6
Printing Tasks . . . . . . . . . . . . . . . . . . . . . . . . . . . . . 3-8
Stopping a Print Job . . . . . . . . . . . . . . . . . . . . . . . . 3-8
Manual Feed Printing (Pausing between Pages) . . . . . . . . . . 3-9
Printing on Both Sides of Media (Duplexing) . . . . . . . . . . 3-10
Printing on Special Media . . . . . . . . . . . . . . . . . . . . . . 3-11
Printing on Letterhead and Preprinted Forms . . . . . . . . . . 3-11
Printing on Envelopes . . . . . . . . . . . . . . . . . . . . . . 3-12
Printing on Labels . . . . . . . . . . . . . . . . . . . . . . . . 3-13
Printing on Transparencies . . . . . . . . . . . . . . . . . . . . 3-14
Printing on Custom-Sized Media . . . . . . . . . . . . . . . . 3-15
Printing with the Infrared Port (Wireless Printing) . . . . . . . . . 3-16
Printing Instructions for the Infrared Port . . . . . . . . . . . . 3-17
4 Printer Tips and Maintenance
Overview . . . . . . . . . . . . . . . . . . . . . . . . . . . . . . . . 4-1
Producing Better Looking Documents . . . . . . . . . . . . . . . . 4-2
Enhancing Printer Resolution (REt Setting) . . . . . . . . . . . . 4-2
Adjusting Print Density . . . . . . . . . . . . . . . . . . . . . . 4-2
Using Watermarks . . . . . . . . . . . . . . . . . . . . . . . . . 4-2
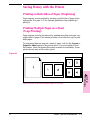
Saving Money with the Printer . . . . . . . . . . . . . . . . . . . . 4-3
Printing on Both Sides of Paper (Duplexing) . . . . . . . . . . . 4-3
Printing Multiple Pages on a Sheet (N-up Printing) . . . . . . . . 4-3
Extending the Life of the Toner Cartridge . . . . . . . . . . . . . 4-4
Toner Cartridge Maintenance . . . . . . . . . . . . . . . . . . . . . 4-6
Life Expectancy . . . . . . . . . . . . . . . . . . . . . . . . . . 4-6
Storing Toner Cartridges . . . . . . . . . . . . . . . . . . . . . . 4-6
Recycling Toner Cartridges . . . . . . . . . . . . . . . . . . . . 4-6
Using Non-HP Toner Cartridges . . . . . . . . . . . . . . . . . . 4-6
Printer Maintenance . . . . . . . . . . . . . . . . . . . . . . . . . . 4-7
Cleaning the Printer . . . . . . . . . . . . . . . . . . . . . . . . 4-7
Internal Cleaning Procedure . . . . . . . . . . . . . . . . . . . . 4-8
Table of Contents-2 EN

5 Problem Solving
Overview . . . . . . . . . . . . . . . . . . . . . . . . . . . . . . . . 5-1
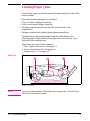
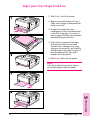
Clearing Paper Jams . . . . . . . . . . . . . . . . . . . . . . . . . . 5-2
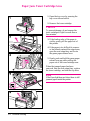
Paper Jam: Tray 2 Paper Feed Area . . . . . . . . . . . . . . . . 5-3
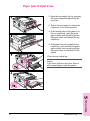
Paper Jam: Toner Cartridge Area . . . . . . . . . . . . . . . . . . 5-4
Paper Jam: Output Areas . . . . . . . . . . . . . . . . . . . . . . 5-5
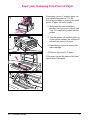
Paper Jam: Removing Torn Pieces of Paper . . . . . . . . . . . . 5-6
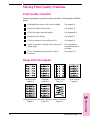
Solving Print Quality Problems . . . . . . . . . . . . . . . . . . . . 5-7
Print Quality Checklist . . . . . . . . . . . . . . . . . . . . . . . 5-7
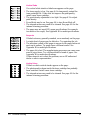
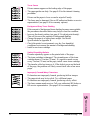
Image Defect Examples . . . . . . . . . . . . . . . . . . . . . . . 5-7
Troubleshooting Checklist . . . . . . . . . . . . . . . . . . . . . . 5-10
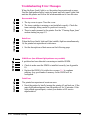
Troubleshooting Error Messages . . . . . . . . . . . . . . . . . 5-12
Troubleshooting General Printing Problems . . . . . . . . . . . 5-15
Troubleshooting Infrared Printing Problems . . . . . . . . . . . 5-17
Troubleshooting Macintosh Problems . . . . . . . . . . . . . . 5-18
Troubleshooting PostScript Errors . . . . . . . . . . . . . . . . 5-21
6 Warranties/Licenses
Overview . . . . . . . . . . . . . . . . . . . . . . . . . . . . . . . . 6-1
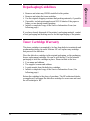
Limited Printer Warranty . . . . . . . . . . . . . . . . . . . . . . . 6-2
Exclusions . . . . . . . . . . . . . . . . . . . . . . . . . . . . . . 6-2
Warranty Limitations . . . . . . . . . . . . . . . . . . . . . . . . 6-3
Limit of Liability . . . . . . . . . . . . . . . . . . . . . . . . . . 6-3
Service During the Warranty Period . . . . . . . . . . . . . . . . 6-4
Service After the Warranty Period . . . . . . . . . . . . . . . . . 6-4
Repackaging Guidelines . . . . . . . . . . . . . . . . . . . . . . . . 6-5
Toner Cartridge Warranty . . . . . . . . . . . . . . . . . . . . . . . 6-5
HP Software Product License . . . . . . . . . . . . . . . . . . . . . 6-7
Sales and Service Offices . . . . . . . . . . . . . . . . . . . . . . . 6-8
Calling for Help . . . . . . . . . . . . . . . . . . . . . . . . . . . 6-8
EN Table of Contents-3

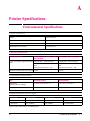
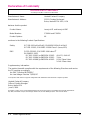
A Printer Specifications
Environmental Specifications . . . . . . . . . . . . . . . . . . . . . A-1
Regulatory Information . . . . . . . . . . . . . . . . . . . . . . . . A-2
FCC Regulations . . . . . . . . . . . . . . . . . . . . . . . . . . A-2
VCCI Statement (Japan) . . . . . . . . . . . . . . . . . . . . . . A-3
Laser Safety Statement . . . . . . . . . . . . . . . . . . . . . . . A-3
Ozone Emission . . . . . . . . . . . . . . . . . . . . . . . . . . A-4
E
NERGY STAR Computers Compliance . . . . . . . . . . . . . . . A-4
LED Safety . . . . . . . . . . . . . . . . . . . . . . . . . . . . . A-4
Laser Statement for Finland . . . . . . . . . . . . . . . . . . . . A-5
Declaration of Conformity . . . . . . . . . . . . . . . . . . . . . A-6
B Media Specifications
Overview . . . . . . . . . . . . . . . . . . . . . . . . . . . . . . . . B-1
Paper and Preprinted Forms . . . . . . . . . . . . . . . . . . . . . B-3
Adhesive Labels . . . . . . . . . . . . . . . . . . . . . . . . . . . . B-5
Overhead Transparencies . . . . . . . . . . . . . . . . . . . . . . . B-6
Envelopes . . . . . . . . . . . . . . . . . . . . . . . . . . . . . . . B-7
Card Stock . . . . . . . . . . . . . . . . . . . . . . . . . . . . . . . B-9
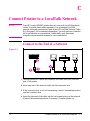
C Connect Printer to a LocalTalk Network
Connect to the End of a Network . . . . . . . . . . . . . . . . . . . C-1
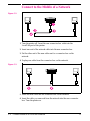
Connect to the Middle of a Network . . . . . . . . . . . . . . . . . C-2
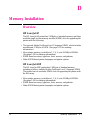
D Memory Installation
Overview . . . . . . . . . . . . . . . . . . . . . . . . . . . . . . . . D-1
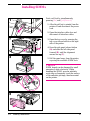
Installing SIMMs . . . . . . . . . . . . . . . . . . . . . . . . . . . D-2
Checking SIMM Installation . . . . . . . . . . . . . . . . . . . . D-4
E PCL Printer Commands
PCL Printer Commands (Escape Sequences) . . . . . . . . . . . . . E-1
PCL Printer Command Syntax . . . . . . . . . . . . . . . . . . E-2
Using PCL Printer Commands . . . . . . . . . . . . . . . . . . . E-3
PCL Font Selection . . . . . . . . . . . . . . . . . . . . . . . . . E-3
Common PCL Printer Commands . . . . . . . . . . . . . . . . . E-4
Index
Table of Contents-4 EN

1
Printer Setup
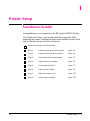
Installation Checklist
Congratulations on your purchase of the HP LaserJet 6P/6MP Printer!
This Chapter will help you set up and install the new printer. After
unpacking the printer, complete the steps in the checklist in order. Each
step is detailed with easy-to-follow directions.
Unpack the printer and accessories.
Step 1 Review printer parts and locations Page 1-2
Step 2 Prepare a location for the printer Page 1-4
Step 3 Remove the internal packaging Page 1-5
Step 4 Install the toner cartridge Page 1-6
Step 5 Load paper into Tray 2 Page 1-7
Step 6 Attach printer cables Page 1-8
Step 7 Attach the power cord Page 1-12
Step 8 Install printer software Page 1-13
EN Printer Setup 1-1

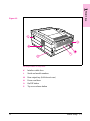
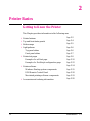
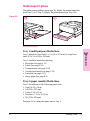
Step 1. Review Printer Parts and Locations
Front/left sides of the printer
A Top status panel
B Top output tray
C Tray 1 (multi-purpose tray, fold down to use)
D Tray 2 (paper cassette)
E Tray 1 status light
F Tray 2 empty light
G IR (infrared) status light
H Infrared port
I Front status panel
J Removable side panel (for installing memory or language
SIMMs)
K Interface cable door
Figure 1-1
1-2 Printer Setup EN

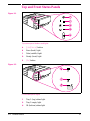
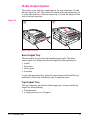
Back/right sides of the printer
K Interface cable door
L Serial and model numbers
M Rear output tray (fold down to use)
N Power cord door
O On/Off button
P Top cover release button
Figure 1-2
1
Printer Setup
EN Printer Setup 1-3

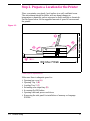
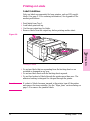
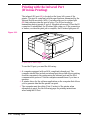
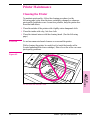
Step 2. Prepare a Location for the Printer
Place your printer on a sturdy, level surface in a well ventilated room.
The environment should be stable, with no abrupt changes in
temperature or humidity and no exposure to direct sunlight or chemicals.
See the figure below for the suggested amount of space to leave around
the printer.
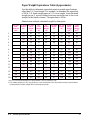
Printer space requirements
Make sure there is adequate space for:
• Opening top cover (A)
• Opening Tray 1 (B)
• Loading Tray 2 (C)
• Extending rear output tray (D)
• Accessing On/Off button
• Opening cable and power cord doors
• Removing the side panel for installation of memory or language
SIMMs
Figure 1-3
1-4 Printer Setup EN

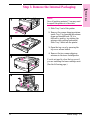
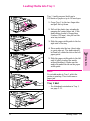
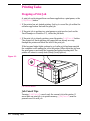
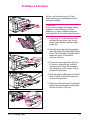
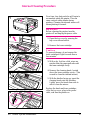
Step 3. Remove the Internal Packaging
Note
Save all packing material. You may need
to repack the printer at a later date.
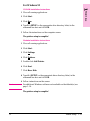
1 Slide Tray 2 out of the printer.
2 Remove the orange shipping retainer
inside Tray 2 by pressing the retainer
down and straight back. (If it is
difficult to remove, try rotating the
retainer while pulling backwards.)
Slide Tray 2 back into the printer.
3 Open the top cover by pressing the
top cover release button.
4 Remove the two orange shipping
retainers in the toner cartridge area.
You do not need to close the top cover if
you are installing the toner cartridge next.
(See the following page.)
1
Printer Setup
EN Printer Setup 1-5

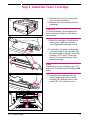
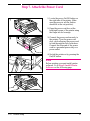
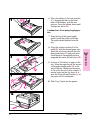
Step 4. Install the Toner Cartridge
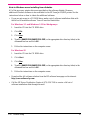
1 Open the top cover by pressing the
top cover release button.
2 Remove the toner cartridge from its
packaging.
Caution
To prevent damage, do not expose the
toner cartridge to light for more than a
few minutes.
3 Shake the cartridge to distribute the
toner evenly inside the cartridge.
Avoid tipping the cartridge on end.
4 Locate the clear plastic sealing tape
on the right end of the cartridge. Pull
the entire length of the tape out of the
cartridge (12-15 in/30-35cm) and
discard. Avoid touching any black
toner on the tape.
Note
If toner gets on your clothing, wipe it off
with a dry cloth and wash clothing in cold
water.
5 Insert the toner cartridge into the
printer lining up the arrow on the
cartridge (A) with the arrow in the
printer (B). Close the top cover.
1-6 Printer Setup EN

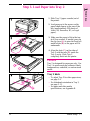
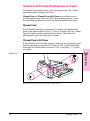
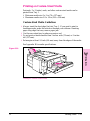
Step 5. Load Paper into Tray 2
1 Slide Tray 2 (paper cassette) out of
the printer.
2 Load paper up to the arrows on the
paper length spacer in the rear of the
tray (approximately 250 sheets of
Letter, A4, Executive, B5, or Legal
paper).
3 Make sure the paper is flat in the tray
at all four corners. If needed, press on
the clip lever (A) to raise the front left
metal holder (B) so the paper will fit
underneath.
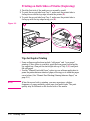
4
Align the slots (C) on the sides of
Tray 2 with the rails (D) inside the
Tray 2 cavity. Slide Tray 2
completely back into the printer.
Caution
Tray 2 is designed for paper use only. Use
Tray 1 to print envelopes, adhesive labels,
transparencies, cardstock, or custom sized
media.
Tray 2 hints
• To adjust Tray 2 for other paper sizes,
see page 3-6.
• For letterhead orientation in Tray 2,
see page 3-11.
• For paper and other media
specifications, see Appendix B.
1
Printer Setup
EN Printer Setup 1-7

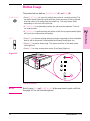
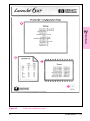
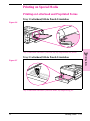
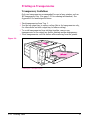
Step 6. Attach Printer Cables
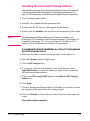
The HP LaserJet 6P/6MP Printer supports three different interfaces that
require cable connections:
• LocalTalk port (A) for Macintosh computers and LocalTalk networks
• Large B-type Parallel Port (B)
• Small C-type Parallel Port (C)
Printer interface connections
Note The printer also supports wireless connection with the infrared port.
(See page 3-16 for instructions on how to print with the infrared port.)
Figure 1-4
1-8 Printer Setup EN

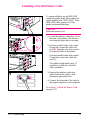
Choosing a Printer Connection
The following descriptions will help you choose the correct connection
to use between the computer and printer.
Note No printer cables are included in the package contents. See ordering
information starting on page 2-20 for HP recommended printer cables.
Large Parallel Port (B on preceding page)
Use this port when:
• Connecting to an IBM, or IBM-compatible, computer.
• Your parallel cable has a standard length (up to three meters) with a
B-type (large) end.
See page 1-10 for installation instructions.
Small Parallel Port (C on preceding page)
Use this port when:
• Connecting to an IBM, or IBM-compatible, computer.
• Your parallel cable is longer than three meters (up to ten meters) with
a C-type (small) end.
See page 1-10 for installation instructions.
LocalTalk Port (A on preceding page)
Use this port when:
• Connecting to a Macintosh, or Macintosh-compatible, computer. See
page 1-11 for installation instructions.
• Connecting to a LocalTalk network. See Appendix C for installation
instructions.
Infrared Port
Use this port when:
• Printing from an IrDA-compliant device, such as a laptop or
notebook computer. For more information on infrared printing, see
page 3-16.
1
Printer Setup
EN Printer Setup 1-9

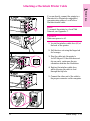
Attaching a Parallel Printer Cable
To ensure reliability use an IEEE-1284
compliant parallel cable (these cables are
clearly marked with “IEEE-1284”). Only
IEEE-1284 cables support all of the
printer’s advanced functions.
Caution
Make sure power is off.
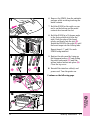
1
Locate the interface cable door (A) at
the back of the printer. Pull the door
out using the finger tab for leverage.
2 If using a parallel cable with a large
B-type end, connect the cable into
port (B). Snap the wire clips in place
to secure the cable to the printer.
If using a parallel cable with a small
C-type end, connect the cable into
port (C).
The cables should install easily. If
installation is difficult, check the
cable orientation.
3 Replace the interface cable door
while allowing the cable to feed
through its appropriate hole.
4 Connect the other end of the cable to
the proper connector on the computer.
Go to Step 7. Attach the Power Cord,
on page 1-12.
1-10 Printer Setup EN

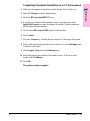
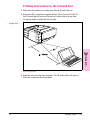
Attaching a Macintosh Printer Cable
You can directly connect the printer to a
Macintosh (or Macintosh-compatible)
computer using either a LocalTalk or
Macintosh serial cable.
Note
To connect the printer to a LocalTalk
Network, see Appendix C.
Caution
Make sure power is off.
1
Locate the interface cable door (A) at
the back of the printer.
2 Pull the door out using the finger tab
for leverage.
3 Plug the cable into the printer’s
LocalTalk port. If the cable does not
slip on easily, make sure the pin
orientation matches the illustration.
4 Replace the interface cable door
while allowing the cable to feed
through the top hole.
5 Connect the other end of the cable to
the proper connector on the computer.
1
Printer Setup
EN Printer Setup 1-11
Page is loading ...
Page is loading ...
Page is loading ...
Page is loading ...
Page is loading ...
Page is loading ...
Page is loading ...
Page is loading ...
Page is loading ...
Page is loading ...
Page is loading ...
Page is loading ...
Page is loading ...
Page is loading ...
Page is loading ...
Page is loading ...
Page is loading ...
Page is loading ...
Page is loading ...
Page is loading ...
Page is loading ...
Page is loading ...
Page is loading ...
Page is loading ...
Page is loading ...
Page is loading ...
Page is loading ...
Page is loading ...
Page is loading ...
Page is loading ...
Page is loading ...
Page is loading ...
Page is loading ...
Page is loading ...
Page is loading ...
Page is loading ...
Page is loading ...
Page is loading ...
Page is loading ...
Page is loading ...
Page is loading ...
Page is loading ...
Page is loading ...
Page is loading ...
Page is loading ...
Page is loading ...
Page is loading ...
Page is loading ...
Page is loading ...
Page is loading ...
Page is loading ...
Page is loading ...
Page is loading ...
Page is loading ...
Page is loading ...
Page is loading ...
Page is loading ...
Page is loading ...
Page is loading ...
Page is loading ...
Page is loading ...
Page is loading ...
Page is loading ...
Page is loading ...
Page is loading ...
Page is loading ...
Page is loading ...
Page is loading ...
Page is loading ...
Page is loading ...
Page is loading ...
Page is loading ...
Page is loading ...
Page is loading ...
Page is loading ...
Page is loading ...
Page is loading ...
Page is loading ...
Page is loading ...
Page is loading ...
Page is loading ...
Page is loading ...
Page is loading ...
Page is loading ...
Page is loading ...
Page is loading ...
Page is loading ...
Page is loading ...
Page is loading ...
Page is loading ...
Page is loading ...
Page is loading ...
Page is loading ...
Page is loading ...
Page is loading ...
Page is loading ...
Page is loading ...
Page is loading ...
Page is loading ...
Page is loading ...
Page is loading ...
Page is loading ...
Page is loading ...
Page is loading ...
Page is loading ...
Page is loading ...
Page is loading ...
Page is loading ...
Page is loading ...
Page is loading ...
Page is loading ...
Page is loading ...
Page is loading ...
Page is loading ...
Page is loading ...
Page is loading ...
Page is loading ...
Page is loading ...
Page is loading ...
Page is loading ...
Page is loading ...
Page is loading ...
-
 1
1
-
 2
2
-
 3
3
-
 4
4
-
 5
5
-
 6
6
-
 7
7
-
 8
8
-
 9
9
-
 10
10
-
 11
11
-
 12
12
-
 13
13
-
 14
14
-
 15
15
-
 16
16
-
 17
17
-
 18
18
-
 19
19
-
 20
20
-
 21
21
-
 22
22
-
 23
23
-
 24
24
-
 25
25
-
 26
26
-
 27
27
-
 28
28
-
 29
29
-
 30
30
-
 31
31
-
 32
32
-
 33
33
-
 34
34
-
 35
35
-
 36
36
-
 37
37
-
 38
38
-
 39
39
-
 40
40
-
 41
41
-
 42
42
-
 43
43
-
 44
44
-
 45
45
-
 46
46
-
 47
47
-
 48
48
-
 49
49
-
 50
50
-
 51
51
-
 52
52
-
 53
53
-
 54
54
-
 55
55
-
 56
56
-
 57
57
-
 58
58
-
 59
59
-
 60
60
-
 61
61
-
 62
62
-
 63
63
-
 64
64
-
 65
65
-
 66
66
-
 67
67
-
 68
68
-
 69
69
-
 70
70
-
 71
71
-
 72
72
-
 73
73
-
 74
74
-
 75
75
-
 76
76
-
 77
77
-
 78
78
-
 79
79
-
 80
80
-
 81
81
-
 82
82
-
 83
83
-
 84
84
-
 85
85
-
 86
86
-
 87
87
-
 88
88
-
 89
89
-
 90
90
-
 91
91
-
 92
92
-
 93
93
-
 94
94
-
 95
95
-
 96
96
-
 97
97
-
 98
98
-
 99
99
-
 100
100
-
 101
101
-
 102
102
-
 103
103
-
 104
104
-
 105
105
-
 106
106
-
 107
107
-
 108
108
-
 109
109
-
 110
110
-
 111
111
-
 112
112
-
 113
113
-
 114
114
-
 115
115
-
 116
116
-
 117
117
-
 118
118
-
 119
119
-
 120
120
-
 121
121
-
 122
122
-
 123
123
-
 124
124
-
 125
125
-
 126
126
-
 127
127
-
 128
128
-
 129
129
-
 130
130
-
 131
131
-
 132
132
-
 133
133
-
 134
134
-
 135
135
-
 136
136
-
 137
137
-
 138
138
-
 139
139
-
 140
140
-
 141
141
-
 142
142


Ask a question and I''ll find the answer in the document
Finding information in a document is now easier with AI
Related papers
Other documents
-
OKI B730dn Owner's manual
-
GCC Printers Elite XL-1208S User manual
-
GCC Printers Elite 1212 User manual
-
QMS 1660 Getting Started
-
-
-
Lexmark W810n - Optra B/W Laser Printer Owner's manual
-
 Tally Genicom 9316 User manual
-
IBM Infoprint 1125 User manual
-
