Page is loading ...

ADVANCE
S U S T A I N A B L E C O M F O R T
®
SMART TC°
Ireland
en
User Guide
Digital clock thermostat
Smart TC°

Dear end user,
Thank you for choosing this Smart TC°. You can control your home heating using the Smart TC° or also by using an app. With
this Smart TC°, you are in the driver’s seat to control the temperature of your home. It’s all about your comfort, just the way you
want it.
This manual contains easy to use information and is intended for installers and end users.
Use the manual menu to get quick access to the instructions you need. For your own safety and optimum performance of the
Smart TC°, we advise you to read the manual first.
The manual is subject to change, the online version is always the latest. If you are using a printed copy, please check the
website for the latest version. See contact details on the front or back cover.
We hope you will enjoy working with the Smart TC°.

Contents
1 Manual menu . . . . . . . . . . . . . . . . . . . . . . . . . . . . . . . . . . . . . . . . . . . . . . . . . . . . . . . . . . . . . . . . . . . . . . . . . . . . . . . . . . . . . . .5
2 Introduction . . . . . . . . . . . . . . . . . . . . . . . . . . . . . . . . . . . . . . . . . . . . . . . . . . . . . . . . . . . . . . . . . . . . . . . . . . . . . . . . . . . . . . . . 6
2.1 Symbols used in the manual . . . . . . . . . . . . . . . . . . . . . . . . . . . . . . . . . . . . . . . . . . . . . . . . . . . . . . . . . . . . . . . . . . . . . .6
2.2 Introducing the Smart TC° . . . . . . . . . . . . . . . . . . . . . . . . . . . . . . . . . . . . . . . . . . . . . . . . . . . . . . . . . . . . . . . . . . . . . . . 6
2.3 The Smart TC° and its app . . . . . . . . . . . . . . . . . . . . . . . . . . . . . . . . . . . . . . . . . . . . . . . . . . . . . . . . . . . . . . . . . . . . . . . 7
2.4 What's new for the Smart TC° . . . . . . . . . . . . . . . . . . . . . . . . . . . . . . . . . . . . . . . . . . . . . . . . . . . . . . . . . . . . . . . . . . . . .7
2.5 How to use the Smart TC° . . . . . . . . . . . . . . . . . . . . . . . . . . . . . . . . . . . . . . . . . . . . . . . . . . . . . . . . . . . . . . . . . . . . . . . 7
2.5.1 Using the rotary dial and buttons . . . . . . . . . . . . . . . . . . . . . . . . . . . . . . . . . . . . . . . . . . . . . . . . . . . . . . . . . . .7
2.5.2 Entering the main menu and menu items . . . . . . . . . . . . . . . . . . . . . . . . . . . . . . . . . . . . . . . . . . . . . . . . . . . . 8
2.5.3 Entering the Quick Access menu and menu items . . . . . . . . . . . . . . . . . . . . . . . . . . . . . . . . . . . . . . . . . . . . . 8
2.5.4 Returning to the previous step or home screen . . . . . . . . . . . . . . . . . . . . . . . . . . . . . . . . . . . . . . . . . . . . . . . .8
2.5.5 Scrolling through menu items and changing settings . . . . . . . . . . . . . . . . . . . . . . . . . . . . . . . . . . . . . . . . . . . 8
2.5.6 Screen shows no information . . . . . . . . . . . . . . . . . . . . . . . . . . . . . . . . . . . . . . . . . . . . . . . . . . . . . . . . . . . . . 9
2.6 Description of the display . . . . . . . . . . . . . . . . . . . . . . . . . . . . . . . . . . . . . . . . . . . . . . . . . . . . . . . . . . . . . . . . . . . . . . . . 9
2.6.1 Description of the icons in the display . . . . . . . . . . . . . . . . . . . . . . . . . . . . . . . . . . . . . . . . . . . . . . . . . . . . . . 10
2.6.2 Customising the main screen display . . . . . . . . . . . . . . . . . . . . . . . . . . . . . . . . . . . . . . . . . . . . . . . . . . . . . . 12
2.7 Zone selection . . . . . . . . . . . . . . . . . . . . . . . . . . . . . . . . . . . . . . . . . . . . . . . . . . . . . . . . . . . . . . . . . . . . . . . . . . . . . . . .12
2.8 Presence detection . . . . . . . . . . . . . . . . . . . . . . . . . . . . . . . . . . . . . . . . . . . . . . . . . . . . . . . . . . . . . . . . . . . . . . . . . . . . 12
3 General use . . . . . . . . . . . . . . . . . . . . . . . . . . . . . . . . . . . . . . . . . . . . . . . . . . . . . . . . . . . . . . . . . . . . . . . . . . . . . . . . . . . . . . .13
3.1 Changing the mode quickly . . . . . . . . . . . . . . . . . . . . . . . . . . . . . . . . . . . . . . . . . . . . . . . . . . . . . . . . . . . . . . . . . . . . . .13
3.2 Changing the room temperature . . . . . . . . . . . . . . . . . . . . . . . . . . . . . . . . . . . . . . . . . . . . . . . . . . . . . . . . . . . . . . . . . . 13
3.2.1 Changing the temperature in manual mode . . . . . . . . . . . . . . . . . . . . . . . . . . . . . . . . . . . . . . . . . . . . . . . . . 13
3.2.2 Changing the temperature for a short period in scheduling mode . . . . . . . . . . . . . . . . . . . . . . . . . . . . . . . . .14
3.3 Creating a temperature schedule to control the room temperature . . . . . . . . . . . . . . . . . . . . . . . . . . . . . . . . . . . . . . . 14
3.3.1 Changing the weekdays of a temperature schedule . . . . . . . . . . . . . . . . . . . . . . . . . . . . . . . . . . . . . . . . . . . 14
3.3.2 Copying a weekday of a temperature schedule . . . . . . . . . . . . . . . . . . . . . . . . . . . . . . . . . . . . . . . . . . . . . . .16
3.3.3 Selecting another temperature schedule . . . . . . . . . . . . . . . . . . . . . . . . . . . . . . . . . . . . . . . . . . . . . . . . . . . .16
3.4 Changing the zone temperatures . . . . . . . . . . . . . . . . . . . . . . . . . . . . . . . . . . . . . . . . . . . . . . . . . . . . . . . . . . . . . . . . . 17
3.5 Topping up . . . . . . . . . . . . . . . . . . . . . . . . . . . . . . . . . . . . . . . . . . . . . . . . . . . . . . . . . . . . . . . . . . . . . . . . . . . . . . . . . . 17
3.5.1 Topping up manually . . . . . . . . . . . . . . . . . . . . . . . . . . . . . . . . . . . . . . . . . . . . . . . . . . . . . . . . . . . . . . . . . . . 17
3.5.2 Topping up automatically . . . . . . . . . . . . . . . . . . . . . . . . . . . . . . . . . . . . . . . . . . . . . . . . . . . . . . . . . . . . . . . .17
3.6 Setting a holiday schedule . . . . . . . . . . . . . . . . . . . . . . . . . . . . . . . . . . . . . . . . . . . . . . . . . . . . . . . . . . . . . . . . . . . . . . 17
3.6.1 Creating a holiday schedule . . . . . . . . . . . . . . . . . . . . . . . . . . . . . . . . . . . . . . . . . . . . . . . . . . . . . . . . . . . . . 18
3.6.2 Changing a holiday schedule . . . . . . . . . . . . . . . . . . . . . . . . . . . . . . . . . . . . . . . . . . . . . . . . . . . . . . . . . . . . .18
3.6.3 Deleting a holiday schedule . . . . . . . . . . . . . . . . . . . . . . . . . . . . . . . . . . . . . . . . . . . . . . . . . . . . . . . . . . . . . .19
3.7 Activating fireplace mode . . . . . . . . . . . . . . . . . . . . . . . . . . . . . . . . . . . . . . . . . . . . . . . . . . . . . . . . . . . . . . . . . . . . . . . 19
3.8 Activating antifrost mode . . . . . . . . . . . . . . . . . . . . . . . . . . . . . . . . . . . . . . . . . . . . . . . . . . . . . . . . . . . . . . . . . . . . . . . .19
3.9 Switching the central heating on/off . . . . . . . . . . . . . . . . . . . . . . . . . . . . . . . . . . . . . . . . . . . . . . . . . . . . . . . . . . . . . . . 20
3.9.1 Switching to cooling mode . . . . . . . . . . . . . . . . . . . . . . . . . . . . . . . . . . . . . . . . . . . . . . . . . . . . . . . . . . . . . . .20
3.10 Switching to auto mode . . . . . . . . . . . . . . . . . . . . . . . . . . . . . . . . . . . . . . . . . . . . . . . . . . . . . . . . . . . . . . . . . . . . . . . . .20
4 Customisation . . . . . . . . . . . . . . . . . . . . . . . . . . . . . . . . . . . . . . . . . . . . . . . . . . . . . . . . . . . . . . . . . . . . . . . . . . . . . . . . . . . . . 21
4.1 Hot water settings . . . . . . . . . . . . . . . . . . . . . . . . . . . . . . . . . . . . . . . . . . . . . . . . . . . . . . . . . . . . . . . . . . . . . . . . . . . . . 21
4.1.1 Changing the hot water temperature . . . . . . . . . . . . . . . . . . . . . . . . . . . . . . . . . . . . . . . . . . . . . . . . . . . . . . . 21
4.1.2 Setting the hot water comfort mode . . . . . . . . . . . . . . . . . . . . . . . . . . . . . . . . . . . . . . . . . . . . . . . . . . . . . . . .21
4.1.3 Setting the hot water reduced (energy-saving) mode . . . . . . . . . . . . . . . . . . . . . . . . . . . . . . . . . . . . . . . . . . 21
4.1.4 Changing the hot water schedule . . . . . . . . . . . . . . . . . . . . . . . . . . . . . . . . . . . . . . . . . . . . . . . . . . . . . . . . . 21
4.2 Smart TC° settings . . . . . . . . . . . . . . . . . . . . . . . . . . . . . . . . . . . . . . . . . . . . . . . . . . . . . . . . . . . . . . . . . . . . . . . . . . . . 22
4.2.1 Setting the date and time . . . . . . . . . . . . . . . . . . . . . . . . . . . . . . . . . . . . . . . . . . . . . . . . . . . . . . . . . . . . . . . .22
4.2.2 Setting country and language . . . . . . . . . . . . . . . . . . . . . . . . . . . . . . . . . . . . . . . . . . . . . . . . . . . . . . . . . . . . 22
4.2.3 Main screen setting . . . . . . . . . . . . . . . . . . . . . . . . . . . . . . . . . . . . . . . . . . . . . . . . . . . . . . . . . . . . . . . . . . . . 23
4.2.4 Presence sensor . . . . . . . . . . . . . . . . . . . . . . . . . . . . . . . . . . . . . . . . . . . . . . . . . . . . . . . . . . . . . . . . . . . . . . 23
4.2.5 Display current or target temperature . . . . . . . . . . . . . . . . . . . . . . . . . . . . . . . . . . . . . . . . . . . . . . . . . . . . . . 23
4.2.6 Child lock . . . . . . . . . . . . . . . . . . . . . . . . . . . . . . . . . . . . . . . . . . . . . . . . . . . . . . . . . . . . . . . . . . . . . . . . . . . . 24
4.2.7 Changing the name of an activity . . . . . . . . . . . . . . . . . . . . . . . . . . . . . . . . . . . . . . . . . . . . . . . . . . . . . . . . . 24
4.2.8 Changing the name of a zone . . . . . . . . . . . . . . . . . . . . . . . . . . . . . . . . . . . . . . . . . . . . . . . . . . . . . . . . . . . . 25
4.2.9 Changing the display settings . . . . . . . . . . . . . . . . . . . . . . . . . . . . . . . . . . . . . . . . . . . . . . . . . . . . . . . . . . . . 25
4.2.10 Enabling time synchronization by internet . . . . . . . . . . . . . . . . . . . . . . . . . . . . . . . . . . . . . . . . . . . . . . . . . . . 26
4.2.11 Enabling daylight saving . . . . . . . . . . . . . . . . . . . . . . . . . . . . . . . . . . . . . . . . . . . . . . . . . . . . . . . . . . . . . . . . 26
4.2.12 Changing unit system . . . . . . . . . . . . . . . . . . . . . . . . . . . . . . . . . . . . . . . . . . . . . . . . . . . . . . . . . . . . . . . . . . 26
4.3 Smart TC° connections . . . . . . . . . . . . . . . . . . . . . . . . . . . . . . . . . . . . . . . . . . . . . . . . . . . . . . . . . . . . . . . . . . . . . . . . . 26
4.3.1 Establishing the wi-fi connection . . . . . . . . . . . . . . . . . . . . . . . . . . . . . . . . . . . . . . . . . . . . . . . . . . . . . . . . . . 26
Contents
7720691 - v.01 - 05102018 3

4.3.2 Downloading the app . . . . . . . . . . . . . . . . . . . . . . . . . . . . . . . . . . . . . . . . . . . . . . . . . . . . . . . . . . . . . . . . . . .27
4.3.3 Connecting the app with the Smart TC° . . . . . . . . . . . . . . . . . . . . . . . . . . . . . . . . . . . . . . . . . . . . . . . . . . . . 27
4.3.4 Connecting your home automation application with the Smart TC° . . . . . . . . . . . . . . . . . . . . . . . . . . . . . . . 28
4.3.5 Registering installer access . . . . . . . . . . . . . . . . . . . . . . . . . . . . . . . . . . . . . . . . . . . . . . . . . . . . . . . . . . . . . .28
4.4 Advanced settings . . . . . . . . . . . . . . . . . . . . . . . . . . . . . . . . . . . . . . . . . . . . . . . . . . . . . . . . . . . . . . . . . . . . . . . . . . . . .28
4.4.1 Resetting to default settings . . . . . . . . . . . . . . . . . . . . . . . . . . . . . . . . . . . . . . . . . . . . . . . . . . . . . . . . . . . . . 28
4.4.2 Check for software update . . . . . . . . . . . . . . . . . . . . . . . . . . . . . . . . . . . . . . . . . . . . . . . . . . . . . . . . . . . . . . .29
4.4.3 Temperature calibration . . . . . . . . . . . . . . . . . . . . . . . . . . . . . . . . . . . . . . . . . . . . . . . . . . . . . . . . . . . . . . . . .29
4.4.4 Activating Preheat . . . . . . . . . . . . . . . . . . . . . . . . . . . . . . . . . . . . . . . . . . . . . . . . . . . . . . . . . . . . . . . . . . . . . 29
4.4.5 Setting the threshold for auto mode . . . . . . . . . . . . . . . . . . . . . . . . . . . . . . . . . . . . . . . . . . . . . . . . . . . . . . . .30
4.5 Installer settings . . . . . . . . . . . . . . . . . . . . . . . . . . . . . . . . . . . . . . . . . . . . . . . . . . . . . . . . . . . . . . . . . . . . . . . . . . . . . . 30
4.5.1 Changing the heating curve . . . . . . . . . . . . . . . . . . . . . . . . . . . . . . . . . . . . . . . . . . . . . . . . . . . . . . . . . . . . . .30
4.5.2 Setting the control strategy . . . . . . . . . . . . . . . . . . . . . . . . . . . . . . . . . . . . . . . . . . . . . . . . . . . . . . . . . . . . . . 31
4.5.3 Setting the heat up speed . . . . . . . . . . . . . . . . . . . . . . . . . . . . . . . . . . . . . . . . . . . . . . . . . . . . . . . . . . . . . . . 31
4.5.4 Setting the cool down speed . . . . . . . . . . . . . . . . . . . . . . . . . . . . . . . . . . . . . . . . . . . . . . . . . . . . . . . . . . . . . 32
4.5.5 Setting the minimum central heating power . . . . . . . . . . . . . . . . . . . . . . . . . . . . . . . . . . . . . . . . . . . . . . . . . .32
4.5.6 Setting the maximum central heating power . . . . . . . . . . . . . . . . . . . . . . . . . . . . . . . . . . . . . . . . . . . . . . . . . 33
4.5.7 Setting maximum domestic hot water power . . . . . . . . . . . . . . . . . . . . . . . . . . . . . . . . . . . . . . . . . . . . . . . . . 33
5 Messages and data . . . . . . . . . . . . . . . . . . . . . . . . . . . . . . . . . . . . . . . . . . . . . . . . . . . . . . . . . . . . . . . . . . . . . . . . . . . . . . . . .35
5.1 Outside temperature . . . . . . . . . . . . . . . . . . . . . . . . . . . . . . . . . . . . . . . . . . . . . . . . . . . . . . . . . . . . . . . . . . . . . . . . . . . 35
5.2 Energy consumption . . . . . . . . . . . . . . . . . . . . . . . . . . . . . . . . . . . . . . . . . . . . . . . . . . . . . . . . . . . . . . . . . . . . . . . . . . . 35
5.3 Installer details . . . . . . . . . . . . . . . . . . . . . . . . . . . . . . . . . . . . . . . . . . . . . . . . . . . . . . . . . . . . . . . . . . . . . . . . . . . . . . . 35
5.4 Appliance data . . . . . . . . . . . . . . . . . . . . . . . . . . . . . . . . . . . . . . . . . . . . . . . . . . . . . . . . . . . . . . . . . . . . . . . . . . . . . . . 35
5.5 Technical information . . . . . . . . . . . . . . . . . . . . . . . . . . . . . . . . . . . . . . . . . . . . . . . . . . . . . . . . . . . . . . . . . . . . . . . . . . 36
5.6 Error messages overview . . . . . . . . . . . . . . . . . . . . . . . . . . . . . . . . . . . . . . . . . . . . . . . . . . . . . . . . . . . . . . . . . . . . . . . 36
5.7 Sending error information to manufacturer . . . . . . . . . . . . . . . . . . . . . . . . . . . . . . . . . . . . . . . . . . . . . . . . . . . . . . . . . . 37
6 Installation . . . . . . . . . . . . . . . . . . . . . . . . . . . . . . . . . . . . . . . . . . . . . . . . . . . . . . . . . . . . . . . . . . . . . . . . . . . . . . . . . . . . . . . . 38
6.1 System overview . . . . . . . . . . . . . . . . . . . . . . . . . . . . . . . . . . . . . . . . . . . . . . . . . . . . . . . . . . . . . . . . . . . . . . . . . . . . . .38
6.1.1 Systems with gateway . . . . . . . . . . . . . . . . . . . . . . . . . . . . . . . . . . . . . . . . . . . . . . . . . . . . . . . . . . . . . . . . . . 38
6.1.2 System without gateway . . . . . . . . . . . . . . . . . . . . . . . . . . . . . . . . . . . . . . . . . . . . . . . . . . . . . . . . . . . . . . . . 38
6.2 Standard delivery . . . . . . . . . . . . . . . . . . . . . . . . . . . . . . . . . . . . . . . . . . . . . . . . . . . . . . . . . . . . . . . . . . . . . . . . . . . . . 38
6.3 Preparation . . . . . . . . . . . . . . . . . . . . . . . . . . . . . . . . . . . . . . . . . . . . . . . . . . . . . . . . . . . . . . . . . . . . . . . . . . . . . . . . . . 38
6.4 Installation of the gateway . . . . . . . . . . . . . . . . . . . . . . . . . . . . . . . . . . . . . . . . . . . . . . . . . . . . . . . . . . . . . . . . . . . . . . 39
6.5 Location of the Smart TC° . . . . . . . . . . . . . . . . . . . . . . . . . . . . . . . . . . . . . . . . . . . . . . . . . . . . . . . . . . . . . . . . . . . . . . .39
6.6 Installation of the Smart TC° . . . . . . . . . . . . . . . . . . . . . . . . . . . . . . . . . . . . . . . . . . . . . . . . . . . . . . . . . . . . . . . . . . . . . 40
6.7 Setup procedure . . . . . . . . . . . . . . . . . . . . . . . . . . . . . . . . . . . . . . . . . . . . . . . . . . . . . . . . . . . . . . . . . . . . . . . . . . . . . . 40
6.8 Software update . . . . . . . . . . . . . . . . . . . . . . . . . . . . . . . . . . . . . . . . . . . . . . . . . . . . . . . . . . . . . . . . . . . . . . . . . . . . . . 40
7 Troubleshooting . . . . . . . . . . . . . . . . . . . . . . . . . . . . . . . . . . . . . . . . . . . . . . . . . . . . . . . . . . . . . . . . . . . . . . . . . . . . . . . . . . . .41
7.1 Error messages . . . . . . . . . . . . . . . . . . . . . . . . . . . . . . . . . . . . . . . . . . . . . . . . . . . . . . . . . . . . . . . . . . . . . . . . . . . . . . .41
7.2 Other problems or questions . . . . . . . . . . . . . . . . . . . . . . . . . . . . . . . . . . . . . . . . . . . . . . . . . . . . . . . . . . . . . . . . . . . . .41
8 Appendix . . . . . . . . . . . . . . . . . . . . . . . . . . . . . . . . . . . . . . . . . . . . . . . . . . . . . . . . . . . . . . . . . . . . . . . . . . . . . . . . . . . . . . . . . 42
8.1 Terms and conditions . . . . . . . . . . . . . . . . . . . . . . . . . . . . . . . . . . . . . . . . . . . . . . . . . . . . . . . . . . . . . . . . . . . . . . . . . . 42
8.2 Disposal . . . . . . . . . . . . . . . . . . . . . . . . . . . . . . . . . . . . . . . . . . . . . . . . . . . . . . . . . . . . . . . . . . . . . . . . . . . . . . . . . . . . 42
8.3 Technical specifications . . . . . . . . . . . . . . . . . . . . . . . . . . . . . . . . . . . . . . . . . . . . . . . . . . . . . . . . . . . . . . . . . . . . . . . . 42
8.4 ErP information . . . . . . . . . . . . . . . . . . . . . . . . . . . . . . . . . . . . . . . . . . . . . . . . . . . . . . . . . . . . . . . . . . . . . . . . . . . . . . . 43
8.4.1 Product fiche . . . . . . . . . . . . . . . . . . . . . . . . . . . . . . . . . . . . . . . . . . . . . . . . . . . . . . . . . . . . . . . . . . . . . . . . . 43
Contents
4 7720691 - v.01 - 05102018

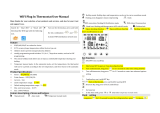
1 Manual menu
Introduction
This chapter introduces you to the thermostat. You will find basic
information, e.g. how to use the rotary dial and buttons plus how to
interpret the information on the screen.
Chapter: Introduction, page 6
General use
This chapter helps you with the daily use of the thermostat. You will find
instructions for daily use like how to change temperatures in different
modes, changing control modes.
Chapter: General use, page 13
Customisation
This chapter helps you with customising the thermostat.
Chapter: Customisation, page 21
Messages and data
This chapter helps you with navigating to information and data of the
thermostat and system.
Chapter: Messages and data, page 35
Installation
This chapter helps you with the installation and commissioning of the
thermostat.
Chapter: Installation, page 38
Troubleshooting
This chapter helps you when there is a problem with the thermostat, an
error message will appear on the home screen.
Chapter: Troubleshooting, page 41
Appendix
This chapter gives you more technical information about the thermostat.
Chapter: Appendix, page 42
Fig.1
Introduction
AD-3001023-01
Fig.2 General use
AD-3001024-01
Fig.3 Customisation
AD-3001025-01
Fig.4 Messages and data
AD-3001026-01
Fig.5 Installation
AD-3001027-01
Fig.6 Troubleshooting
AD-3001028-01
Fig.7 Appendix
AD-3001029-01
1 Manual menu
7720691 - v.01 - 05102018 5

2 Introduction
This chapter introduces you to the thermostat. You will find basic
information, e.g. how to use the rotary dial and buttons plus how to
interpret the information on the screen.
Next chapter: General use, page 13
First chapter: Manual menu, page 5
2.1 Symbols used in the manual
This manual uses various symbols to draw attention to special instructions.
We do this to improve user safety, to prevent problems and to guarantee
correct operation.
Warning
Risk of dangerous situations that may result in minor personal
injury.
Caution
Risk of material damage.
Important
Please note: important information.
See
Reference to other manuals or pages in this manual.
2.2 Introducing the Smart TC°
Intended use. The Smart TC° is designed to operate as a room thermostat
with the possibility to operate your heating system. It has a Wi-Fi
connection to be able to connect to the Internet, making it possible to
operate the Smart TC° with an app on a mobile device.
Warning
Do not use the Smart TC° for systems that are not in accordance
with the intended use.
A simple user interface. Like many other interfaces you have to scroll
through menus, select and enter options and confirm changes. The Smart
TC° has only two buttons that you can either short-press or long-press.
There is one rotary dial to scroll forward or backward. It’s as easy as that!
Controlling the temperature. Your plans change. No problem, control the
temperature as you wish, in manual mode or schedule mode. You can
even be flexible by switching between three schedules. Do you prefer
using your mobile device anywhere in the house? The Smart TC° app is
available for iOS, Android and Windows.
What do I do when I …? I want to …? How do I …? Are you going away
for a holiday? Do you want to make a fire in your fireplace? Do you need a
hot water boost? Or do you want a short temperature change? You can
find most answers in the "General use" chapter.
For more information, see
General use, page 13
AD-3001023-01
2 Introduction
6 7720691 - v.01 - 05102018

2.3 The Smart TC° and its app
The climate in your home contributes to your comfort; with the Smart TC°
you are able to control the temperature in your home the way you want it.
In case you prefer to control your climate with your mobile device (e.g.
smartphone or tablet) you can download the Smart TC° app and connect it
with your Smart TC°. You can also connect your home automation
application with the Smart TC°.
Important
The Smart TC° needs a reliable connection with other devices
(e.g. appliance, wi-fi router) in your home.
2.4
What's new for the Smart TC°
This document is based on software version 1.47 for the Smart TC°.
These are the new possibilities of use:
Automatic topping up (this option is available if your installation is fit for
it).
Connection with a home automation application.
Connection with an access point in the wi-fi network (WPS).
Exact actual time retrieval from the internet (NTP).
Choice of unit system for the display: imperial system or metric system.
Privacy policy readable in the Settings Menu.
New menu item Installer.
New advanced settings (these options are available if your installation is
fit for them):
Heating Curve
Control Strategy
Heatup speed
Cool down speed
Minimum central heating power
Maximum central heating power
Maximum domestic hot water power
New icons for No connection and for the anti-frost mode.
Period setting for short temperature change.
Temperature setting for the anti-frost mode (this option is available if
your installation is fit for it).
Error message to the manufacturer.
Several menu changes.
2.5 How to use the Smart TC°
Before you can use the Smart TC°, it first needs to be installed.
For more information, see
Installation, page 38
2.5.1
Using the rotary dial and buttons
The rotary dial has two buttons: the top button is the select button, the
bottom button is the home button. Pressing a button for a shorter or longer
time will start different actions, as shown in this manual.
Short button press: Press less than a second on the button (<1).
Long button press: Press longer than a second on the button (>1).
Rotary dial: Turn the rotary dial to choose and adjust menus, submenus
and settings.
Fig.8
AD-3000987-01
App
App
21.0 °C
5.0 30.0
Fig.9
AD-3000988-01
<1 >1
>1<1
2 Introduction
7720691 - v.01 - 05102018 7

2.5.2 Entering the main menu and menu items
The main menu gives you access to all submenus and settings.
Short-press the select button to enter the main menu from the home
screen.
Turn the rotary dial forward or backward to select a menu item.
Short-press the select button to confirm the selection.
2.5.3 Entering the Quick Access menu and menu items
The Quick Access menu gives you access to a selection of menu items.
Long-press the select button to enter the Quick Access menu from the
home screen.
Turn the rotary dial forward or backward to select a menu item.
Short-press the select button to confirm the selection.
2.5.4 Returning to the previous step or home screen
You can return to the previous step of the menu or return immediately to
the home screen.
1. Short-press the home button to return to the previous step.
2. Long-press the home button to return to the home screen.
2.5.5
Scrolling through menu items and changing settings
With the rotary dial you can scroll through menu items and change values,
temperatures and time settings.
Fig.10
AD-3000989-01
<1
...
.....
.......
.........
Fig.11
AD-3000990-01
>1
.
.
.
.
.
.
.
.
.
.
.
.
.
.
.
.
.
21.0 °C
Fig.12
AD-3000991-01
<1
21.0 °C
23.0
...
.....
.......
.........
Fig.13
AD-3000992-01
>1
21.0 °C
23.0
2 Introduction
8 7720691 - v.01 - 05102018

1. Turn the rotary dial to scroll through the menu items.
2. Select the menu item you want to change.
3. Short-press the select button to confirm the selection.
4. Turn the rotary dial to scroll through the submenu items.
5. Select the submenu item you want to change.
6. Short-press the select button to confirm the selection.
7.
Turn the rotary dial to change the setting.
8. Short-press the select button to confirm the selection.
2.5.6
Screen shows no information
When the rotary dial, select button or home button are not operated and
no people are in front of the Smart TC° for 30 seconds, the display of the
Smart TC° goes in stand-by mode and will show no information (black
screen).
Important
Press a button, turn the rotary dial or use the presence sensor
to activate the display.
The Smart TC° will display the home screen after activation of
the display. Any unconfirmed setting or selection will be lost.
On delivery the presence sensor is active. You can switch off
the presence detection.
For more information, see
Presence sensor, page 23
2.6 Description of the display
1
Current temperature (or target temperature)
2
Temperature scale
3
Control mode icon
4
Main screen information box
5
Main screen information box
6
Zone icon, Error icon or Filling needed icon
The temperature scale in the main screen shows the difference between
the current and target temperature. The white line represents the current
temperature. The target temperature is displayed in small digits next to the
scale. The temperature scale is visible when the current temperature
differs from the target temperature.
Important
The Smart TC° displays the current temperature in a large font by
default. You can change the display of the temperature to show
the target temperature.
For more information, see
Screen shows no information, page 9
Main screen setting, page 23
Changing the display settings, page 25
Fig.14
AD-3000993-01
...
.....
.......
.........
<1
Fig.15
AD-3000994-01
21.0 °C
23.0
<1
Fig.16
AD-3000995-01
>30
Fig.17
AD-3000996-01
21.0 °C
5.0 30.0
3
4
1
6
2
5
2 Introduction
7720691 - v.01 - 05102018 9

2.6.1 Description of the icons in the display
Possible icons in the display (depending on the configuration of your
installation).
Tab.1 Control mode icons
Manual mode: Manual mode is ac
tive
See
Changing the mode quickly, page 13
Changing the temperature in manual mode, page 13
Anti-frost mode: Anti-frost mode is
active
See
Changing the mode quickly, page 13
Activating antifrost mode, page 19
Holiday period: Holiday period is ac
tive
See
Changing the mode quickly, page 13
Setting a holiday schedule, page 17
Fireplace mode: Fireplace mode is
active
See
Changing the mode quickly, page 13
Activating fireplace mode, page 19
Temperature scheduling: Tempera
ture scheduling is active
See
Changing the mode quickly, page 13
Creating a temperature schedule to control the room tem
perature, page 14
Short temperature change: Schedul
ing mode is interrupted for a short
temperature change
See
Changing the mode quickly, page 13
Changing the temperature for a short period in scheduling
mode, page 14
Topping up: manual or automatic re
fill for the installation.
See
Topping up, page 17
Rotary dial: You are turning the rota
ry dial to set the temperature
See
Changing the temperature in manual mode, page 13
Changing the temperature for a short period in scheduling
mode, page 14
Tab.2 Main screen icons
Date
See
Setting the date and time, page 22
Main screen setting, page 23
Time
See
Setting the date and time, page 22
Main screen setting, page 23
Outdoor temperature
See
Main screen setting, page 23
Outside temperature, page 35
Boiler status: Heating demand
See
Main screen setting, page 23
Boiler status: Heating active
See
Main screen setting, page 23
2 Introduction
10 7720691 - v.01 - 05102018

Appliance mode: On
See
Switching the central heating on/off, page 20
Main screen setting, page 23
Appliance mode: Off
See
Switching the central heating on/off, page 20
Main screen setting, page 23
Appliance mode: Cooling
See
Switching to cooling mode, page 20
Main screen setting, page 23
Appliance mode: Auto
See
Switching to auto mode, page 20
Main screen setting, page 23
Tab.3 Zone icons
Basement
See
Changing the zone temperatures, page 17
Changing the name of a zone, page 25
Bedroom
See
Changing the zone temperatures, page 17
Changing the name of a zone, page 25
Kitchen
See
Changing the zone temperatures, page 17
Changing the name of a zone, page 25
Living room
See
Changing the zone temperatures, page 17
Changing the name of a zone, page 25
Study
See
Changing the zone temperatures, page 17
Changing the name of a zone, page 25
Swimming pool
See
Changing the zone temperatures, page 17
Changing the name of a zone, page 25
Generic
See
Changing the zone temperatures, page 17
Changing the name of a zone, page 25
Tab.4 Error icon
Error display: The appliance reports
an active error
See
Error messages overview, page 36
Troubleshooting, page 41
Error display: The Smart TC° has no
internet connection
See
Smart TC° connections, page 26
2 Introduction
7720691 - v.01 - 05102018 11

2.6.2 Customising the main screen display
You can configure the main screen of the display by adding two
information boxes on the screen, one to the left and one to the right of the
rotary dial.
The information boxes can show:
Time and date
Detailed information about your system
You can also change the display of the temperature to show the current or
target temperature.
For more information, see
Main screen setting, page 23
Display current or target temperature, page 23
2.7
Zone selection
In case you have multiple zones in your heating system, it is possible to
control temperatures in multiple zones. A zone can be a room or, for
example, the ground or first floor. The zones are named CircA, CircB etc.
by default. These factory names can be changed in any name you prefer.
You can change the names on the Smart TC° or in the app.
The multiple zoning options needs to be supported by a matching
appliance configuration.
For more information, see
Changing the name of a zone, page 25
Changing the zone temperatures, page 17
2.8 Presence detection
The main screen of the display will light up (for 5 seconds) if the presence
sensor detects that you are in front of the Smart TC° or pass by. You can
disable the presence sensor in the settings menu.
For more information, see
Presence sensor, page 23
Fig.18
AD-3000997-01
21.0
°C
10.0
2 Introduction
12 7720691 - v.01 - 05102018

3 General use
This chapter helps you with the daily use of the thermostat. You will find
instructions for daily use like how to change temperatures in different
modes, changing control modes.
Next chapter: Customisation, page 21
Previous chapter: Introduction, page 6
First chapter: Manual menu, page 5
3.1 Changing the mode quickly
You can change the control mode quickly from the access menu.
1. Long-press the select button to enter the Quick Access menu.
2. Turn the rotary dial to select the desired mode.
3. Short-press the select button to confirm your choice.
Tab.5 Possible mode and description
Manual: The room temperature can be set instantly with the rotary dial.
Antifrost: The room temperature is set to the antifrost temperature setting.
Holiday: The room temperature is set to the holiday temperature setting.
Fireplace: Continue heating other rooms in the same zone while an additional heat source heats the room where the Smart TC
° is located.
Scheduling: The room temperature is controlled by a temperature schedule.
(1)
(1) When multiple schedules are enabled, Schedules 1 to 3 are shown.
For more information, see
Changing the temperature in manual mode, page 13
Changing the temperature for a short period in scheduling mode,
page 14
Setting a holiday schedule, page 17
Activating fireplace mode, page 19
Activating antifrost mode, page 19
3.2
Changing the room temperature
3.2.1
Changing the temperature in manual mode
In manual mode you can easily change the room temperature.
1. Check that the Smart TC° operates in manual mode (see icon in top-
right corner of main screen).
2. Turn the rotary dial to change the temperature.
While you turn the rotary dial, the target temperature is displayed in
light digits. After a few seconds, the Smart TC° shows the home
screen again with the current temperature (or target temperature) in
bold digits.
Important
When the Smart TC° is in manual mode, only a scheduled holiday
period can automatically change the room temperature.
AD-3001024-01
Fig.19
AD-3000990-01
>1
.
.
.
.
.
.
.
.
.
.
.
.
.
.
.
.
.
21.0 °C
Fig.20
AD-3000998-01
23.0 °C
23.0
?
3 General use
7720691 - v.01 - 05102018 13

3.2.2 Changing the temperature for a short period in
scheduling mode
You can change the temperature for a short set period when the Smart TC
° is in scheduling mode. At the end of the period the Smart TC° will return
to the scheduled temperature.
1. Check that the Smart TC° operates in scheduling mode: see the icon
in the top-right corner of the main screen.
2. Change the temperature with the rotary dial.
3. Long-press the select button.
4. Change the period between 0 and 24 hours.
Important
If you change it to 0 hours, the short temperature change is
deleted.
5. Confirm the change.
Important
You can delete the set temperature change by selecting Clear
Short Temperature Change in the main menu..
3.3
Creating a temperature schedule to control the room temperature
A temperature schedule enables you to change the target temperature at
any moment that you choose. You can set a different schedule for each
day of the week.
You can customise each day schedule to your own preference:
Change the switch time.
Choose another activity between two switch times.
Change the temperature of an activity.
Add up to a maximum of 6 switch times per day.
Remove switch times to a minimum of none (resulting in constant
temperature all day long based on the last activity from the previous
day).
You can create up to three week schedules. For example, you can create
time schedules for:
A week with normal working hours.
A week with different working hours.
A week when you are at home most of the time.
3.3.1 Changing the weekdays of a temperature schedule
You can change, add or delete temperature intervals in one or more
weekdays of a timer program. For example, you can lower the temperature
during the night and when you are out of the house. You can set the
switch point and the activity (with its temperature) for each interval of the
schedule.
1. Enter the main menu.
2. Select Change Temperature Scheduling, Change Heating
Temperature Scheduling or Change Cooling Temperature Scheduling.
Important
Availability of the submenus depends on your appliance.
3. If multiple schedules is enabled: Select Schedule 1, Schedule 2 or
Schedule 3.
Fig.21
AD-3000999-01
23.0 °C
23.0
?
3 General use
14 7720691 - v.01 - 05102018

4. Select and confirm the day(s) that you want to program.
Important
When you select more than one day, the days will be assigned
the same day schedule.
Help text on the display above the schedule helps you perform
changes.
5. Confirm the selected day(s) by rotating the rotary dial to DONE and
pressing the select button.
6. Change, add or delete activities and switch times.
Important
You can short-press the home button to go back one step.
Changing an activity
The temperature of a time interval in the day schedule is set by the
selected activity. By changing the activity another target temperature is
set.
Important
When you change an activity the cursors mark the item you are
changing.
1. Select the activity with the rotary dial.
2. Confirm the selection.
3. Choose another activity with the rotary dial or leave it as is.
4. Confirm the selection.
5. Change the temperature of the activity or leave it as is.
Important
The temperature you set for an activity is the same for every
day of the week where you use this activity.
The Custom activity, however, can have a different temperature
on each day of the week.
6. Confirm the selection.
For more information, see
Changing the name of an activity, page 24
Changing a switch time
The switch time is the start time of new activity interval in the day
schedule.
Important
When you change a switch time the cursors mark the item you are
changing.
1. Select the switch time with the rotary dial.
2. Confirm the selection.
3. Change the switch time.
4. Confirm the selection.
Fig.22
AD-3001000-01
....... .......
....... ....... ....... ....... ....... ....... ....... ....... ....... .......
....... ....... ....... ....... ....... ....... ....... ....... ....... .......
.
.
.
.
.
.
.
.
.
.
.
.
.
.
.
.
.
.
.
.
.
.
.
.
.
<1
Fig.23
AD-3001001-01
....... .......
....... ....... ....... ....... ....... ....... ....... ....... ....... .......
....... ....... ....... ....... ....... ....... ....... ....... ....... .......
.
.
.
.
.
.
.
.
.
.
.
.
.
.
.
.
.
.
.
.
.
.
.
.
.
<1
Fig.24
AD-3001002-01
1
8
.
0
º
1
9
.
5
º
1
9
.
5
º
2
1
.
5
º
1
8
.
0
º
.
.
.
.
.
.
.
.
.
.
.
.
.
.
.
.
.
.
.
.
.
.
0
7
:
4
5
1
0
:
2
5
1
6
:
1
5
2
2
:
4
5
.......
<1
Fig.25
AD-3001003-01
1
8
.
0
º
1
9
.
5
º
1
9
.
5
º
2
1
.
5
º
1
8
.
0
º
.
.
.
.
.
.
.
.
.
.
.
.
.
.
.
.
.
.
.
.
.
.
0
7
:
4
5
1
0
:
2
5
1
6
:
1
5
2
2
:
4
5
.......
<1
3 General use
7720691 - v.01 - 05102018 15

Adding or deleting activities and switch times
You can add or remove activity intervals from the day schedule.
1. Select an activity and long-press the select button to add an interval.
An new interval is created within the start and end time of the
existing activity interval.
2. Repeat step 1 to add more intervals, if required.
3. Change the activity of the new interval(s).
4. Change the switch time of the new interval(s), if required.
5. Select a switch time and long-press the select button to delete an
interval.
6. Select DONE using the rotary dial to save the day schedule.
3.3.2
Copying a weekday of a temperature schedule
You can copy the schedule of one weekday to other weekdays, to speed
up the creation of a temperature schedule.
1. Enter the main menu.
2. Select Change Temperature Scheduling, Change Heating
Temperature Scheduling or Change Cooling Temperature Scheduling.
Important
Availability of the submenus depends on your appliance.
3. If multiple schedules is enabled: Select Schedule 1, Schedule 2 or
Schedule 3.
4. Select the weekday you want to copy.
5. Confirm the selected day(s) by rotating the rotary dial to DONE and
pressing the select button.
The day schedule is opened.
6. Select Copy using the rotary dial.
7. Confirm the selection.
The week schedule is opened.
8. Select and confirm the weekday(s) on which you want to copy the day
schedule.
9. Confirm the selected day(s) by rotating the rotary dial to DONE and
pressing the select button.
The day schedule is copied to the selected day(s).
3.3.3
Selecting another temperature schedule
Your weekly programme can differ from week to week. The Smart TC°
offers you three possible schedules to program. You can set which
temperature schedule is active. First you have to enable the use of
multiple schedules.
1. Enter the main menu.
2. Select Settings.
3. Select Enable multiple schedules.
4. Enter the main menu.
5. Select Select Active Temperature Schedule.
6. Select Schedule 1, Schedule 2 or Schedule 3.
Fig.26
AD-3001030-01
1
8
.
0
º
1
9
.
5
º
1
9
.
5
º
2
1
.
5
º
1
8
.
0
º
.
.
.
.
.
.
.
.
.
.
.
.
.
.
.
.
.
.
.
.
.
.
0
7
:
4
5
1
0
:
2
5
1
6
:
1
5
2
2
:
4
5
.......
>1
Fig.27
AD-3001031-01
1
8
.
0
º
1
9
.
5
º
1
9
.
5
º
2
1
.
5
º
1
8
.
0
º
.
.
.
.
.
.
.
.
.
.
.
.
.
.
.
.
.
.
.
.
.
.
0
7
:
4
5
1
0
:
2
5
1
6
:
1
5
2
2
:
4
5
.......
>1
3 General use
16 7720691 - v.01 - 05102018

7. Confirm the selection.
The selected temperature schedule becomes active, which is shown
by the icon in the top-right corner of the main screen.
3.4 Changing the zone temperatures
If you have multiple zones in your heating system you can control the
temperature in each zone.
1. Enter the main menu.
2. Select Zone Selection.
3. Confirm the selection.
The available zones are displayed.
4. Select a zone.
5. Confirm the selection.
The main screen is displayed with the icon and the name of the
selected zone.
6. Change the temperature using the rotary dial.
7. Confirm the selection.
3.5
Topping up
When your appliance is fitted with a refilling unit, you can top up your
installation in two ways: automatic and manual. You select the automatic
or manual topping up option via the Smart TC° app or the control panel on
your appliance.
3.5.1 Topping up manually
As soon as the water pressure becomes too low, the display shows a
warning: Water pressure is too low. Top up your installation via the auto-fill
menu.
1. Enter the main menu.
2. Select Water pressure low.
3. Confirm the selection.
4. Select Ok to confirm that the appliance can start topping up the
installation.
Important
Topping up stops automatically when the maximum water
pressure is reached.
Topping up stops automatically and the display shows an error
message when topping up takes too long.
5. Select Abort when you want to stop topping up before the maximum
water pressure is reached.
3.5.2 Topping up automatically
As soon as the water pressure becomes too low, the refilling unit starts
topping up the installation. Topping up stops automatically when the
maximum water pressure is reached. The display shows a message
Congratulations! Your installation has been topped up successfully..
Important
When topping up takes too long it stops automatically and the
display shows an error message.
3.6
Setting a holiday schedule
When you will be away for a longer period you can decrease the room
temperature to save energy. The holiday mode temperature overrules the
temperature(s) set in scheduling mode or manual mode.
Fig.28
AD-3001248-01
....... .......
....... ....... ....... ....... ....... ....... ....... ....... ....... .......
}
.
.
.
<1
3 General use
7720691 - v.01 - 05102018 17

3.6.1 Creating a holiday schedule
You can create a holiday schedule via the main menu or via the quick
access menu.
Creating a holiday schedule via the main menu
1. Enter the main menu.
2. Select Input Holiday Period.
3. Confirm the selection.
4. Set the starting date and end date of the holiday period:
4.1. Select an item.
4.2. Confirm the selection.
4.3. Turn the rotary dial to change the item.
4.4. Confirm the change.
5. Set the room temperature for the holiday period:
5.1. Turn the rotary dial to select Temperature.
5.2. Confirm the selection.
5.3. Turn the rotary dial to change the temperature.
Important
The heating device in your installation determines what is the
minimum temperature for the holiday period.
5.4. Confirm the change.
The display shows: Holiday period set.
The main screen will show the holiday icon in the top right
corner when the holiday period starts.
Important
The holiday mode can also be set for any other appliance in your
installation, such as a cooling unit or a hot water generator.
Creating a holiday schedule via the quick access menu
1. Long-press the Select button.
2. Select Holiday.
3. Confirm the selection.
4. Set the starting date and end date of the holiday period:
4.1. Select an item.
4.2. Confirm the selection.
4.3. Turn the rotary dial to change the item.
4.4. Confirm the change.
5. Set the room temperature for the holiday period:
5.1. Turn the rotary dial to select Temperature.
5.2. Confirm the selection.
5.3. Turn the rotary dial to change the temperature.
Important
The heating device in your installation determines what is the
minimum temperature for the holiday period.
5.4. Confirm the change.
The display shows: Holiday period set.
Important
The holiday mode can also be set for any other appliance in your
installation, such as a cooling unit or a hot water generator.
3.6.2
Changing a holiday schedule
You can change the holiday schedule via the main menu and via the quick
access menu..
Changing the holiday schedule via the main menu
1. Enter the main menu.
2. Select Input Holiday Period.
Fig.29
AD-3001249-01
.. .
.........
...... ... .. ..
..... ... .. :
....
..
... .. ..
..... ... .. :
....... .......
<1
3 General use
18 7720691 - v.01 - 05102018

3. Confirm the selection.
4. Select Edit.
5. Confirm the selection.
6. Change the period and/or temperature.
7. Select Save.
8. Confirm the change.
Changing the holiday schedule via the quick access menu
1. Long-press the Select button to enter the quick access menu.
2. Select Holiday.
3. Confirm the selection.
4. Select Edit.
5. Confirm the selection.
6. Change the period and/or temperature.
7. Select Save.
8. Confirm the change.
3.6.3 Deleting a holiday schedule
You can delete the holiday schedule via the main menu and via the quick
access menu.
Deleting the holiday schedule via the main menu
1. Enter the main menu.
2. Select Input Holiday Period.
3. Confirm the selection.
4. Turn the rotary dial to the left to select Clear.
5. Confirm the selection.
Deleting the holiday schedule via the quick access menu
1. Long-press the Select button to enter the quick access menu.
2. Select Holiday.
3. Confirm the selection.
4. Turn the rotary dial to the left to select Clear.
5. Confirm the selection.
3.7 Activating fireplace mode
Fireplace mode enables you to continue heating other rooms that are
controlled by your system while another heat source heats the room where
the Smart TC° is. For instance a fire lighted in your fireplace or a large
number of people can heat the room so much, that the appliance stops
heating all the rooms.
Important
Activate the Fireplace mode before the other heat source
becomes active.
1. Enter the main menu.
2. Select Enable Fireplace.
3. Confirm the selection.
The fireplace icon appears in the top right corner of the main
screen.
Important
You can switch off fireplace mode by selecting Fireplace disabled
in the main menu.
3.8
Activating antifrost mode
You can activate the antifrost mode for central heating and domestic hot
water production, when you will be out of the house in winter for a longer
period of time. The heating system will keep the temperature just high
enough to avoid frost damage and thus save the maximum amount of
energy.
3 General use
7720691 - v.01 - 05102018 19

Caution
Freezing can still occur in rooms that are not heated. Open all
radiators and zones of the central heating system to prevent
freezing.
1. Enter the main menu.
2. Select Enable Frost Protection.
3. Confirm the selection.
The display shows a message that you can change the frost
protection temperature.
4. Long-press the select button while the message is visible.
5. Turn the rotary dial to change the temperature.
Important
The appliance in your installation determines what is the minimum
temperature for the antifrost mode.
6. Confirm the change.
Antifrost mode is on and the display shows the antifrost icon in the
top right corner of the main screen.
Important
In antifrost mode you cannot change the room temperature. If
you try to do so, the display shows a message.
You can deactivate the antifrost mode by selecting Enable
Manual Mode or Enable Temperature Scheduling.
3.9
Switching the central heating on/off
You can switch off the central heating function of the installation, to save
energy during e.g. the summer period.
If heating is switched off, the appliance will continue providing hot tap
water (depending on the configuration of your system).
1. Enter the main menu.
2. Select Operating mode.
3. Select and confirm OFF to switch off the heating function.
4. Select and confirm ON to switch the heating function on again.
3.9.1 Switching to cooling mode
If your installation has a cooling unit, you can activate the cooling mode
via the Smart TC°.
If cooling is switched on, the appliance will continue providing hot tap
water (depending on the configuration of your system).
1. Enter the main menu.
2. Select Operating mode.
3. Select COOLING to switch to the cooling mode.
3.10
Switching to auto mode
If your installation has a cooling unit and an outside temperature sensor,
you can activate the auto mode via the Smart TC°.
In auto mode, the Smart TC° can automatically adjust the inside
temperatures by activating the heating and/or cooling function of the
installation. Switching between heating and/or cooling depends on the set
threshold.
1. Enter the main menu.
2. Select Operating mode.
3. Select AUTO to switch to the auto mode.
For more information, see
Setting the threshold for auto mode, page 30
Fig.30
AD-3001250-01
7.0
....... .......
....... ....... ....... ....... ....... ....... ....... ....... ....... .......
<1
3 General use
20 7720691 - v.01 - 05102018
1/48