1
American Trail Products (Part # 35150001/35150002)
2015-2018 Renegade / Compass 2.0 / 4.0 Lift Kit
Installation Instructions
American Trail Products, LLC
817 East Lambert Road
La Habra, CA 90631
Phone (877) 360-5337
Email: [email protected]
Thank you for choosing American Trail Products. If you have any questions
about the install of this product, please call our tech help at 877-360-JEEP.
We will be happy to assist you with any questions you may have.

2
American Trail Products, LLC
817 East Lambert Road
La Habra, CA 90631
Phone (877) 360-5337
Email: [email protected]
BILL OF MATERIALS:
DESCRIPTION QTY PER KIT
Front Lift Spacer 2
Rear Lift Spacer 6
Control Arm Drop Spacer 2
Brake Line Spacer 2
Muffler Spacer 2
Rear Cross Member Spacer 4
Carrier Bearing Spacer 2
Charcoal Canister Bracket 1
Sway Bar Link 2
DESCRIPTION QTY PER KIT
Bolt, Hex Flange Head M10 x 25 12
Bolt, Hex Head M10 x 80 8
Stud, M10 x 50 6
Bolt, Hex Flange Head M8 x 45 4
Bolt, Hex Flange Head M10 x 50 2
Bolt, Hex Flange Head M6 x 20 1
Bolt, Hex Head M14 x 160 4
Bolt, Hex Head M14 x 130 4
Washer, M10 16
Washer, M8 4
Washer, M14 4
Washer, M12 4
Nut, Nylock M12 4

3
SAFETY WARNING: American Trail Products LLC. recommends this Kit be installed by a professional techni-
cian with knowledge of disassembly/reassembly procedures pertaining to your vehicle.
PRE-INSTALATION NOTES
1. Special literature required: OE Service Manual for model/year of vehicle. Refer to manual for proper disas-
sembly/reassembly procedures of OE and related components.
2. Adhere to recommendations when replacement fasteners, retainers and keepers are called out in the OE
manual.
3. Larger rim and tire combinations may increase leverage on suspension, steering, and related components.
When selecting combinations larger than OE, consider the additional stress you could be inducing on the OE
and related components.
4. Post suspension system installation vehicles may experience drive line vibrations. Angles may require tun-
ing, worn parts may require replacement, shafts may need to be lengthened or trued, and U-joints may need to
be replaced.
5. Secure and properly block vehicle prior to installation of American Trail Products LLC. components. Always
wear safety glasses when using power tools.
POST-INSTALATION NOTES
1. Check all fasteners for proper torque. Check to ensure for adequate clearance between all rotating, mobile,
fixed, and heated members. Verify clearance between exhaust and brake lines, fuel lines, fuel tank, floor
boards and wiring harness. Check steering gear for clearance. Test and inspect brake system.
2. Perform steering sweep to ensure front brake hoses have adequate slack and do not contact any rotating,
mobile or heated members. Inspect rear brake hoses at full extension for adequate slack. Failure to perform
hose check/ replacement may result in component failure. Longer replacement hoses, if needed can be pur-
chased from a local parts supplier.
3. Headlight adjustment is highly recommended so as to not blind other drivers.
4. Re-torque all fasteners after 500 miles. Always inspect fasteners and components during routine
PRODUCT SAFETY WARNING: Modifying your vehicle ride height may result in the vehicle handling differ-
ently than a factory equipped vehicle. Extreme care must be used to prevent loss of control or vehicle rollover.
Failure to drive your modified vehicle safely may result in serious injury or death. American Trail Products LLC.
does not recommend the combined use of suspension lifts, body lifts, or other lifting devices.
Always read instructions completely before beginning installation of any
American Trail Products.
American Trail Products, LLC
817 East Lambert Road
La Habra, CA 90631
Phone (877) 360-5337
Email: [email protected]

4
American Trail Products, LLC
817 East Lambert Road
La Habra, CA 90631
Phone (877) 360-5337
Email: [email protected]
WIPER REMOVAL
COWL COVER REMOVAL
To remove the cowl cover you will need to first
pop the center of the fastening pins up, this can
be done with a small flathead screwdriver. Next,
with a panel removal tool, pop the pins out. On
each side of the panel is a foam filler section
held in by a push in pin, this can be removed by
hand.
Begin by parking the vehicle on a level surface
with the parking brake engaged. Open the hood to remove the windshield wip-
ers. A small plastic cap that covers the nuts will
need to be removed first, then the nuts and
washers can be removed with a 17mm socket.
This will make reassembly much easier.
Caution, when removing the
wipers you need to take note of
position. Also, mark arms as
driver and passenger.
Note:
Renegade - Remove the cowl to access upper
strut hardware
Compass - Do not remove the cowl, but lift up
enough to access upper strut hardware.

5
FRONT SUSPENSION REMOVAL
American Trail Products, LLC
817 East Lambert Road
La Habra, CA 90631
Phone (877) 360-5337
Email: [email protected]
First, make sure parking brake is
engaged. Lift the front of your vehicle and
support with jack stands.
Remove the front wheels with a 17mm
socket.
Starting on the drivers side, remove the
sway bar link. You will need an 18mm
wrench for the nut and T-40 Torx bit to
hold the shaft during removal.
Disconnect the tie rod from
the steering knuckle. You will
need a 17mm socket to
remove the nut, and a ham-
mer to strike the knuckle and
free the tie rod.
Next, remove the bolts that attach the strut
to the knuckle using a 16mm wrench & E-
18 Torx and pull the strut out of the steer-
ing knuckle. Caution, support steering
knuckle and CV axle when separated to
avoid popping the axles out and damaging
the CV joint.
Finally, remove the 3 upper strut bolts with
the E-14 reverse Torx socket and remove
strut from vehicle.
First remove the clip that holds
the brake line to the strut with
needle nose pliers. Now remove
the ABS line from its attachment
points on the strut body. 4.0 installation
This is where you use a spring compres-
sor and replace the coil spring with the
new 4.0 coil springs

6
FRONT SUSPENSION INSTALL
Place your new lift spacer on top of the
strut and install the provided M10 bolts
using red Loctite and torque to 35 ft
lbs.
Installing Strut -
Step 1. install and attach
the strut assembly using
the 3 factory bolts, leaving
loose at this time.
Step 2. reattach the strut
to the knuckle using the 2
factory bolts and torque to
90 ft lbs.
Step 3. Now push the top
of the strut towards the
motor and torque the
upper bolts to 35 ft lbs.
(see fig 3)
Reattach the brake and ABS
lines to the strut using all of
the factory retaining clips.
Reinstall the steering tie rod and
tighten. Now you can repeat the
suspension removal and suspension
installation on the passenger side of
the vehicle.
Install the new sway bar end links
using the supplied hardware. Note;
both joints will need to be aligned
before tightening the jam nut to en-
sure there is no binding that can limit
steering and ruin the joints.
Caution -Once you tighten the jam nuts,
turn the steering wheel full lock in both
directions making sure the endlinks are
not binding up.
Finally, go over your work to ensure all
hardware is tight and the lines and clips
are attached. Now, Reinstall the wheels
and lift the vehicle to remove the jack
stands.
American Trail Products, LLC
817 East Lambert Road
La Habra, CA 90631
Phone (877) 360-5337
Email: [email protected]
Note: At full droop axle may
be touching the strut, this is
normal and during install.
Fig 1
Fig 2
Fig 3

7
CARRIER BEARING, EXHAUST & ABS/E-BRAKE SPACERS
Remove carrier bearing bolts using an E-
14 reverse Torx socket. Next install the
carrier bearing spacers and longer sup-
plied hardware. Once you have both
bolts installed, tighten.
Remove the two bolts that attach the
exhaust hangers. Now, install the
spacers on both sides (just under the
heat shield) and tighten all hardware.
Remove the two bolts that attach the
ABS/Brake line brackets. Next, install
the spacers on both sides and tighten
all hardware.
Support the rear differential with a floor
jack while loosening the cross member
bolts with the E-20 reverse Torx. Next
remove bolts on one side, install the
spacers with supplied hardware and
repeat on the other side of cross mem-
ber. Tighten hardware to 120 ft lbs.
Remove the inner fender liners with a
Phillips screw driver and 10mm socket.
You have 5 Phillips head screws and 4
10mm plastic nuts that hold the liner in
place. Now you should be able to care-
fully remove the liner from the vehicle.
American Trail Products, LLC
817 East Lambert Road
La Habra, CA 90631
Phone (877) 360-5337
Email: [email protected]
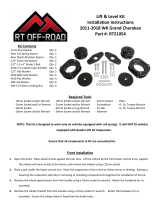
REAR CROSS MEMBER & CONTROL ARM SPACERS
2WD – Use shorter 130mm bolt
4WD – Use longer 160mm bolt
Rear Cross Member
Hardware Identification
Used On 4WD Only

8
American Trail Products, LLC
817 East Lambert Road
La Habra, CA 90631
Phone (877) 360-5337
Email: [email protected]
REAR SUSPENSION REMOVAL
Remove brake line, ABS line and E-
brake wire from strut with needle nose
pliers. Next remove the E-brake plug
from the caliper being careful not to
damage.
Remove the sway bar end link from the
strut and push away from the strut.
Now, remove the 2 bolts holding the
strut to the knuckle and remove the
strut from the knuckle.
Next remove the 3 bolts that attach
the strut to the body. You can now
remove the strut from the vehicle.
REAR SUSPENSION INSTALL
Install stud into with red Loctitie as shown
and tighten into the round side of the rear lift spacer as show.
Remove the bolts holding the
bracket with the E-14 Socket. Now
install the drop spacer with supplied
hardware and torque to 75 ft lbs.
Repeat on other side.
Remove
E_-14 Torx
4.0 installation
This is where you use a spring compressor
and replace the coil spring with the new 4.0
coil springs

9
American Trail Products, LLC
817 East Lambert Road
La Habra, CA 90631
Phone (877) 360-5337
Email: [email protected]
CHARCOAL CANISTER RELOCATION MOUNT
Now, Secure the strut assembly to the
steering knuckle using the factory bolts
and then, using an E-18 reverse Torx
socket and a 16mm socket, tighten them
to 90 ft. lbs. Now, attach the sway bar
end link, then attach the brake line, ABS
line and E-brake wires using all factory
clips. Repeat on other side. Now check
all hardware to ensure a proper install.
REAR SUSPENSION INSTALL
Next install the 3 supplied
bolts that attach the strut to
the body. Leave loose until
you have the lower part of the
strut attached (shown below in
next step) Then tighten.
Next Remove the charcoal canister
3 bolts using a 10mm socket. You
will need to swing the canister to the
side to get the rear strut installed.
Being careful not to damage the
tubes or wiring connected to the
canister.
Attach relocation bracket into the
upper hole as shown using the
factory hardware using a 10mm
socket.
Next, Position the charcoal canister
into position at the lower bolts, and
rotate to line up with the new reloca-
tion bracket and install the supplied
10mm bolt and washer.
Install on the supplied strut spacers (3 per
side) and tighten into the body and torque
to 35 ft lbs.

10
American Trail Products, LLC
817 East Lambert Road
La Habra, CA 90631
Phone (877) 360-5337
Email: [email protected]
ALIGNMENT NOTES
1. Your vehicle will require a 4 wheel alignment!
2. Let you alignment tech know what was in-
stalled.
3. Your rear cross member has been dropped
down, this will effect alignment and normally
needs to be adjusted to achieve proper align-
ment specs.
Like us on facebook
Follow us on instagram
@americantrailproducts or tag
#americantrailproducts
You’re finished! There is one last thing we would like you to due. Take pictures or
video of your Jeep and post it on social media showing your American Trail Prod-
ucts kit installed. We may send you something as a thank you for your effort.
Thank you for choosing American Trail Products!
Any questions or comments call 877-360-JEEP.
/