m
Operations Critical Wireless
Remote Control POD, WP300
PMLN8298
User Manual
Notice to Users (FCC and Industry
Canada)
This device complies with part 15 of the FCC Rules and
Industry Canada license-exempt RSS standard(s). Operation is
subject to the following conditions:
This device may not cause harmful interference.
This device must accept any interference received, including
interference that may cause undesired operation.
Changes or modifications made to this device, not expressly
approved by Motorola Solutions, could void the authority of the
user to operate this equipment.RF Energy Exposure and
Product Safety Guide for Portable Two-Way Radios
Before using this product, read the RF Energy Exposure and
Product Safety Guide that ships with the radio which contains
instructions for safe usage and RF energy awareness and
control for compliance with applicable standards and regulation.
Supplier’s Declaration of Conformity
Per FCC CFR 47 Part 2 Section 2.1077(a)
Responsible Party
Name: Motorola Solutions, Inc.
Address: 2000 Progress Pkwy, Schaumburg, Il. 60196, U.S.A.
Phone Number: 1-800-927-2744
Hereby declares that the product:
Model Name: WP300
conforms to the following regulations:
FCC Part 15, subpart B, section 15.107(a), 15.107(d), and
section 15.109(a)
Class B Digital Device
Class B Digital Device
As a personal computer peripheral, this device complies with
Part 15 of the FCC Rules. This device complies with Industry
Canada license-exempt RSS standard(s). Operation is subject
to the following conditions:
1. This device may not cause harmful interference.
2. This device must accept any interference received, includ-
ing interference that may cause undesired operation.
Notice: This equipment has been tested and found to comply
with the limits for a Class B digital device, pursuant to part 15 of
the FCC Rules. These limits are designed to provide
reasonable protection against harmful interference in a
residential installation. This equipment generates, uses and can
radiate radio frequency energy and, if not installed and used in
accordance with the instructions, may cause harmful
interference to radio communications. However, there is no
guarantee that interference will not occur in a particular
installation.
If this equipment does cause harmful interference to radio or
television reception, which can be determined by turning the
equipment off and on, the user is encouraged to try to correct
the interference by one or more of the following measures:
• Reorient or relocate the receiving antenna.
• Increase the separation between the equipment and
receiver.
• Connect the equipment into an outlet on a circuit different
from that to which the receiver is connected.
• Consult the dealer or an experienced radio or TV
technician for help.
Avis aux utilisateurs (FCC et Industrie
Canada)
Le présent appareil est conforme aux CNR d'Industrie
Canada applicables aux appareils radio exempts de licence
et à la partie 15 des règlements de la FCC :
• Cet appareil ne doit pas causer d'interférence nuisible.
• Cet appareil doit accepter toute interférence reçue, y
compris les interférences pouvant entraîner un
fonctionnement indésirable.
• Toute modification effectuée à cet appareil sans
l'autorisation explicite de Motorola Solutions peut
annuler l'autorisation d'utiliser cet appareil.
Déclaration de conformité du
fourmisseur
Règlement CFR 47 partie 2 section 2.1077(a) de la FCC
Partie responsable
Nom: Motorola Solutions, Inc.
Adresse: 2000 Progress Pkwy, Schaumburg, Il. 60196,
U.S.A.
Numéro de téléphone: 1-800-927-2744
Déclare par les présentes que le produit :
Nom de modèle: WP300
sont conformes aux réglementations suivantes:
Partie 15, sous-partie B, section 15.107(a), 15.107(d) et
section 15.109(a) des règlements de la FCC
Appareil numérique de Classe B
En tant que périphérique d'ordinateur personnel, cet appareil
est conforme aux stipulations de la partie 15 des
règlements de la FCC. Cet appareil est conforme aux CNR
d'Industrie Canada applicables aux appareils radio
exempts de licence. Son utilisation est assujettie aux deux
conditions suivantes:
1. Cet appareil ne doit pas causer d'interférence nuisible.
2. Cet appareil doit accepter toute interférence reçue, y
compris les interférences pouvant entraîner un
fonctionnement indésirable.
AVIS: Cet équipement a fait l'objet de tests et a été déclaré
conforme aux limites établies pour un appareil numérique de
classe B, conformément à la section 15 des règlements de la
FCC. Ces limites sont fixées afin d'offrir une protection
suffisante contre des interférences nuisibles dans une
installation résidentielle. Cet équipement génère, utilise et
peut émettre de l'énergie de radiofréquence et, s'il n'est pas
installé ou utilisé conformément aux instructions, il peut
provoquer un brouillage nuisible aux communications radio.
Cependant, il est impossible de garantir qu'il n'y aura aucune
interférence dans une installation particulière.
Si cet appareil cause une interférence nuisible à la réception
de la radio ou de la télévision, ce qui peut être déterminé en
éteignant et en allumant l'appareil, vous êtes encouragé à
remédier à la situation en prenant une ou plusieurs des
mesures suivantes:
• Réorienter ou déplacer l'antenne réceptrice.
• Augmenter la distance entre l'équipement et le
récepteur.
• Brancher l'appareil dans une autre prise sur un circuit
différent de celui du récepteur.
Consulter un revendeur ou un technicien de radio ou de
télévision chevronné pour obtenir de l'aide.
RF Energy Exposure and Product Safety
Guide for Portable Two-Way Radios
Before using this product, read the RF Energy Exposure and
Product Safety Guide that ships with the radio which contains
instructions for safe usage and RF energy awareness and
control for compliance with applicable standards and regulation.
Acoustic Safety
Exposure to loud noises from any source for extended periods
of time may temporarily or permanently affect your hearing. The
louder the radio volume, the less time is required before your
hearing could be affected. Hearing damage from loud noise is
sometimes undetectable at first and can have a cumulative
effect. To protect your hearing:
• Use the lowest volume necessary to do your job.
• Turn up the volume only if you are in noisy surroundings.
• Turn down the volume before adding headset or
earpiece.
• Limit the amount of time you use headsets or earpieces at
high volume.
• When using the radio without a headset or earpiece, do
not place the radio speaker directly against your ear.
• If you experience hearing discomfort, ringing in your ears,
or speeches that are muffled, you should stop listening to
your radio through your headset or earpiece, and have
your hearing checked by your doctor.
Important Information
• Do not charge your accessory in temperature below
0 °C (32 °F) or above 45 °C (113 °F). Do not store
your accessory in direct sunlight or where expected
temperatures can exceed this range, such as inside
a parked car.
• Storing your fully charged accessory in high temperature
conditions may permanently reduce the life of the internal
battery.
• Battery life may temporarily shorten in low-temperature
conditions.
• The Remote Control POD should be stored between
–10 °C (14 °F) and 30 °C (86 °F) to minimize permanent
battery capacity loss.
• To prevent injury, do not disassemble, puncture, or crush
the POD because these actions can cause the battery to
short-circuit.
• Do not expose or throw the POD into heat or fire.
• Do not dispose of the POD into household waste.
• Do not fill the audio jack and USB charging port with
water. If water enters the audio jack and/or USB charging
port, remove water by shaking the POD. Always cover the
audio jack and USB charging port with a dust cap when
not in use.
For more information on what RF energy exposure is, and
how to control your exposure to ensure compliance with
established RF exposure limits, consult the following
websites:
• https://www.fcc.gov/
• http://www.ic.gc.ca/eic/site/smt-gst.nsf/eng/
sf11467.html
• http://www.ic.gc.ca/eic/site/smt-gst.nsf/eng/
sf01904.html
• https://www.osha.gov/
• https://osha.europa.eu/en
• http://www.who.int/peh-emf/project/en/
For additional user training information on exposure
requirements, consult the following websites:
• https://www.motorolasolutions.com/en_us/about/
company-overview/corporateresponsibility/governance-
and-policies/wireless-communication-and-
healthfaqs.html
• https://learning.motorolasolutions.com/
Visitez les sites Web suivants pour obtenir plus de
renseignements sur ce qu'est
l'énergie RF et sur les moyens de contrôle à prendre afin de
respecter les limites
établies en matière d'exposition aux radiofréquences:
• https://www.fcc.gov/
• http://www.ic.gc.ca/eic/site/smt-gst.nsf/eng/
sf11467.html
• http://www.ic.gc.ca/eic/site/smt-gst.nsf/eng/
sf01904.html
• https://www.osha.gov/
• https://osha.europa.eu/en
• http://www.who.int/peh-emf/project/en/
Pour plus de renseignements sur la formation des utilisateurs
relativement aux limites d'exposition, consultez les sites
suivants:
• https://www.motorolasolutions.com/en_us/about/
company-overview/corporateresponsibility/governance-
and-policies/wireless-communication-and-
healthfaqs.html
• https://learning.motorolasolutions.com/
Accessories Manager App Introduction
Download and install Accessory Manager Application for future
software upgrades and new feature releases.
You are recommended to install Accessory Manager to upgrade
accessories firmware to the latest version for the first time
before use.
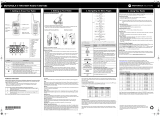
POD Overview
Note: Call button/MFB and volume buttons are not applicable
when function as a Standalone PTT device.
* These accessories are purchased separately.
Table 1: POD Overview and Description
No. Description
1 Audio Jack
2 Call Button/Multifunctional Button (MFB)
3PTT Button
4 Emergency Button
5 Volume Down
6 Volume Up
7 Power Button
8 Audio/Bluetooth Indicator
9 Power/Battery Indicator
10 NFC Location
11 Charging Port
Table 2: Compatible Parts and Accessories
Part Number Description
*PMLN8077A In-Line PTT Earpiece with Standard Cord
*PMLN8125A In-Line PTT Earpiece with Short Cord
*PMLN8190A 1-Wire Enhance Clear Tube Earpiece,
2.5 mm Single Pin, Straight
PMLN6246A Swivel Clip for Wireless Push-to-Talk
PODs
*PMLN8332A Vehicle Mount for Operations Critical
Wireless Remote Control Pod, WP300
Note:
• These accessories can be paired with a Kodiak
Broadband PTT enabled device. To enable the
emergency button functionality, ensure the emergency
function is enabled on the Kodiak. Refer to your Kodiak
User Guide for setup instructions.
• Bluetooth Device Name: WP300_xxxx. The character
string "WP300_xxxx" is the Bluetooth device name.
"xxxx" is the last four digits of the Bluetooth address.
• The MAC Address is located on top of the individual box
and within the QR code behind the belt clip. Additional
MAC Address labels are provided in the individual box.
• To support new device/radios and functionalities,
upgrade the WP300 firmware to the latest version.
Getting Started
Before you start, fully charge the POD. To charge it, turn off
the POD and connect the USB charging cable to the POD.
Plug the charging cable to the USB power source.
Table 3: Charging Indicators
Power Indicator Description
Rapid blinking red Charging error
Solid red Charging
Blinking green Almost fully charged
Solid green Battery is fully charged
Read the following table to understand the audio and Bluetooth
status indication.
Note: Microphone is muted and incoming call indication is not
applicable when function as a standalone PTT device.
When POD is not charging, refer to the following table to
understand the indication.
Table 4: Battery Indication
Power Indicator Description
Off Battery level is medium or high
Blinking red Battery level is low
Table 5: Audio and Bluetooth Status Indicators
Audio/Bluetooth
Indicator Description
Blinking in blue Enter pairing
Solid blue Disconnected
Double blinking blue
(Once) Connected
Solid red Mic muted
Blinking in green Receiving incoming call
Table 6: Status Indication
Indicator Status Description
Audio/
Bluetooth Double-blinking blue Connected
Note: To determine the detail status of the Pod, short press the
Power button.
*To troubleshoot when your radio indicates operation mode
error, perform one of the following options:
• To restore to previous operation mode, attach or detach
the earpiece from the POD.
• To switch to operation mode, follow the steps in
"Operation Mode Switching".
Attaching Integrated Microphone/
Receiver Headset (Earpiece)
1. To attach and lock the earpiece, align the “unlock” symbol
on the connector, push the connector in and turn the
connector until the “lock” symbol is aligned.
Power Double-blinking green Battery level is high
Double-blinking amber Battery level is medium
Table 7: Operation Mode Indication
Indicator Status Description
Bluetooth
and Power
LED
Both LEDs blink red
simultaneously.
Operation mode
error*
The Bluetooth LED blinks blue
twice and the Power LED
blinks green twice
simultaneously.
POD is entering
or exiting Dark
Mode
Table 6: Status Indication
Indicator Status Description
2. To unlock and detach the earpiece, turn the connector to
align the “unlock” symbol with the recess on the front
housing and pull the connector out.
Note:
• Attach or detach your earpiece prior to establishing the
connection with the radio or adapter.
• The wireless is disconnected upon accidental,
intentional removal, or attachment of the earpiece from
or to the device. This is indicated by a red LED blinking
rapidly.
Pairing the WP300 Pod
There are two methods of pairing the WP300 Pod, using (A)
Bluetooth or (B) using Near Field Communication (NFC).
Note: If you want to change the WP300 pairing mode or pair it
with a new host device, always ensure that the WP300 is
unpaired from the existing Bluetooth connection on the host
device and the pairing is cleared before starting a new pairing
process.
(A) Pairing the POD through Bluetooth
To function in audio mode, ensure the earpiece portion of
the Wireless Device is plugged into the POD portion.
To function as a Standalone PTT mode, remove the
earpiece.
1. From the power-off state, press and hold the Power button
until the blue LED blinks.
2. From the compatible device, search and select POD from
the Bluetooth list. The device is connected.
*MN007882A01*
MN007882A01-AD
MOTOROLA, MOTO, MOTOROLA SOLUTIONS and the
Stylized M logo are trademarks or registered trademarks
of Motorola Trademark Holdings, LLC and are used
under license. All other trademarks are the property of
their respective owners.
© 2021 and 2022 Motorola Solutions, Inc.
All rights reserved.
Printed in
MN007882A01_.fm Page 1 Tuesday, July 19, 2022 10:11 AM