Page is loading ...

APX™ TWO-WAY RADIOS
APX 3000
USER GUIDE
APX2000_M1_Front_Cover.fm Page 1 Tuesday, February 19, 2013 10:59 AM

APX_3000_M1.book Page 2 Tuesday, May 14, 2013 4:17 PM

English
m
ASTRO
®
APX™ 3000
Digital Portable Radios
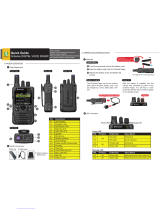
Quick Reference Card
RF Energy Exposure and Product Safety
Guide for Portable Two-Way Radios
ATTENTION!
This radio is restricted to Occupational use only. Before using
the radio, read the RF Energy Exposure and Product Safety
Guide for Portable Two-Way Radios which contains important
operating instructions for safe usage and RF energy awareness
and control for Compliance with applicable standards and
Regulations.
Radio Controls
Turning Radio On/Off
Control Buttons for Channels, Zone or
Volume
* MFB can be programmed to Top, Top Side and
Middle Side button. It can be configured to
support two features out of Volume, Channel or
Zone mode.
Making a Call
You may hear Channel Voice Announcement
upon entering channel or zone mode if
preprogrammed.
Sending an Emergency Alarm
***Default emergency button press timer is
set to 1 second. This timer is programmable,
see page 40 in the user guide for details.
To exit emergency at any time, press and hold
the Emergency button.
Top Button*
_______________
Up Arrow
Button**
____________
Antenna
Top Side Button*
______________
Middle Side
Button*
______________
Down Arrow
Button**
____________
On/Off Switch
IMPORTANT!
You must connect a speaker microphone,
earpiece or headset to hear the audio
indicators; and a GCAI DRSM to see the strings
and icons of your radio.
• On – Push the On/Off Switch downwards. You
see a Green Dot.
• Off – Push the On/Off Switch upwards.
• Multi-Functional Button (MFB)* – To toggle
between Volume, Channel or Zone mode.
• Up Arrow Button** – To increase volume; to
toggle the channels or zones up.
Side
Connector
Cover
Battery
Connector
Transmit/
Receive LED
Battery
Bluetooth
Pairing
Spot
Bluetooth
LED
• Down Arrow Button** – To decrease volume;
to toggle the channels or zones down.
1 Press the Multi-Functional Button* to the
desirable channel or zone mode.
2 Press the Up/Down Arrow Button to change
the channel/zone.
3 Adjust volume, if necessary.
4 Press the PTT button to transmit; release to
receive.
1 Press and release the Emergency button***.
2 When acknowledgment is received, you hear
four beeps; alarm ends; and radio exits
emergency.
*PMLN6407B*
PMLN6407B
MOTOROLA, MOTO, MOTOROLA SOLUTIONS and the Stylized M logo are trademarks or registered trademarks of Motorola Trademark Holdings, LLC and are used under license.
All other trademarks are the property of their respective owners. © 2012–2013 by Motorola Solutions, Inc. All Rights Reserved. 05/13.
1303 East Algonquin Road., Schaumburg, Illinois 60196, U.S.A.
APX_3000_M1.book Page 3 Tuesday, May 14, 2013 4:17 PM

English
Sending an Emergency Call
To exit emergency at any time, press and hold
the Emergency button.
Sending a Silent Emergency Alarm
To exit emergency at any time, press and hold
the Emergency button.
LED Indicator
Bluetooth Pairing with Mission Critical
Wireless Pod
Audio indications include alert tones and Voice
Announcement (feature enabled via CPS).
Bluetooth Pairing with Mission Critical
Wireless Remote Control Unit (RCU)
PMLN6233_ Discreet Mission Critical Wireless
RCU is recommended to use with your
APX 3000 as it provides additional functionality
to this radio.
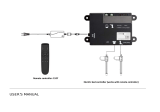
Connecting to Display Remote Speaker
Microphone (DRSM)
Only DRSM supports the APX 3000 display
capability.
1 Press the Emergency button.
2 Press and hold the PTT button. Speak clearly
with the microphone near your mouth.
3 Release the PTT button to end call.
4 Press and hold Emergency button to exit
emergency.
1 Press the Emergency button.
2 The LED does not light up, and there is no
tone.
3 Silent emergency continues until you press
and hold the Emergency button to exit
emergency state.
OR
Press and release the PTT button to exit the
Silent Emergency Alarm mode and enter
regular dispatch or Emergency Call mode.
Solid red Radio is transmitting.
Blinking red
Radio is transmitting at low
battery condition.
Rapid blinking red Power-Up failure.
Solid green
Radio has completed power
up.
Blinking blue
(3 Blinks)
Bluetooth is powering On/
Off.
Slow blinking blue Bluetooth is ready to pair.
Rapid blinking
blue for two
seconds
Bluetooth fails to connect or
disconnect from a device.
Solid blue for two
seconds
Bluetooth device is
connected or disconnected.
Solid blue Bluetooth error.
Blinking blue at
heartbeat pace
Radio is connected with at
least one Bluetooth
accessory device.
1 To hear audio indications, plug the earpiece
into the Wireless Pod.
OR
To function as a Standalone PTT Device,
remove the earpiece.
2 Power on both your radio and Pod.
3 Ensure the Bluetooth feature of your radio and
Pod are enabled. Ensure the Pod is in pairing
mode.
4 Place the Bluetooth pairing spot of your Pod
within one inch from the Bluetooth pairing spot
on your radio.
1 Verify that both your radio and your RCU are
powered ON and in pairing mode.
2 To enter pairing mode on your RCU, press and
hold the Trunk button while powering up the
RCU.
3 Place the Bluetooth pairing spot on your RCU
within one inch of the Bluetooth pairing spot
on your radio.
4 Radio LED turns solid blue for two seconds
and then blinking blue at heartbeat pace to
indicate connection is successfully
established.
1 Turn off your Radio.
2 Align and attach the RSM’s connector to your
radio’s side connector.
3 Secure by tightening the screw on the lower
end of the connector.
APX_3000_M1.book Page 4 Tuesday, May 14, 2013 4:17 PM

Declaration of Conformity
English
i
Declaration of Conformity
This declaration is applicable to your radio only if your radio is labeled with the FCC logo shown below.
DECLARATION OF CONFORMITY
Per FCC CFR 47 Part 2 Section 2.1077(a)
Responsible Party
Name: Motorola Solutions, Inc.
Address: 1303 East Algonquin Road, Schaumburg, Illinois 60196, U.S.A.
Phone Number: 1-800-927-2744
Hereby declares that the product:
Model Name: APX 3000
conforms to the following regulations:
FCC Part 15, subpart B, section 15.107(a), 15.107(d) and section 15.109(a)
Class B Digital Device
As a personal computer peripheral, this device complies with Part 15 of the FCC Rules. Operation is subject to the
following two conditions:
1. This device may not cause harmful interference, and
2. This device must accept any interference received, including interference that may cause undesired operation.
APX_3000_M1.book Page i Tuesday, May 14, 2013 4:17 PM

Declaration of Conformity
English
ii
Note: This equipment has been tested and found to comply with the limits for a Class B digital device, pursuant to part
15 of the FCC Rules. These limits are designed to provide reasonable protection against harmful interference in a
residential installation. This equipment generates, uses and can radiate radio frequency energy and, if not
installed and used in accordance with the instructions, may cause harmful interference to radio communications.
However, there is no guarantee that interference will not occur in a particular installation.
If this equipment does cause harmful interference to radio or television reception, which can be determined by
turning the equipment off and on, the user is encouraged to try to correct the interference by one or more of the
following measures:
• Reorient or relocate the receiving antenna.
• Increase the separation between the equipment and receiver.
• Connect the equipment into an outlet on a circuit different from that to which the receiver is connected.
• Consult the dealer or an experienced radio/TV technician for help.
APX_3000_M1.book Page ii Tuesday, May 14, 2013 4:17 PM

Contents
English
iii
Contents
This User Guide contains all the information you need
to use the APX™ 3000 Series Digital Portable Radios.
Declaration of Conformity . . . . . . . . . . . . . . . . . .i
Important Safety Information . . . . . . . . . . . . . vii
RF Energy Exposure and Product Safety Guide for
Portable Two-Way Radios . . . . . . . . . . . . . . . . . . . vii
Software Version . . . . . . . . . . . . . . . . . . . . . . .viii
Notice to Users (FCC and Industry Canada) . . . . . viii
Informations importantes sur la sécurité . . . .ix
Exposition aux radiofréquences et sécurité du produit
pour radios bidirectionnelles portatives . . . . . . . . . .ix
Version du logiciel . . . . . . . . . . . . . . . . . . . . . . . x
Avis aux utilisateurs (FCC et Industrie Canada) . . . . x
Computer Software Copyrights . . . . . . . . . . . .xi
Documentation Copyrights . . . . . . . . . . . . . . . .xi
Disclaimer . . . . . . . . . . . . . . . . . . . . . . . . . . . . .xii
Getting Started . . . . . . . . . . . . . . . . . . . . . . . . . .1
How to Use This Guide . . . . . . . . . . . . . . . . . . . . . . . 1
Notations Used in This Manual . . . . . . . . . . . . . . . . . 1
Additional Performance Enhancement . . . . . . . . . . . 2
Dynamic System Resilience (DSR) . . . . . . . . . . . . . 2
CrossTalk Prevention . . . . . . . . . . . . . . . . . . . . . . . 2
Encrypted Integrated Data (EID) . . . . . . . . . . . . . . . 2
SecureNet . . . . . . . . . . . . . . . . . . . . . . . . . . . . . . . . 2
What Your Dealer/System Administrator
Can Tell You . . . . . . . . . . . . . . . . . . . . . . . . . . . . . . 3
Preparing Your Radio for Use . . . . . . . . . . . . . .3
Charging the Battery . . . . . . . . . . . . . . . . . . . . . . . . . 5
Battery Charger . . . . . . . . . . . . . . . . . . . . . . . . . . . . 5
Attaching the Battery‡ . . . . . . . . . . . . . . . . . . . . . . . . 5
Installing the Antenna . . . . . . . . . . . . . . . . . . . . . . . . 6
Attaching the Accessory Connector Cover . . . . . . . . 7
Installing Accessories with GCAI Connector . . . . . . . 7
Turning On Your Radio‡ . . . . . . . . . . . . . . . . . . . . . . 8
Adjusting the Volume† . . . . . . . . . . . . . . . . . . . . . . . 9
Pairing Radio with Pod and Earpiece†‡ . . . . . . . . . . 9
APX_3000_M1.book Page iii Tuesday, May 14, 2013 4:17 PM

Contents
English
iv
Pairing Radio with Mission Critical Remote Control
Unit (RCU) . . . . . . . . . . . . . . . . . . . . . . . . . . . . . . 10
Using the Carry Holster . . . . . . . . . . . . . . . . . . . . . 11
Inserting to the Carry Holster . . . . . . . . . . . . . . . . . 11
Removing Your Radio from the Carry Holster . . . . 11
Tying Your Radio and Flexible Antenna to Your
Body . . . . . . . . . . . . . . . . . . . . . . . . . . . . . . . . . . . 12
Positioning Your Radio and Devices on Your
Body . . . . . . . . . . . . . . . . . . . . . . . . . . . . . . . . . . . . 13
Installing the Flexible Antenna . . . . . . . . . . . . . . . . 13
Strapping the Antenna onto Your Body . . . . . . . . . 15
Identifying Radio Controls . . . . . . . . . . . . . . . .16
Radio Parts and Controls . . . . . . . . . . . . . . . . . . . . 17
Programmable Features . . . . . . . . . . . . . . . . . . . . . 18
Assignable Radio Functions . . . . . . . . . . . . . . . . . . 18
Assignable Settings or Utility Functions . . . . . . . . . 19
Accessing the Preprogrammed Functions . . . . . . . 19
Multi-Functional Button (MFB) . . . . . . . . . . . . . . . . 19
Using Push-To-Talk (PTT) Button† . . . . . . . . . . . . 20
Identifying Status Indicators . . . . . . . . . . . . . .20
Status Icons‡ . . . . . . . . . . . . . . . . . . . . . . . . . . . . . 20
LED Indicator . . . . . . . . . . . . . . . . . . . . . . . . . . . . . 22
LED Indicators in Surveillance Mode† . . . . . . . . . . 23
Intelligent Lighting Indicators‡ . . . . . . . . . . . . . . . . 24
Alert Tones† . . . . . . . . . . . . . . . . . . . . . . . . . . . . . . 25
General Radio Operation . . . . . . . . . . . . . . . . 28
Selecting a Zone† . . . . . . . . . . . . . . . . . . . . . . . . . 28
Selecting a Radio Channel† . . . . . . . . . . . . . . . . . . 29
Using Mode Select Feature . . . . . . . . . . . . . . . . . . 30
Saving a Zone and Channel to a Mode Select
Button† . . . . . . . . . . . . . . . . . . . . . . . . . . . . . . . . . .30
Receiving and Responding to a Radio Call . . . . . . 31
Receiving and Responding to a Call‡ . . . . . . . . . . .31
Receiving and Responding to a Private Call
(Trunking Only)†‡ . . . . . . . . . . . . . . . . . . . . . . . . . .32
Receiving and Responding to a Telephone Call
(Trunking Only)†‡ . . . . . . . . . . . . . . . . . . . . . . . . . .32
Making a Radio Call† . . . . . . . . . . . . . . . . . . . . . . . 33
Repeater or Direct Operation . . . . . . . . . . . . . . . . . 33
Monitoring Features†‡ . . . . . . . . . . . . . . . . . . . . . . 34
Monitoring a Channel . . . . . . . . . . . . . . . . . . . . . . .34
Conventional Mode Operation . . . . . . . . . . . . . . . .34
Advanced Features . . . . . . . . . . . . . . . . . . . . . 35
Advanced Call Features . . . . . . . . . . . . . . . . . . . . . 35
Receiving and Responding to a Selective Call
(Conventional Only)†‡ . . . . . . . . . . . . . . . . . . . . . .35
APX_3000_M1.book Page iv Tuesday, May 14, 2013 4:17 PM

Contents
English
v
Using the Dynamic Regrouping Feature (Trunking
Only)†‡ . . . . . . . . . . . . . . . . . . . . . . . . . . . . . . . . . .36
Requesting a Reprogram (Trunking Only)†‡ . . . . . 36
Classifying Regrouped Radios . . . . . . . . . . . . . . . . 37
Scan . . . . . . . . . . . . . . . . . . . . . . . . . . . . . . . . . . . . 37
Turning Scan On or Off‡ . . . . . . . . . . . . . . . . . . . . .37
Deleting a Nuisance Channel† . . . . . . . . . . . . . . . .38
Restoring a Nuisance Channel . . . . . . . . . . . . . . . .38
Call Alert Paging†‡ . . . . . . . . . . . . . . . . . . . . . . . . . 39
Receiving a Call Alert Page . . . . . . . . . . . . . . . . . .39
Emergency Operation†‡ . . . . . . . . . . . . . . . . . . . . . 39
Sending an Emergency Alarm . . . . . . . . . . . . . . . .40
Sending an Emergency Call (Trunking Only) . . . . .40
Sending an Emergency Alarm with Emergency
Call . . . . . . . . . . . . . . . . . . . . . . . . . . . . . . . . . . . . .41
Sending a Silent Emergency Alarm . . . . . . . . . . . .42
Using the Emergency Keep-Alive Feature . . . . . . .42
Man Down†‡ . . . . . . . . . . . . . . . . . . . . . . . . . . . . . . 43
Pre-Alert Timer . . . . . . . . . . . . . . . . . . . . . . . . . . . .44
Post-Alert Timer . . . . . . . . . . . . . . . . . . . . . . . . . . .44
Alerting Tones When Man Down Feature is
Triggered . . . . . . . . . . . . . . . . . . . . . . . . . . . . . . . . .44
Triggering Emergency . . . . . . . . . . . . . . . . . . . . . . .45
Exiting Man Down Feature . . . . . . . . . . . . . . . . . . .45
Re-Initiating Man Down . . . . . . . . . . . . . . . . . . . . . .45
Testing the Man Down Feature . . . . . . . . . . . . . . . .46
Secure Operations . . . . . . . . . . . . . . . . . . . . . . . . . 47
Selecting Secure Transmissions†‡ . . . . . . . . . . . . 47
Selecting Clear Transmissions†‡ . . . . . . . . . . . . . 47
Managing Encryption . . . . . . . . . . . . . . . . . . . . . . . 48
Loading an Encryption Key† . . . . . . . . . . . . . . . . . 48
Using the Multikey Feature . . . . . . . . . . . . . . . . . . 48
Erasing All the Selected Encryption Keys‡ . . . . . . 49
Requesting an Over-the-Air Rekey
(ASTRO Only)†‡ . . . . . . . . . . . . . . . . . . . . . . . . . . 49
MDC Over-the-Air Rekeying (OTAR) Page . . . . . 50
Infinite UKEK Retention . . . . . . . . . . . . . . . . . . . . 50
Hear Clear† . . . . . . . . . . . . . . . . . . . . . . . . . . . . . 50
Using Radio Kill‡ . . . . . . . . . . . . . . . . . . . . . . . . . . 51
Using Direct Kill . . . . . . . . . . . . . . . . . . . . . . . . . . 51
Trunking System Controls†‡ . . . . . . . . . . . . . . . . . . 51
Using the Failsoft System . . . . . . . . . . . . . . . . . . . 51
Going Out of Range . . . . . . . . . . . . . . . . . . . . . . . . 52
Using the Site Trunking Feature . . . . . . . . . . . . . . 52
Mission Critical Wireless
- Bluetooth® -†‡ . . . . . . . . . . . . . . . . . . . . . . . . . . 53
Turning the Bluetooth On . . . . . . . . . . . . . . . . . . . . 53
Turning the Bluetooth Off . . . . . . . . . . . . . . . . . . . . 53
Re-Pair Timer . . . . . . . . . . . . . . . . . . . . . . . . . . . . 53
Bluetooth Drop Timer . . . . . . . . . . . . . . . . . . . . . . . 54
Pairing the Bluetooth Device with Your Radio . . . . 55
Indicating the Bluetooth Connection is Lost . . . . . . 56
APX_3000_M1.book Page v Tuesday, May 14, 2013 4:17 PM

Contents
English
vi
Turning the Bluetooth Audio On (Routing the Audio
from Your Radio to the Headset) . . . . . . . . . . . . . . 56
Turning the Bluetooth Audio Off (Routing the Audio
from the Headset to Your Radio) . . . . . . . . . . . . . . 57
Adjusting the Volume of Your Radio from Bluetooth
Audio Device . . . . . . . . . . . . . . . . . . . . . . . . . . . . . 57
Clearing All Bluetooth Devices Information . . . . . . 57
Programming Over Project 25 (POP 25)
(ASTRO 25 and ASTRO Conventional) . . . . . . . . 58
Utilities . . . . . . . . . . . . . . . . . . . . . . . . . . . . . . . . . . 58
Flipping the Display on DRSM‡ . . . . . . . . . . . . . . . 58
Controlling the Display Backlight‡ . . . . . . . . . . . . . 58
Locking and Unlocking the Controls†‡ . . . . . . . . . . 59
Turning Voice Mute On or Off†‡ . . . . . . . . . . . . . . . 59
Using the Time-Out Timer . . . . . . . . . . . . . . . . . . . 59
Using the Conventional Squelch Operation
Features . . . . . . . . . . . . . . . . . . . . . . . . . . . . . . . . . 60
Analog Options . . . . . . . . . . . . . . . . . . . . . . . . . . . 60
Digital Options . . . . . . . . . . . . . . . . . . . . . . . . . . . . 60
Using the Digital PTT ID Feature‡ . . . . . . . . . . . . . 61
Using the Smart PTT Feature (Conventional
Only) . . . . . . . . . . . . . . . . . . . . . . . . . . . . . . . . . . . . 61
Voice Announcement† . . . . . . . . . . . . . . . . . . . . . . 62
Helpful Tips . . . . . . . . . . . . . . . . . . . . . . . . . . . .63
Troubleshooting . . . . . . . . . . . . . . . . . . . . . . . . . . . 63
Caring for Your Radio . . . . . . . . . . . . . . . . . . . . . . 64
Cleaning Your Radio . . . . . . . . . . . . . . . . . . . . . . . .65
Handling Your Radio . . . . . . . . . . . . . . . . . . . . . . . .65
Servicing Your Radio . . . . . . . . . . . . . . . . . . . . . . .66
Taking Care of the Battery†‡ . . . . . . . . . . . . . . . . . 66
Checking the Battery Charge Status . . . . . . . . . . . .66
LED and Sounds . . . . . . . . . . . . . . . . . . . . . . . . . .66
Fuel Gauge Icon . . . . . . . . . . . . . . . . . . . . . . . . . . .66
Battery Recycling and Disposal . . . . . . . . . . . . . . .67
Accessories . . . . . . . . . . . . . . . . . . . . . . . . . . . 68
Highlights for the Accessories . . . . . . . . . . . . . . . . 68
Appendix: Maritime Radio Use in the VHF
Frequency Range . . . . . . . . . . . . . . . . . . . . . . 69
Special Channel Assignments . . . . . . . . . . . . . . . . 69
Emergency Channel . . . . . . . . . . . . . . . . . . . . . . . .69
Non-Commercial Call Channel . . . . . . . . . . . . . . . .69
Operating Frequency Requirements . . . . . . . . . . . 70
Declaration of Compliance for the User of Distress
and Safety Frequencies . . . . . . . . . . . . . . . . . . . . 72
Glossary . . . . . . . . . . . . . . . . . . . . . . . . . . . . . . 73
Commercial Warranty . . . . . . . . . . . . . . . . . . . 77
APX_3000_M1.book Page vi Tuesday, May 14, 2013 4:17 PM

Important Safety Information
English
vii
Important Safety Information
RF Energy Exposure and Product Safety Guide
for Portable Two-Way Radios
ATTENTION!
This radio is restricted to Occupational use only.
Before using the radio, read the RF Energy Exposure and
Product Safety Guide for Portable Two-Way Radios
which contains important operating instructions for safe
usage and RF energy awareness and control for
Compliance with applicable standards and Regulations.
For a list of Motorola-approved antennas, batteries, and
other accessories, visit the following website:
http://www.motorolasolutions.com/APX
Under Industry Canada regulations, this radio transmitter may
only operate using an antenna of a type and maximum (or
lesser) gain approved for the transmitter by Industry Canada. To
reduce potential radio interference to other users, the antenna
type and its gain should be so chosen that the equivalent
isotropically radiated power (e.i.r.p.) is not more than that
necessary for successful communication.
This radio transmitter has been approved by Industry Canada to
operate with the Motorola-approved antenna types with the
maximum permissible gain and required antenna impedance for
each antenna type indicated. Antenna types not included,
having a gain greater than the maximum gain indicated for that
type, are strictly prohibited for use with this device.
APX_3000_M1.book Page vii Tuesday, May 14, 2013 4:17 PM

Software Version
English
viii
Software Version
All the features described in the following sections are
supported by the radio's software version R10.00.00 or
later.
Check with your dealer or system administrator
for more details of all the features supported.
Notice to Users (FCC and Industry Canada)
This device complies with Part 15 of the FCC rules and
RSS 210 of the Industry Canada rules per the conditions
listed below:
1 This device may not cause harmful interference.
2 This device must accept any interference received,
including interference that may cause undesired
operation.
3 Changes or modifications made to this device, not
expressly approved by Motorola, could void the user's
authority to operate this equipment.
APX_3000_M1.book Page viii Tuesday, May 14, 2013 4:17 PM

Informations importantes sur la sécurité
ix
Français Canadien
Informations importantes sur la
sécurité
Exposition aux radiofréquences et sécurité du
produit pour radios bidirectionnelles portatives
ATTENTION!
Cette radio ne doit être utilisée qu'à des fins
professionnelles. Avant d'utiliser la radio, lisez le guide
Exposition aux radiofréquences et sécurité du produit pour
radios bidirectionnelles portatives, qui contient d'importantes
instructions de fonctionnement pour une utilisation sécuritaire et
des informations sur l'exposition aux fréquences
radioélectriques afin d'assurer la conformité aux normes et
règlements applicables.
Pour obtenir une liste d'antennes et d'autres accessoires
approuvés par Motorola, consultez le site Web:
http://www.motorolasolutions.com/APX
Selon la règlementation d'Industrie Canada, cet émetteur radio
ne peut être utilisé qu'avec une antenne dont le type et le gain
maximal (ou minimal) sont approuvés par Industrie Canada
pour cet émetteur. Afin de limiter les interférences radio pour les
autres utilisateurs, le type et le gain de l'antenne doivent être
choisis de façon à ce que la puissance isotrope rayonnée
équivalente (P.I.R.E.) ne soit pas plus forte qu'il ne le faut pour
établir la communication.
Le présent émetteur a été approuvé par Industrie Canada pour
fonctionner avec les types d'antenne agréés par Motorola et
ayant un gain admissible maximal ainsi que l'impédance
requise pour chaque type d'antenne indiqué. Les types
d'antenne non inclus, dont le gain est supérieur au gain
maximal indiqué, sont strictement interdits pour l'exploitation de
l'émetteur.
APX_3000_M1.book Page ix Tuesday, May 14, 2013 4:17 PM

Version du logiciel
x
Français Canadien
Version du logiciel
Toutes les fonctionnalités décrites dans les sections
suivantes sont prises en charge par la version du logiciel
R10.00.00 ou ultérieure de la radio.
Vérifiez auprès de votre détaillant ou de l'administrateur
de système pour obtenir des renseignements sur les
fonctionnalités prises en charge.
Avis aux utilisateurs (FCC et Industrie Canada)
Cet appareil est conforme à la Partie 15 des règlements
de la FCC et RSS 210 du règlement d'Industrie Canada
selon les conditions énumérées ci-dessous:
1 Ce dispositif ne doit pas causer d'interférences
nuisibles.
2 Cet appareil doit accepter toute interférence reçue, y
compris les interférences qui peuvent perturber le
fonctionnement.
3 Les changements ou les modifications apportées à ce
dispositif, non expressément approuvées par Motorola,
peuvent annuler le droit de l'utilisateur à utiliser cet
équipement.
APX_3000_M1.book Page x Tuesday, May 14, 2013 4:17 PM

Computer Software Copyrights
English
xi
Computer Software Copyrights
The Motorola products described in this manual may
include copyrighted Motorola computer programs stored
in semiconductor memories or other media. Laws in the
United States and other countries preserve for Motorola
certain exclusive rights for copyrighted computer
programs, including, but not limited to, the exclusive right
to copy or reproduce in any form the copyrighted
computer program. Accordingly, any copyrighted
Motorola computer programs contained in the Motorola
products described in this manual may not be copied,
reproduced, modified, reverse-engineered, or distributed
in any manner without the express written permission of
Motorola. Furthermore, the purchase of Motorola
products shall not be deemed to grant either directly or by
implication, estoppel, or otherwise, any license under the
copyrights, patents or patent applications of Motorola,
except for the normal non-exclusive license to use that
arises by operation of law in the sale of a product.
Documentation Copyrights
No duplication or distribution of this document or any
portion thereof shall take place without the express
written permission of Motorola. No part of this manual
may be reproduced, distributed, or transmitted in any
form or by any means, electronic or mechanical, for any
purpose without the express written permission of
Motorola.
APX_3000_M1.book Page xi Tuesday, May 14, 2013 4:17 PM

Disclaimer
English
xii
Disclaimer
The information in this document is carefully examined,
and is believed to be entirely reliable. However, no
responsibility is assumed for inaccuracies. Furthermore,
Motorola reserves the right to make changes to any
products herein to improve readability, function, or
design. Motorola does not assume any liability arising out
of the applications or use of any product or circuit
described herein; nor does it cover any license under its
patent rights, nor the rights of others.
APX_3000_M1.book Page xii Tuesday, May 14, 2013 4:17 PM

Getting Started
English
1
Getting Started
Take a moment to review the following:
How to Use This Guide . . . . . . . . . . . . . . . . . . . . . . . . . page 1
Notations Used in This Manual . . . . . . . . . . . . . . . . . . . page 1
Additional Performance Enhancement . . . . . . . . . . . . . page 2
What Your Dealer/System Administrator
Can Tell You. . . . . . . . . . . . . . . . . . . . . . . . . . . . . . . . page 3
How to Use This Guide
This User Guide covers the basic operation of the APX™3000
Portables.
However, your dealer or system administrator may have
customized your radio for your specific needs. Check with your
dealer or system administrator for more information.
Notations Used in This Manual
Throughout the text in this publication, you will notice the use of
WARNING, Caution, and Note. These notations are used to
emphasize that safety hazards exist, and the care that must be
taken or observed.
An operational procedure, practice, or condition,
etc., which may result in injury or death if not
carefully observed.
An operational procedure, practice, or
condition, etc., which may result in damage
to the equipment if not carefully observed.
Note:
An operational procedure, practice, or condition,
etc., which is essential to emphasize.
!!
!
APX_3000_M1.book Page 1 Tuesday, May 14, 2013 4:17 PM

Getting Started
English
2
Additional Performance Enhancement
The following are some of the latest creations designed to
enhance the security, quality and efficiency of your radios.
Dynamic System Resilience (DSR)
DSR ensures your radio system is seamlessly switched to a
backup master site dynamically in case of system failure.
DSR also provides additional indication e.g. failure detection,
fault recovery, and redundancy within the system to address to
you who is in need. Mechanisms related to the Integrated Voice
and Data (IV & D) or data centric are all supported by DSR.
CrossTalk Prevention
This feature prevents crosstalk scenario from happening,
especially when a wideband antenna is used. This feature
allows the adjustment of the Trident Transmitting SSI clock rate
in your radio to be varied from the Receiving Frequency. This
subsequently reduced the possibilities of radio frequency
interfering spurs and prevents the issues of crosstalk.
Encrypted Integrated Data (EID)
EID provides security encryption and authentication of IV & D
data bearer service communication between your radio and the
Customer Enterprise Network.
SecureNet
SecureNet allows you to perform secured communications on
an Analog or Motorola Data Communication (MDC) channel.
The MDC OTAR feature will allow you to perform OTAR
activities on an MDC channel.
APX_3000_M1.book Page 2 Tuesday, May 14, 2013 4:17 PM

Preparing Your Radio for Use
English
3
What Your Dealer/System Administrator
Can Tell You
Check with your dealer or system administrator for the correct
radio settings, if your radio is to be operated in extreme
temperatures (less than -30 °C or more than +60 °C), to ensure
proper operation.
You can also consult your dealer or system administrator about
the following:
• Is your radio preprogrammed with any preset conventional
channels?
• Which buttons have been preprogrammed to access other
features?
• What optional accessories may suit your needs?
Preparing Your Radio for Use
APX 3000 is a small body radio meant to work together with
other light weight accessories such as Mission Critical Wireless
Remote Control Unit (RCU), headset and pod in order to
interact with you efficiently.
IMPORTANT!
1 Your radio has a Voice Announcement feature
(programmable) which provides audible status
updates of your radio function through the speaker
microphone, earpiece or headset. This helps to
confirm the changes you have made when interacting
with your radio in covert. See Voice Announcement†
on page 62 to learn how this feature works.
2 You must connect a GCAI Display Remote Speaker
Microphone (DRSM) to see the radio status
displayed in words or icons. Most of these radio
statuses are mentioned in the content across this
manual.
APX_3000_M1.book Page 3 Tuesday, May 14, 2013 4:17 PM

Preparing Your Radio for Use
English
4
Throughout the text in this publication, notice the use of the
symbols shown below. They are to remind you that an external
accessory is required to see or hear the indications of your radio
during an operation procedure, practice, or condition etc.,
which:
The application of these accessories are optional. Consult your
agent for the most suitable features and accessories required
for you to work with this radio.
Assemble your radio by following these steps:
Charging the Battery . . . . . . . . . . . . . . . . . . . . . . . . . . . page 5
Battery Charger . . . . . . . . . . . . . . . . . . . . . . . . . . . . . page 5
Attaching the Battery‡ . . . . . . . . . . . . . . . . . . . . . . . . . . page 5
Installing the Antenna . . . . . . . . . . . . . . . . . . . . . . . . . . page 6
Attaching the Accessory Connector Cover . . . . . . . . . . page 7
Installing Accessories with GCAI Connector . . . . . . . . . page 7
Turning On Your Radio‡ . . . . . . . . . . . . . . . . . . . . . . . . page 8
Adjusting the Volume† . . . . . . . . . . . . . . . . . . . . . . . . . . page 9
Pairing Radio with Pod and Earpiece†‡ . . . . . . . . . . . . page 9
Pairing Radio with Mission Critical Remote Control
Unit (RCU) . . . . . . . . . . . . . . . . . . . . . . . . . . . . . . . . . . page 10
Using the Carry Holster . . . . . . . . . . . . . . . . . . . . . . . . page 11
Inserting to the Carry Holster . . . . . . . . . . . . . . . . . . page 11
Removing Your Radio from the Carry Holster . . . . . page 11
Tying Your Radio and Flexible Antenna to Your Body . page 12
Positioning Your Radio and Devices on Your Body . page 13
Installing the Flexible Antenna . . . . . . . . . . . . . . . . . page 13
†
Requires to connect a speaker microphone,
earpiece or headset to your radio to hear the
audio tones or announcements.
‡
Requires to connect a DRSM to your radio to
read the strings or indications displayed on your
radio.
APX_3000_M1.book Page 4 Tuesday, May 14, 2013 4:17 PM
/