Page is loading ...

1
395 x 390 x 840
11Kg
15Kg
3
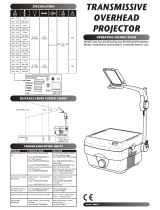
TRANSMISSIVE
OVERHEAD
PROJECTOR
TRANSMISSIVE
OVERHEAD
PROJECTOR
OPERATING INSTRUCTIONS
Thank you for purchasing our Overhead Projector.
Please read these instructions carefully before use.
DISTANCE FROM SCREEN CHART
3.67m
1.99m
1.45m
3.0m
1.5m 1.0m
317mm (12½”)
Single/Triple
Element Lens
A1/223
24V 250W
3.15A
5 x 20mm
A1/239
36V 400W
6.3A
5 x 20mm
8.0A
5 x 20mm
HMP 575
230V
808... - 230
911... - 240 230V U.K.
230V U.K.
230V U.K.
230V U.K.
230V U.K.
912... - 240
914... - 240
924... - 240
808... - 240
SPECIFICATION
Part No.- 21075/3
Kg
FEATURES
M
N
K
On/Off Switch
Euro Plug Socket
Fringe Control
Lamp Change
Outlet Socket
Economy Switch
H
J
K
L
M
N
A
B
C
D
E
F
G
Mirror
Drive Unit Wheel
Column
Column Release Catch
Platform Release
Platform
Head Unit
A
H
K
L
J
G
C
B
D
E
F
K

1
UNPACKING, ASSEMBLY & SET UP
3
2
4
5
UNPACKING & ASSEMBLY
SET UP
MAINTENANCE & CARE
REPLACING THE FUSE
REPLACING THE LAMP
CLEANING
FEATURES
SAFE GUARDS
1)
2)
3)
1)
2)
The Euro-socket is fitted with a fuse. If you suspect a blown fuse the procedure for replacement
is as follows:-
1)
2)
3)
4)
5)
1)
2)
3)
4)
5)
6)
7)
8)
9)
10)
11)
Periodic cleaning of the OHP is recommended as some components may have their
performance impaired by environmental conditions. The following procedure should be
followed:-
1)
2)
3)
4)
5)
6)
7)
1)
2)
3)
4)
5)
6)
1)
2)
3)
4)
5)
6)
7)
8)
9)
10)
11)
12)
YOUR PROJECTOR IS NOW READY TO BE SWITCHED ON.
WARNING! - THIS APPLIANCE MUST BE EARTHED.
IF IN DOUBT CONSULT A QUALIFIED ELECTRICIAN
Carefully remove OHP from packaging. (Complete and return guarantee card. UK only).
Turn knob (C) clockwise to move the head unit (B) away from the OHP body. Raise
column (D) to the vertical position ensuring column release catch (E) is fully engaged.
Rotate head unit until in horizontal position. To lower the column (D) back to the
transportation position, rotate head unit to inverse position, lift column release catch (E)
and lower column until securely held by retainer.
Raise mirror (A) to approximately 45° until engaged (see diagram 3 for correct position).
Firmly insert cable (diagram 5) into OHP socket (diagram 4) and connect to electricity
supply.
Switch projector on using ON/OFF switch (H). Move projector forward or backward to
obtain the desired picture projection size.
Place transparency on platform (G) and turn drive unit wheel (C) clockwise or
anticlockwise until projected image is clear and sharp.
Switch off OHP at ON/OFF switch (H) and at mains socket.
Disconnect the Euro-plug from the Euro-socket.
Pull out the fuse drawer (diagram 4).
Lift out suspect fuse and replace with another of the specified type.
Close fuse holder draw. Reconnect Euro-plug to Euro-socket. The OHP is now ready for use
Switch off OHP at ON/OFF switch (H) and at mains socket.
Disconnect the Euro-plug from the Euro-socket.
Allow OHP to cool before attempting lamp replacement.
Open platform using platform release (F).
Lift condenser lens & plate (where applicable) which is situated above the lamps.
Remove the lamp from the lamp holder and discard of properly.
WARNING - Beware of sharp edges on the surrounding metalwork.
Install a new lamp of the specified type using the handling procedures described by the
lamp manufacturer.
Confirm lamp element is positioned centrally over the lamp box mirror and adjust
appropriately.
Close the condenser lens & plate firmly and ensure it is lying flat (where applicable).
Close the platform and reset the lamp change slider to position “lamp 1” (where applicable).
Reconnect the Euro-plug. The OHP is now ready for use.
Switch off OHP at ON/OFF switch (H) and at mains socket.
Disconnect the Euro-plug from the Euro-socket.
Allow OHP to cool.
Head unit - the mirror surface (A) should be wiped with a soft, lint free cloth.
N.B. - avoid scratching the mirrors surface.
The Glass lens should be wiped with a soft, lint free cloth.
The top surface of the platforms glass area (G) may be cleaned with a soft cloth and a mild
non-abrasive cleaning solution.
Fresnel lens - open the platform (G) using the platform release (F). The fresnel lens
is the large semi transparent plastic area with concentric circles mounted on the underside
of the platform. Press back the retaining clips on one edge of the fresnel lens and lift it out
taking extreme care not to scratch the lens surface. Gently clean both surfaces of the lens
with a soft, clean lint free cloth. The under side of the platform glass may also be cleaned at
this point (refer to 6). Insert the fresnel back into the platform ensuring it is the same way
around prior to removal and properly seated.
ON/OFF switch (H).
Economy switch (N) (where applicable) used to dim the light output of the lamp and
prolong lamp life. Switch should be engaged not less than 30 seconds after powering up
projector.
Platform release button (F) allows the platform to be opened and access to the interior of
the machine for lamp replacement (and fringe control setting on certain 911 models).
WARNING - switch off machine and allow to cool before changing lamps or altering
internal fringe control settings.
Lamp change (L) (where applicable) allows immediate replacement with a second lamp if
lamp one should fail by sliding lever/slider across.
Fringe control (K) (where applicable) allows the elimination of brown/yellow or blue
colouration (fringing) from the edge of a focused picture.
Outlet socket (M) (where applicable) is ideal for use with LCD Panels, reducing the number
of cables running to the OHP.
DO NOT obstruct the air vents.
DO NOT leave the OHP unattended when switched on, especially when the OHP is used
near children.
DO NOT touch any part of the OHP that may become hot.
DO NOT touch any parts of the OHP if the power cables are damaged or if the OHP has
been dropped and damaged in any way. In these circumstances a qualified person should
check the OHP before use.
DO NOT leave the power cable where it can be tripped over or pulled. Make sure it does
not come into contact with any hot surfaces such as pipes or radiators. Make sure the
cable is not squashed or pinched.
DO NOT leave the OHP plugged in when not in use. Always unplug before cleaning or
servicing.
DO NOT immerse OHP in water or other liquids.
DO NOT store in direct sunlight.
DO NOT leave OHP switched on with mirror plate (A) in the down/closed position.
ONLY use the OHP for the intended purpose.
ONLY use the mains outlet socket (N) (where applicable) for LCD panels.
ONLY replace failed components with those of the recommended type.
/