Page is loading ...

Model:
AWD001
PLEASE READ ALL INSTRUCTIONS BEFORE USE
REMOVES IMPURITIES FROM
YOUR TAP WATER
Aqua Otima is a unique water ltration system that has been developed to deliver the
purest ltered water quickly - removing high level of herbicides, pesticides, lead, chlorine and
limescale.
INSTRUCTIONS
AWD001_IM_without_elec-timer_JULY2011.indd 1 2013/07/11 09:52:55 AM

Handle
Fig.1
Fig.5
Fig.4
Fig.3
Fig.2
1.
Lid
rim
lter holder
water
tank
cooling
unit
light
spout
drain
plug
seal
tab
buldge
buldge
unlock
water
lter
lter
holder
lter
holder
slots
lugs
seal
insert coin
and unscrew
tap
underneath cooling unit
tab
seal
tab
bulge
bulge
lock
water
lter
lter
holder
tab
AWD001_IM_without_elec-timer_JULY2011.indd 2 2013/07/11 09:52:56 AM

ATTENTION
2.
Read the instructions and keep them safe. If you pass the water cooler on to anyone else, pass the
instructions on also. Remove all packaging before using the water cooler, but keep it until you are
satised that the water cooler is working.
AQUA OPTIMA™
You can nd more information about AQUA OPTIMA™ lter cartridges in the AQUA OPTIMA™
brochure supplied with the lter, or by visiting www.aqua-optima.co.za
Important safeguards
Follow basic safety precautions, including:
1. This appliance must only be used by or under the supervision of a responsible adult.
Use and store the appliance out of reach of children.
2. Don’t put the water cooler, cable or plug in any liquid; don’t use the water cooler in
a bathroom, near a source of water, or outdoors.
3. Place the water cooler on a stable, level surface.
4. Leave a space of at least 50mm (2
inches) all round the water cooler.
5. Route the cable so that it doesn’t hang over the edge of the counter to avoid it being pulled or
tripped over.
6. This appliance must not be operated by an external timer or remote control system.
7. Fill only with fresh, cold, tap water. Consume the ltered water within two days.
8. To avoid interference with the internal fan, do not allow anything to enter the grille at the rear.
9. The water cooler should be emptied and cleaned every 3 weeks.
10. Any water to be used in the preparation of baby food should be boiled after it has been ltered.
11. Don’t move or carry the water cooler unless it is empty.
12. Don’t use the water cooler for any purpose other than ltering and cooling fully treated tap
water supplied by the water authority.
13. Don’t use the appliance if it is damaged or has malfunctioned.
14. If the cable is damaged the appliance must be returned to avoid a potential hazard. Do not have it
repaired by anyone who is not an authorised service agent, as this will void the guarantee.
HOUSEHOLD USE ONLY
Water Filter
The water lter contains an ion exchange resin and activated carbon to reduce the amount of
calcium carbonate (limescale), chlorine, herbicides pesticides, fertilizers, bacteria, particles (e.g. sand,
rust), odours, etc.
Hot or Cold?
*You can use the water from the cooler in your kettle/coffee machine for hot drinks, to improve their
taste.
Before using the water cooler for the rst time
• Remove all packaging from the water cooler.
• Use the handle to lift the lid off the lter holder (Fig. 1).
• Removing the lter holder will need two hands – put the thumbs inside the walls of the lter
holder, put the ngers on the outside of the rim, and gently lift upwards.
• Turn to ‘care and maintenance’ on page 5 and clean the water cooler to remove any dust
that may have accumulated during transit, then follow the instructions below, but skip the section
about removing the old lter.
AWD001_IM_without_elec-timer_JULY2011.indd 3 2013/07/11 09:52:56 AM

Preparing a new lter
• Remove all packaging from the water lter.
• Do not worry about the black carbon particles on the packaging or lter, they are harmless.
• Wipe the outside of the water lter with a damp cloth.
• Do not use washing liquid, or anything that might taint the water.
• For the lter to perform at its best, all air bubbles must be removed before use.
• Submerge the water lter in a bowl of cold water and shake it
gently. When no more bubbles are released, the water lter is ready for use.
• You might see black carbon particles in the water. Again, don’t worry as they are harmless.
Removing the old water lter
• Use the handle to lift the lid off the lter holder (Fig.1)
• Removing the lter holder will need two hands – put the thumbs inside the walls of the lter
holder, put the ngers on the outside of the rim, and gently lift upwards.
• Don’t turn the lter holder upside down. Try to keep the lter upright at all times.
• Grip the bottom of the lter with the other hand.
• Turn the lter clockwise (about 1.5cm), to bring the tabs on the top of the lter into the bulges
at the sides of its holder, then bring the lter down and out of the lter holder.
• Gently ease the seal off the underside of the water tank (Fig.3)
• Clean the seal and water tank with a damp cloth. Don’t use washing-up liquid, or anything that
might taint the water.
• Fit the seal snugly to the underside of the lter holder. The lugs in the bottom of the lter holder
t into the slots in the seal (Fig.3).
Fitting the new lter
• Align the tabs on the top of the lter with the bulges on the underside of the lter holder.
• Lift the lter up and into its holder, push it gently against the seal, and turn it anticlockwise
(about 1.5cm) to lock it into the lter holder.
• Lower the lter holder into the water tank.
Filling the water tank
• Lift the lid off the lter holder (if it’s not already off).
• Use a jug to pour water into the lter holder. If you don’t have a big enough jug, clean out your
electric kettle and use that – most kettles hold about 1.7litres. Two jugs, two kettles, or a jug and
a kettle makes life even easier.
* Don’t pour directly on to the lter.
Air Locks
• To prevent air locks in the cooling unit (underneath the water tank) you need to keep the tap
open while you’re lling the water tank, so that the incoming water drives the air out.
• Put a container that holds at least a litre under the spout.
• If the container is tall enough, use it to push the tap back against the wall of the cooler. If not
you’ll have to hold the tap open with a nger.
• Either way, push the tap back against the wall of the cooler and keep it there.
• Pour water into the top of the lter holder.
• Keep pouring until about
to litre comes out of the spout, then let the tap close.
• That should be enough to clear all air out of the system.
• With the tap closed, keep pouring into the lter holder until the water tank is full, and the lter
holder is full to within about a centimeter of the rim.
• Water ow through the lter will get slower, as the water tank and the lter ll up.
• Put the lid on – the edges of the lid should be just clear of the water.
3.
AWD001_IM_without_elec-timer_JULY2011.indd 4 2013/07/11 09:52:56 AM

Power up
• Put the plug into the wall socket (switch the socket on if it’s switchable).
• The light will come on, and the fan will start up - you may hear it in the background.
• Initially, the light will be deep blue. It’ll change to pale blue or white when the water in the cool-
ing unit has reached drinking temperature. This takes about an hour and a half, depending on local
conditions (temperature, humidity/pressure).
Using the tap
• Wait till the light has changed from deep blue to pale blue or white before taking water from the
cooler.
• Hold a suitable container against the tap to allow the water to ow.
• As you take water from the cooling unit, it’s replaced by water from the water tank, so the light
may turn deep blue again.
• The cooling unit holds about 1.2 litres of water, and the layer of water at the bottom of the
water tank, just above the cooling unit, will be almost as cold, so you can probably take about a
litre and a half before the colder water runs out.
• If you empty the cooling tank, wait until the light turns pale blue/white before taking any more.
4.
Topping up
• You may top the water up at any time, you don’t need to keep the lter submerged.
• Try to keep the water level at least half way up to the water tank, as the head of the water in the
water tank provides the force that dispenses the water through the spout.
• If the water level falls below the bottom of the water tank, the spout will dry up.
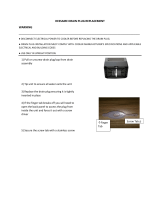
Emptying
There’s a drain plug underneath the cooling unit which must be unscrewed to empty the cooling unit
of the last 1.2 litres of water (Fig.5).
a) Use up all the water in the water tank, and let it run dry.
b) Unplug the cooler.
c) Remove the lid, and lift out the lter holder (leave the lter attached to it).
d) Carry the cooler into the kitchen (carry it empty – when the cooler is full, the water
alone weighs 7kg).
e) Support the cooler with one arm, rest the bottom edge of the cooler on the edge of the
kitchen sink, so that the drain plug is over the sink.
f) Use a coin to unscrew the drain plug.
g) When it’s empty, screw the drain plug back in, and wipe off any spillage.
AWD001_IM_without_elec-timer_JULY2011.indd 5 2013/07/11 09:52:56 AM

Low usage
If you don’t use enough water to top the cooler up at least once a day, we suggest that you empty the
cooler completely at least once a week, and clean it out- see ‘care and maintenance’ below.
Care and maintenance
• Don’t put any part of the appliance in a dishwasher – the harsh environment inside the
dishwasher will affect the nishes.
• Do not use harsh or abrasive cleaning agents or solvents.
1. Unplug the cooler
2. If it’s not already empty, empty the water tank via the tap and spout.
3. Remove the lter from the lter holder, then carefully remove the seal from the lter
holder.
4. Wipe the lter, seal, lter holder, lid, and the inside of the water tank with a clean damp cloth.
5. Don’t use washing up liquid or anything else that might taint the water.
6 . Wipe the outside surfaces of the cooler with a clean damp cloth. If necessary, use a little
household detergent but make sure it has been washed off afterwards to avoid tainting the water.
7. Replace the seal, then replace the lter in the lter holder.
8. Replace the lter holder in the water tank.
9. Fill the water tank and the lter holder to within 1cm of the top of the lter holder and replace
the lid.
10. Empty the water tank via the tap and spout, to ush out the cooling unit.
11. Fill the water tank and lter holder to within 1cm of the top of the lter holder and replace the
lid.
12. Plug the cooler into the wall socket, and leave it for 90minutes, when the light turns pale blue
to white, the water should be chilled.
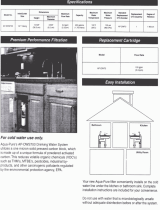
Replacement lters
You can purchase replacement lter at leading retailers nationally. Visit www.aqua-optima.co.za or call
086 111 5006 for more information.
Service
This product has no user serviceable parts. If the product is not working read the instructions again,
check the plug fuse and main fuse/circuit breaker. If the product will still not work please call cus-
tomer care.
Customer care service help line: 086 111 5006
5.
AWD001_IM_without_elec-timer_JULY2011.indd 6 2013/07/11 09:52:56 AM

6.
AWD001_IM_without_elec-timer_JULY2011.indd 7 2013/07/11 09:52:56 AM

Strix Model SWP320 is
NSF International against
NSF/ANSI Standard 42 for
material requirements only.
MODEL:
AWD001
www.aqua-optima.co.za
AWD001_IM_without_elec-timer_JULY2011.indd 8 2013/07/11 09:52:58 AM
/