Promaster Studio Flash Kit-Basic 3 light Owner's manual
- Category
- Camera flashes
- Type
- Owner's manual
This manual is also suitable for

SystemPRO 160A Studio Flash
OWNER’S MANUAL
This document contains important safety and operating instructions for the PROMASTER SystemPRO 160A
Studio Flash. Please read and follow all instructions before installation or making adjustments to the equipment.
Safety Precautions
1.
Before using the flash, make sure that your lighting equipment is plugged into a 110 volt AC power source.
2. Do not expose your lighting equipment to sunlight, moisture, dust, dirt, rain or water.
3. Any exposure to chemical solutions, gasoline, grease, oil, paint, or detergents can result in permanent
damage to your equipment.
4. Do not insert any metal objects into your lighting equipment.
5. Do not touch or handle equipment with wet hands or allow your equipment to be in contact with water.
6. Be sure to disconnect from the power supply when the light is not in use.
7. Do not attempt to repair your lighting equipment yourself.
8. This flash has an over frequency protection circuit. Rapid continuous firing of your flash will cause an audible
alert. Continued rapid firing after the audible alert will cause the flash to cease operation and trigger a “cool
down” period of approximately 10 seconds. After this period the flash will resume operation. You may also
Reboot the flash by cycling the power of and then on.
Tips for Use
1.
Keep the internal surface of the reflector clean. Wipe off dust with a soft cloth after turning the power off.
2. Turn the power off and store your equipment in a dry place when it is not in use.
Introduction
The SystemPRO 160A Studio Flash is a valuable tool for both professional and amateur photographers.
Standard features include color-temperature corrected circular flash tube (5600k), fixed reflector providing a large
lighting-coverage and even lighting effects, continuous power level adjustment , remote slave sensor, audible
flash ready signal, built-in umbrella holder, and adjustable dual-locking flash mount.
Specifications
Power Input:
AC110 volt, 60Hz Flash Power: 160ws (joule) in full Recharge Time: 0.5-3 seconds in
full.
Flash-tube Lifetime: over 8,000 typical flash Fuse: 5A
Power Setting: 1/16 to full
continuously
Color Temperature: 5600K Guide No.: 120ft/36m ISO100
Flashing Duration: 1/600 sec. @t=0.1; 1/1000 sec. @t=0.5 Slave Effectiveness: 10m; 35ft
Lighting Range: 55 degree Modeling Power: Halogen 75w Bulb Base: E-14 screw
Synch Voltage: 6volt
Dimension:4"×7-1/2"(100mm×195mm)
Weight: 1.8Lb (800g)
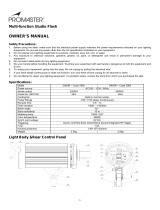
Control Panel
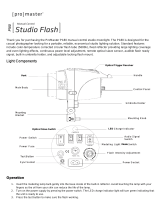
(1) Power supply indicator
(2) Ch
arge indicator
(3) Slave sensor
(4) General power on/off switch
(5) Safety fuse
(6) Synch cord base
(7) Output power setting for flash & modeling bulb
(8) On/off switch for modeling bulb
(9) On/off switch for audio signal
(10) Test button for flash
(11) Umbrella holder
(12) Angle adjustable handle

(13) Stand mounting bolt
Operation
1.
Screw the modeling bulb gently into the base inside of the built-in reflector.
2. Turn on the power supply by pressing the power button (4). The power indicator light (2) will turn red
indicating that the unit is ready to use.
3. Press the test button (10) to make sure the flash working.
4. Use the output power setting button (7) to select desired exposure.
5. Link the flash unit to your camera using a synch cord or use the built-in slave sensor to trigger the flash.
6. Slide the audio signal switch (9) to the right (on position) to activate the audible flash ready signal.
When the audio signal switch is set to off (to the left) the audible flash ready signal is disabled.
Package includes:
1 – PROMASTER Syste
mPRO 160A flash
1 – Synch cord
1 – Flash tube
1 – 75w halogen modeling lamp
1 – Owners manual
-
 1
1
-
 2
2
Promaster Studio Flash Kit-Basic 3 light Owner's manual
- Category
- Camera flashes
- Type
- Owner's manual
- This manual is also suitable for
Ask a question and I''ll find the answer in the document
Finding information in a document is now easier with AI
Related papers
-
 Promaster P180 Owner's manual
-
 Promaster P180 User manual
-
 Promaster Compact Umbrella Owner's manual
-
 Promaster Studio Flash User manual
-
 Promaster SystemPro Lite Tent Owner's manual
-
 Promaster SM300 Studio Monolight Owner's manual
-
 Promaster SM180 Studio Monolight User manual
-
 Promaster D400R Studio Flash Owner's manual
-
 Promaster PL400 Advanced LCD Control Studio Flash Owner's manual
-
 Promaster PL400 Digital LCD Control Studio Flash Owner's manual
Other documents
-
 WalimexPro VC-1000 Instuction Manual
-
 Square SP4200 User manual
-
 Photogenic Professional Lighting PLRX1000DR User manual
-
Starblitz Kit studio 2x400W Owner's manual
-
Godox AD600M Owner's manual
-
 Linkstar 564321 User manual
-
Godox Pocket Flash AD200Pro User manual
-
Godox Pocket Flash AD200 User manual
-
 Photogenic Professional Lighting PM800 User manual
-
Cheetah cl-360x User manual


