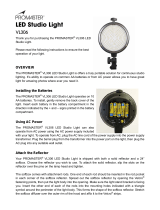
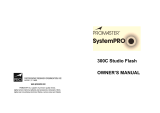
Promaster Studio Flash User manual
- Category
- Camera flashes
- Type
- User manual
This manual is also suitable for

300C Studio Flash
OWNER’S MANUAL

Safety Precautions
1. Before using the flash, make sure that your lighting
equipment is plugged into a 110 volt AC power source. Do
not use any power supply other than the AC specification
indicated on your equipment.
2. Do not expose the equipment to sunlight, moisture, dust,
dirt, rain or water.
3. Any exposure to chemical solutions, gasoline, grease, oil,
paint, or detergents can result in permanent damage to
your equipment.
4. Do not insert any metal objects into your lighting
equipment.
5. Do not touch or handle equipment with wet hands or allow
your equipment to be in contact with water.
6. Do not keep the power on when the light is not in use.
7. Do not attempt to repair your lighting equipment yourself. If
a problem arises, contact the store from which you
purchased the light.
8. If the audible flash ready signal buzzes for a long period of
time or there is no response from your flash, please
disconnect your flash from the power supply and
reconnect.
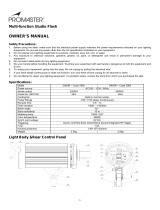
Specifications:
Power Supply: AC100130volt 50/60Hz
Strobe output: 300WS
Guide No. (ISO100): 54m
Cooling Fan: Built-in Mini Fan Cooler
Power Setting: 1/32 to 1/1 continuously
Recycle Time: 0.5–2.5s
Flash Duration: 1/1500–1/800s
Recycle Indication: Ready Light & Audio Signal &
Modeling Lamp
Flash Beam Width: Over 55 Degree
Slave Sensitivity: Over 33ft. Radius,360 Degree
Modeling Lamp: Diffused Halogen Quartz 150W/E27
Color Temperature: 5600K
Synch Cord Voltage: 6VDC
Triggering: Synch Cord, Test Button & Slave Sensor
Fuse: 10A
Housing Size: 136mm127mm320mm
Body Weight: 2.2kg

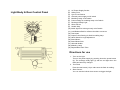
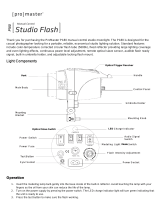
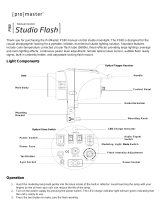
Light Body & Rear Control Panel
(1) AC Power Supply Socket
(2) Safety Fuse
(3) Synch Cord Socket
(4) General power supply on/off switch
(5) Modeling Lamp on/off switch
(6) Power setting for modeling lamp on/off switch
(7) Recharge Ready-Light
(8) Slave Sensor
(9) Handle Grip
(10) Audio signal for recharge ready on/off switch
(11) Lock/Release Bolt for reflector & softbox connector
(12) Test button
(13) Output Power Setting for flash/ modeling lamp
(14) Hand Wheel for angle adjustment
(15) Stand Mount
(16) Stand Mount Bolt
(17) Umbrella Holder
(18) Modeling Lamp
(19) Replaceable Flash Tube
Directions for use
1 Turn on the Light
Turn on the power supply by pressing down the power button
(4). The recharge ready light (7) will turn red light when the
flash has been fully charged.
2 Test Flash
Press the test button (12) to make sure the flash is working.
3 Slave Sensor
You can use the built-in slave sensor to trigger the light.

4. Synch Cord
Link the studio flash to your camera with a synch cord to
trigger the light. You may also use the built-in slave sensor to
trigger your flash.
5. Audio Signal
Setting the audio signal button (10) to the ON (I) position will
activate an audio signal to remind you when the flash has
been fully recharged. Set the button to the OFF (O) position
will disable the audible signal.
6. Modeling Lamp
To turn the lamp off, set the switch (5) to “0”. When set to "=",
the modeling lamp is on at full power. When set to the "-"
position, the modeling lamp varies in brightness as you turn
the output control button (13). Press the DIM switch (6) to the
"I" position and the modeling lamp will turn itself off when the
flash is fired and then will turn on automatically when the flash
is fully charged.
7. Adjust Output Power for Flash
Use the flash power adjustment knob (13) for the desired
exposure. The power level can be set continuously from 1/32
to full power.
8. Attaching the Reflector
The reflector has 3 pins around the perimeter of its base. Line
these pins up with the corresponding notches in the flash head
front collar. Rotate the reflector clockwise until it locks into
position To remove the reflector, push the locking lever on the
top of the flash head and rotate the reflector counter clockwise,
then pull it way from the flash head.
9. Replacing flash tube
Wear gloves whenever removing the flash or modeling lamp.
When replacing the flash tube, first remove the modeling lamp,
then insert the flash tube. DO NOT TOUCH the anode OR
cathode of the flash tube.
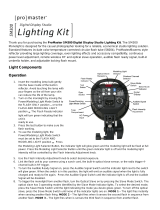
Package includes:
Description QTY
PROMASTER SystemPRO 300C Flash 1
15' Power Cable 1
15' Synch Cord 1
7" Standard Reflector 1
150W Modeling Lamp 1
Protective Cover 1
Owner’s Manual 1
-
 1
1
-
 2
2
-
 3
3
-
 4
4


Promaster Studio Flash User manual
- Category
- Camera flashes
- Type
- User manual
- This manual is also suitable for
Ask a question and I''ll find the answer in the document
Finding information in a document is now easier with AI
Related papers
-
 Promaster SM300 Studio Monolight Owner's manual
-
 Promaster Studio Flash Owner's manual
-
 Promaster P180 Owner's manual
-
 Promaster P180 User manual
-
 Promaster D400R Studio Flash Owner's manual
-
 Promaster LED Studio Light User manual
-
 Promaster LED Studio Light User manual
-
 Promaster PRM1000 Remote Studio Monolight Owner's manual
-
 Promaster Studio Flash Kit-Deluxe 2 light Owner's manual
-
 Promaster Compact Umbrella Owner's manual


Other documents
-
Starblitz Kit studio 2x400W Owner's manual
-
 Linkstar 564321 User manual
-
Elinchrom 1000 User manual
-
 Square SP4200 User manual
-
Metz CL-1 User manual
-
Profoto D1 500 User manual
-
 Photogenic Professional Lighting PLRX1000DR User manual
-
Godox AD600M Owner's manual
-
 Photogenic Professional Lighting PM800 User manual
-


