
DG-BG4300N
300Mbps Wireless ADSL2/2+
Broadband Router
User Manual
V1.0
2011-12-01
As our product undergoes continuous development the specifications are subject to change without prior notice

DG-BG4300N User Manual
COPYRIGHT
Copyright © 2011 by this company. All rights reserved. No part of this publication may be
reproduced, transmitted, transcribed, stored in a retrieval system, or translated into any
language or computer language, in any form or by any means, electronic, mechanical,
magnetic, optical, chemical, manual or otherwise, without the prior written permission of this
company
This company makes no representations or warranties, either expressed or implied, with respect
to the contents hereof and specifically disclaims any warranties, merchantability or fitness for
any particular purpose. Any software described in this manual is sold or licensed "as is". Should
the programs prove defective following their purchase, the buyer (and not this company, its
distributor, or its dealer) assumes the entire cost of all necessary servicing, repair, and any
incidental or consequential damages resulting from any defect in the software. Further, this
company reserves the right to revise this publication and to make changes from time to time in
the contents thereof without obligation to notify any person of such revision or changes.
Trademarks:
DIGISOL™ is a trademark of Smartlink Network Systems Ltd. All other trademarks are the
property of the respective manufacturers.

DG-BG4300N User Manual
INDEX
1. Product Information ......................................................................................................... 6
1.1 Introduction and Safety Information .................................................................................. 6
1.2 Other features of the router .............................................................................................. 6
1.3 Safety Information ......................................................................................................... 7
1.4 System Requirements ..................................................................................................... 8
1.5 Package Contents ........................................................................................................... 8
1.6 Get Familiar with your new ADSL2+ Wireless broadband router ............................................ 9
2. System and Network Setup ............................................................................................. 11
2.1 Hardware Installation ................................................................................................... 11
3. Software Installation ....................................................................................................... 13
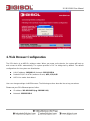
4. Web Browser Configuration ............................................................................................. 22
5. Setup ............................................................................................................................ 27
5.1 WAN Configuration .................................................................................................... 27
5.1.1 ATM Settings ...................................................................................................... 29
5.1.2 ADSL Settings ..................................................................................................... 30
5.2 LAN Configuration ..................................................................................................... 32
5.2.1 LAN Interface Setup ............................................................................................ 32
5.2.2 DHCP Mode ........................................................................................................ 33
5.2.2.1 DHCP Server Configuration ........................................................................... 33
5.2.2.2 DHCP Relay Configuration ............................................................................ 34
5.2.3 DHCP Static Configuration ................................................................................... 35
5.2.4 LAN IPV6 Configuration ....................................................................................... 36
5.3 Wireless Configuration ............................................................................................... 40
5.3.1 Basic Setting ....................................................................................................... 40
5.3.2 Wireless Security Setup ....................................................................................... 41
5.3.3 Wireless Multiple BSSID Setup ............................................................................. 43
5.3.4 Wireless Access Control ....................................................................................... 44
5.3.5 Wireless Advanced Settings ................................................................................. 45
5.3.6 WPS ( Wi-Fi Pprotected Setup) ............................................................................ 48
6. Advanced Setup ............................................................................................................. 50
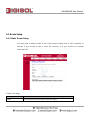
6.1 Route Setup .............................................................................................................. 51
6.1.1 Static Route Setup .............................................................................................. 51
6.1.2 IPv6 Routing Configuration .................................................................................. 52
6.1.3 RIP Configuration ............................................................................................... 53
6.2 NAT Configuration ..................................................................................................... 54
6.2.1 DMZ Setup ......................................................................................................... 54
6.2.2 Virtual Server ...................................................................................................... 55
6.2.3 NAT Forwarding Setup ......................................................................................... 58
6.2.4 NAT ALG and Pass-Through ................................................................................. 59
6.2.5 NAT EXCLUDE IP Setup ....................................................................................... 60
6.2.6 NAT Port Trigger ................................................................................................. 60
6.2.7 FTP ALG Configuration ........................................................................................ 61
6.2.8 NAT IP MAPPING ................................................................................................ 62

DG-BG4300N User Manual
6.3 QoS .......................................................................................................................... 63
6.3.1 IP QoS ............................................................................................................... 63
6.4 CWMP Setup ............................................................................................................. 65
6.4.1 TR-069 Configuration .......................................................................................... 65
6.5 Port Mapping Setup ................................................................................................... 67
6.5.1 Port Mapping Configuration ................................................................................. 68
6.6 Others ...................................................................................................................... 69
6.6.1 Bridge Setting ..................................................................................................... 69
6.6.2 Client Limit Configuration .................................................................................... 70
6.6.3 Tunnel Configuration ........................................................................................... 71
6.6.4 Other Advanced Configuration ............................................................................. 72
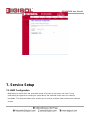
7. Service Setup ................................................................................................................ 73
7.1 IGMP Configuration ................................................................................................... 73
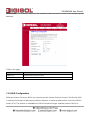
7.1.1 IGMP Proxy Configuration .................................................................................... 74
7.1.2 MLD Configuration .............................................................................................. 75
7.2 UPnP Setup ............................................................................................................... 77
7.2.1 UPnP Configuration ............................................................................................. 77
7.3 SNMP Setup .............................................................................................................. 78
7.3.1 SNMP Protocol Configuration ............................................................................... 78
7.4 DNS Setup ................................................................................................................ 79
7.4.1 DNS Configuration ............................................................................................... 79
7.4.2 IPv6 DNS ............................................................................................................ 80
7.5 Dynamic DNS ............................................................................................................ 81
7.5.1 Dynamic DNS ( DDNS) Configuration .................................................................... 81
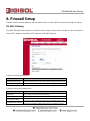
8. Firewall Setup ................................................................................................................ 83
8.1 MAC Filtering ............................................................................................................ 83
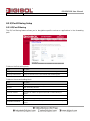
8.2 IP/Port Filtering Setup ............................................................................................... 84
8.2.1 IP/Port Filtering .................................................................................................. 84
8.2.2 IPv6/ Port Filtering .............................................................................................. 86
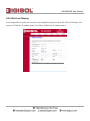
8.3 URL Filter ................................................................................................................. 87
8.3.1 URL Blocking Configuration ................................................................................. 87
8.4 ACL Setup ................................................................................................................. 88
8.4.1 ACL Configuration ............................................................................................... 88
8.4.2 IPv6 ACL Configuration ....................................................................................... 89
8.5 DoS Setting .............................................................................................................. 90
9. Maintenance Setup ........................................................................................................ 91
9.1 Upgrade ................................................................................................................... 91
9.1.1 Upgrade Firmware .............................................................................................. 91
9.1.2 Backup/Restore Settings ...................................................................................... 92
9.2 Password .................................................................................................................. 94
9.2.1 User Account Configuration ................................................................................. 94
9.3 Reboot ..................................................................................................................... 95
9.3.1 Commit/Reboot ................................................................................................... 95
9.4 Time Setup ............................................................................................................... 96
9.4.1 System Time Configuration .................................................................................. 96
9.5 Log Setup ................................................................................................................. 97
9.5.1 Log Setting ......................................................................................................... 97

DG-BG4300N User Manual
9.6 Diagnostic Setup ....................................................................................................... 98
9.6.1 Ping Diagnostic ................................................................................................... 98
9.6.2 Ping6 Diagnostic ................................................................................................. 98
9.6.3 Traceroute Diagnostic .......................................................................................... 99
9.6.4 OAM Fault Management – Connectivity Verification ............................................... 99
9.6.5 ADSL Diagnostic................................................................................................ 100
9.6.6 Diagnostic Test ................................................................................................. 101
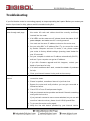
Troubleshooting ............................................................................................................... 102

DG-BG4300N User Manual
1. Product Information
1.1 Introduction and Safety Information
The DG-BG4300N supports Annex A mode. It provides four 10/100 Base-T Ethernet ports for user. The
device provides high-speed ADSL2+ broadband connection to the Internet or Intranet for high-end users,
such as net bars and office users.
It provides high performance access to the Internet, downstream up to 24 Mbps and upstream up to 1
Mbps. The device supports WLAN access to the Internet, such as WLAN AP or WLAN device. It
complies with IEEE 802.11b/g, IEEE 802.11n specifications, WEP, WPA, and WPA2 security
specifications.
You can configure the router by running the Setup Wizard in the CD-ROM provided in the package. The
wizard provides quick setup for Internet and Wireless connection. When you start the Setup Wizard,
Please follow the easy steps in Quick Installation Guide.
1.2 Other features of the router
High Internet Access throughput. Downstream at 24 Mbps and Upstream at 1 Mbps.
Wireless speed up to 300Mbps.
Allows multiple users to share a single xDSL internet connection.
Access private LAN servers from the internet.
Four wired LAN ports (10/100M) and one WAN port (RJ-11).
Works with IEEE 802.11b/g/n wireless LAN devices.
Supports IPv6.
Supports DHCP (Server/Client) for easy IP-address setup.

DG-BG4300N User Manual
1.3 Safety Information
In order to keep the safety of users and your properties, please follow the safety instructions as
mentioned below:
1. This router is designed for indoor use only; DO NOT place this router outdoor.
2. DO NOT place this router close to a hot or humid area, like kitchen or bathroom. Also, do not leave
this router in the car during summer.
3. DO NOT pull any connected cable with force; disconnect it from the router first.
4. If you want to place this Router at a height or mount on the wall, please make sure it is firmly secured.
Falling from a height would damage the router and its accessories and warranty will be void.
5. Accessories of this router, like antenna and power supply, are dangerous to small children.
KEEP THIS ROUTER OUT OF THE REACH OF CHILDREN.
6. The Router will get heated up when used for long time (This is normal and is not a malfunction). DO
NOT put this Access Point on paper, cloth, or other flammable materials.
7. There’s no user-serviceable part inside the router. If you find that the router is not working properly,
please contact your dealer of purchase and ask for help. DO NOT disassemble the router, warranty
will be void.
8. If the router falls into water when it’s powered, DO NOT use your hands to pick it up. Switch the
electrical power off before you do anything, or contact an experienced electrical technician for help.
9. If you smell something strange, or even see some smoke coming out from the router or power supply,
remove the power supply or switch the electrical power off immediately, and call dealer of purchase for
help.

DG-BG4300N User Manual
1.4 System Requirements
Notebook or desktop computer with network adapter (wired/wireless)
Internet connection, provided by xDSL or cable modem with a RJ-45 Ethernet port.
Web browser (Microsoft Internet Explorer 4.0 or above, Netscape Navigator 4.7 or above, Opera
web browser, or Safari web browser).
An available AC power socket (100 – 240V, 50/60Hz)
1.5 Package Contents
Before you start using this router, please check if there’s anything missing in the package, and contact
your dealer of purchase to claim for missing items:
DG-BG4300N ADSL2+ Wireless Broadband Router
Switching power adapter (9V DC, 1A)
Rubber feet (4 Nos.)
Quick Installation Guide
Installation software CD (includes User Manual, Utility)
Patch chord (1 No.)

DG-BG4300N User Manual
1.6 Get Familiar with your new ADSL2+ Wireless broadband router
Front Panel
LED
Color
Status
Description
Power
Red
ON
Device is initializing or initialization is failed
Green
OFF
Power is OFF
ON
Power is ON
WPS
Green
Blinking
WPS negotiation is enabled, waiting for the clients
OFF
WPS negotiation is not enabled on the device.
WLAN
Green
ON
WLAN connection is normal.
Blinking
Data is being transmitted or received.
OFF
Wireless is not enabled
LAN
(1~4)
Green
ON
LAN connection is normal.
Blinking
Physical link is UP.
OFF
LAN port is not in use.
ADSL
Green
ON
Physical link is UP.
Blinking
ADSL handshaking process is ON.
OFF
No ADSL signal is being detected.
Internet
Green
ON
Internet connection is established.
Blinking
Data is being transmitted or received.
OFF
Device is not connected to Internet.

DG-BG4300N User Manual
Rear Panel
Interfaces
Description
Antenna
It is a 2dBi dipole antenna.
Radio
ON/OFF
Switch the button to activate or deactivate the wireless
functions.
WPS
Press this button for less then 5 seconds to start WPS function.
Reset
Press this button and hold for 10 seconds to restore all settings
to factory defaults.
LAN (1~4)
Local Area Network (LAN) ports 1 to 4.
Line (WAN)
(WAN / Internet) port. Connect ISP line to the Line port.
Power
Power connector, connects to A/C power adapter.

DG-BG4300N User Manual
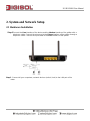
2. System and Network Setup
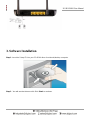
2.1 Hardware Installation
Step 1 Connect the Line interface of the device and the Modem interface of the splitter with a
telephone cable. Connect the phone set to the Phone interface of the splitter through a
telephone cable. Connect the input cable to the Line interface of the splitter.
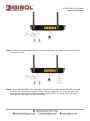
Step 2 Connect all your computers, network devices (switch / hub) to the LAN port of the
router.

DG-BG4300N User Manual
Step 3 Connect the power adapter (9V DC / 1A) to the wall socket, and then connect it to the ‘Power’
socket of the router.
Step 4 Please check all LEDs on the front panel. Power LED ‘should be steadily ON, ADSL and LAN
should be ON. Check if the computer / network device connected to the respective port of the
router is powered ON and correctly connected. If power LED ‘P’ is not ON, or any LED you
expected is not ON, please recheck the cabling.

DG-BG4300N User Manual
3. Software Installation
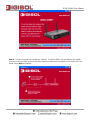
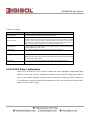
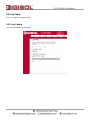
Step 1: Insert the Setup CD into your CD-ROM drive of notebook/desktop computer.
Step 2 : You will see the Autorun utilit. Click ‘Start’ to continue.

DG-BG4300N User Manual
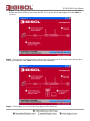
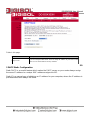
Step 3 : Connect one end of the telephone cable RJ-11 into the ADSL port provided on the splitter
from the service provider and connect other telephone cable from the splitter to the LINE port on the
router. Click ‘Next’ to continue.

DG-BG4300N User Manual
Step 4 : Power ON the router. It will take approximately 30 seconds for router to boot up completely.
Ensure that all the LED’s on the router are ON. If not, try the above steps again else click ‘Next’ to
continue.
Step 5 : Connect one end of the network cable to one of the LAN ports (1~4) of the router and the other
end to your computer. Click ‘Next’ to continue with the installation.
Step 6 : On this page, you can view the description of LED indicators.

DG-BG4300N User Manual
Step 7 : If the LED indications are proper click ‘Next’ to continue with the installation.
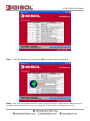
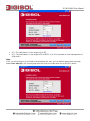
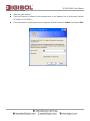
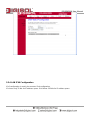
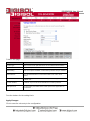
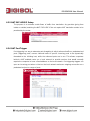
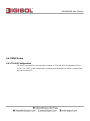
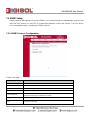
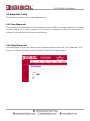
Step 8 : Here, you can configure the ADSL router. Select the Country : India and then select the service
provider from the drop-down list. You can change the VPI/VCI value as instructed by your ISP.

DG-BG4300N User Manual
VPI : The valid value is in the range of 0 to 255
VCI : The valid value is in the range of 32 to 65535. (0 to 31 is reserved for local management of
ATM traffic).
Note :
If ISP you are looking for is not listed in the dropdown list, then you can add the parameters manually,
select ‘User defined’ in the Country and enter the Service Provider with correct VPI/VCI values.

DG-BG4300N User Manual
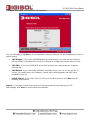
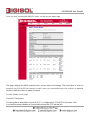
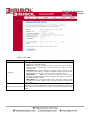
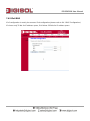
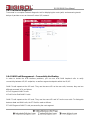
Step 9 : Click ‘Next’ to continue with the installation.
You can select LLC or VC-Mux as the encapsulation mode according to the uplink equipment or use the
default setting.
1483 Bridged : If you select 1483 Bridged as the WAN protocol, you must use the third party
Dial-up software or Windows New Connection Wizard to configure the Internet dial-up access.
1483 MER : If you select 1483 MER as the WAN protocol, the router obtains an IP address
automatically.
1483 Routed : If you select 1483 Routed as the WAN protocol, you can not use the DHCP
service. You need to enter the IP address, subnet mask, default gateway and DNS that is
provided by your ISP.
PPPoE /PPPoA : If you select PPPoE or PPPoA as the WAN protocol, click Next, and the
following page appears.
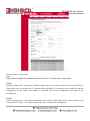
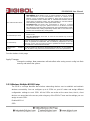
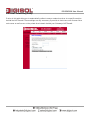
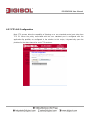
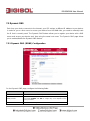
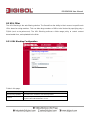
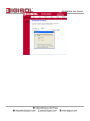
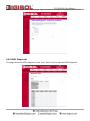
Step 10 : In this page, enter the correct user ID and password that is provided by your ISP.
After settings, click ‘Next’ to continue with the installation.

DG-BG4300N User Manual
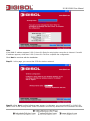
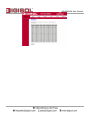
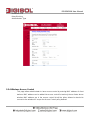
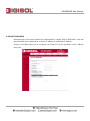
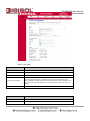
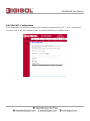
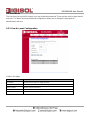
Following page appears showing the WAN status.

DG-BG4300N User Manual
Note:
If the WAN IP address appears 0.0.0.0, then click Retry for retrying the connection to Internet. If a valid
IP address appears, other than 0.0.0.0, then click Finish to complete the configuration.
Click ‘Next’ to continue with the installation.
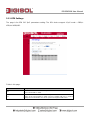
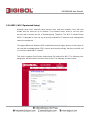
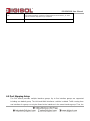
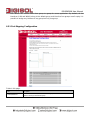
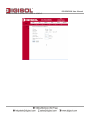
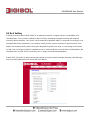
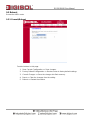
Step 11 : In this page, you can set the SSID for wireless network.
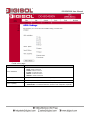
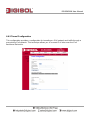
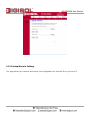
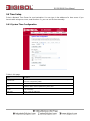
Step 12 : Click ‘Next’ and the following page appears. In this page, you can select WEP or WPA-PSK
/WPA2-PSK as the security mode. Enter 5 characters for WEP key. And enter 8~63 characters for WPA-
Page is loading ...
Page is loading ...
Page is loading ...
Page is loading ...
Page is loading ...
Page is loading ...
Page is loading ...
Page is loading ...
Page is loading ...
Page is loading ...
Page is loading ...
Page is loading ...
Page is loading ...
Page is loading ...
Page is loading ...
Page is loading ...
Page is loading ...
Page is loading ...
Page is loading ...
Page is loading ...
Page is loading ...
Page is loading ...
Page is loading ...
Page is loading ...
Page is loading ...
Page is loading ...
Page is loading ...
Page is loading ...
Page is loading ...
Page is loading ...
Page is loading ...
Page is loading ...
Page is loading ...
Page is loading ...
Page is loading ...
Page is loading ...
Page is loading ...
Page is loading ...
Page is loading ...
Page is loading ...
Page is loading ...
Page is loading ...
Page is loading ...
Page is loading ...
Page is loading ...
Page is loading ...
Page is loading ...
Page is loading ...
Page is loading ...
Page is loading ...
Page is loading ...
Page is loading ...
Page is loading ...
Page is loading ...
Page is loading ...
Page is loading ...
Page is loading ...
Page is loading ...
Page is loading ...
Page is loading ...
Page is loading ...
Page is loading ...
Page is loading ...
Page is loading ...
Page is loading ...
Page is loading ...
Page is loading ...
Page is loading ...
Page is loading ...
Page is loading ...
Page is loading ...
Page is loading ...
Page is loading ...
Page is loading ...
Page is loading ...
Page is loading ...
Page is loading ...
Page is loading ...
Page is loading ...
Page is loading ...
Page is loading ...
Page is loading ...
Page is loading ...
-
 1
1
-
 2
2
-
 3
3
-
 4
4
-
 5
5
-
 6
6
-
 7
7
-
 8
8
-
 9
9
-
 10
10
-
 11
11
-
 12
12
-
 13
13
-
 14
14
-
 15
15
-
 16
16
-
 17
17
-
 18
18
-
 19
19
-
 20
20
-
 21
21
-
 22
22
-
 23
23
-
 24
24
-
 25
25
-
 26
26
-
 27
27
-
 28
28
-
 29
29
-
 30
30
-
 31
31
-
 32
32
-
 33
33
-
 34
34
-
 35
35
-
 36
36
-
 37
37
-
 38
38
-
 39
39
-
 40
40
-
 41
41
-
 42
42
-
 43
43
-
 44
44
-
 45
45
-
 46
46
-
 47
47
-
 48
48
-
 49
49
-
 50
50
-
 51
51
-
 52
52
-
 53
53
-
 54
54
-
 55
55
-
 56
56
-
 57
57
-
 58
58
-
 59
59
-
 60
60
-
 61
61
-
 62
62
-
 63
63
-
 64
64
-
 65
65
-
 66
66
-
 67
67
-
 68
68
-
 69
69
-
 70
70
-
 71
71
-
 72
72
-
 73
73
-
 74
74
-
 75
75
-
 76
76
-
 77
77
-
 78
78
-
 79
79
-
 80
80
-
 81
81
-
 82
82
-
 83
83
-
 84
84
-
 85
85
-
 86
86
-
 87
87
-
 88
88
-
 89
89
-
 90
90
-
 91
91
-
 92
92
-
 93
93
-
 94
94
-
 95
95
-
 96
96
-
 97
97
-
 98
98
-
 99
99
-
 100
100
-
 101
101
-
 102
102
-
 103
103


Ask a question and I''ll find the answer in the document
Finding information in a document is now easier with AI
Related papers
-
Digisol DG-BG4300NU User manual
-
-
-
-
-
-
-
-
-
Other documents
-
Edimax AR-7182WnB User manual
-
-
Atlantis Network Router A02-RA144-W300N User manual
-
Trendnet TEW-436BRM Owner's manual
-
Hamlet HRDSL150W User manual
-
Billion Electric Company 5200N User manual
-
Planet ADE-3400 User manual
-
Dlink DSL-2890AL User manual
-
Billion BiPAC 5200N User manual
-
Tenda D1201 Product information