Dell PowerEdge 2550 Owner's manual

Category
Server/workstation motherboards
Type
Owner's manual
Dell™PowerEdge™2550SystemsInstallationandTroubleshootingGuide
Preface
Introduction
Checking the Basics
Messages and Codes
Finding Software Solutions
RunningtheDell™Diagnostics
Checking the Equipment
Checking Inside the System
Installing System Board Options
Installing a Drive in the Peripheral Bay
Installing Hard-Disk Drives
Getting Help
Jumpers, Switches, and Connectors
Abbreviations and Acronyms
Figures
Tables
Notes, Notices, Cautions, and Warnings
Informationinthisdocumentissubjecttochangewithoutnotice.
©2001DellComputerCorporation.Allrightsreserved.
Reproduction in any manner whatsoever without the written permission of Dell Computer Corporation is strictly forbidden.
Trademarks used in this text: Dell, PowerEdge, Dell OpenManage, Dimension, Inspiron, Dell Precision, Optiplex, Latitude, and DellWare are trademarks of Dell Computer Corporation;
Intel is a registered trademark and MMX is a trademark of Intel Corporation; Microsoft , Windows, Windows NT, and MS-DOS are registered trademarks of Microsoft Corporation.
Other trademarks and trade names may be used in this document to refer to either the entities claiming the marks and names or their products. Dell Computer Corporation
disclaims any proprietary interest in trademarks and trade names other than its own.
Initial release: 9 Jan 2001
NOTE: A NOTE indicates important information that helps you make better use of your computer.
NOTICE: A NOTICE indicates either potential damage to hardware or loss of data and tells you how to avoid the problem.
CAUTION: A CAUTION indicates a potentially hazardous situation which, if not avoided, may result in minor or moderate injury.
WARNING: A WARNING indicates a potentially hazardous situation which, if not avoided, may result in severe injury.
Back to Contents Page
Installing Hard-Disk Drives
Dell™PowerEdge™2550SystemsInstallationandTroubleshootingGuide
This section describes how to install and configure small computer system interface (SCSI) hard-disk drives in the system's internal hard-disk drive bays.
InstructionsarealsoincludedforupgradingthesystembyinstallinganoptionalSCSIbackplanedaughtercardforsplitbackplaneoperationoraDell™
PowerEdge™ExpandableRAIDController(PERC)hostadaptercard.
The hard-disk drive bays provide space for up to four 1-inch hard-disk drives. (You can also install a fifth hard-disk drive in the peripheral bay by purchasing an
upgrade kit from Dell. For installation information, see the documentation provided with the upgrade kit.)
Figure10-1 illustrates the system components associated with the SCSI hard-disk drives.
Figure 10-1. Hard-Disk Drive Hardware
Preparing SCSI Hard-Disk Drives for Installation
SCSI Hard-Disk Drive Configuration
The SCSI drives must be configured as follows:
l Disable termination on the drives. The SCSI backplane board provides termination for the SCSI bus.
l Set the SCSI ID on all drives to 0. All SCSI ID numbers for the drives are set by the SCSI backplane board, as shown in Figure10-1.
l Configure the drives so that the drive motor waits for a start unit command from the SCSI host adapter before spinning.
Partitioning and Formatting SCSI Hard-Disk Drives
You may need to use programs other than those provided with the operating system to partition and format SCSI hard-diskdrives.See"Installingand
Configuring SCSI Drivers" in the User's Guide for information and instructions.
When you format a high-capacity SCSI hard-disk drive, be sure to allow enough time for the formatting to complete. Long formatting times for these drives are
normal.
General Information on Cabling
The four connectors on the SCSI backplane board are designated as SCSI ID 0 through SCSI ID 3 (see Figure10-1). If a fifth hard-disk drive is installed in the
Preparing SCSI Hard-Disk Drives for Installation
General Information on Cabling
Installing SCSI Hard-Disk Drives
Installing a Dell PowerEdge Expandable RAID Controller Host Adapter
Card
Installing a SCSI Backplane Daughter Card
Configuring the Boot Device
NOTE: Dell recommends that you use only drives that Dell has tested and approved for use with the SCSI backplane board.
NOTICE: Do not turn off or reboot your system while the drive is being formatted. Turning off or rebooting your system while the drive is being
formatted can cause a drive failure.
peripheral bay, it is identified as SCSI ID 4.
To operate the backplane in a 1 x 4 configuration, attach a single host adapter to connector SCSIA on the backplane board (see FigureA-4 in "Jumpers,
Switches, and Connectors"). You can operate the SCSI backplane board in a split 2 x 2 mode if a second, optional SCSI backplane daughter card is installed
(see "Installing a SCSI Backplane Daughter Card"). In split mode, a host adapter attached to connector SCSIB on the backplane controls slots SCSI 0 and SCSI
1, while the host adapter connected to SCSIA controls slots SCSI 2, SCSI 3, and the fifth drive slot, SCSI 4 (if installed).
Installing SCSI Hard-Disk Drives
SCSI hard-disk drives are supplied by Dell in special drive carriers that fit in the hard-disk drive bays. To install a SCSI hard-disk drive, perform the following
steps.
1. If the system does not have a RAID controller installed, shut down the system.
2. If the optional front bezel is installed, remove it. See "Removing the Front Bezel" in "Checking Inside the System."
3. If you have not already done so, unlock and open the system doors (see "Opening the System Doors" in "Checking Inside the System") and remove the
hard-disk drive lock from the hard-disk drive bay where you will install the new drive (see Figure10-2).
Figure 10-2. Removing a Hard-Disk Drive Lock
4. For systems with RAID controllers, power down the hard-diskdrivebay.Ifahard-disk drive is currently installed in the bay, wait until all three SCSI
hard-disk drive indicators on the hard-disk drive carrier handle are off before proceeding.
5. Open the drive carrier handle and slide the carrier toward you until it is free of the drive bay (see Figure10-3).
Figure 10-3. SCSI Hard-Disk Drive Carrier
6. Open the handle on the new hard-disk drive carrier.
7. Align the edge of the carrier with the notch in the chassis and insert the carrier into the drive bay (see Figure10-3).
NOTICE: Hot-plug drive installation is not supported for systems without an integrated redundant array of independent disks (RAID) controller or Dell
PERC host adapter card.
8. Close the drive carrier handle to lock the new drive carrier in place.
9. If you removed the bezel in step 2, reinstall it now.
10. Install any required SCSI device drivers. For more information, see your operating system documentation.
11. If the hard-disk drive is a new drive, run the Dell Diagnostics to test the new drive.
Installing a Dell PowerEdge Expandable RAID Controller Host Adapter Card
Follow these general guidelines when you install a Dell host adapter card. For specific instructions, refer to the documentation supplied with the PERC host
adapter card.
1. Turn off the system, including any attached peripherals, and disconnect the system from the electrical outlet.
2. Unpack the host adapter card and prepare it for installation. For instructions, see the documentation accompanying the host adapter card.
3. Open the system doors (see "Opening the System Doors" in "Checking Inside the System").
4. Install the controller card in an expansion slot. See "Installing System Board Options" for information on installing the card.
5. Detach the interface cable from the SCSI host adapter connector on the system board (labeled "SCSIA") See Figure10-1 for the location of this
connector.
6. Connect the end of the SCSI interface cable to the connector on the host adapter card. To identify the correct connector, see the documentation for the
host adapter card.
7. If you are attaching multiple external SCSI devices, daisy-chain the devices to each other using the cables shipped with each device. See each device's
documentation for information on cabling that device as part of a daisy chain.
8. Close the system doors, and then reconnect the system and peripherals to their electrical outlets.
9. Connect the external SCSI device(s) to electrical outlet(s).
For each external device, plug the socket end of the power cable into the power receptacle on the back of the device, and plug the other end of the
power cable into an electrical outlet.
10. Install any required SCSI device drivers. For more information, see your operating system documentation.
11. Test the SCSI hard-disk drive by running the Dell Diagnostics.
Installing a SCSI Backplane Daughter Card
To operate the SCSI backplane in a 2 x 2 split backplane configuration, you must install a second, optional daughter card. To install the daughter card, perform
the following steps.
1. Turn off the system, including any attached peripherals, and disconnect the system from the electrical outlet.
2. Unpack the SCSI backplane board daughter card kit.
3. Open the system doors (see "Opening the System Doors" in "Checking Inside the System").
4. Remove the two hard-disk drives from the right-hand drive bay (see "Installing SCSI Hard-Disk Drives").
5. The daughter card fits between the sides of a card guide on the floor of the drive bay. To install the card in the card guide, perform the following steps:
a. Hold the daughter card by its edges with the component side facing up and the card connector facing the SCSI backplane board (see Figure10-
4).
Figure 10-4. Installing a Daughter Card
WARNING: Before you install the host adapter card, you must turn off the system and disconnect it from the electrical outlet. For more
information, see "Safety FirstFor You and Your Computer" in "Checking Inside the System."
WARNING: See "Protecting Against Electrostatic Discharge" in the safety instructions in the System Information document.
WARNING: Before you install the daughter card, you must turn off the system and disconnect it from the electrical outlet. For more information,
see "Safety FirstFor You and Your Computer" in "Checking Inside the System."
NOTICE: You must remove all hard-disk drives to avoid damaging the SCSI backplane board when you remove it later in this procedure.
b. Position the card in the drive bay so that the notches on the left and right edges of the card are aligned with the tabs on the card guide in
the drive bay.
c. Lower the card into the card guide.
d. Slide the daughter card into the drive bay and align the connector on the card with the corresponding connector on the backplane.
e. Lock the card into place by closing the retention lever on the card's front edge (see Figure10-4).
6. Reinstall the hard-disk drives in the system.
7. Change the SCSI cable connections to the SCSI backplane as necessary to operate the backplane as a 2 x 2 split backplane.
To configure the drives in a split 2 x 2 configuration (or 1 x 2 and 1 x 3 in a five-drive system), you must connect two SCSI channels to the SCSI
backplane board. The channel attached to connector SCSIB on the backplane board controls slots SCSI ID 0 and SCSI ID 1, while the channel connector
to connector SCSIA controls slots SCSI ID 2, SCSI ID 3, and the fifth drive slot (if installed), SCSI ID 4 (see Figure10-1).
8. Close the system doors, and then reconnect the system and peripherals to their electrical outlets.
Configuring the Boot Device
If you plan to boot the system from a hard-disk drive, the drive must be attached to the primary (or boot) controller or SCSI host adapter card. You can select
the primary controller using the System Setup program. See "Using the System Setup Program" in the User's Guide for instructions.
Back to Contents Page
NOTICE: Ensure that the two connectors are aligned before proceeding.
Back to Contents Page
Getting Help
Dell™PowerEdge™2550SystemsInstallationandTroubleshootingGuide
Help Overview
Dell Contact Numbers
Help Overview
This section describes the tools Dell provides to help you when you have a problem with your system. It also tells you when and how to contact Dell for
technical or customer assistance.
Technical Assistance
If you need assistance with a technical problem, perform the following steps:
1. Complete the troubleshooting procedures provided in this guide.
2. RuntheDell™Diagnostics.
See "RunningtheDell™Diagnostics."
3. Make a copy of the Diagnostics Checklist, and fill it out.
4. Use Dell's extensive suite of online services available at Dell's website (http://www.dell.com) for help with installation and troubleshooting
procedures.
For more information, see "World Wide Web."
5. If the preceding steps have not resolved the problem, call Dell for technical assistance.
When prompted by Dell's automated telephone system, enter your Express Service Code to route the call directly to the proper support personnel. If
you do not have an Express Service Code, open the Dell Accessories folder, double-click the Express Service Code icon, and follow the directions.
For instructions on using the technical support service, see "Technical Support Service" and "Before You Call."
Help Tools
Dell provides a number of tools to assist you. These tools are described in the following sections.
World Wide Web
The Internet is your most powerful tool for obtaining information about your system and other Dell products. Through the Internet, you can access most of the
services described in this section, including AutoTech, TechFax, order status, technical support, and product information.
You can access Dell's support website at http://support.dell.com. To select your country, click the map that appears. The Welcome to support.dell.com page
opens. Enter your system information to access help tools and information.
Dell can be accessed electronically using the following addresses:
l World Wide Web
http://www.dell.com/
http://www.dell.com/ap/ (for Asian/Pacific countries only)
http://www.euro.dell.com (for Europe only)
http://www.dell.com/la (for Latin American countries)
l Anonymous file transfer protocol (FTP)
ftp.dell.com/
Log in as user:anonymous, and use your e-mail address as your password.
l Electronic Support Service
NOTE: Dell's Express Service Code system may not be available in all countries.
NOTE: Some of the following tools are not always available in all locations outside the continental U.S. Please call your local Dell representative for
information on availability.
[email protected] (for Asian/Pacific countries only)
support.euro.dell.com (for Europe only)
l Electronic Quote Service
[email protected] (for Asian/Pacific countries only)
l Electronic Information Service
AutoTech Service
Dell's automated technical support serviceAutoTechprovides recorded answers to the questions most frequently asked by Dell customers about their
portable and desktop systems.
When you call AutoTech, you use your touch-tone telephone to select the subjects that correspond to your questions.
The AutoTech service is available 24 hours a day, seven days a week. You can also access this service through the technical support service. For the telephone
number to call, see "Dell Contact Numbers."
TechFax Service
Dell takes full advantage of fax technology to serve you better. Twenty-four hours a day, seven days a week, you can call the Dell TechFax line toll-free for all
kinds of technical information.
Using a touch-tone phone, you can select from a full directory of topics. The technical information you request is sent within minutes to the fax number you
designate. For the TechFax telephone number to call, see "Dell Contact Numbers."
Automated Order-Status System
You can call this automated service to check on the status of any Dell products that you have ordered. A recording prompts you for the information needed to
locate and report on your order. For the telephone number to call, see "Dell Contact Numbers."
Technical Support Service
Dell's industry-leading hardware technical-support service is available 24 hours a day, seven days a week, to answer your questions about Dell hardware.
Our technical support staff pride themselves on their track record: more than 90 percent of all problems and questions are taken care of in just one toll-free
call,usuallyinlessthan10minutes.Whenyoucall,ourexpertscanrefertorecordskeptonyourDellsystemtobetterunderstandyourparticularquestion.
Our technical support staff use computer-based diagnostics to provide fast, accurate answers to questions.
To contact Dell's technical support service, see "Before You Call" and then call the number for your country as listed in "Dell Contact Numbers."
Problems With Your Order
If you have a problem with your order, such as missing parts, wrong parts, or incorrect billing, contact Dell for customer assistance. Have your invoice or
packing slip handy when you call. For the telephone number to call, see "Dell Contact Numbers."
Product Information
If you need information about additional products available from Dell, or if you would like to place an order, visit Dell's website at http://www.dell.com/. For
the telephone number to call to speak to a sales specialist, see "Dell Contact Numbers."
Returning Items for Warranty Repair or Credit
Prepare all items being returned, whether for repair or credit, as follows:
1. Call Dell to obtain an authorization number, and write it clearly and prominently on the outside of the box.
For the telephone number to call, see "Dell Contact Numbers."
2. Include a copy of the invoice and a letter describing the reason for the return.
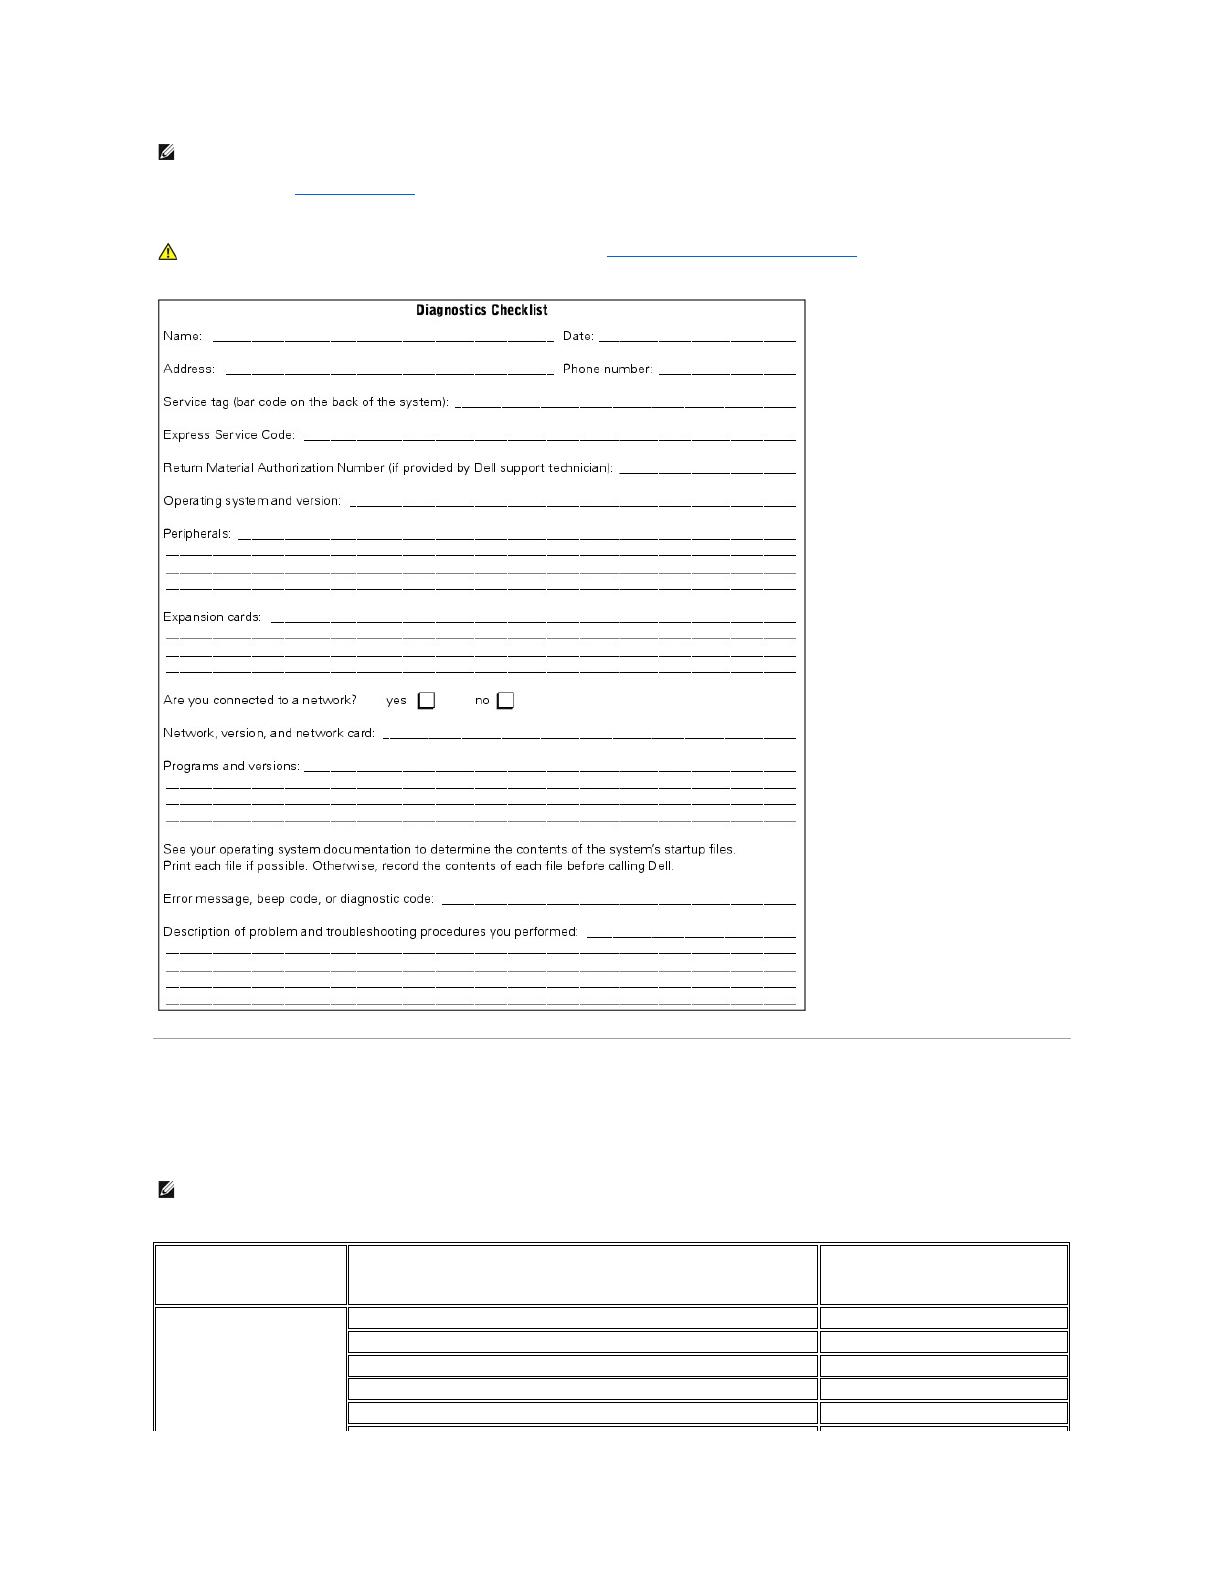
3. Include a copy of the Diagnostics Checklist indicating the tests you have run and any error messages reported by the Dell Diagnostics.
4. Include any accessories that belong with the item(s) being returned (such as power cables, software diskettes, and guides) if the return is for credit.
5. Pack the equipment to be returned in the original (or equivalent) packing materials.
You are responsible for paying shipping expenses. You are also responsible for insuring any product returned, and you assume the risk of loss during
shipment to Dell. Collect-on-delivery (C.O.D.) packages are not accepted.
Returns that are missing any of the preceding requirements will be refused at our receiving dock and returned to you.
Before You Call
Remember to fill out the Diagnostics Checklist. If possible, turn on your system before you call Dell for technical assistance and call from a telephone at or near
the system. You may be asked to type some commands at the keyboard, relay detailed information during operations, or try other troubleshooting steps
possible only at the system itself. Make sure that the system documentation is available.
Dell Contact Numbers
The following table provides country-specific access codes and telephone numbers, websites, and email addresses that you can use to contact Dell.
The codes required depend on where you are calling from as well as the destination of your call; in addition, each country has a different dialing protocol. If
you need assistance in determining which codes to use, contact a local or an international operator.
NOTE: Have your Express Service Code ready when you call. The code helps Dell's automated-support telephone system direct your call more efficiently.
CAUTION: Before servicing any components inside your system, see "Safety FirstFor You and Your Computer."
NOTE: Toll-free numbers are for use only within the country for which they are listed. Area codes are most often used to call long distance within your
own country (not internationally)in other words, when your call originates in the same country you are calling.
Country (City)
International Access Code
Country Code
City Code
Department Name or Service Area,
Website and E-mail Address
Area Codes,
LocalNumbers,andTollFreeNumbers
Australia (Sydney)
International Access Code:
0011
Country Code: 61
City Code: 2
Home and Small Business
1-300-65-55-33
Government and Business
tollfree:1-800-633-559
Preferred Accounts Division (PAD)
tollfree:1-800-060-889
Customer Care
tollfree:1-800-819-339
Corporate Sales
tollfree:1-800-808-385
Transaction Sales
tollfree:1-800-808-312
Fax
tollfree:1-800-818-341
Austria (Vienna)
International Access Code:
900
Country Code: 43
City Code: 1
Home/Small Business Sales
0179567602
Home/Small Business Fax
0179567605
Home/Small Business Customer Care
0179567603
Preferred Accounts/Corporate Customer Care
06608056
Home/Small Business Technical Support
0179567604
Preferred Accounts/Corporate Technical Support
06608779
Switchboard
01491040
Website: http://support.euro.dell.com


Belgium (Brussels)
International Access Code: 00
Country Code: 32
City Code: 2
Technical Support
024819288
Customer Care
024819119
Home/Small Business Sales
tollfree:080016884
Corporate Sales
024819100
Fax
024819299
Switchboard
024819100
Website: http://support.euro.dell.com
Brazil
International Access Code:
0021
Country Code: 55
City Code: 51
Customer Support, Technical Support
0800 90 3355
Sales
0800 90 3366
Website: http://www.dell.com/br
Brunei
Country Code: 673
Customer Technical Support (Penang, Malaysia)
604 633 4966
Customer Service (Penang, Malaysia)
604 633 4949
Transaction Sales (Penang, Malaysia)
604 633 4955
Canada (North York, Ontario)
International Access Code:
011
Automated Order-Status System
tollfree:1-800-433-9014
AutoTech (Automated technical support)
tollfree:1-800-247-9362
Customer Care (From outside Toronto)
tollfree:1-800-387-5759
Customer Care (From within Toronto)
416758-2400
Customer Technical Support
tollfree:1-800-847-4096
Sales (Direct Salesfrom outside Toronto)
tollfree:1-800-387-5752
Sales (Direct Salesfrom within Toronto)
416 758-2200
Sales (Federal government, education, and medical)
tollfree:1-800-567-7542
Sales (Major Accounts)
tollfree:1-800-387-5755
TechFax
tollfree:1-800-950-1329
Chile (Santiago)
Country Code: 56
City Code: 2
Sales, Customer Support, and Technical Support
tollfree:1230-020-4823
China (Xiamen)
Country Code: 86
City Code: 592
Technical Support
tollfree:8008582437
Customer Experience
tollfree:8008582060
Home and Small Business
tollfree:8008582222
Preferred Accounts Division
tollfree:8008582062
Large Corporate Accounts
tollfree:8008582999
Czech Republic (Prague)
International Access Code: 00
Country Code: 420
City Code: 2
Technical Support
02 22 83 27 27
Customer Care
02 22 83 27 11
Fax
02 22 83 27 14
TechFax
02 22 83 27 28
Switchboard
02 22 83 27 11
Website: http://support.euro.dell.com
Denmark (Horsholm)
Technical Support
45170182
International Access Code:
009
Country Code: 45
Relational Customer Care
45170184
Home/Small Business Customer Care
32875505
Switchboard
45170100
Fax Technical Support (Upplands Vasby, Sweden)
859005594
Fax Switchboard
45170117
Website: http://support.euro.dell.com
Finland (Helsinki)
International Access Code:
990
Country Code: 358
City Code: 9
Technical Support
0925331360
Technical Support Fax
0925331381
Relational Customer Care
0925331338
Home/Small Business Customer Care
0969379194
Fax
0925331399
Switchboard
0925331300
Website: http://support.euro.dell.com
France (Paris/Montpellier)
International Access Code: 00
Country Code: 33
City Code: (1) (4)
Home and Small Business
Technical Support
0825387270
Customer Care
0825823833
Switchboard
0825004700
Switchboard (Alternative)
0499754000
Sales
0825004700
Fax
0825004701
Website: http://support.euro.dell.com
Corporate
Technical Support
0825004719
Customer Care
0825338339
Switchboard
0155947100
Sales
0155947100
Fax
0155947199
Website: http://support.euro.dell.com
Germany (Langen)
International Access Code: 00
Country Code: 49
City Code: 6103
Technical Support
06103766-7200
Home/Small Business Customer Care
0180-5-224400
Global Segment Customer Care
06103766-9570
Preferred Accounts Customer Care
06103766-9420
Large Accounts Customer Care
06103766-9560
Public Accounts Customer Care
06103766-9555
Switchboard
06103766-7000
Website: http://support.euro.dell.com
Hong Kong
International Access Code:
001
Country Code: 852
Technical Support
tollfree:800964107
Customer Service (Penang, Malaysia)
6046334949
Transaction Sales
tollfree:800964109
Corporate Sales
tollfree:800964108
Ireland (Cherrywood)
International Access Code: 16
Country Code: 353
City Code: 1
Technical Support
0870 908 0800
Customer Care
012044026
Sales
01 286 0500
SalesFax
012040144
Fax
0870 907 5590
Switchboard
012860500
Website: http://support.euro.dell.com
Italy (Milan)
Home and Small Business
International Access Code: 00
Country Code: 39
City Code: 02
Technical Support
0257782690
Customer Care
0269682114
Fax
0269682413
Switchboard
0269682112
Website: http://support.euro.dell.com
Corporate
Technical Support
0257782690
Customer Care
0257782555
Fax
0257503530
Switchboard
02577821
Website: http://support.euro.dell.com
Japan (Kawasaki)
International Access Code:
001
Country Code: 81
City Code: 44
Technical Support (Server)
tollfree:0120-1984-35
TechnicalSupport(Dimension™andInspiron™)
Technical Support Outside of Japan (Dimension and Inspiron)
tollfree:0120-1982-26
81-44-520-1167
TechnicalSupport(OptiPlex™,DellPrecision™,andLatitude™)
Technical Support Outside of Japan (OptiPlex, Dell Precision, and Latitude)
tollfree:0120-1984-33
81-44-556-3894
24-Hour Automated Order Service
044556-3801
Customer Care
044556-4240
Home and Small Business Group Sales
044556-3344
Preferred Accounts Division Sales
044556-3433
Large Corporate Accounts
044556-3430
Faxbox Service
044556-3490
Switchboard
044556-4300
Website: http://support.jp.dell.com
Korea (Seoul)
International Access Code:
001
Country Code: 82
City Code: 2
Technical Support
tollfree:080-200-3800
Sales
tollfree:080-200-3777
Customer Service (Seoul, Korea)
2194-6220
Customer Service (Penang, Malaysia)
604 633 4949
Fax
2194-6202
Switchboard
2194-6000
Latin America
Customer Technical Support (Austin, Texas, U.S.A.)
512728-4093
Customer Service (Austin, Texas, U.S.A.)
512728-3619
Fax (Technical Support and Customer Service)(Austin, Texas, U.S.A.)
512728-3883
Sales (Austin, Texas, U.S.A.)
512728-4397
SalesFax (Austin, Texas, U.S.A.)
512728-4600
or512728-3772
Luxembourg
International Access Code: 00
Country Code: 352
Technical Support (Brussels, Belgium)
024819288
Home/Small Business Sales (Brussels, Belgium)
tollfree:080016884
Corporate Sales (Brussels, Belgium)
024819100
Customer Care (Brussels, Belgium)
024819119
Fax (Brussels, Belgium)
024819299
Switchboard (Brussels, Belgium)
024819100
Website: http://support.euro.dell.com
Macau
Country Code: 853
Technical Support
tollfree:0800582
Customer Service (Penang, Malaysia)
604 633 4949
Transaction Sales
tollfree:0800581
Malaysia (Penang)
International Access Code: 00
Country Code: 60
Technical Support
tollfree:1800888298
Customer Service
046334949
Transaction Sales
tollfree:1800888202
City Code: 4
Corporate Sales
tollfree:1800888213
Mexico
International Access Code: 95
Country Code: 52
City Code: 5
Automated Order-Status System (Austin, Texas, U.S.A.)
512728-0685
AutoTech (Automated technical support) (Austin, Texas, U.S.A.)
512728-0686
Customer Technical Support
525228-7870
Sales
525228-7811
ortollfree:91-800-900-37
ortollfree:91-800-904-49
Customer Service
525228-7878
Main
525228-7800
Netherlands (Amsterdam)
International Access Code: 00
Country Code: 31
City Code: 20
Technical Support
0205818838
Customer Care
0205818740
Home/Small Business Sales
tollfree:0800-0663
Home/Small Business Sales Fax
0206827171
Corporate Sales
0205818818
Corporate Sales Fax
0206868003
Fax
0206868003
Switchboard
0205818818
Website: http://support.euro.dell.com
New Zealand
International Access Code: 00
Country Code: 64
Home and Small Business
0800446255
Government and Business
0800444617
Sales
0800441567
Fax
0800441566
Norway (Lysaker)
International Access Code:
095
Country Code: 47
Technical Support
67116882
Relational Customer Care
67117514
Home/Small Business Customer Care
23162298
Switchboard
67116800
Fax Technical Support (Upplands Vasby, Sweden)
59005594
Fax Switchboard
67116865
Website: http://support.euro.dell.com
Poland (Warsaw)
International Access Code:
011
Country Code: 48
City Code: 22
Technical Support
225795700
Customer Care
225795999
Sales
225795999
Fax
225795998
Switchboard
225795999
Website: http://support.euro.dell.com
Portugal
International Access Code: 00
Country Code: 35
Technical Support
35800834077
Customer Care
34902118540or
35800834075
Sales
35800834075
Fax
351214240112
Singapore (Singapore)
International Access Code:
005
Country Code: 65
Technical Support
tollfree:8006011051
Customer Service (Penang, Malaysia)
6046334949
Transaction Sales
tollfree:8006011054
Corporate Sales
tollfree:8006011053
South Africa (Johannesburg)
International Access Code:
09/091
Country Code: 27
City Code: 11
Technical Support
0117097710
Customer Care
0117097707
Sales
0117097700
Fax
0117060495
Switchboard
0117097700
Website: http://support.euro.dell.com
Southeast Asian and Pacific
Countries
Customer Technical Support, Customer Service, and Sales (Penang, Malaysia)
6046334810
Spain (Madrid)
International Access Code: 00
Country Code: 34
City Code: 91
Home and Small Business
Technical Support
902100130
Customer Care
902118540
Sales
902118541
Switchboard
902118541
Fax
902118539
Website: http://support.euro.dell.com
Corporate
Technical Support
902100130
Customer Care
902118546
Switchboard
917229200
Fax
917229583
Website: http://support.euro.dell.com
Sweden (Upplands Vasby)
International Access Code:
009
Country Code: 46
City Code: 8
Technical Support
0859005199
Relational Customer Care
0859005642
Home/Small Business Customer Care
0858770527
Fax Technical Support
0859005594
Sales
0859005185
Website: http://support.euro.dell.com
Switzerland (Geneva)
International Access Code: 00
Country Code: 41
City Code: 22
Technical Support (Home and Small Business)
0844811411
Technical Support (Corporate)
0844822844
Customer Care (Home and Small Business)
0848802202
Customer Care (Corporate)
0848821721
Fax
0227990190
Switchboard
0227990101
Website: http://support.euro.dell.com
Taiwan
International Access Code:
002
Country Code: 886
Technical Support
tollfree:0080601255
Technical Support (Servers)
tollfree:0080601256
Transaction Sales
tollfree:0080651228
or080033556
Corporate Sales
tollfree:0080651227
or080033555
Thailand
International Access Code:
001
Country Code: 66
Technical Support
tollfree:088006007
Customer Support (Penang, Malaysia)
604 633 4949
Sales
tollfree:088006009
U.K. (Bracknell)
International Access Code:
010
Country Code: 44
City Code: 1344
Technical Support (Corporate/Preferred Accounts/PAD [1000+ employees])
08709080500
Technical Support (Direct/PAD and General)
08709080800
Global Accounts Customer Care
01344723186
Corporate Customer Care
01344723185
Preferred Accounts (500-5000 employees) Customer Care
01344723196
Central Government Customer Care
01344723193
Local Government Customer Care
01344723194
Home/Small Business Sales
08709074000
Corporate/Public Sector Sales
01344860456
Website: http://support.euro.dell.com
Back to Contents Page
U.S.A. (Austin, Texas)
International Access Code:
011
Country Code: 1
Automated Order-Status System
tollfree:1-800-433-9014
AutoTech (for portable and desktop systems)
tollfree:1-800-247-9362
Dell Home and Small Business Group (for portable and desktop systems):
Customer Technical Support (Return Material Authorization Numbers)
tollfree:1-800-624-9896
Customer Technical Support (Home sales purchased via http://www.dell.com)
tollfree:1-877-576-3355
Customer Service (Credit Return Authorization Numbers)
tollfree:1-800-624-9897
National Accounts (systems purchased by established Dell national accounts [have your account number handy], medical
institutions, or value-added resellers [VARs]):
Customer Service and Technical Support (Return Material Authorization
Numbers)
tollfree:1-800-822-8965
Public Americas International (systems purchased by governmental agencies [local, state, or federal] or educational
institutions):
Customer Service and Technical Support (Return Material Authorization
Numbers)
tollfree:1-800-234-1490
Dell Sales
tollfree:1-800-289-3355
ortollfree:1-800-879-3355
Spare Parts Sales
tollfree:1-800-357-3355
DellWare™
tollfree:1-800-753-7201
Desktop and Portable Fee-Based Technical Support
tollfree:1-800-433-9005
Server Fee-Based Technical Support
tollfree:1-800-967-0765
Sales (Catalogs)
toll free: 1-800-426-5150
Fax
tollfree:1-800-727-8320
TechFax
tollfree:1-800-950-1329
Dell Services for the Deaf, Hard-of-Hearing, or Speech-Impaired
tollfree:1-877-DELLTTY
(1-877-335-5889)
Switchboard
512338-4400
Dellnet Technical Support
tollfree:1-877-Dellnet
(1-877-335-5638)
Back to Contents Page
Jumpers, Switches, and Connectors
Dell™PowerEdge™2550SystemsInstallationandTroubleshootingGuide
Jumpers and SwitchesAGeneralExplanation
System Board Jumpers
System Board Connectors
SCSI Backplane Board Connectors
Disabling a Forgotten Password
This section provides specific information about the jumpers on the system board. It also provides some basic information on jumpers and switches and
describes the connectors and sockets on the various boards in the system.
Jumpers and SwitchesAGeneralExplanation
Jumpers and switches provide a convenient and reversible way of reconfiguring the circuitry on a printed circuit board. When reconfiguring the system, you
may need to change jumper settings on the system board. You may also need to change jumper and/or switch settings on expansion cards or drives.
Jumpers
Jumpers are small blocks on a circuit board with two or more pins emerging from them. Plastic plugs containing a wire fit down over the pins. The wire connects
the pins and creates a circuit. To change a jumper setting, pull the plug off its pin(s) and carefully fit it down onto the pin(s) indicated.
Figure A-1. Example Jumpers
A jumper is referred to as open or unjumpered when the plug is pushed down over only one pin or if there is no plug at all. When the plug is pushed down
over two pins, the jumper is referred to as jumpered. The jumper setting is often shown in text as two numbers, such as 1-2. The number 1 is printed on the
circuit board so that you can identify each pin number based on the location of pin 1.
FigureA-3 shows the location and default settings of the jumper blocks on the system board. See TableA-1 for the designations, default settings, and
functions of the system's jumpers.
Switches
Switches control various circuits or functions in the system. The switches that you are most likely to encounter are dual in-line package (DIP) switches, which
are normally packaged in groups of two or more switches in a plastic case. Two common types of DIP switches are slide switches and rocker switches (see
FigureA-2).
Figure A-2. Example Switches
Each of these switches has two positions or settings (usually on and off). To change the setting of a slide switch, use a small, pointed object such as a small
screwdriver or a straightened paper clip to slide the switch to the proper position. To change the setting of a rocker switch, use the screwdriver or paper clip
to press down on the appropriate side of the switch. In either case, do not use a pen, pencil, or other object that might leave a residue on the switch.
System Board Jumpers
FigureA-3 shows the location of the configuration jumpers on the system board. TableA-1 lists the function of these jumpers.
WARNING: Make sure the system is turned off before you change a jumper setting. Otherwise, damage to the system or unpredictable results
may occur.
Figure A-3. System Board Jumpers

Table A-1. System-Board Jumper Settings
System Board Connectors
TableA-2 lists the connectors and sockets located on the system board. See Figure8-1 for the location of these connectors and sockets.
Table A-2. System Board Connectors and Sockets
Jumper
Setting
Description
CARDBIOS
Reserved (do not change).
ISA_CLR
(default)
The configuration settings are retained at system boot.
The configuration settings are cleared at next system boot. (If the configuration settings become corrupted to the point
where the system will not boot, install the jumper plug and boot the system. Remove the jumper before restoring the
configuration information.)
PASSWRD
(default)
The password feature is enabled.
The password feature is disabled.
jumpered unjumpered
NOTE: For the full name of an abbreviation or acronym used in this table, see "Abbreviations and Acronyms."
Connector or Socket
Description
BACKPLANE
Hot-pluggable SCSI backplane board interface cable connector
BATTERY
Battery connector
COMn
Serial port connectors; sometimes referred to as COM1 and COM2
DIMM_x
memory module sockets
DIMM_RAID
memory module socket for integrated RAID controller
INTRUS
Intrusion-alarm switch connectors
KYBD
Keyboard connector
MOUSE
Mouse connector
SCSI Backplane Board Connectors
FigureA-4 shows the location of the connectors on the back of the small computer system interface (SCSI) backplane board.
Figure A-4. Connectors on the SCSI Backplane Board
FigureA-5 shows the connectors and sockets located on the interposer board.
Figure A-5. Connectors on the Interposer Board
Disabling a Forgotten Password
The system's software security features include a system password and a setup password, which are discussed in detail in "Using the System Setup Program"
in the User's Guide. A password jumper on the system board enables these password features or disables them and clears any password(s) currently in use.
To disable a forgotten system password or setup password, perform the following steps.
1. Turn off the system, including any attached peripherals, and disconnect the system from the electrical outlet.
2. Open the system doors (see "Opening the System Doors" in "Checking Inside the System").
NICn
NIC connectors
PANEL
System control panel connector
PARALLEL
Parallel port connector; sometimes referred to as LPT1
POWERn
Power connectors
PROC_n
Microprocessor connectors
RAID_KEY
Socket for integrated RAID controller hardware key
RISER
PCI riser board connector
SCSIA, SCSIB
SCSI host adapter connectors
USBn
USB connectors
VGA
Video connector
VRMn
Primary and secondary VRM connectors
NOTE: For the full name of an abbreviation or acronym used in this table, see "Abbreviations and Acronyms."
3. Refer to FigureA-3 for the location of the password jumper (labeled "PASSWRD") on the system board.
4. Remove the jumper plug from the PASSWRD jumper.
5. Close the system doors, and then reconnect the system and peripherals to their electrical outlets, and turn them on.
The existing passwords are not disabled (erased) until the system boots with the PASSWRD jumper plug removed. However, before you assign a new
system and/or setup password, you must install the jumper plug.
6. Repeat steps 1 and 2.
7. Install the jumper plug on the PASSWRD jumper.
8. Close the system doors, reconnect the system and peripherals to their electrical outlets, and turn them on.
9. Assign a new system and/or setup password.
To assign a new system password using the System Setup program, see "Assigning a System Password" in the User's Guide. To assign a new setup
password using the System Setup program, see "Assigning a Setup Password" in the User's Guide.
Back to Contents Page
NOTE: If you assign a new system and/or setup password with the jumper plug still removed, the system disables the new password(s) the next time it
boots.
Back to Contents Page
Abbreviations and Acronyms
Dell™PowerEdge™2550SystemsInstallationandTroubleshootingGuide
A
ampere(s)
AC
alternating current
ACPI
Advanced Configuration and Power Interface
ADC
analog-to-digital converter
ADI
Autodesk Device Interface
AI
artificial intelligence
ANSI
American National Standards Institute
APIC
Advanced Peripheral Interrupt Controller
ASCII
American Standard Code for Information Interchange
ASIC
application-specific integrated circuit
BBS
bulletin board service
BIOS
basic input/output system
bpi
bits per inch
bps
bits per second
BTU
British thermal unit
C
Celsius
CCFT
cold cathode fluorescent tube
CD
compact disc
CD-ROM
compact disc read-only memory
CGA
color graphics adapter
cm
centimeter(s)
CMOS
complementary metal-oxide semiconductor
C.O.D.
collect on delivery
cpi
characters per inch
cpl
characters per line
CPU
central processing unit
DAC
digital-to-analog converter
DAT
digital audio tape
dB
decibel(s)
dBA
adjusted decibel(s)
DC
direct current
DIMM
dual in-line memory module
DIN
Deutsche Industrie Norm
DIP
dual in-line package
DMA
direct memory access
DOC
Department of Communications (in Canada)
dpi
dots per inch
DRAC
DellOpenManage™RemoteAssistantCard
DRAM
dynamic random-access memory
DS/DD
double-sided double-density
  • Page 1 1
  • Page 2 2
  • Page 3 3
  • Page 4 4
  • Page 5 5
  • Page 6 6
  • Page 7 7
  • Page 8 8
  • Page 9 9
  • Page 10 10
  • Page 11 11
  • Page 12 12
  • Page 13 13
  • Page 14 14
  • Page 15 15
  • Page 16 16
  • Page 17 17
  • Page 18 18
  • Page 19 19
  • Page 20 20
  • Page 21 21
  • Page 22 22
  • Page 23 23
  • Page 24 24
  • Page 25 25
  • Page 26 26
  • Page 27 27
  • Page 28 28
  • Page 29 29
  • Page 30 30
  • Page 31 31
  • Page 32 32
  • Page 33 33
  • Page 34 34
  • Page 35 35
  • Page 36 36
  • Page 37 37
  • Page 38 38
  • Page 39 39
  • Page 40 40
  • Page 41 41
  • Page 42 42
  • Page 43 43
  • Page 44 44
  • Page 45 45
  • Page 46 46
  • Page 47 47
  • Page 48 48
  • Page 49 49
  • Page 50 50
  • Page 51 51
  • Page 52 52
  • Page 53 53
  • Page 54 54
  • Page 55 55
  • Page 56 56
  • Page 57 57
  • Page 58 58
  • Page 59 59
  • Page 60 60
  • Page 61 61
  • Page 62 62
  • Page 63 63
  • Page 64 64
  • Page 65 65
  • Page 66 66
  • Page 67 67
  • Page 68 68
  • Page 69 69
  • Page 70 70
  • Page 71 71
  • Page 72 72
  • Page 73 73
  • Page 74 74
  • Page 75 75
  • Page 76 76
  • Page 77 77
  • Page 78 78
  • Page 79 79
  • Page 80 80
  • Page 81 81
  • Page 82 82
  • Page 83 83

Dell PowerEdge 2550 Owner's manual

Category
Server/workstation motherboards
Type
Owner's manual

Ask a question and I''ll find the answer in the document

Finding information in a document is now easier with AI