
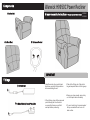
eat Unit
Transformer
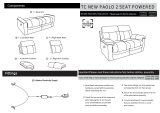
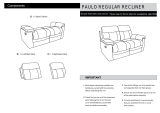
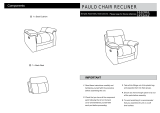
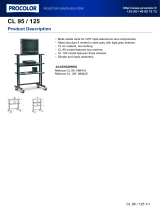
Components
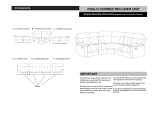
Simple Assembly Instructions - Please keep for future refence
Fittings
IMPO RTAN T
1xS
A
B
C
1xBack Rest
1xRemote Control
1x
1.Read these instr ucti on ca refully and
familiarise yo urse lf with the procedure
before ass embling the unit.
2.Check that yo u have all the component
parts following the list on the back
cover and familiarise yourself with
each part before proce eding.
3.Take all the fittings out of the pl ast ic
bag and sepa rate them int o thei r gr oups .
4.Ensur e you have enough spac e to lay
out all the par ts bef or e ass embly.
5.To avoi d scrat chi ng it is recom mended
that you ass em ble the uni t on a sof t
level sur face.
Warwick H9950C Power Recliner
6905941
6911265
1x
Mains Electricity Supply Plug Cable
E
D
G
F

Push the "DOWN" button which will recliner
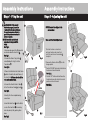
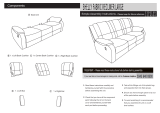
Assembly Instructions Assembly Instructions
Stage 1 - Fiting the unit Stage 2 - Adjusting the unit
WARNING:If the supply
cord is damaged,it must be
replaced by the manufacturer,
its service agent or similarly
qualified persons in order to
avoid a hazard.
See fig.
.
NOTE:Connect the adapt or to the
mains sock et.
Back and Fo ot Rest Adjust ment
Thi s chair features a electronic
recl ini ng and rai sed foot
rest .You need to use the
to it.
NOTE:It woul d be use ful to ask
someone to he lp you at thi s
stage.
Metal Lock
fig.
function
1.
fig.1
.
remote
ustadj
1.
storage pocket
1.Remove and unpack the fittings which
are stored under the Seat Unit
2.Connect the Mains Plug Cable
socket(labelled G in fig 1) into the
Transformer .
H
which is fasted to the metal frame of
the Seat Unit .
4.Connect the Electric Motor Cable
H
3.Please to find the Electric Motor Cable
to the Transformer Cable at point .
F
5.See fig 2 for the completed wiring
connections.
6.Insert the Back Rest into the Metal
Locks of the Seat Unit .Ensure they
lock into place by fully pushing them
down.
G
Remove the Remote Control from the
the chair and raise the footrest
Push the "UP" button which will lower the
footrest and move the chair to its normal
position or incline it forward.
F
E
D
A
B
A
D
E
A
B
F
G
A
E
B
A
C
C
C
H
Please do not untie the
See fig. 1.
wire on the metal frame.
See fig. 2.
See fig. 2.
See fig. 2.
fig.4
fig.3
2
See fi
g.
3.
See fig. 4.See fig.
2.
3.

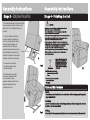
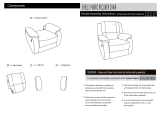
Assembly Instructions Assembly Instructions
Stag Stage 4 - Finishing the Unit
Care and Maintenance
fig.6
A
!
CAUTION:
WAS TE ELE CT RI CA L PR OD UC TS
SH OU LD NO T BE DI SP OS ED OF
WI TH HO US EHO LD WAS TE .PL E-
AS E RE CY CL E WHE RE FAC IL ITI -
ES EXI ST .CH E CK WI TH YO UR
LOC AL AUTH OR ITY FOR RECYAL
ING AD VI CE .
NOTE:It would be useful to ask
someone to help you at this
Stage.
1.Finally carefully place the unit in
the desired location.
See fig.6.
Safety
Cleaning
Fitting
To avoid any risk of suffocation to animals or children dispose of the plastic
bags immediately.
As with all surfaces clean with a damp cloth and mild detergent ,do not use
bleach or abrasive products.
From time to time please ensure there are no loose screws on the product.
-This appliance is not intended for use by persons(including
children) with reduced physical,sensory or mental capabilities,
or lack of experience and knowledge,unless they have
been given supervision or instruction concerning
use of the appliance by a person responsible for their safety.
-Children should be supervised to ensure that they do not
play with the appliance.
-Beware of entrapment. Keep hands and fingers clear of
mechanism
when operating the controls.
-Ensure that children or pets are not playing or lying in the
way when the mechanism is operated.
-Prevent children from playing on the furniture or with the controls.
-Ensure that the cable between the transformer and the plug
is kept clear of the mechanism under the chair.
e 3 -
Safety Power Pressure Pads
1.The Warwick is fitted with 3 Pressure Pad Strips
prevent entrapment by stopping the
chair from any further motion should
an object become trapped on the
underside of the chair .When the
pressure pad strip comes into contact
with anything the chair will stop.The
obstruction should then be removed to
2. These are fitted for your safety to
3.It is important to ensure that
there pressure pads are Kept
4.Finally always make sure that
there are no obstructions under
the chair before or during
always be kept away from the
locations
fig.5
on the underside of the frame at the back and
sides of the Chair .The diagram shows the
operation Children and Pets should
underside of the chair.
clear of obstructions.
enable the chair to function normally.
Pressure Pad Strips
7
fig.
.
-
 1
1
-
 2
2
-
 3
3


Argos Home AH WARWICK POWER RECLINER CHOCOLATE User manual
- Type
- User manual
- This manual is also suitable for
Ask a question and I''ll find the answer in the document
Finding information in a document is now easier with AI
Related papers
-
Argos Home AH1 COSTA SWIVEL CHAIR RED User manual
-
 Argos Home Adjustable Chrome 2 Tier Clothes Rail User manual
-
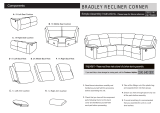 Argos Home BRADLEY User manual
-
 Argos Home Paolo Corner Manual Recliner Sofa User manual
-
Argos Home PAULO LARGE RECLINER 1454026 User manual
-
 Argos Home AH NEW PAOLO 2 SEAT RECLINER BLACK POWER User manual
-
-
Argos Home TC NEW PAOLO 3 SEAT RECLINE TAN PWR User manual
-
 Argos Home NEW PAOLO User manual
-
 Argos Home TC NEW PAOLO 2 SEAT RECLINE TAN User manual


Other documents
-
 The Collection by Argos TC NEW PAOLO CHAIR RECLINER TAN User manual
-
 Procolor 098415 Datasheet
-
 The Collection by Argos 3316904 User manual
-
SunriseMedical EIPW25 Owner's manual
-
 Quickie Mfg. Quickie Groove M User manual
-
 The Collection by Argos H-5749C User manual
-
Invacare Harrier XHD User manual
-
 Convaid Rodeo User manual
-
Quickie F35 R2 Instructions For Use Manual
-
 Argos TC NEW PAOLO 5481215 Simple Assembly Instructions


