Page is loading ...

Water Purifier, Auto Still
®
Model
WA 200
Instruction Manual
- Version 7 -
Yamato Scientific Co., LTD.
This paper has been printed on recycled paper.
z Thank you for purchasing "Auto Still
®
, WA 200"
of Yamato Scientific Co., Ltd.
z To use this unit properly, read this "Instruction
Manual" thoroughly before using this unit.
Keep this instruction manual around this unit for
referring at anytime.
WARNING!
Carefully read and thoroughly understand the
important warning items described in this
manual before using this unit.

Contents
Cautions in Using with Safety................................................................1
• Explanation.................................................................................................................... 1
• Table of Illustrated Symbols .......................................................................................... 2
• Fundamental Matters of “WARNING!” and “CAUTION!” ............................................... 3
Before Using this unit.............................................................................5
Description and Function of Each Part...............................................15
• Main Unit ..................................................................................................................... 15
• Piping System View..................................................................................................... 16
• Principle of Operation.................................................................................................. 17
•
Control Panel............................................................................................................... 19
Operation Method .................................................................................23
• Setup and Check before Use ...................................................................................... 23
• Operation Procedure................................................................................................... 24
• Sampling of Pure Water .............................................................................................. 25
• Sampling Specified Quantity of Ion Exchange Water.................................................. 26
• Sampling Specified Quantity of Distilled Water ........................................................... 27
• Display of Water Quality.............................................................................................. 28
• Display and Reset of Accumulative Water Feed ......................................................... 30
Handling Precautions ...........................................................................31
Maintenance Method.............................................................................32
• Daily Inspection and Maintenance .............................................................................. 32
• Washing of Distiller...................................................................................................... 34
• Replacement of Heater ............................................................................................... 38
•
Washing of Water Supply Hose Filter.......................................................................... 39
•
Replacement of Hose.................................................................................................. 39
Long storage and disposal...................................................................40
•
When not using this unit for long term / When disposing ............................................ 40
In the Event of Failure….......................................................................43
• Trouble display and description of error code ............................................................. 43
• Display of Trouble Other than Error Code ................................................................... 44
• Remedy for Trouble..................................................................................................... 45
• Remedy in Emergency ................................................................................................ 46
After Service and Warranty ..................................................................47
Specification..........................................................................................48
Wiring Diagram......................................................................................49
Replacement Parts Table......................................................................50
Reference...............................................................................................51
• List of Dangerous Substances .................................................................................... 51

1
Cautions in Using with Safety
Explanation
MEANING OF ILLUSTRATED SYMBOLS
Various symbols are used in this safety manual in order to use the unit without
danger of injury and damage of the unit. A list of problems caused by ignoring
the warnings and improper handling is divided as shown below.Be sure that you
understand the warnings and cautions in this manual before operating the unit.
WARNING!
If the warning is ignored, there is the danger of a problem that
may cause a serious accident or even fatality.
CAUTION!
If the caution is ignored, there is the danger of a problem that may
cause injury/damage to property or the unit itself.
Meaning of Symbols
This symbol indicates items that urge the warning (including the caution).
A detailed warning message is shown adjacent to the symbol.
This symbol indicates items that are strictly prohibited.
A detailed message is shown adjacent to the symbol with specific actions not to
perform.
This symbol indicates items that should be always performed.
A detailed message with instructions is shown adjacent to the symbol.
Illustrated Symbols

2
Cautions in Using with Safety
Table of Illustrated Symbols
Warning
Warning,
generally
Warning,
high voltage
Warning,
high temperature
Warning,
drive train
Warning,
explosive
Caution
Caution,
generally
Caution,
electrical shock
Caution,
scald
Caution,
no road heating
Caution,
not to drench
Caution,
water only
Caution,
deadly poison
Prohibit
Prohibit,
generally
Prohibit,
inflammable
Prohibit,
to disassemble
Prohibit,
to touch
Compulsion
Compulsion,
generally
Compulsion,
connect to the
grounding
terminal
Compulsion,
install on a flat
surface
Compulsion,
disconnect the
power plug
Compulsion,
periodical
inspection

3
Cautions in Using with Safety
Fundamental Matters of “WARNING!” and “CAUTION!”
WARNING!
Do not use this unit in an area where there is flammable or explosive gas
Never use this unit in an area where there is flammable or explosive gas.
This unit is not explosion-proof. An arc may be generated when the power switch is turned on or off,
and fire/explosion may result. (Refer to Page 51 “List of Dangerous Substances”.)
Be sure to connect grounding wire.
Connect to grounded plug socket. If no grounded plug socket is available, be sure to connect
grounding lead by use of ground adapter attached in nonstandard. Failure to do so could cause
electric shock or fire.
If a problem occurs
If smoke or strange odor should come out of this unit for some reason, turn off the power key right
away, and then turn off the circuit breaker and the main power. Immediately contact a service
technician for inspection. If this procedure is not followed, fire or electrical shock may result. Never
perform repair work yourself, since it is dangerous and not recommended.
Do not use the power cord if it is bundled or tangled
Do not use the power cord if it is bundled or tangled. If it is used in this manner, it can overheat and
fire may be caused.
Do not process, bend, wring, or stretch the power cord forcibly
Do not process, bend, wring, or stretch the power cord forcibly. Fire or electrical shock may result.
Do not disassemble or modify this unit
Do not disassemble or modify this unit. Fire or electrical shock or failure may be caused.
Do not touch hot portion
Boiler may be hot in some portion in operation or immediately after operation. Be aware of burns.
When performing maintenance of heater etc., ensure that the boiler is cooled down beforehand.
Close the tap when unit is out of service
When unit is out of service (at night or on holiday), be sure to close the tap so as to avoid water leakage
accident.

4
Cautions in Using with Safety
Fundamental Matters of “WARNING!” and “CAUTION!”
CAUTION!
During a thunder storm
During a thunderstorm, turn off the power key immediately, then turn off the circuit breaker and the main
power. If this procedure is not followed, fire or electrical shock may be caused.
Exercise care in handling washing liquid (Orgazor)
Principal component of washing liquid (Orgazor) is sulfamic acid, which is acidic almost equal to water
solution PH:1. Use protective tool (gloves, mask, and glasses) in handling. When it is touched by
human body, immediately wash it away with clean water.

5
Before Using this unit
Requirements for Installation
WARNING!
1. Always ground this unit
• Connect the power plug to a receptacle with grounding connectors.
• Do not forget to ground this unit, to protect you and the unit from electrical shock in case of
power surge. Choose a receptacle with grounding connectors as often as possible.
• Do not connect the grounding wire to a gas pipe, or by means of a lightning rod or telephone
line. A fire or electrical shock will occur.
2. Choose a proper place for installation
• Do not install this unit in a place where:
♦ Rough or dirty surface.
♦ Flammable gas or corrosive gas is generated.
♦ Ambient temperature exceeds 35°C.
♦ Ambient temperature fluctuates violently.
♦ There is direct sunlight.
♦ There is excessive humidity and dust.
♦ There is a constant vibration.
• Keep space around each product above the range shown below. Install units within sink
equipment if possible.
More than 10cm
Front side
More
than
10cm
More
than
10cm
3. Do not use this unit in an area where there is flammable or explosive gas
• Never use this unit in an area
where there is flammable or
explosive gas. This unit is not
explosion-proof. An arc may be
generated when the power
switch is turned ON or OFF,
and fire/explosion may result.
(To know about flammable or
explosive gas, refer to Page 51
“List of Dangerous
Substances”.)

6
Before Using this unit
Requirements for Installation
4. Do not modify
• Never disassemble this unit.
• This unit has high voltage inside in some
portion, which may cause electric shock.
Contact dealers or Yamato Scientific Co., Ltd.
sales office for adjusting or repairing inside.
• In routine maintenance and inspection, follow
the procedure described in the instruction
manual. Do avoid modification by customer
because it may lead to trouble.
5. Installation on horizontal surface
• Set this unit to the flattest place. Setting this
unit on rough or slope place could cause the
vibration or noise, or cause the unexpectible
trouble or malfunction.
6. Choose a correct power distribution board or receptacle
• Use a plug socket conforming to electric capacity (capacity 15A or greater).
• When power capacity is insufficient, sampling of distilled water goes short, and normal control
is disabled by fall of power voltage. Connect to power equipment having sufficient power
capacity.
Electric capacity:
100V AC Single phase 15A
7. Connection of power cord
• Always ensure that breaker on power unit side is "Off" before connecting power cord. Power
plug of this unit uses 3-core cord including grounding wire, and the plug is grounded type. If
your plug socket is not compatible (2P), use a ground adapter attached in nonstandard. In
using ground adapter, be sure to ground a grounding lead.

7
Before Using this unit
Requirements for Installation
8. Handling of power code
• Do not entangle the power cord. This will cause overheating and possibly a fire.
• Do not bend or twist the power cord, or apply excessive tension to it. This may cause a fire
and electrical shock.
• Do not lay the power cord under a desk or chair, and do not allow it to be pinched in order to
prevent it from being damaged and to avoid a fire or electrical shock.
• Keep the power cord away from any heating equipment such as a room heater. The cord's
insulation may melt and cause a fire or electrical shock.
• If the power cord becomes damaged (wiring exposed, breakage, etc.), immediately turn off the
power at the rear of this unit and shut off the main supply power. Then contact your nearest
dealer for replacement of the power cord. Leaving it may cause a fire or electrical shock.
• Connect the power plug to the outlet which is supplied appropriate power and voltage.
9. Connect the water supply hose securely
• Always ensure that breaker on power unit side is "Off" before connecting power cord. Power
plug of this unit uses 3-core cord including grounding wire, and the plug is grounded type. If
your plug socket is not compatible (2P), use a ground adapter attached in nonstandard. In
using ground adapter, be sure to ground a grounding lead.
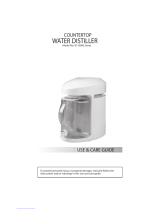
10. Connect the water supply hose securely
• Connection on tap side
1. Slide the sleeve of socket ③ on connection port side in the arrow direction, then connection
port body and water supply hose can be separated. There separate the two parts.
2. Once loosen the plug ② from the ring ①.
3. Tighten the 4 mounting screws ⑤ uniformly while pressing the ring ① slightly and uniformly
to make the packing ⑥ in flat contact with water tap. If the tap is a chemical tap, adjust the
position so that the mounting screw is located at the bottom valley of tap nipple as shown.
4. Turn the plug ② clockwise to tighten securely. This will allow the tap and connection port to
be sealed by packing ⑥.
5. Insert the socket ③ securely to the plug ② with the sleeve slid in the arrow direction. The
sleeve returns to the original position when released, and then connection is completed.
Tap
Connection
Port Body
Socket on
Connection
Port
Side
Water
Supply Hose
Sleeve on Water
Supply Port
Water
Supply Port
Connection Port Body
①Ring
②Plug
③Socket
④Spacer
⑤Mounting Screw
⑥Packing
⑦Filter
One-touch
Joint
④
⑤
⑥
⑦
①
②
③
Tap
Sleeve
Tap side

8
Before Using this unit
Requirements for Installation
11. Connection on body side
1. Remove the rubber cap from the plug ⑧.
2. Insert the socket
⑨ securely to the plug ⑧
on body side with the sleeve slid in the
arrow direction. The sleeve returns to the
original position when released, and then
connection is completed. The socket
contains a valve inside, which opens only
when the socket is connected by plug;
otherwise, water is not fed because this
valve does not open.
12. Connect the water supply hose to the tap provided with sink equipment
• If the water supply hose is
connected to a tap without
sink equipment, flood damage
may be caused when water
supply hose is disconnected
or damaged; therefore be
sure to connect to a tap
having sink equipment.
Sleeve
⑧
⑨
Tap
Water supply hose
Socket on
connection
port side
Connection port Body
Sink

9
Before Using this unit
Requirements for Installation
CAUTION!
13. When the sink equipment is remote from water tap, use "Water Supply Port Unit"
(optional accessory).
• Water supply port unit is made
in a set from the nipple to the
sleeve shown on the right.
See the instruction manual of
"Water Supply Port Unit" for
detail, such as the method for
connecting to city water tube.
• "Water Supply Port Unit" is
designed to loosen the
connection to the tap harder
than the set of standard water
supply hoses when water
pressure fluctuates.
Nipple
Strainer with valve
City water tube
Elbow
Water supply hose
Sleeve
14. Observe the specified pressure range of raw water from waterworks
• Apply the range of city water pressure between 0.5 X 100kPa and 5 X 100kPa (0.5 - 5kgf/cm
2
)
including nighttime.
• Range of raw water pressure is the same when "Water Supply Port Unit" (optional accessory)
is used.

10
Before Using this unit
Requirements for Installation
WARNING!
15. Connect the drain hose securely
• If the drain hose is not connected securely, it may be disconnected, leaking water in the unit,
or leading to trouble of system.
1. Take the drain hose and hose band out of attachments to the body.
2. Always make sure that the electric leakage breaker of the unit is "OFF".
3. Remove the rubber cap located at the outlet of drain port.
4. Feed the hose through the hose band, then into the drain port, and tighten the hose band
securely.
Hose Band
Drain Hose Drain Hose
Drain Port
16. Use care in routing of drain hose
• Do avoid making bend or projection of drain hose.
• Place the drain hose lower than the drain port of this unit. Further, avoid piping which allows
paddle in the hose or at the hose outlet, because it is a resistance against drain.
• Place the end of drain hose where drain is allowed. When distilled water is being prepared,
cooling water is drained approx. 2 liters/min. Also drain further increases when boiler water is
drained, and sufficient drain equipment is required.

11
Before Using this unit
Requirements for Installation
17. Check the drain temperature of cooling water
• Drain temperature may exceed 60℃ in drainage from boiler. Drain to a place remote from
working environment not to be touched easily because there is a danger of burns.
• The cooling water with hot temperature may flow out. It may cause deterioration of pipe
when vinyl chloride pipe is used for sink drain equipment, so drain to a position farther than
sink drainpipe. Further, use VP pipe (JIS K6741) for vinyl chloride pipe, and DV-RR joint for
joint part, and use a drain trap (nonstandard options) when drain temperature is high (above
60℃) even if insertion socket (JIS K6739) is used. Even when drain temperature is below
60℃, use a drain trap attached in nonstandard if the tube and joint above are not used.
18. When drain temperature of sink equipment does not fall under 60℃
• Use a drain trap (optional accessory).
• Drain trap makes temperature fall by accumulating cooled drain water temporarily. Further, it
mixes city water and cooled-down drain water, makes mixed water temperature fall, then lets
drain to sink equipment.
• Contact your dealer or Yamato Scientific sales office for detail of drain trap.
Auto Still
Drain trap (optional)
Frame (optional)

12
Before Using this unit
Requirements for Installation
19. Install the ion exchange resin cartridge (CPC-N) and soft water resin cartridge
(OWA30) securely
• Install the ion exchange resin cartridge (CPC-N) and soft water resin cartridge (OWA30) following
the procedure shown below.
• Connect securely because insecure connection may cause water leakage.
1. Make sure that the electric leakage breaker of this unit is "Off" and that the tap is tightened.
2. Take the ion exchange resin cartridge and soft water resin cartridge out of attachments to the body.
3. Place the ion exchange resin cartridge and soft water resin cartridge taken out on the receiver within
the unit. (See Fig.1.)
4. Fix the ion exchange resin cartridge and soft water resin cartridge with the band of receiver. (See
Fig.2.)
5. Remove the rubber cap attached to the inlet and outlet of ion exchange resin cartridge and soft
water resin cartridge.
6. Fit in the coupler marked with (N) (IN) to the inlet of ion exchange resin cartridge (left) until click is
heard.
7. Fit in the coupler marked with (N) (OUT) to the outlet of ion exchange resin cartridge (right) until click
is heard.
8. Fit in the coupler marked with (soft water) (IN) to the inlet of soft water resin cartridge (left) until click
is heard.
9. Fit in the coupler marked with (soft water) (OUT) to the outlet of soft water resin cartridge (right) until
click is heard.
Coupler may be hard at first. When applying force in inserting, do not make it curved because
insertion port may be broken.
Yellowish colored water may come out through Ion Exchange Resins packed in Soft Water Resin
Cartridge at the beginning. This yellowish colored water will be caused by the polystyrene sulfonic
acid(PSA) in Ion Exchange Resins only at the beginning and is not the Remarkable phenomenon.
This PSA will be stayed inside the boiler at distilling process and never dissolved into the distilled
water. However, yellowish colored water can be drained by opening the boiler drain cock around 20
minutes (about 20 litters).
Ion Exchange Resin Cartridge (CPC-N)
Soft Water Resin Cartridge (OWA30)
Fig.1
Fig.2
OUT
IN

13
Before Using this unit
Requirements for Installation
20. Secure the pre-treatment cartridge securely
• Connect the hose in the body securely following the procedure shown below.
• Insecure connection may cause disconnection of connection hose, resulting in accident by
water leakage.
1. Make sure that the electric leakage breaker of this unit is "OFF" and that the tap is tightened.
2. Take the pre-treatment cartridge
① out of attachments to the body.
3. Inlet and outlet of the pre-treatment cartridge
① are provided with a cap, so remove it.
4. When the front door of this unit is opened, connection hose marked IN and OUT is found in
the coupler; there make connection matching them with IN and OUT on pre-treatment
cartridge
①.
5. In connecting, mate the coupler and port of cartridge while sliding the blue portion
③ of
coupler toward the hose, push in, then release the blue portion
③.
6. When connection is finished, place the pre-treatment cartridge at the position shown on the
right (near side on the left of distilled water tank) as paying attention to the bend of hose.
Fig.3
Fig.4
②
①

14
Before Using this unit
Requirements for Installation
21. Connect the membrane filter securely
• Install the membrane filter by the procedure shown below.
• Connect securely because insecure connection may cause water leaking from screwed part,
mixing into and contaminating collected pure water.
1. Take two membrane filters and sealing tape out of attachments to the body.
2. Wrap the seal tape a few winds around with a slight tension clockwise viewing from wrapping side.
At that time, pay attention to the direction of arrow on the membrane filter.
Seal Tape
3. Screw the membrane filter about 3 turns into the screw of filter joint with seal tape side up. At that
time, pay attention not to crush threads. Check for water leakage in sampling pure water. If any
leakage is found, screw in further.
22. After installation
• This unit may topple over due to unexpected earthquake or shock causing injury. Take an
appropriate measure against toppling for safety.

15
Description and Function of Each Part
Main Unit
The name of each part is shown below.
Pre-treatment Cartridge
Heater Terminal Block
Heater
Ion Exchange Resin
Cartridge (CPC-N)
Production Plate
Control Panel
Boiler
Boiler Water Drain Cock Soft Water Resin Cartridge (OWA30)
Distilled Water Tank
Earth Leakage Breaker
Specification Plate
Drain Port
Water Supply Port
Membrane Filter
(Ion Exchange Water Sampling Port)
Membrane Filter
(Distilled Water Sampling Port)

16
Description and Function of Each Part
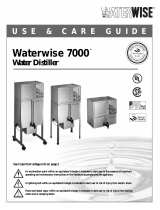
Piping System View
1
Pressure Reduction Valve
17
Distilled Water Quality Gauge Electrode
2
Pressure Switch
18
Initial Accumulated Water Drain
Solenoid Valve
3
Cooling Water Solenoid Valve
19
Ion Exchange Water Sampling Solenoid Valve
4
Boiler Water Supply Solenoid Valve
20
Distilled Water Sampling Solenoid Valve
5
Pre-treatment Cartridge
21
Flow Rate Sensor
6
Soft Water Resin Cartridge
22
Ion Exchange Water Sampling Port
7
Float Cylinder
23
Distilled Water Sampling Port
8
Boiler Overheat Detecting Float Switch
24
Distilled Water Tank
9
Boiler Water Level Control Float Switch
25
Water Level Detecting Float Switch
10
Heater Control Float Switch
26
Air Filter
11
Boiler Water Drain Solenoid Valve
27
Magnet Pump
12
Boiler Drain Cock
28
Pressure Detector
13
Boiler
29
Ion Exchange Resin Cartridge
14
Heater
30
Distilled Water Tank Drain Port
15
Condenser
31
Membrane Filter
16
Ion Exchange Water Quality Gauge Electrode
32
Membrane Filter
Boiler Water Level Control Solenoid Valve
2
3
4
6
15
13
14
7
8
5
9
11
12
17
25
29
16
19
22
23
24
30
27
20
26
28
21
10
18
31
32
33
33

17
Description and Function of Each Part
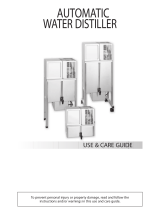
Principle of Operation
1. Boiler Water Supply and Distilling Operation
Turn "ON" the electric leakage breaker, and press the power switch, then the boiler water supply
solenoid valve (4), Boiler Water Level Control Solenoid Valve (33) opens, feeding water to the
boiler. When the boiler water level control float switch (9) in the float cylinder (7) detects water
level, the heater (14) is energized and distilling is started. Water supply to the boiler is
controlled by opening and closing the boiler water supply solenoid valve by use of boiler water
level control float switch (9).
Boiler water is automatically drained every 6 hours, which prevents condensation of boiler water.
2. Flow of Cooling Water
During distilling operation, water is fed and drained in the order of Pressure reducing valve (1),
Cooling water solenoid valve (3), and Condenser (15). Distilling is stopped when distilled water
tank is full, and feeding of cooling water is also automatically stopped.
7
9
14
13
33
4
15
3
1

18
Description and Function of Each Part
Principle of Operation
3. Sampling of Distilled Water
The distilled water condensed in the condenser (15) is stored in the distilled water tank (24) from
the distilled water quality electrode (17) after discharging the initial boiled water via the initial
boiled water discharge solenoid valve (16) for about 10 min. since the distillation is started. If
the float switch (25) on top of the tank trips, it is deemed as Full Tank, and distillation is stopped.
When distilled water is sampled and a specified amount is consumed, distilled water is produced
automatically.
The stored distilled water is sampled by distilled water sampling pump (27) through flow rate
sensor (21), distilled water sampling solenoid valve (20), and membrane filter (32).
When the storage of distilled water in the tank goes below 2l approx., float switch at the bottom
operates and the pump stops automatically in order to prevent idling of pump
4. Sampling Ion Exchanged Water
The stored distilled water is collected by sampling pump (27) through flow rate sensor (21), ion
exchange resin cartridge (29), ion exchanged water quality electrode (16), ion exchanged water
sampling solenoid valve, and membrane filter (31).
When storage of distilled water in the tank goes below 2l approx., float switch at the bottom
operates and the pump stops automatically in order to prevent idling of pump.
Knurled Screw
15
21
17
18
27
20
23
32
25
24
25
22
27
21
31
29
16
19
/