Page is loading ...

Water Purifier, Auto Still
Model
WS 200/220
Instruction Manual
- First Edition -
Yamato Scientific Co. LTD.
z Thank you for purchasing " Auto Still, WS
Series" of Yamato Scientific Co., Ltd.
z To use this unit properly, read this "Instruction
Manual" thoroughly before using this unit.
Keep this instruction manual around this unit
for referring at anytime.
WARNING!:
Carefully read and thoroughly understand the
important warning items described in this
manual before using this unit.


Contents
Cautions in Using with Safety................................................................1
• Explanation....................................................................................................................1
• Table of Illustrated Symbols ..........................................................................................2
• Fundamental Matters of “WARNING!” and “CAUTION!”...............................................3
Before Using this unit.............................................................................4
• Requirements for Installation.........................................................................................4
Description and Function of Each Part.................................................7
• Main Unit.......................................................................................................................7
• Control Panel.................................................................................................................9
• Piping System View.....................................................................................................10
Installation/Operation Method..............................................................11
• Connecting the Water Supply Hose ............................................................................ 11
• Connecting the Drain Hose......................................................................................... 12
• Operation Preparation.................................................................................................12
• Operation Method........................................................................................................12
Handling Precautions ...........................................................................13
Maintenance Method.............................................................................15
• Daily Inspection and Maintenance ..............................................................................15
• Washing Distiller..........................................................................................................16
• Washing Method .........................................................................................................18
• Replacement of Hose..................................................................................................19
• Replacement of Heater ...............................................................................................20
Long storage and disposal...................................................................21
•
When not using this unit for long term / When disposing............................................21
In the Event of Failure….......................................................................22
After Service and Warranty ..................................................................23
Specification..........................................................................................24
Wiring Diagram......................................................................................25
Replacement Parts Table......................................................................26
Reference...............................................................................................27
• List of Dangerous Substances ....................................................................................27


1
Cautions in Using with Safety
Explanation
MEANING OF ILLUSTRATED SYMBOLS
Various symbols are used in this safety manual in order to use the unit without
danger of injury and damage of the unit. A list of problems caused by ignoring
the warnings and improper handling is divided as shown below.Be sure that you
understand the warnings and cautions in this manual before operating the unit.
WARNING!
If the warning is ignored, there is the danger of a problem that
may cause a serious accident or even fatality.
CAUTION!
If the caution is ignored, there is the danger of a problem that may
cause injury/damage to property or the unit itself.
Meaning of Symbols
This symbol indicates items that urge the warning (including the caution).
A detailed warning message is shown adjacent to the symbol.
This symbol indicates items that are strictly prohibited.
A detailed message is shown adjacent to the symbol with specific actions not to
perform.
This symbol indicates items that should be always performed.
A detailed message with instructions is shown adjacent to the symbol.
Illustrated Symbols

2
Cautions in Using with Safety
Table of Illustrated Symbols
Warning
Warning,
generally
Warning,
high voltage
Warning,
high temperature
Warning,
drive train
Warning,
explosive
Caution
Caution,
generally
Caution,
electrical shock
Caution,
scald
Caution,
no road heating
Caution,
not to drench
Caution,
water only
Caution,
deadly poison
Prohibit
Prohibit,
generally
Prohibit,
inflammable
Prohibit,
to disassemble
Prohibit,
to touch
Compulsion
Compulsion,
generally
Compulsion,
connect to the
grounding
terminal
Compulsion,
install on a flat
surface
Compulsion,
disconnect the
power plug
Compulsion,
periodical
inspection

3
Cautions in Using with Safety
Fundamental Matters of “WARNING!” and “CAUTION!”
WARNING!
Do not use this unit in an area where there is flammable or explosive gas
Never use this unit in an area where there is flammable or explosive gas.
This unit is not explosion-proof. An arc may be generated when the power switch is turned on or off,
and fire/explosion may result. (Refer to page27 “List of Dangerous Substances”.)
Always ground this unit
Always ground this unit on the power equipment side in order to avoid electrical shock due to a power
surge.
If a problem occurs
If smoke or strange odor should come out of this unit for some reason, turn off the power key right
away, and then turn off the circuit breaker and the main power. Immediately contact a service
technician for inspection. If this procedure is not followed, fire or electrical shock may result. Never
perform repair work yourself, since it is dangerous and not recommended.
Do not use the power cord if it is bundled or tangled
Do not use the power cord if it is bundled or tangled. If it is used in this manner, it can overheat and
fire may be caused.
Do not process, bend, wring, or stretch the power cord forcibly
Do not process, bend, wring, or stretch the power cord forcibly. Fire or electrical shock may result.
Substances that can not be used
Never use explosive substances, flammable substances and substances that include explosive or
flammable ingredients in this unit. Explosion or fire may occur.
Do not disassemble or modify this unit
Do not disassemble or modify this unit. Fire or electrical shock or failure may be caused.
CAUTION!
During a thunder storm
During a thunderstorm, turn off the power key immediately, then turn off the circuit breaker and the main
power. If this procedure is not followed, fire or electrical shock may be caused.

4
Before Using this unit
Requirements for Installation
WARNING!
1. Always ground this unit
• Connect the power plug to a receptacle with grounding connectors.
• Do not forget to ground this unit, to protect you and the unit from electrical shock in case of
power surge. Choose a receptacle with grounding connectors as often as possible.
• Do not connect the grounding wire to a gas pipe, or by means of a lightning rod or telephone
line. A fire or electrical shock will occur.
2. Choose a proper place for installation
• Do not install this unit in a place where:
♦ Rough or dirty surface.
♦ Flammable gas or corrosive gas is generated.
♦ Ambient temperature exceeds 35°C.
♦ Ambient temperature fluctuates violently.
♦ There is direct sunlight.
♦ There is excessive humidity and dust.
♦ There is a constant vibration.
• Install this unit on a stable place with the space as shown below. This unit should be installed
horizontally by using adjusters on the four corners.
Main Unit
More than
20cm
More than
20cm
More than 20cm
Front side

5
Before Using this unit
Requirements for Installation
3. Do not use this unit in an area where there is flammable or explosive gas
• Never use this unit in an area where there is
flammable or explosive gas. This unit is not
explosion-proof. An arc may be generated
when the power switch is turned ON or OFF,
and fire/explosion may result. (To know about
flammable or explosive gas, refer to page27
“List of Dangerous Substances”.)
4. Do not modify
• Modification of this unit is strictly prohibited.
This could cause a failure.
5. Installation on horizontal surface
• Set this unit to the flattest place. Not setting
this unit with its 4 legs covered with rubber
contacted to the setting place surface evenly
could cause the vibration or noise, or cause
the unexpectible trouble or malfunction.

6
Before Using this unit
Requirements for Installation
CAUTION!
6. Choose a correct power distribution board or receptacle
• Choose a correct power distribution board or receptacle that meets the unit’s rated electric
capacity.
Electric capacity: WS200: AC100 V, 15A
WS220: AC100 V, 15A
NOTE)
There could be the case that the unit does not run even after turning ON the power. Inspect
whether the voltage of the main power is lowered than the specified value, or whether other
device(s) uses the same power line of this unit. If the phenomena might be found, change the
power line of this unit to the other power line.
7. Before/after installing
• It may cause injure to a person if this unit falls down or moves by the earthquake and the
impact. etc..To prevent, take measures that the unit cannot fall down, and not install to busy
place.
8. Handling of power code
• Do not entangle the power cord. This will cause overheating and possibly a fire.
• Do not bend or twist the power cord, or apply excessive tension to it. This may cause a fire
and electrical shock.
• Do not lay the power cord under a desk or chair, and do not allow it to be pinched in order to
prevent it from being damaged and to avoid a fire or electrical shock.
• Keep the power cord away from any heating equipment such as a room heater. The cord's
insulation may melt and cause a fire or electrical shock.
• If the power cord becomes damaged (wiring exposed, breakage, etc.), immediately turn off the
power at the rear of this unit and shut off the main supply power. Then contact your nearest
dealer for replacement of the power cord. Leaving it may cause a fire or electrical shock.
• Connect the power plug to the outlet which is supplied appropriate power and voltage.

7
Description and Function of Each Part
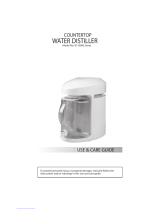
Main Unit
WS200
Rear view (common to WS200/220)
Power cord
Drain hose
Water supply port
Heater
Tank
Float switch
Float tube
Water cock
Rubber leg
Condenser
Micro switch
Bimetal thermostat
Boiler
Fixed flow rate valve
Solenoid valve
Drain port
Boiler drain cock
Production plate
(Right side of the unit)
Power switch
(Earth leakage breaker)
Control/Display panel

8
Description and Function of Each Part
Main Unit
WS220
Tank
Float switch
Float tube
Water cock
Rubber leg
Condenser
Micro switch
Bimetal thermostat
Boiler
Fixed flow rate valve
Solenoid valve
Drain port
Boiler drain cock
Production plate
(Right side of the unit)
Power switch
(Earth leakage breaker)
Control/Display panel
Water supply port
Heater

9
Description and Function of Each Part
Control Panel
POWER
DISTILL
FULL LEVEL
POWER
ALARM
①
②
④
③ ⑤
① Power switch:
Power switch shared by the earth leakage breaker. If the
lever is raised, it is ON.
② Power lamp:
POWER (green): Goes ON when the power switch is ON.
③ Alarm lamp:
ALARM (red): Goes ON when the boiler water level falls.
④ Distillation lamp:
DISTILL (green): Goes ON in distillation (= heater energized).
⑤
Full tank lamp
FULL LEVEL (green): Goes ON when the tank is full. Then,
the lamps ③ and ④ are OFF.
NOTE) If the boiler water falls below the specified level, the alarm lamp remains ON until the specified level of
water is supplied in the boiler after the power switch is turned ON.
The alarm lamp goes OFF when the specified level is reached and the heater is energized (distillation
lamp ON).

10
Description and Function of Each Part
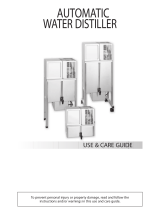
Piping System View
① Water supply port ⑨ Heater
② Solenoid valve ⑩ Heater integument pipe
③ Fixed flow rate valve ⑪ Boiler
④ Micro switch (Heater control) ⑫ Condenser
⑤ Float ⑬ Float switch
⑥ Float tube ⑭ Tank
⑦ Drain port ⑮ Water cock
⑧ Manually cock ( Boiler drain)
Mechanism
1) Water Supply (cooling water, boiler water)
Raw water is controlled to a specified flow rate (about 0.8 liter/min.) by the fixed flow rate
valve, and heat-exchanged in the condenser ⑫ as the cooling water, and then supplied to the
boiler ⑪ via the float tube ⑥, thus overflowing if exceeding the specified level finally to be
drained to outside.
2) Distillation
When the boiler ⑪ reaches the specified water level, the float ⑤in the float tube ⑥ goes up,
and detects the water level, and the heater⑨is turned ON to start distillation. The water
boiled in the boiler turns to steam, cooled/condensed in the condenser ⑫, and then pooled in
the tank as distilled water.
3) Full Tank
When the tank ⑭ reaches the specified amount of water of about 20 liter, the float switch ⑬
trips, and the solenoid valve (for supplying water) ② turns OFF, preventing the water supply
to the main unit, while the heater ⑨ turns OFF to stop distillation. When any specified
amount water has been sampled from the tank, distillation will be restarted.
4) Sampling Water
The distilled water pooled in the tank ⑭ can be sampled by opening the water cock ⑮.
WS200 ⑩
WS220
Water supply Water drain
Sampling

11
Installation/Operation Method
Connecting the Water Supply Hose
Set the main unit at a level and stable place near the tap and sink.
Keep the space of about 20cm or more in the both sides, over and back of the main unit for radiation.
Take out the accessories such as the water supply hose and water drain hose from the packaging
material in the bottom.
Tap Side (See Fig. 1)
1. Slide the sleeve of the socket ③ in the
direction of arrow, and the main unit of the
connection port can be separated from the
hose. At first separate the two components.
2. Loosen the plug ② once by the ring ①.
3. Tighten uniformly the 4 fixing screws ⑤ while
pressing softly the packing ⑥ onto the tap
flat. If the tap is a chemical water tap, the
fixing screws should be adjusted and located
at the lowest depth of the tap nipple as shown
in the drawing.
4. Turn the plug ② clockwise and tighten it
firmly. Thus, the tap and the connection port
are sealed with the packing ⑥.
5. While the sleeve is being slid in the direction of
arrow, insert the socket ③ into the plug ②
firmly. If the sleeve returns when hand
comes off, the connection is accomplished.
NOTE) Ensure that the pressure of water way
remains in the range 50 - 500 Kpa including
night hours.
① Ring
② Plug
③ Socket
Sleeve
Tap
④ Spacer
⑤
Fixing Screw
⑥ Packing
⑦ Filter
Tap Side (Fig. 1)
Main Body Side (See Fig. 2)
1. Remove the rubber cap from the plug ①.
2. While the sleeve is being slid in the direction of
arrow, insert the socket ② firmly into the plug ①
in the main unit side. If the sleeve returns when
hand comes off, the connection is accomplished.
The socket has a valve in it, and such valve will not
open unless the plug is connected, thus preventing
the passage of water.
NOTE) Be sure to connect the attached hose to the tap
at a place where sink is installed (water drain).
If no water drain system is available in the tap
side, be sure to use "Water supply power unit" in
the nonstandard option for safety measure for
water leakage.
① Plug
② Socket
Sleeve
Main Body Side (Fig. 2)
Water Suppl
y
Hose
Water Supply Port
(at the bottom of main body)

12
Installation/Operation Method
Connecting the Drain Hose
1. Remove the rubber plug from the outlet of the
water drain port ②.
2. Route the water drain hose ⑤, and insert it into
the water drain port ②. Then tighten them
with the attached hose band ⑥ firmly.
3. When discharging the boiler water, the temp of
the drained water could exceed 60℃. Worker
could be burned. Do not touch such water
carelessly. Water should be drained to a place
away from the work place.
NOTE)
• The water drain hose may be routed in from the
right/left sides of the main unit. Route such
hose in from convenient side.
• Do not wind around the water drain hose, but
cut it to the required length for use. Take
delicate care to prevent it from being folded,
and be sure to place it below the water drain
port of the main unit. Any piping possibly
causing water pool in the hose or at the outlet
of the hose should be avoided, because the
resistance in discharging water increases.
Flow of water could also be reversed.
①
②
③
④
⑤
⑥
Tap
① Water supply port ② Water drain port
③ Water supply hose ④ Power cable
⑤ Water drain hose ⑥ Hose band
Operation Preparation
Open the front door of the main unit, and remove
the rubber rings fixing the micro-switch and the
float in the float tube (fixed to prevent the float
from coming off in transit). (Be sure to remove
this, for non-load combustion is feared.)
Operation Method
1. Open the tap.
2. Check if the manual cock for discharging boiler water is closed.
3. Turn ON the power switch (shared by earth leakage breaker) in the front.
4. The distilled water pooled in the tank can be sampled by opening the tap.
Micro Switch
Ring Rubber
Float
Float Tube

13
Handling Precautions
WARNING!
If a problem occurs
If smoke or strange odor should come out of this unit for some reason, turn off the power key
right away, and then turn off the circuit breaker and the main power. Immediately contact a
service technician for inspection. If this procedure is not followed, fire or electrical shock may
result. Never perform repair work yourself, since it is dangerous and not recommended.
Substances that cannot be used
Never use explosive substances, flammable substances and substances that include explosive
or flammable ingredients in this unit. Explosion or fire may occur. (Refer to page27 “List of
Dangerous Substances”.)
CAUTION!
Do not step on this unit
Do not step on this unit. It will cause injury if this unit fall down or break.
Do not put anything on this unit
Do not put anything on this unit. It will cause injury if fall.
During a thunder storm
During a thunderstorm, turn off the power key immediately, then turn off the circuit breaker and
the main power. If this procedure is not followed, fire or electrical shock may be caused.
Clean this unit with enough
The insides of the boiler, condenser and storage tank are washed previously. However, when
using this unit for the first time or after this unit was stopped for a long time, drain about 5 liters of
water in an attempt to remove initial impurities.
Sampled amount
Amount of the distilled water sampled differs more or less according to the minor fluctuations of
heater capacity, power voltage or of raw water temp. and the boiler scale deposited on the
heater.
Pressure of water way
The pressure of water way shall always be in the range 50 - 500 Kpa (0.5 - 5kgf/cm
2
). If the
pressure of water way is too low, steam could gush out from the condenser due to the shortage
of cooling water.
Countermeasure for stop operation during night or long-term stop
In case of stopping operation during night or long-term, toggle the power switch to "OFF", and
also close the tap.

14
Handling Precautions
CAUTION!
Prevention of freezing
If it is necessary to use this unit at a cold place in winter, and if the pipe or the water in the boiler
could freeze, install an electric lamp (100 - 200W) in the armor of the main unit to prevent
freezing. Such lamp to prevent freezing and this unit shall always be energized by different
power sources. Such lamp must not be energized via the breaker in this unit.
Using well water
If any well water is used for the raw water, more of residues including scale are deposited in the
boiler. Therefore, clean the inside of the boiler more often than the case tap water is used.
Characteristics of distilled water
Distilled water has the following characteristics. However, it is ideal to use the demineralized
water immediately after it is distilled and sampled. If, therefore, distilled water has been pooled
in the tank for a long time, drain such water once, and then start distillation anew. Substances
of low boiling point such as ammonia can be removed, and both electrolytic and non-electrolytic
substances can be removed averagely as well. In the manufacturing (condensation and
storage) process, however, carbon dioxide gas is absorbed from the atmosphere to produce
carbonic acid. So the electric conductivity is worse than ion exchanged water; about 2 to 3 x
10
-4
S/m (2 to 3μS/cm) 25℃. This is a weak acidity (PH5 to 6). To remove the dissolved
gases (oxygen and carbon dioxide gas) in the demineralized water, see the item "2 - Common
Items, (8) Water" in JIS K 0102 (How to Test Industrial Waste Water).
Recovery of power failure
When power is supplied after a power failure, the device automatically starts operation again with
the same state as just before the power failure. It is danger that the device starts unattached
operation after a power failure. We recommend for you to turn off the switch of this unit if a
power failure occurs during operation.

15
Maintenance Method
Daily Inspection and Maintenance
For the safety use of this unit, please perform the daily inspection and maintenance without fail.
Since this unit distills the city water directly, scale is deposited in the boiler extremely. Therefore,
maintenance and checks are mainly planned to remove such boiler scale.
Reference for maintenance
Maintenance/check items Reference for timing Remarks
Washing Distiller 3 months
Washing water supply hose
filter
6 months
Wash the distiller more often in
case the quality of raw water is
not good.
Replacement of hoses 2 years
Connections shall be checked
once per month.
Replacement of flow washers
If the amount of cooling water
decreases and if steam comes
out from the condenser or float
tube.
The flow washer (rubber) in the
fixed flow rate valve deteriorates
in about 2 years. In such a case,
ask for services.
WARNING!
• Disconnect the power cable from the power source when doing an inspection or maintenance
unless needed.
• Perform the daily inspection and maintenance after returning the temperature of this unit to the
normal one.
• Do not disassemble this unit.
CAUTION!
Main unit maintenance
• Use a well-drained soft cloth to wipe dirt on this
unit. Do not use benzene, thinner or cleanser for
wiping. Do not scrub this unit. Deformation,
deterioration or color change may result in.
Monthly maintenance
• Check the earth leakage breaker function.
1. Connect the power cord.
2. Turn the breaker on.
3. Push the red test switch by a ballpoint pen etc.
4. If there is no problem, the earth leakage breaker will be turned off.
For any questions, contact the dealer who you purchased this unit from, or the nearest sales
division in our company.

16
Maintenance Method
Washing Distiller
1. Water Drained from Boiler
Water in the boiler is condensed as the distillation continues, thus promoting the deposition of boiler
scale. To prevent this, open the front door once or twice daily (after every 5 - 8 hours of distillation),
and drain water via the boiler water drain cock in the front. After completing the drain of water, turn ON
the power switch to start supplying water. Close the cock after discharging water for 2 - 3 min. This
washes away the scale from the pipes effectively.
2. Washing Distiller
If large amount of boiler scale is deposited in the boiler or float tube, malfunction (non-load combustion)
could result. Check the unit once per month. Wash the boiler once in about 3 months. Do this more
often according to the water quality and operating hours.
Removal of Distiller
1. Turn OFF the power switch.
2. Open the front door.
3. Open the manual cock to drain the water from the boiler.
2-A) WS200 (See Fig. 5 on the next page.)
1. Raise the cover (Teflon tube) ⑧ for the heater terminal ⑫ on top of the boiler, and remove the lead
wire from the heater ④ by using Phillips screwdriver. In doing this, take care not to drop the heater
lead wire or terminal cover in the back until it is installed next.
2. Pull off the metal piece (same as ⑥ in WS220) fixing the boiler ① and condenser by loosening the
3 knurled screws (same as ⑦ in WS220).
3. Remove the silicone hoses and cap nuts from the boiler water drain port ⑨ and the boiler water
supply port ⑩. In doing this, pay attention to the dripping water.
4. When the screws fixing the boiler are removed by using Phillips screwdriver, the distiller (boiler) can
be removed.
NOTE) Packing is provided between the condenser and boiler. Store this with great care.
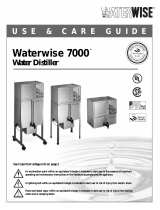
2-B) WS220 (See Figs. 5 on the next page and 5-1 on this page.)
The heater terminal ⑫ is connected to the
terminal block a in the upper frame. Remove the
locking screw c, terminal cover b and locking
screw d by using Phillips screwdriver, and remove
the lead wire of the heater.
Take the subsequent steps the same way as in
WS200.
NOTE)
• Packing is used in each connection. Take
care not to lose these packing when removing
components.
• Glass components and heater are easily
damaged. Handle these things with great
care. Do not try to fold or pull the heater or
lead wire more than necessary, either.
d
a
c
b
a
Terminal Block
b
Terminal Cover
c
Locking Screw (for Locking
Terminal Cover)
d
Locking Screw (for Locking Lead Wire)
Fig. 5-1
/