Page is loading ...

Hold
1 sec.
Hold
1 sec.
SERIES 70
SERVO NXT - MODULATING CONTROLLER
Installation, Operation and Maintenance Manual
THE HIGH PERFORMANCE COMPANYBRAY.COM


1
Series 70
Servo NXT - Modulating Controller
Installation, Operation and Maintenance Manual
Table of Contents
1. Definition of Terms . . . . . . . . . . . . . . . . . . . . . . . . . . . . . . . . . . . . . . . . .2
2. Safety . . . . . . . . . . . . . . . . . . . . . . . . . . . . . . . . . . . . . . . . . . . . . . .2
2.1 Hazard-Free Use . . . . . . . . . . . . . . . . . . . . . . . . . . . . . . . . . . . . . . . .2
2.2 Qualified Personnel. . . . . . . . . . . . . . . . . . . . . . . . . . . . . . . . . . . . . . .2
3. Description of Operation . . . . . . . . . . . . . . . . . . . . . . . . . . . . . . . . . . . . . .3
4. User Interface . . . . . . . . . . . . . . . . . . . . . . . . . . . . . . . . . . . . . . . . . . .3
4.1 Product Settings . . . . . . . . . . . . . . . . . . . . . . . . . . . . . . . . . . . . . . . .3
4.1.1 Changing Settings . . . . . . . . . . . . . . . . . . . . . . . . . . . . . . . . . . . . .4
4.1.2 Description of Settings. . . . . . . . . . . . . . . . . . . . . . . . . . . . . . . . . . .4
4.1.2.1 Input Signal Type . . . . . . . . . . . . . . . . . . . . . . . . . . . . . . . . . . .4
4.1.2.2 Output Signal Type . . . . . . . . . . . . . . . . . . . . . . . . . . . . . . . . . .5
4.1.2.3 Failure Position . . . . . . . . . . . . . . . . . . . . . . . . . . . . . . . . . . . .5
4.1.2.4 Close Speed Control . . . . . . . . . . . . . . . . . . . . . . . . . . . . . . . . .5
4.1.2.5 Open Speed Control . . . . . . . . . . . . . . . . . . . . . . . . . . . . . . . . .5
4.1.2.6 Dead Band Control . . . . . . . . . . . . . . . . . . . . . . . . . . . . . . . . . .5
4.1.2.7 Torque Switch Detection . . . . . . . . . . . . . . . . . . . . . . . . . . . . . . .6
4.1.2.8 Reverse Acting Mode . . . . . . . . . . . . . . . . . . . . . . . . . . . . . . . . .6
4.1.3 Motor Stall Detection . . . . . . . . . . . . . . . . . . . . . . . . . . . . . . . . . . .6
4.2 Operating Modes . . . . . . . . . . . . . . . . . . . . . . . . . . . . . . . . . . . . . . . 7
4.2.1 Remote Mode . . . . . . . . . . . . . . . . . . . . . . . . . . . . . . . . . . . . . . .7
4.2.2 Local Mode . . . . . . . . . . . . . . . . . . . . . . . . . . . . . . . . . . . . . . . .7
4.2.3 Manual Mode . . . . . . . . . . . . . . . . . . . . . . . . . . . . . . . . . . . . . . .7
4.2.4 Autocalibration Mode . . . . . . . . . . . . . . . . . . . . . . . . . . . . . . . . . . .7
4.3 Status Indication . . . . . . . . . . . . . . . . . . . . . . . . . . . . . . . . . . . . . . . .7
4.3.1 Valve Position . . . . . . . . . . . . . . . . . . . . . . . . . . . . . . . . . . . . . . .7
4.3.2 Fault Status . . . . . . . . . . . . . . . . . . . . . . . . . . . . . . . . . . . . . . . .8
4.3.3 Bray Logo . . . . . . . . . . . . . . . . . . . . . . . . . . . . . . . . . . . . . . . . .8
5. Hardware Description . . . . . . . . . . . . . . . . . . . . . . . . . . . . . . . . . . . . . . .9
5.1 Terminal Connections. . . . . . . . . . . . . . . . . . . . . . . . . . . . . . . . . . . . . .9
5.1.1 Power . . . . . . . . . . . . . . . . . . . . . . . . . . . . . . . . . . . . . . . . . . .9
5.1.2 Heater . . . . . . . . . . . . . . . . . . . . . . . . . . . . . . . . . . . . . . . . . . .9
5.1.3 Motor . . . . . . . . . . . . . . . . . . . . . . . . . . . . . . . . . . . . . . . . . . .9
5.1.4 Input Signal . . . . . . . . . . . . . . . . . . . . . . . . . . . . . . . . . . . . . . . .9
5.1.5 Output Signal . . . . . . . . . . . . . . . . . . . . . . . . . . . . . . . . . . . . . . .9
5.1.6 FB Pot . . . . . . . . . . . . . . . . . . . . . . . . . . . . . . . . . . . . . . . . . . 10
5.1.7 Control Box . . . . . . . . . . . . . . . . . . . . . . . . . . . . . . . . . . . . . . . 10
5.1.8 Hand Wheel . . . . . . . . . . . . . . . . . . . . . . . . . . . . . . . . . . . . . . .10
5.1.9 Torque Switch . . . . . . . . . . . . . . . . . . . . . . . . . . . . . . . . . . . . . . 10
5.1.10 Limit Switch . . . . . . . . . . . . . . . . . . . . . . . . . . . . . . . . . . . . . . 10
6. Quick Start Guide . . . . . . . . . . . . . . . . . . . . . . . . . . . . . . . . . . . . . . . . 11
7. Troubleshooting Guide . . . . . . . . . . . . . . . . . . . . . . . . . . . . . . . . . . . . . . 12

2
Series 70
Servo NXT - Modulating Controller
Installation, Operation and Maintenance Manual
1. Definition of Terms
READ AND FOLLOW THESE INSTRUCTIONS
SAVE THESE INSTRUCTIONS
WARNING indicates a potentially hazardous situation which, if not avoided,
could result in death or serious injury.
CAUTION indicates a potentially hazardous situation which, if not avoided,
may result in minor or moderate injury.
NOTICE
used without the safety alert symbol indicates a potential situation
which, if not avoided, may result in an undesirable result or state,
including property damage.
2. Safety
2.1 Hazard-Free Use
This device left the factory in proper condition to
be safely installed and operated in a hazard-free
manner. The notes and warnings in this document
must be observed by the user to ensure hazard-free
operation of this device.
All necessary precautions need to be taken to
prevent damage due to rough handling, impact, or
improper storage. Do not use abrasive compounds
to clean the device, or scrape its surfaces with any
objects.
Configuration and setup procedures for this device
are described in this manual. Proper configuration
and setup are required for the safe operation of
this device.
The control system in which this device is installed
must have proper safeguards to prevent injury to
personnel, or damage to equipment, should a failure
of system components occur.
WARNING
Equipment controlled by the device can generate
large mechanical forces during normal operation.
2.2 Qualified Personnel
WARNING
The device must only be installed, commissioned,
operated and repaired by qualified personnel.
Installation, commissioning, operation and
maintenance of the device must be performed
under strict observation of all applicable codes,
standards and safety regulations..
As per this document, a qualified person is one
who is trained in:
• The operation and maintenance of electric
equipment and systems in accordance with
established safety practices.
• Procedures to energize, de-energize, ground,
tag and lock electrical circuits and equipment
in accordance with established safety practices.
• The proper use and care of personal protective
equipment (PPE) in accordance with established
safety practices.
• First aid.

3
Series 70
Servo NXT - Modulating Controller
Installation, Operation and Maintenance Manual
3. Description of Operation
The Bray Series 70 Servo NXT provides complete
modulating control and monitoring of the Bray
Series 70 Electric Actuator. The basic function of
the Servo NXT is to position the S70 Actuator in
response to a command signal from a process
controller. The process controller contains a desired
process set point entered by the user, and continually
monitors the process variable (such as flow rate,
tank level, etc.) through some type of sensor.
Varying the command signal to the Servo NXT will
cause the actuator to change position, which will
move the associated control valve to modify the
process variable. The process controller continually
calculates and transmits the appropriate command
signal to the Servo NXT to maintain the process at
the desired set point.
The command signal to the Servo NXT can be various
DC voltage ranges (0-5V, 0-10V, 2-10V) or a 4-20mA
current source. The Servo NXT simultaneously
provides a feedback output signal, representing
the current actuator position. The retransmission
output signal reported by the Servo NXT can also
be various DC voltage ranges (0-5V, 0-10V) or a
4-20mA current source. These settings along with
specific operating modes are enabled by a simple-
to-use configuration menu.
4. User Interface
The Servo NXT features a rich, LED-based menu that
displays both configurable settings and operational
status. Indicators are grouped together based on
function, shown by their respective label(s). Without
any user interaction, the Servo NXT will display
the factory default product settings, in addition to
mode of operation, valve position, and fault status.
4.1 Product Settings
The product settings determine how the Servo
NXT will respond to commands from the process
controller. These must be defined and verified
before operation begins. The settings that can be
adjusted on the Servo NXT are, in clockwise order:
• “Input” – Input Command
• “Output” – Output Command
• “Fail” – Failure Position
• “Close Speed” – Close Speed Control
• “Open Speed” – Open Speed Control
• “Dead Band” – Dead Band Control
• “Torque Switch” – Torque Switch Detection
• “Reverse Acting” – Reverse Acting Mode
All units ship with default settings from the factory.
Feature Setting
Input Command 4-20mA
Output Command 4-20mA
Failure Position Last
Open Speed Control 100%
Close Speed Control 100%
Dead Band Control 3%
Torque Switch Detection Off
Reverse Acting Mode Off
Figure 1: Servo NXT default settings
Figure 2: Servo NXT Menu

4
Series 70
Servo NXT - Modulating Controller
Installation, Operation and Maintenance Manual
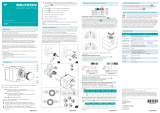
4.1.1 Changing Settings
Settings can be changed locally by utilizing the
keypad on the Servo NXT. The keypad is located on
the right side of the unit, and the keys are labelled
based on the operation performed.
• Up arrow - Cycles the cursor (see below) in a
counter-clockwise direction
• Down arrow - Cycles the cursor in a clockwise
direction
• Check mark - Activates the selected setting (if
applicable) and saves the current configuration
Settings are changed using the cursor, visualized
by a flashing indicator. To produce the cursor, the
up or down arrow key must be pressed, causing
one of the setting indicators to flash. Pressing
or holding the Up or Down Arrow will move the
cursor in the respective direction, as illustrated in
Figure 3. Producing the cursor does not alter any
settings without further user input, and the cursor
will automatically timeout if the keypad is not used.
Once the cursor has been positioned over a desired
setting, pressing and holding the check mark for 1
second or more will activate the selected setting.
Attempting to activate a setting that is already
active will have no additional effect.
4.1.2 Description of Settings
4.1.2.1 Input Signal Type
Input signals position the valve under control,
based on the magnitude of the signal. During
normal operation, the minimum value corresponds
to the close position and the maximum value to
the open position. Reverse Acting Mode inverts
this relationship (maximum value = close position,
minimum value = open position). Only one input
signal can be active at a time.
Input setting Description
4-20mA (default) Analog Current Range
Minimum: 4mA
Maximum: 20mA
0-10V Analog Voltage Range
Minimum: 0V
Maximum: 10V
0-5V Analog Voltage Range
Minimum: 0V
Maximum: 5V
2-10V Analog Voltage Range
Minimum: 2V
Maximum: 10V
Figure 3:
Servo NXT
Input settings

5
Series 70
Servo NXT - Modulating Controller
Installation, Operation and Maintenance Manual
4.1.2.2 Output Signal Type
Output signals report the position of the valve under
control, based on the magnitude of the signal. The
minimum value corresponds to the close position
and the maximum value to the open position. Only
one output signal can be active at a time.
Output setting Description
4-20mA (default) Analog Current Range
Minimum: 4mA
Maximum: 20mA
0-10V Analog Voltage Range
Minimum: 0V
Maximum: 10V
0-5V Analog Voltage Range
Minimum: 0V
Maximum: 5V
Figure 4 - Servo NXT Output settings
4.1.2.3 Failure Position
The Failure Position determines how the Servo
NXT positions the valve upon loss of input signal.
Loss of input signal occurs when the input signal
received is outside the valid range of the selected
Input Signal Type, e.g. an input signal of less than
4mA for the 4-20mA input. Only one failure position
can be active at a time.
Fail setting: Description:
Close Valve is closed on loss of input signal
Open Valve is opened on loss of input signal
Last (default) Position valve at the last valid
commanded position before loss of
input signal
Figure 5 - Servo NXT Fail Settings
4.1.2.4 Close Speed Control
Close Speed Control determines how quickly
the Servo NXT operates the actuator in the close
direction. This value is a percentage of the full
speed. The illuminated indicators act as a level
gauge: activating a speed setting illuminates all
lower speed setting indicators. Maximum speed
illuminates all indicators, while minimum speed
illuminates only one.
Close Speed Setting Description
0% - 100% (default)
Step size: 20%
Actuator close speed
as a percentage of full
speed
Figure 6 - Servo NXT Close Speed Setting
4.1.2.5 Open Speed Control
Open Speed Control determines how quickly
the Servo NXT operates the actuator in the open
direction. This value is a percentage of the full
speed. The illuminated indicators act as a level
gauge: activating a speed setting illuminates all
lower speed setting indicators. Maximum speed
illuminates all indicators, while minimum speed
illuminates only one.
Open Speed Setting Description
0% - 100% (default)
Step size: 20%
Actuator open speed
as a percentage of full
speed
Figure 7 - Servo NXT Open Speed Setting
4.1.2.6 Dead Band Control
Dead Band Control determines the acceptable
offset between the position command provided
by the input command and the current position
of the actuator, determined from the feedback
signal provided by the potentiometer. This value is
a percentage of the full input range, and creates
an inactive area centered around the desired set
point. For example, for a 0-10V input command, a
2% Dead Band Control setting allows the actuator
position to be offset from the desired set point by
up to 0.1V in either direction, creating a dead band
with a span of 0.2V. The illuminated indicators act
as a level gauge: activating a dead band setting
illuminates all lower dead band setting indicators.
Maximum dead band illuminates all indicators,
while minimum dead band illuminates only one.
Dead Band Setting Description
1% - 6%
3% (default)
Step size: 1%
Acceptable offset
between command
position and actuator
position
Figure 8 - Servo NXT Dead Band Setting

6
Series 70
Servo NXT - Modulating Controller
Installation, Operation and Maintenance Manual
4.1.2.7 Torque Switch Detection
Torque Switch Detection determines whether the
Servo NXT is responding to changes to the torque
switch assembly. When on, the Servo NXT will stop
the actuator if a torque switch is engaged, signaling
that the actuator is operating at torques above its
rated torque. This setting should only be activated
if torque switches are connected to the Servo NXT.
Torque Switch Setting Description
On Actuator movement
stopped if the torque
switch engages
Off (default) Torque switch state
ignored
Figure 9 - Servo NXT Torque Switch Settings
4.1.2.8 Reverse Acting Mode
Reverse Acting Mode determines how the Servo
NXT responds to input commands. When on, the
Servo NXT will operate inversely to how it operates
normally, treating the maximum input signal value as
the close command and the minimum input signal
as the open command. This setting does not affect
the output signal.
Reverse Acting Setting Description
On Servo NXT responds
inversely to input
commands
Off (default) Servo NXT responds
normally to input
commands
Figure 10 - Servo NXT Reverse Acting Mode Settings
4.1.3 Motor Stall Detection
A standard feature on the Servo NXT is motor stall
detection. If the feedback signal provided to the
Servo NXT by the potentiometer does not match the
expected operation, then a fault state is entered.
More specifically, if the actuator controlled by the
Servo NXT is operating the motor either open or
close and the feedback potentiometer does not
detect any movement, a Motor Stall Fault will
occur. This most often occurs when the travel of
the actuator is impeded due to excessive valve
torque or a blockage in the valve flow stream.
When a Motor Stall Fault occurs, the actuator
will move in the opposite direction of travel from
where the fault occurred for 2 seconds. This relieves
the actuator and underlying valve from any static
torque load. After this movement, the actuator will
stop and continuously flash all five fault indicators
simultaneously. The actuator will not respond to
further commands and will remain in this state until
the handwheel is engaged. After the handwheel
is engaged and then disengaged, the actuator will
resume normal operation.
In rare cases, it may be desirable to disable this
feature. The Motor Stall Detection feature can be
disabled by simultaneously pressing and holding
the Up and Down Arrow keys for 5 seconds. After
5 seconds, all valve position indicators will flash
simultaneously for 1 second indicating that the
feature has been disabled. The feature can be
re-enabled by repeating the process. When the
feature is re-enabled, the 5 fault indicators will
flash simultaneously for 1 second.
NOTE: It is suggested that the Motor Stall
Detection is disabled when the Servo NXT is
installed in size 130 and 180 S70 actuators due
to the slower operating speed.

7
Series 70
Servo NXT - Modulating Controller
Installation, Operation and Maintenance Manual
4.2 Operating Modes
4.2.1 Remote Mode
By default, the operating mode of the Servo NXT is
remote mode, where the valve is positioned based
on input signals. Exiting another mode of operation
generally results in the Servo NXT returning to
remote mode.
4.2.2 Local Mode
Local Mode is entered if a connection is made to
the Control Box terminals and a command signal is
present. This allows the Servo NXT to be controlled
by a local control box, mounted to or near the
actuator. See the section on the control box for
more information.
4.2.3 Manual Mode
This operating mode allows for the actuator to
be controlled directly from the user interface on
the Servo NXT. By utilizing the keypad, the user
can change the position of the valve with a single
button press.
Manual mode is exited in the same way it is entered:
by pressing and holding the manual mode button
for 1 second. While in manual mode, the indicator
next to the manual mode button remains lit. Manual
mode can only be entered during remote operation.
• Up arrow – Energizes the actuator in the open
direction. The actuator will operate until it reaches
the end of travel or the user presses the check
mark key.
• Down arrow - Energizes the actuator in the
close direction. The actuator will operate until it
reaches the end of travel or the user presses the
check mark key.
• Check mark – Sets the current actuator position as
the command position. If the actuator is energized
when the button is pressed, then it stops in place.
4.2.4 Autocalibration Mode
The Servo NXT uses an automated calibration
sequence to determine the operating points
for the application in which it is installed. These
operating points allow the Servo NXT to calculate
the correct feedback position of the product,
making autocalibration an important step during
commissioning. Servo NXT units that have not
been calibrated will flash the indicator next to
autocalibration button to show that they are using
default values for calculating position.
Autocalibration mode is entered by pressing and
holding the Autocalibration button for at least
3 seconds. While in autocalibration mode, the
autocalibration indicator remains lit. In addition,
the product settings’ indicators will change state
to show that autocalibration has been entered,
and will continue to flash at the end of travel
until autocalibration completes. Upon completion
of the autocalibration sequence, the product
settings’ indicators will return to normal and the
autocalibration indicator will remain lit, indicating
that the new parameters have been stored.
No other operating modes can be entered during
autocalibration, and entering autocalibration mode
will override any previous mode of operation.
NOTICE
If the fault indication lights illuminate during
autocalibration, then the autocalibration sequence
could not be successfully completed. Upon failure
of autocalibration, the autocalibration indicator
will continue flashing to indicate that default
parameters are still being used for positioning.
Refer to the troubleshooting section for more
information.
CAUTION
The Servo NXT will not be remotely controllable
during the autocalibration sequence. If
autocalibration needs to be aborted, engage
(pull out) the handwheel.
4.3 Status Indication
These are all indicators that report key information
on the operation and functional status of the Servo
NXT and actuator.
4.3.1 Valve Position
This string of indicators provides position
information of the valve under control. In addition,
if the actuator is operating the valve, then it also
indicates the current command position and
direction of travel.
• Direction indicators – The Open (green) and
Close (red) indicators at both ends of the valve
position indicator show the current direction
of travel. When the actuator is energized, the
corresponding indicator will flash to indicate
travel. The green indicator will be lit if the open
travel limit is reached. The red indicator will
remain lit if the close travel limit is reached.
• Position indicators – The indicators between
the direction indicators act as a level gauge,

8
Series 70
Servo NXT - Modulating Controller
Installation, Operation and Maintenance Manual
with the fully closed position serving as the zero
point. Each indicator represents 15 degrees of
travel, so that the total number of illuminated
indicators shows the distance the valve is from
the fully closed position. As the command signal
is changed, a single indicator will flash which
represents the relative level of the command
signal. The indicators that remain solid represent
the relative position of the actuator. Once the
actuator reaches the command signal set point,
the single command signal indicator will stop
flashing. This scheme provides the operator
an indication of both the command signal and
actuator position using a single display.
4.3.2 Fault Status
These indicators in the lower left of the user interface
illuminate in the event of a fault. The occurrence of
a fault generally indicates that user intervention is
required to restore operation, and these indicators
attempt to provide the diagnostic information needed
to accomplish this.
The Fault Status indicators are, from left to right:
• Cmd Signal – A valid input command is not present.
• Limit Switch – Both travel limit switches have been
engaged, preventing the actuator from operating,
or the travel limit switches are not correctly wired
to the Servo NXT.
• Hand Wheel – The actuator handwheel has been
engaged (pulled out), or the handwheel switch is
not correctly wired to the Servo NXT.
• FB pot – The feedback potentiometer is outside
its range of travel or is not correctly wired to the
Servo NXT.
• Torque Switch – A torque switch has been
engaged, or the torque switches are not correctly
wired to the Servo NXT.
In addition, all the fault indicators can be flashing
in unison. During autocalibration, this means that
the autocalibration sequence has failed. During
normal operation, this indicates that a motor stall
fault has occurred. Refer to the section on Motor
Stall Detection for more detail on a motor stall fault.
Refer to the Troubleshooting section for the actions
required to clear a fault.
4.3.3 Bray Logo
The indicators that illuminate the Bray logo in the
lower right of the user interface serve as status
indicators for the Servo NXT. No matter what
operation is performed, these indicators should be
flashing on and off. If they are not flashing, refer to
the Troubleshooting section.
Com
+3.3V
Wiper
Com
Close
Open
Com
HW
Com
Com
Close
Open
Com
Com
Close
Open
Input +
Input -
Output +
Output -
Neut
Live
Neut
Live
Close
Neut
Open
Figure 11: 120VAC / 230VAC Servo NXT terminal labels

9
Series 70
Servo NXT - Modulating Controller
Installation, Operation and Maintenance Manual
5. Hardware Description
5.1 Terminal Connections
WARNING
Turn off all power and lockout/tag out service
panel before installing or modifying any electrical
wiring.
Terminals are provided on the unit for the landing
of stripped wires, connecting the Servo NXT to
the external sources and signals needed for it to
successfully operate. These terminals are positioned
on the unit based on physical location of the
connecting components and the voltages expected
at the connection. There are two categories that
the terminal connections fall into: high/low voltage
and customer/actuator connection. Connections
of differing voltage levels are differentiated by
their height on the Servo NXT, with high voltage
connections being near the bottom of the unit
and low voltage connections being near the top.
Similarly, the customer and actuator connections are
positioned such that they are easily accessible once
the Servo NXT is installed in an actuator. Actuator
connections are generally made at the factory,
and should not require any customer adjustment.
All connections required for proper operation are
bolded below.
Customer
Connection
Actuator
Connection
High
voltage
(> 15V)
Power Heater,
Motor
Low
voltage
(< 15V)
Input Signal
(Input+, Input-)
Output Signal
(Output+, Output-)
FB Pot,
Control Box,
Hand Wheel,
Torque Switch,
Limit Switch
Figure 12: Terminal Connection categories
NOTICE
Refer to the actuator wiring diagram for wire
gauge, torque, voltage, and temperature limits
of the terminal blocks. All actuator connections
should match the actuator wiring diagram.
5.1.1 Power
Power connection that energizes the Servo NXT
and powers the actuator under control. The voltage
supplied should be based on the actuator nameplate
voltage and the voltage listed on the Servo NXT label.
CAUTION
Verify that the actuator nameplate voltage
and the Servo NXT label voltage match before
providing power to the unit.
The Servo NXT has an onboard protective fuse
that is in line with the input power connection.
This protective fuse is rated to 5A, the maximum
allowable current draw for the Servo NXT. Therefore,
the power supply connected to the input power
connection should be rated to provide at least this
much current to each Servo NXT.
5.1.2 Heater
If the actuator has an internal heater, then the heater
wires are terminated at this connection. The heater
will be powered by the input power connection.
Only Bray supplied heaters should be connected
to the Servo NXT.
5.1.3 Motor
Connections for the motor that operates the
actuator. Refer to the actuator manual for more
information on the motor.
5.1.4 Input Signal
Connection for the input signal that positions the
valve under control, based on the magnitude of the
signal. The signal that is present at this connection
should be based on the input setting (see Product
Settings).
Input signals are polarized, so that miswiring may
result in unexpected behavior. Ensure that the wiring
diagram is followed when making this connection.
5.1.5 Output Signal
Connection for the output signal that reports the
position of the valve under control, based on the
magnitude of the signal. The signal that is present
at this connection is based on the output setting
(see Product Settings).
Output signals are polarized, so that miswiring may
result in unexpected behavior. Ensure that the wiring
diagram is followed when making this connection.

10
Series 70
Servo NXT - Modulating Controller
Installation, Operation and Maintenance Manual
NOTICE
The output signal is powered by the Servo NXT.
An external source should never be connected to
the terminals.
5.1.6 FB Pot
Connections for the Feedback Potentiometer,
used by the controller to determine the position
of the valve.
The Servo NXT provides a logic level voltage across
the potentiometer, and then monitors the voltage
that is returned on the wiper connection. The
wiper voltage will change as the potentiometer is
turned, due to the rotation of the cam shaft. During
autocalibration, the Servo NXT can save the wiper
voltage range and use it to position the actuator
accurately and precisely.
NOTICE
The Servo NXT has been programmed to monitor
a specific range of feedback voltage. Utilizing a
potentiometer other than the factory provided
potentiometer may result in unexpected
behavior.
NOTICE
Servo NXT feedback potentiometer voltage
may be measured between terminals “C” and
“PW”. Voltage must be between 0.1 Volts and
3.1 Volts for valve closed and opened positions
respectively. Refer to the S70 Electric Actuator
IOM for potentiometer alignment instructions.
5.1.7 Control Box
Connections for the local control station, if present.
The local control station allows for local operation
of the actuator, putting the Servo NXT in local mode
and overriding remote input commands.
The Servo NXT provides a logic level voltage at
the Open and Close terminals of this connection.
If a switch connects either of the terminals to
the COM terminal, this pin will be pulled to 0V,
signaling the Servo NXT to enter local mode. The
Servo NXT will not exit local mode until the Open
and Close terminals return to their original voltage
level. Once in local mode, the Servo NXT will ignore
input commands until remote operation resumes.
5.1.8 Hand Wheel
Connections for the handwheel override switch.
When the actuator handwheel is engaged (pulled
out), this switch prevents the actuator from
operating until the handwheel is disengaged.
The Servo NXT provides a logic level voltage at the
HW terminal of this connection. If the handwheel
is engaged (pulled out), this pin will get pulled to
0V, signaling the Servo NXT and resulting in a fault.
5.1.9 Torque Switch
Connections for the torque switch assembly, if
present, which alert the Servo NXT to the presence
of excessive torque applied to the actuator.
The Servo NXT provides a logic level voltage at the
Open and Close terminals of this connection. If the
actuator torque increases above the rated torque,
the switch at the applicable connection will pull
this pin to 0V, signaling the Servo NXT to enter a
fault condition.
5.1.10 Limit Switch
Connections for the travel limit switches, which
indicate to the Servo NXT when an end of travel
set point has been reached.
The Servo NXT provides a logic level voltage at the
Open and Close terminals of this connection. Once
one of the travel limit switches is engaged, the switch
at the applicable connection will engage and pull
this pin to 0V, signaling the Servo NXT to end travel.
For proper operation, both travel limit switches
should not be engaged at the same time. This
would prevent the Servo NXT from operating the
actuator, and results in a fault condition.
NOTICE
Low voltage, actuator connections are powered
by the Servo NXT. An external source should
never be connected to these terminals.
Refer to the actuator manual for more
information on these components, or if these
components need to be repaired or replaced

11
Series 70
Servo NXT - Modulating Controller
Installation, Operation and Maintenance Manual
6. Quick Start Guide
Refer to the actuator manual before adjusting or
replacing any actuator components.
1. Terminate the customer connections at the Servo
NXT terminals in accordance with the actuator
wiring diagram
a. To reduce the propagation of noise on the
customer cables, power lines and signal lines
should not be routed together.
b. Signal lines should be shielded, and the
shield line should only be grounded at one end,
preferably at the controller.
2. Apply power to the Servo NXT
a. Verify the Bray Logo is illuminated and flashing
on and off
3. Set the Input Command signal type
4. If necessary, adjust the other default product
settings
5. Verify (or adjust) the travel limits in the actuator
a. Bray actuators are shipped with the travel
switches in the factory default position – close
travel limit set at 0 degrees and the open travel
limit at 90 degrees.
b. If the travel limit switch settings are moved
from the factory default position, the feedback
potentiometer may need to be adjusted for
autocalibration to complete.
6. Put the Servo NXT in Autocalibration mode
a. If autocalibration completes, then the product
is ready for service
b. If autocalibration fails, then move to step 7
7. Using the Input Command signal, command the
actuator to the fully opened position
a. Observe the Servo NXT as it operates, and
correct any faults that occur. Refer to the
Troubleshooting guide for more information.
8. Using the Input Command signal, command the
actuator to the fully closed position
a. Observe the Servo NXT as it operates, and
correct any faults that occur.
9. Return to step 6
FEEDBACK
POTENTIOMETER
WHITE
ORANGE
GREY
YELLOW
YELLOW
OVERRIDE SW
N.C.
N. O.
N.C.
N.C.
N. O.
N. O.
N.C.
N. O.
COM
COM
COM
COM
BLUE
BLUE
RED
RED
OPEN
CLOSE
GREEN
CAM
RED
CAM
COM
INPUT+
INPUT–
OUTPUT+
OUTPUT–
NEUTRAL
LIVE
NEUTRAL
CLOSE
LIVE
NEUTRAL
OPEN
WIPER
POWER
COM
CLOSE
COM
COM1
COM2
CLOSE
OPEN
COM1
COM2
CLOSE
OPEN
HW
OPEN
LIMIT SW
MOTOR
COMMAND INPUT
POWER HEATER
HAND
WHEEL CTRL BOX FB POT
TORQUE SW
RED
YELLOW
OR BLACK
BLUE
HEATER
(OPTIONAL)
MOTOR
ON
C
FIELD WIRING ACTUATOR
SHIELDED CABLE
OUTGOING FEEDBACK SIGNAL (SHIELDED)
INCOMING COMMAND SIGNAL
(SEE NOTES 5–7)
(SEE NOTES 6–8)
LOAD DEVICE
NOT TO EXCEED
400 OHMS
(4–20mA CONFIGURATION)
SINGLE PHASE
POWER SUPPLY
NEUTRAL
LIVE
GROUND
POSITION
FEEDBACK
DEVICE
Drawing is for reference only
Actuator specific wiring diagram located inside actuator cover.

12
Series 70
Servo NXT - Modulating Controller
Installation, Operation and Maintenance Manual
Issue Possible Causes Possible Solutions
Servo NXT does not turn on when
power is applied
Fuse is blown Verify and replace fuse
Servo NXT is incorrectly wired Verify wire connections against
the wiring diagram
Servo NXT is not receiving power Test the Input Power connection
with a multimeter or oscilloscope
Power is not correct Check the provided power
against the voltage listed for the
Servo NXT and actuator
Actuator moves back and forth
near setpoint (hunting)
Deadband is too narrow Increase the deadband setting
Excessive noise on the signal lines Use an oscilloscope to test for the
presence of EMI.
Utilize EMI reducing techniques
to mitigate the issue.
Servo NXT not responding to
command signal
Servo NXT in local mode If local control is being used,
ensure the local control station
is not active or is set to remote
mode.
If local control is not being
used, test the voltage on the
Control Box Open and Close pins
relative to the COM pins. Greater
than 3V should be measured.
Servo NXT in manual or
autocalibration mode
Check the indicators for manual
and autocalibration mode
Servo NXT is incorrectly wired Verify wire connections against
the wiring diagram
7. Troubleshooting Guide
Refer to the actuator manual before adjusting or replacing any actuator components. Before testing or
acting on any possible issues, check for any active faults.
WARNING
Turn off all power and lockout/tag out service panel before installing or modifying any elecrical wiring.

13
Series 70
Servo NXT - Modulating Controller
Installation, Operation and Maintenance Manual
Fault Condition Possible Causes Possible Solutions
Cmd Signal Fault Command signal does not match
Input setting
Adjust the Input setting to match
the command signal used
Servo NXT is incorrectly wired Verify wire connections against
the wiring diagram
Servo NXT is not receiving the
command signal
Test the Input Command
connection with a multimeter or
oscilloscope
Limit Switch Fault Both limit switches are engaged Adjust actuator cams
Servo NXT is incorrectly wired Verify wire connections against
the wiring diagram
Travel limit switch failure Test the switches to ensure that
they are changing states when
engaged.
Hand Wheel Fault Hand Wheel is engaged Disengage (push in) hand wheel
Servo NXT is incorrectly wired Verify wire connections against
the wiring diagram
Hand wheel switch failure Test the switch to ensure that it is
changing states when engaged.
FB Pot Fault Potentiometer outside of travel
range
Operate the actuator to the fully
open and fully closed position,
and adjust the potentiometer
position as needed
Servo NXT is incorrectly wired Verify wire connections against
the wiring diagram
Torque Switch Fault Torque Switch setting enabled
with no torque switches
connected
Disable torque switch setting
Torque switche(s) engaged Check the valve and/or actuator
for obstructions.
Servo NXT is incorrectly wired Verify wire connections against
the wiring diagram
Torque Switch failure Test the switches to ensure that
they are changing states when
engaged.
Motor Stall Fault Operational torque is exceeding
the torque rating of the actuator
Check the valve and/or actuator
for obstructions.
Measure the torque required to
rotate the valve and verify against
the rated torque.
Servo NXT is incorrectly wired Verify wire connections against
the wiring diagram
Fault condition during
autocalibration
Fault occurring during calibration Operate the actuator to the fully
open and fully closed position,
and correct any faults that occur
Servo NXT is incorrectly wired Verify wire connections against
the wiring diagram

All statements, technical information, and recommendations in
this bulletin are for general use only. Consult Bray representatives
or factory for the specific requirements and material selection
for your intended application. The right to change or modify
product design or product without prior notice is reserved.
Patents issued and applied for worldwide.
Bray® is a registered trademark of BRAY INTERNATIONAL, Inc.
© 2017 Bray International. All rights reserved.
IOM_S70ServoNXT_Modulating Controller_5_15_2018
HEADQUARTERS
Bray International, Inc.
13333 Westland East Blvd.
Houston, Texas 77041
Tel: 281.894.5454
bray.com
THE HIGH PERFORMANCE COMPANY
BRAY INTERNATIONAL
PRIMARY SALES AND SERVICE LOCATIONS
USA
Houston, Texas
CHINA
Hangzhou, Zhejiang
MEXICO
Zapopan, Jalisco
RUSSIA
Moscow
AFRICA
Johannesburg
COLOMBIA
Bogotá
MIDDLE EAST
Dubai
SINGAPORE
Ubi Techpark
BENELUX
Heerhugowaard
FRANCE
Voiron
PACIFIC
Melbourne, Australia
SOUTH KOREA
Seoul
BRAZIL
Paulinia, Sao Paulo
GERMANY
Krefeld
PERU
Lima
SOUTHEAST ASIA
Malaysia
CANADA
Montreal
INDIA
Vadodara
POLAND
O´swi¸ecim
UNITED KINGDOM
Glasgow
CHILE
Santiago
ITALY
Milano
FLOW-TEK RITE CORPORATION AMRESIST KUGELHAHN MÜLLER
USA
Houston, Texas
CANADA
Montreal
USA
Houston, Texas
GERMANY
Krefeld
BRAZIL
Paulinia, Sao Paulo VALVTRONIC BRAY/VAAS
CHINA
Hangzhou, Zhejiang
ARGENTINA
Buenos Aires
INDIA
Chennai
/