Page is loading ...

Ascon Tecnologic - AET1 - USER MANUAL - PAG. 1
AET1
TTL TO ETHERNET TCP/IP
GATEWAY
User Manual
17/05 - Code: ISTR_M_AET1_1_01_--
Ascon Tecnologic S.r.l.
Viale Indipendenza 56, 27029 Vigevano (PV) - ITALY
Tel.: +39 0381 69871 - FAX: +39 0381 698730
site: www.ascontecnologic.com
e-mail: [email protected]
FOREWORD
This manual contains the information necessary for
the installation, use and maintenance of the product,
we therefore recommend that the utmost attention is
paid to the following instructions and to save it.
This document is exclusive property of Ascon Tecnologic
which forbids any reproduction and divulgation, even in part, of
the document, unless expressly authorized. Ascon Tecnologic
reserves the right to make any formal or functional changes
at any moment and without any notice.
Ascon Tecnologic
and its legal representatives do not
assume any responsibility for any damage to people, things
or animals deriving from violation, wrong or improper use or
in any case not in compliance with the instrument features.
Whenever a failure or a malfunction of the device
may cause dangerous situations for persons, thing
or animals, please remember that the plant must be
equipped with additional electromechanical devices
which will guarantee safety.
Disposal
The appliance (or the product) must be disposed
of separately in compliance with the local standards
in force on waste disposal.
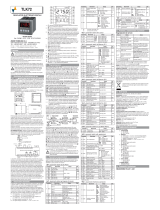
1 OUTLINE DIMENSIONS (mm)
TTL
PWR
RX
TX
27.80
87.50
95.30
31.18
DIN rail
mounting
78.65
21.55
M4
Screw mounting
holes
M4
TTL
PWR
RX
TX
A
B
Connectors
detail
1.1 Mounting requirements
This instrument is intended for permanent installation, for
indoor use only, in an electrical panel which encloses the rear
housing, exposed terminals and wiring on the back. Select a
mounting location having the following characteristics:
1. It should be easily accessible;
2. There is minimum vibrations and no impact;
3. There are no corrosive gases;
4. There are no water or other fluids (i.e. condensation);
5. The ambient temperature is in accordance with the
operative temperature (0... 50°C);
6. The relative humidity is in accordance with the instrument
specifications (20... 85%).
2 CONNECTION DIAGRAM
2.1 General notes about wiring
Do not run the communication cables (TTL or Ethernet)
together with power cables.
2.2 TTL Connection
2.2.1 Cable identification
Cable models: CATTL D020;
Identification: Both side with a black tube.
P1
1
5
P2
1
5
BLACKBLACK
2.3 Ethernet Connection
The Ethernet connection is made with a standard Ethernet
cable with RJ45 connectors.
3 HOW TO PROCEED
1. Connect the CATTL cable to the instrument that must be
connected to the Ethernet network;
2. Power ON the instrument;
3. Plug the second side of the CATTL into connector B;
4. If the LED PWR turns ON, the connection is correct,
otherwise, disconnect the CATTL cable from B connector
and plug it into connector A;
5. The LED PWR turns ON.
Ascon Tecnologic - AET1 - MANUALE UTENTE - PAG. 1
AET1
MODULO GATEWAY
DA TTL A ETHERNET TCP/IP
Manuale Utente
17/05 - Cod.: ISTR_M_AET1_1_01_--
Ascon Tecnologic S.r.l.
Viale Indipendenza 56, 27029 Vigevano (PV) - ITALY
Tel.: +39 0381 69871 - FAX: +39 0381 698730
site: www.ascontecnologic.com
e-mail: [email protected]
PREMESSA
Nel presente manuale sono contenute le informa-
zioni necessarie ad una corretta installazione e le
istruzioni per l’utilizzo e la manutenzione del prodot-
to, si raccomanda pertanto di leggerlo attentamente
e di conservarlo.
La presente pubblicazione è di esclusiva proprietà di Ascon
Tecnologic S.r.l. la quale pone il divieto assoluto di ripro-
duzione e divulgazione, anche parziale, se non espressa-
mente autorizzata. Ascon Tecnologic si riserva di apportare
modifiche estetiche e funzionali in qualsiasi momento e
senza alcun preavviso. Ascon Tecnologic ed i suoi legali
rappresentanti non si ritengono in alcun modo responsabili
per eventuali danni a persone, cose o animali derivanti da
manomissioni, uso improprio, errato o comunque non con-
forme alle caratteristiche dello strumento.
Qualora un guasto o un malfunzionamento dell’appa-
recchio possa creare situazioni pericolose o dannose
per persone, cose o animali si ricorda che l’impianto
deve essere predisposto con dispositivi elettromec-
canici aggiuntivi atti a garantire la sicurezza.
Smaltimento
L’apparecchiatura (o il
prodotto) deve essere
oggetto
di raccolta separata in conformità alle vigenti
normative locali in materia di smaltimento.
1 DIMENSIONI (mm)
TTL
PWR
RX
TX
27.80
87.50
95.30
31.18
DIN rail
mounting
78.65
21.55
M4
Screw mounting
holes
M4
TTL
PWR
RX
TX
A
B
Connectors
detail
1.1 Requisiti per il montaggio
Questi strumenti sono progettati per un’installazione perma-
nente, per l’uso in ambiente coperto e per il montaggio in
quadri elettrici che proteggano la parte posteriore dello stru-
mento, la morsettiera e i collegamenti elettrici. Montare lo
strumento in un quadro che abbia le seguenti caratteristiche:
1. Deve essere facilmente accessibile;
2. Non deve essere sottoposto a vibrazioni o impatti;
3. Non devono essere presenti gas corrosivi;
4. Non deve esserci presenza di acqua o altri fluidi (condensa);
5. La temperatura ambiente deve essere tra 0... 50°C;
6. L’umidità relativa deve rimanere all’interno del campo di
utilizzo (20... 85% RH).
2 COLLEGAMENTI
2.1 Note sui collegamenti elettrici
Non cablare i cavi di comunicazioni (TTL o Ethernet) con i
cavi di potenza.
2.2 Collegamento TTL
2.2.1 Identificazione del vavo
Modello del cavo: CATTL D020;
Identificazione: Le estremità hanno un tubetto nero.
P1
1
5
P2
1
5
BLACKBLACK
2.3 Collegamento Ethernet
Il collegamento alla rete Ethernet è effettuato con un cavo
Ethernet standard con connettori RJ45.
3 COME PROCEDERE
1. Collegare il cavo CATTL allo strumento che va connesso
alla rete Ethernet;
2. Accendere lo strumento;
3. Inserire il secondo connettore del cavo CATTL nel
connettore B del Gateway;
4. Se il LED PWR si accende, il collegamento è corretto,
altrimenti rimuovere il connettore dal connettore B ed
inserirlo nel connettore A del gateway;
5. Il LED PWR si accende.

Ascon Tecnologic - AET1 - MANUALE UTENTE - PAG. 2
4 COME CONFIGURARE L’AET1
1. Dal sito internet “www.ascontecnologic.com”, effettuate il download del file eseguibile USR-MO-.....EXE;
Nota: Il file eseguibile USR-MO-.....EXE non richiede installazione.
2. Collegare l’AET1 alla rete Ethernet;
3. Con il mouse cliccare 2 volte sull’icona del file eseguibile USR-MO-.....EXE, appare la schermata del programma;
4. Cliccare sul bottone “Search Device” (Ricerca dispositivo);
5. Con il mouse selezionare il dispositivo desiderato cliccandoci sopra, il programma visualizza la seguente schermata:
6. Impostare il gateway come illustrato nella figura;
Nota: La velocità della Porta (baudrate) deve essere la stessa assegnata allo strumento.
7. Cliccare su “Save configuration” per salvare la configurazione appena impostata.
La configurazione del Gateway AET1 è terminata.
Ascon Tecnologic - AET1 - USER MANUAL - PAG. 2
4 HOW TO CONFIGURE THE AET1
1. From our website “www.ascontecnologic.com”, please, download the USR-MO-.....EXE file;
Note: USR-MO-.....EXE file does not require to be installed;
2. Connect the AET1 to your ethernet network;
3. Double click on the USR-MO-.....EXE icon, appears the main screen of the program;
4. Click on the “Search Device” button;
5. With the mouse, select the desired device clicking on the corresponding line, the program shows:
6. Set the AET1 as shown in the figure;
Note: The baud rate assigned to the AET1must be the same assigned to the instrument.
7. Push the “Save configuration” button.
The AET1 is now configured.
/