Sunricher SR-ZG9101SAC Operating instructions

Type
Operating instructions

Sunricher SR-ZG9101SAC is a smart 2-gang in-wall switch that allows you to remotely control and automate your lighting. Utilizing the latest ZigBee 3.0 protocol, it offers enhanced connectivity and performance. Compatible with universal ZigBee gateways, this switch can be integrated into your smart home system for seamless control. You can create schedules, set scenes, and adjust lighting levels using your smartphone or voice commands. Additionally, the switch supports Touchlink commissioning, enabling direct pairing with compatible ZigBee remotes without the need for a coordinator.

Sunricher SR-ZG9101SAC is a smart 2-gang in-wall switch that allows you to remotely control and automate your lighting. Utilizing the latest ZigBee 3.0 protocol, it offers enhanced connectivity and performance. Compatible with universal ZigBee gateways, this switch can be integrated into your smart home system for seamless control. You can create schedules, set scenes, and adjust lighting levels using your smartphone or voice commands. Additionally, the switch supports Touchlink commissioning, enabling direct pairing with compatible ZigBee remotes without the need for a coordinator.

Reset
L
L1 NN
S2
2-Gang In Wall Switch
Ratings:100-240V~ ,50/ 60Hz ,MAX:5.1A ( )
S1
L2
MAX:1.7A ( )
ZigBee 2-Gang In-wall Switch
Function introduction
Important: Read All Instructions Prior to Installation
Reset” Key: for
network pairing,
touchlink, factory
reset of the switch
2-gang ZigBee in-wall switch based on latest ZigBee 3.0 protocol
100-240VAC wide input and output voltage
Supports resistive loads and capacitive loads
2 channels output, max. load 5.1A/CH
Input and output with screw terminals, safe and reliable
Enables to control ON/OFF of connected load
ZigBee device with 2 endpoints which can be controlled separately
ZigBee end device that supports Touchlink commissioning
Can directly pair to a compatible ZigBee remote via Touchlink without coordinator
Supports self-forming zigbee network without coordinator and add other devices to the network
Supports find and bind mode to bind a ZigBee remote
Supports zigbee green power and can bind max. 20 zigbee green power switches
Compatible with universal ZigBee gateway products
Can be controlled by universal single wire push switch, 2 channels can be controlled separately by 2 switches
Active power and energy metering functionality
Mini Size, Easy to be installed into a standard wall box
Radio Frequency : 2.4GHz
Waterproof grade: IP20
Input Voltage Output Voltage Output Channel
Product Data
Size(LxWxH)
100-240VAC 2 Channels100-240VAC 45.5x45x20.3mm
DO NOT install with power applied to device.
DO NOT expose the device to moisture.
Safety & Warnings
Operation
1.Do wiring according to connection diagram correctly.
3. Zigbee Network Pairing through Coordinator or Hub (Added to a Zigbee Network)
Step 1: Remove the device from previous zigbee network if it has already been added to, otherwise pairing will
fail. Please refer to the part "Factory Reset Manually".
Step 2: From your ZigBee Controller or hub interface, choose to add lighting device and enter Pairing mode as
instructed by the controller.
Step 3: Reset power of the device to
set it into network pairing mode
(connected light flashes twice
slowly), 15 seconds timeout, repeat
this step.
Step 4: Connected light will blink 5
times and then stay solid on, then the
device will appear in your controller's
menu and can be controlled through
controller or hub interface.
2.This ZigBee device is a wireless receiver that communicates with a variety of ZigBee compatible systems. This
receiver receives and is controlled by wireless radio signals from the compatible ZigBee system.
ZigBee Clusters the device supports are as follows:
Input Clusters
0x0000: Basic 0x0003: Identify 0x0004: Groups 0x0005: Scenes 0x0006: On/off
0x0702: Simple Metering0x0b04: Electrical Measurement0x0b05: Diagnostics
Output Clusters
0x0019: OTA
Compatible Load Types
Load Symbol Load Type Maximum Load Remarks
LED lamps with transformers
LED drivers
Incandescent lighting,
HV Halogen lamps
Low voltage halogen
lighting with electronic
transformers
When connecting resistive load and total load is over 8.1A, the relay will be forced to off and protected.
Over Current Protection
LED indicator: stays off if the device
is not added to a Zigbee network,
stays solid on after the device is
added to a network. Same indication
as connected load when commissioning
the device: network pairing, touchlink,
factory reset
AC power input
2 channels load output
390W/CH @ 230V
180W/CH @ 110V
Due to variety of LED lamp
designs, maximum number
of LED lamps is further
dependent on power factor
result when connected to
switch.
Maximum permitted number
of drivers is 390W divided by
driver nameplate power
rating.
Max. Load
N
L
Rese t
L
L1 NN
S2
2-Gang In Wall Switch
Rat ings: 100-2 40V~, 50/60 Hz,MA X:5.1 A ( )
S1
L2
MAX :1.7A ( )
2 channels switch
input, to control 2
channels load
separately
Resistive load: max. 5.1A/CH
Capacitive load: max. 1.7A/CH
390W/CH @ 230V
180W/CH @ 110V
390W/CH @ 230V
180W/CH @ 110V
1170W/CH @ 230V
560W/CH @ 110V
4. TouchLink to a Zigbee Remote
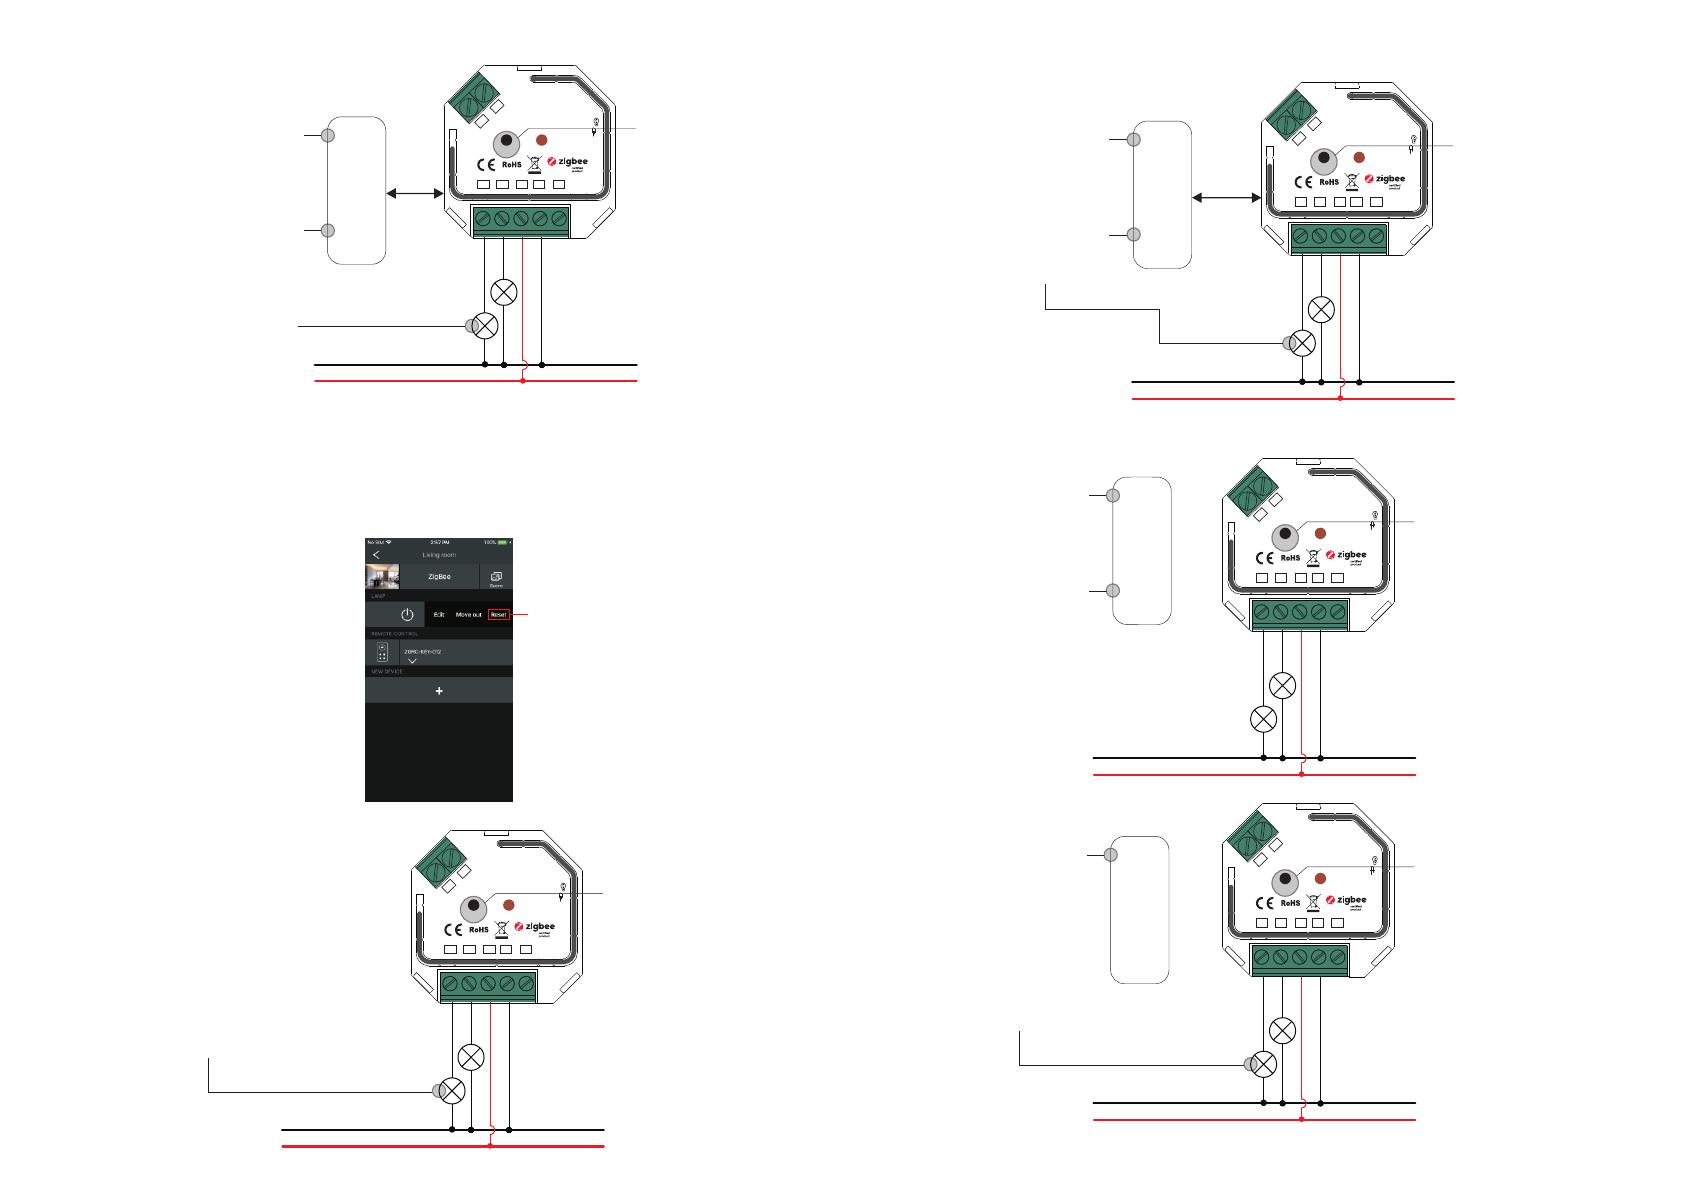
5. Removed from a Zigbee Network through Coordinator or Hub Interface
From your ZigBee controller or hub
interface, choose to delete or reset the
lighting device as instructed. The
connected light blinks 3 times to indicate
successful reset.
Step 4: There shall be indication
on the remote for successful link
and connected light will flash
twice.
Zigbee
Remote < 10cm
Step 2: Bring the remote or touch
panel within 10cm of the lighting
device.
Step 3: Set the remote or touch
panel into Touchlink
commissioning,
please refer to corresponding
remote or touch panel manual to
learn how.
Note: 1) Directly TouchLink (both not added to a ZigBee network), each device can link with 1 remote.
2) TouchLink after both added to a ZigBee network, each device can link with max. 30 remotes.
3) To control by both gateway & remote, add remote and device to network first then TouchLink.
4) After TouchLink, the device can be controlled by the linked remotes.
6. Factory Reset Manually
Step 2: Connected light will blink 3
times to indicate successful reset.
Step 1: Short press “Reset.
key for 5 times continuously
or reset power of the device
for 5 times continuously if
the “Reset” key is not
accessible.
Note: 1) If the device is already at factory
default setting, there is no indication
when factory reset again .
2) All configuration parameters will
be reset after the device is reset or
removed from the network.
7. Factory Reset through a Zigbee Remote (Touch Reset)
Note: Make sure the device already added to a network, the remote added to the same one or not added to any
network.
Step 1: Short press
reset button 4 times to
start TouchLink
Commissioning, 180
seconds timeout,
repeat this step.
Step 4: There shall be indication
on the remote and connected light
flashes 3 times for successful
reset.
Zigbee
Remote < 10cm
Step 2: Bring the remote or touch
panel within 10cm of the lighting
device.
Step 3: SSet the remote or touch
panel into Touch Reset procedure
to reset the device, please refer to
corresponding remote or touch
panel manual to learn how.
8. Find and Bind Mode
Step 1: Short press “Reset.
button 3 times (Or reset
power of the device (initiator
node) 3 times) to start Find
and Bind mode (connected
light flashes slowly) to find
and bind target node, 180
seconds timeout, repeat this
step.
Zigbee
Remote
Step 2: Set the remote or touch
panel (target node) into find
and bind mode, and enable it
to find and bind initiator, please
refer to corresponding remote
or touch panel manual.
Step 3: There shall be
indication on the remote or
touch panel that it bind the
device successfully and can
control it then.to learn how.
Note: Make sure the device and remote already added to the same zigbee network.
9. Learning to a Zigbee Green Power Switch
Step 1: Short press “Reset.
button 4 times (Or reset
power of the device 4 times)
to start Learning to GP
switch mode (connected
light flashes twice), 180
seconds timeout, repeat this
step.
Step 2: Set the green power
switch into Learning mode,
please refer to its manual.
Step 3: Connected light will
flash twice to indicate
successful learning. Then the
switch can control the device.
Note: Each device can learn to max. 20 zigbee green power switches.
Step 1: Method 1: Short press
Reset” button 4 times (or
reset power of the device 4
times) to start Touchlink
commissioning immediately,
180S timeout, repeat this step.
Method 2: Reset power of the
device, Touchlink
commissioning will start after
15S if its not added to a zigbee
network, 165S timeout. Or
start immediately if its already
added to a network, 180S
timeout. Once timeout, repeat
this step.
Zigbee
Green Pow er
Switch
N
L
Reset
L
L1 NN
S2
2-Gang In Wall Switch
Ratings:100- 24 0V ~, 50 /6 0H z, MA X: 5. 1A ( )
S1
L2
MAX:1.7A ( )
N
L
Reset
L
L1 NN
S2
2-Gang In Wall Switch
Ratings:100- 24 0V ~, 50 /6 0H z, MA X: 5. 1A ( )
S1
L2
MAX:1.7A ( )
N
L
Reset
L
L1 NN
S2
2-Gang In Wall Switch
Ratings:100- 24 0V ~, 50 /6 0H z, MA X: 5. 1A ( )
S1
L2
MAX:1.7A ( )
N
L
Reset
L
L1 NN
S2
2-Gang In Wall Switch
Ratings:100- 24 0V ~, 50 /6 0H z, MA X: 5. 1A ( )
S1
L2
MAX:1.7A ( )
N
L
Reset
L
L1 NN
S2
2-Gang In Wall Switch
Ratings:100- 24 0V ~, 50 /6 0H z, MA X: 5. 1A ( )
S1
L2
MAX:1.7A ( )
11. Setup a Zigbee Network & Add Other Devices to the Network (No Coordinator Required)
Step 1: Short press “Reset.
button 4 times (Or reset
power of the device 4 times)
to enable the device to setup
a zigbee network (connected
light flashes twice) to
discover and add other
devices, 180 seconds
timeout, repeat this step.
Zigbee
Remote
Step 2: Set another device or remote or touch panel into network pairing mode and pair to the network, refer to
their manuals.
Step 3: Pair more devices and remotes to the network as you would like, refer to their manuals.
Step 4: Bind the added devices and remotes through Touchlink so that the devices can be controlled by the
remotes, refer to their manuals.
< 10cm
TouchLink
10. Delete Learning to a Zigbee Green Power Switch
Step 1: Short press “Reset.
button 3 times (Or reset
power of the device 3 times)
to start delete Learning to GP
switch mode (connected light
flashes slowly), 180 seconds
timeout, repeat this step.
Zigbee
Green Pow er
Switch
Step 2: Set the paired green
power switch into Learning
mode, please refer to its manual.
Step 3: Connected light will
flash 4 times to indicate
successful deleting.
Note: 1) Each added device can link and be controlled by max. 30 added remotes.
2) Each added remote can link and control max. 30 added devices.
12. OTA
The device supports firmware updating through OTA, and will acquire new firmware from zigbee controller or
hub every 10 minutes automatically.
Wiring Diagram
Notes for the diagrams:
L - terminal for live lead
N - terminal for neutral lead
S1 - terminal for switch key No. 1
S2 - terminal for switch key No. 2
L1 - output terminal no. 1 for light load
L2 - output terminal no. 2 for light load
N
L
Reset
L
L1 NN
S2
2-Gang In Wall Switch
Ratings:100- 24 0V ~, 50 /6 0H z, MA X: 5. 1A ( )
S1
L2
MAX:1.7A ( )
Reset
L
L1 NN
S2
2-Gang In Wall Switch
Ratings:100-240V~,50/60Hz,MAX:5A ( )
S1
L2
MAX:1.7A ( )
N
L
Reset
L
L1 NN
S2
2-Gang In Wall Switch
Ratings:100- 24 0V ~, 50 /6 0H z, MA X: 5. 1A ( )
S1
L2
MAX:1.7A ( )
Neutral
Live
L2
Reset
L
L1 NN
S2
2-Gang In Wall Switch
Ratings:10 0-240V~,50/60Hz,M AX:5 .1A ( )
S1
L2
MAX:1.7A ( )
1. With 1PC 2-Gang 1-Way Switch
L1
COM2 COM1
Supported Switch Types:
The switch types this device supports can be configured by factory setting:
1. Push Switch (factory default setting)
2. Toggle On/Off Switch (can be configured by factory setting upon request)
Neutral
Live
COM COM Reset
L
L1 NN
S2
2-Gang In Wall Switch
Ratings:10 0-240V~,50/60Hz,M AX:5 .1A ( )
S1
L2
MAX:1.7A ( )
Product Dimension
45.5 mm
20.3 mm
45 mm
2. With 2PCS 1-Gang 1-Way Switches
L L
  • Page 1 1
  • Page 2 2
  • Page 3 3
  • Page 4 4

Sunricher SR-ZG9101SAC Operating instructions

Type
Operating instructions

Sunricher SR-ZG9101SAC is a smart 2-gang in-wall switch that allows you to remotely control and automate your lighting. Utilizing the latest ZigBee 3.0 protocol, it offers enhanced connectivity and performance. Compatible with universal ZigBee gateways, this switch can be integrated into your smart home system for seamless control. You can create schedules, set scenes, and adjust lighting levels using your smartphone or voice commands. Additionally, the switch supports Touchlink commissioning, enabling direct pairing with compatible ZigBee remotes without the need for a coordinator.

Ask a question and I''ll find the answer in the document

Finding information in a document is now easier with AI