HOMEWERKS 30-K81WYRNDCHB-Z Installation guide

Category
Faucets
Type
Installation guide

This manual is also suitable for

The HOMEWERKS 30-K81WYRNDCHB-Z is a single-handle kitchen faucet with an 8" centerset, washerless ball design, and a black side-spray. It has a polished chrome finish, a maximum flow rate of 2.2 G/min, and is certified to meet ANSI/NSF61-9 Low Lead Requirements. It also complies with 0.25% weighted average lead content on wetted surfaces. This kitchen faucet is designed for years of trouble-free performance and easy maintenance.

The HOMEWERKS 30-K81WYRNDCHB-Z is a single-handle kitchen faucet with an 8" centerset, washerless ball design, and a black side-spray. It has a polished chrome finish, a maximum flow rate of 2.2 G/min, and is certified to meet ANSI/NSF61-9 Low Lead Requirements. It also complies with 0.25% weighted average lead content on wetted surfaces. This kitchen faucet is designed for years of trouble-free performance and easy maintenance.

Eective/Rev Date: July 31, 2011 1www.homewerksww.com
Instructions
Single Handle Kitchen Faucet with or without Black Side-Spray
116758 Chrome less spray
116757 Chrome with spray
30-K81-WNRNDCH-AD-Z Chrome less spray
30-K81-WYRNDCH-AD-Z Chrome with spray
Tools Required
Adjustable Wrench
Groove Joint Pliers
Pipe Wrench
Phillips Screwdriver
Pipe Tape or pipe thread compound
Safety Tips
If you solder the joints during installation of the faucet, the seats,
cartridges, and washers must be removed before using a ame
or the warranty will be voided on these parts.
Protect your eyes with safety glasses when cutting or soldering
water supply lines.
Cover the sink drain to avoid losing parts.
Things You May Need
Installations may vary depending on how the previous faucet was
installed. Supplies necessary for the installation of your faucet are
not all included; however, they are available wherever plumbing
supplies are sold.
Maintenance
Your new kitchen faucet is designed for years of trouble-free
performance.
Keep it looking new by cleaning it periodically with a soft cloth.
Avoid abrasive cleaners, steel wool, and harsh chemicals as
these will dull the nish and void your warranty.
Important Points
Prior to beginning installation, turn o the hot and cold water
lines, then turn on the old faucet to release built-up pressure.
When installing your new faucet, turn the connector nuts nger
tight, then use one wrench to hold the tting and a second
wrench to tighten the nut. Connections that are too tight will
reduce the integrity of the system.
Wrap all threaded connections with PTFE pipe tape available
at your local hardware or plumbing supply store. Always wrap
in a clock-wise direction.
Contact Us
For Customer Service please call 877-319-3757, or go to
homewerksww.com.
Certications
CALIFORNIA LEAD
PLUMBING LAW
*Image may vary slightly from actual product
30-K81-WNRNDCH-B-Z Chrome less spray
30-K81-WYRNDCH-B-Z Chrome with spray
Eective/Rev Date: July 31, 2011 2www.homewerksww.com
Instructions
Preparation and Assembly
1 2 3
Locate water supply inlet and shut o water
supply valve. These are usually found under the
sink or near the water heater. Remove old
faucet. Clean and dry sink surface area where
new faucet will be mounted.
If faucet is without side spray skip steps 2 and 3.
Install spray head holder on far right hand hole
of the sink using the mounting nut provided.
Drop threaded end of the spray hose down
through the holder to center of the faucet
body.
4 5 6
Thread on mounting bolts to faucet body. Apply clear silicone latex caulk to base plate. Install faucet into sink by feeding all tubes down
through center hole. From under sink, thread
mounting nuts onto threaded metal rods and
tighten nuts. Wipe away excess caulk.
7 8 9
Attach water supply tubes using connecting
nuts provided. Connect 3/8" O.D. inlet tubes to
water supplies with appropriate connections,
left tube to hot water supply and right tube to
cold water supply. Note A and B have to be
purchased separately.
Apply joint tape to shut o valve threads. Attach supply tube to shut o valve. Do not
overtighten.
10
Important: After installation is completed,
remove aerator. Turn on water supply and
allow both hot and cold water to run for at least
one minute. While water is running, check for
leaks. Replace aerator. Tighten nut slightly to
stop minor leaks. If problems persist, refer to
troubleshooting chart.
Certications
Single Handle Kitchen Faucet with or without Black Side-Spray
116758 Chrome less spray
116757 Chrome with spray
30-K81-WNRNDCH-AD-Z Chrome less spray
30-K81-WYRNDCH-AD-Z Chrome with spray
CALIFORNIA LEAD
PLUMBING LAW
30-K81-WNRNDCH-B-Z Chrome less spray
30-K81-WYRNDCH-B-Z Chrome with spray
Eective/Rev Date: July 31, 2011 3www.homewerksww.com
Certications
Troubleshooting
Troubleshooting
PROBLEM: Leaks underneath handle.
CAUSE: Adjusting ring or cap assembly has loosened.
ACTION:
1. Move the handle to the o position. Remove handle by loosening set
screw with Allen wrench (Diagram A).
2. Tighten the adjusting ring by turning it clockwise with a small screwdriver.
Move the ball stem to the on position and continue tightening the
adjusting ring until the leak steps draining out from around the ball stem
(Diagram B)
3. If the leak does not stop, loosen the adjusting ring and tighten the entire
cap assembly by turning it clockwise (Diagram C). Re-tighten the
adjusting ring as before.
4. Replace the handle and tighten the set screw.
PROBLEM: Water does not completely shut o.
CAUSE: Rubber valve seat is dirty or worn, or adjusting ring or cap has
loosened.
ACTION:
1. Remove the handle (Diagram A).
2. Turn o the water under the sink.
3. Unscrew the cap assembly and lift out the stem and ball stem, and the
plastic and rubber cam assembly (Diagram D).
4. Inspect the two rubber valve seats for debris or damage (Diagram E).
Replace with new valve seats if necessary (valve seats are available at
your local hardware or plumbing supply store). Push the rubber valve
seats and springs back in place, smaller end up.
5. Take care when replacing the metal ball to align the metal peg on the
side of the body with the oblong slot on the ball (Diagram F).
6. Reassemble faucet taking care to t the small alignment tab on the
cam into the slot provided (Diagram G).
7. Re-tighten the adjusting ring (Diagram H). Replace the handle and
tighten the set screw.
8. Turn on the water under the sink.
PROBLEM: Aerator leaks or has an improper water ow pattern.
CAUSE: Aerator incorrectly tted or aerator assembly is dirty.
ACTION:
Unscrew the aerator by turning it clockwise. Inspect the black rubber
packing and small parts. Clear away any debris. Reassemble aerator and
replace on end of spout.
PROBLEM: Improper water pattern.
CAUSE: Aerator incorrectly tted or aerator assembly is dirty
ACTION:
1. Remove the aerator from the spout end by turning it clockwise.
2. Gently ush the small parts inside the aerator to clear away any debris.
3. Re-install the small parts as shown in the exploded diagram (Diagram
I). Metal screens must be at and plastic supporter must be straight.
4. Screw the aerator onto the spout end and tighten
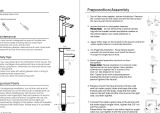
A B C
D E F
G H I
Single Handle Kitchen Faucet with or without Black Side-Spray
116758 Chrome less spray
116757 Chrome with spray
30-K81-WNRNDCH-AD-Z Chrome less spray
30-K81-WYRNDCH-AD-Z Chrome with spray
CALIFORNIA LEAD
PLUMBING LAW
30-K81-WNRNDCH-B-Z Chrome less spray
30-K81-WYRNDCH-B-Z Chrome with spray
Eective/Rev Date: July 31, 2011 4www.homewerksww.com
Specications
Physical Characteristics
Description: Single handle kitchen faucet with 8" centerset,
washerless ball design, and with or without black side-spray
Finish: Polished chrome
Max. Flow Rate: 2.2 G/min (8.3 L/min)
ASME A112.18.1/CSA B125 Certified
Meets ANSI/NSF61-9 Low Lead Requirements
This product complies with 0.25% weighted average lead
content on wetted surfaces.
Total Weight of Item: 3.0 lbs.
Certications
116758 Chrome less spray
116757 Chrome with spray
30-K81-WNRNDCH-AD-Z
Chrome less spray
30-K81-WYRNDCH-AD-Z
Chrome with spray
30-K81-WNRNDCH-B-Z
Chrome less spray
30-K81-WYRNDCH-B-Z
Chrome with spray
CALIFORNIA LEAD
PLUMBING LAW
No. Part Description Material
1 Handle ZZnA14
2 Set screw SUS302
3 Adjusting ring Brass C37700
4 Cap ZZnA14
5 Cam POM
6 Cam packing NBR N7008F+Teon
7 Cartridge SUS302/304
8 Seat NBR
9 Spring SUS304
10 Spout H62+C27200+C37700
11
Aerator assembly
EPDM E7008F
12 POM+SUS302
13 ABS PA727
14 O-ring NBR E7008F
15 Washer POM
16 Body
3101+LTN60-2+C37700+
C12200+SUS+NBR+EPDM
17 Escutcheon ZZnA14
18 Washer Q235
19 Screw SUS302/304
20 Base plate PP+40% CaCO3
21 Bolt Q235A
22 Mounting nut ABS
23 Diverter Brass+POM+NBR N7008F+EPDM
24 Side spray POM+PVC
Eective/Rev Date: July 31, 2011 5www.homewerksww.com
Rough-In
Certications
Single Handle Kitchen Faucet with or without Black Side-Spray
116758 Chrome less spray
116757 Chrome with spray
30-K81-WNRNDCH-AD-Z Chrome less spray
30-K81-WYRNDCH-AD-Z Chrome with spray
30-K81-WNRNDCH-B-Z Chrome less spray
30-K81-WYRNDCH-B-Z Chrome with spray
CALIFORNIA LEAD
PLUMBING LAW
2 1/32"
10 7/16"
6 15 /3 2"
3 11/16"
8 29/32"
6 17 /3 2"
15/16''-27UNS-2A
1 1/ 2"
7 17 /3 2"
8"
10 1/32"
3 3/16 "
27/32"
4 27 /3 2"
2"
1/4''-20UNC-2A
1/2''-14NPSM-2A
  • Page 1 1
  • Page 2 2
  • Page 3 3
  • Page 4 4
  • Page 5 5

HOMEWERKS 30-K81WYRNDCHB-Z Installation guide

Category
Faucets
Type
Installation guide
This manual is also suitable for

The HOMEWERKS 30-K81WYRNDCHB-Z is a single-handle kitchen faucet with an 8" centerset, washerless ball design, and a black side-spray. It has a polished chrome finish, a maximum flow rate of 2.2 G/min, and is certified to meet ANSI/NSF61-9 Low Lead Requirements. It also complies with 0.25% weighted average lead content on wetted surfaces. This kitchen faucet is designed for years of trouble-free performance and easy maintenance.

Ask a question and I''ll find the answer in the document

Finding information in a document is now easier with AI