Page is loading ...

1
RocketStor 6422TS
User Manual
December 30
th
, 2015
Revision 1.1
HighPoint Technologies, Inc.

2
Copyright
Copyright © 2015 HighPoint Technologies, Inc. This document contains materials protected by
International Copyright Laws. All rights reserved. No part of this manual may be reproduced,
transmitted or transcribed in any form and for any purpose without the express written
permission of HighPoint Technologies, Inc.
Trademarks
Companies and products mentioned in this manual are for identification purpose only. Product
names or brand names appearing in this manual may or may not be registered trademarks or
copyrights of their respective owners. Backup your important data before using HighPoint's
products and use at your own risk. In no event shall HighPoint be liable for any loss of profits,
or for direct, indirect, special, incidental or consequential damages arising from any defect or
error in HighPoint's products or manuals. Information in this manual is subject to change
without notice and does not represent a commitment on the part of HighPoint.
Notice
Reasonable effort has been made to ensure that the information in this manual is accurate.
HighPoint assumes no liability for technical inaccuracies, typographical, or other errors
contained herein.
FCC Part 15 Class B Radio Frequency Interference statement
This equipment has been tested and found to comply with the limits for a Class B digital device,
pursuant to part 15 of the FCC Rules. These limits are designed to provide reasonable
protection against harmful interference in a residential installation. This equipment generates
uses and can radiate radio frequency energy and, if not installed and used in accordance with
the instructions, may cause harmful interference to radio communications. However, there is no
guarantee that interference will not occur in a particular installation. If this equipment does
cause harmful interference to radio or television reception, which can be determined by turning
the equipment off and on, the user is encouraged to try to correct the interference by one or
more of the following measures:
Reorient or relocate the receiving antenna.
Increase the separation between the equipment and receiver.
Connect the equipment into an outlet on a circuit different from that to which the receiver is
connected.
Consult the dealer or an experienced radio/TV technician for help.
Modifications not expressly approved by the manufacturer could void the user’s authority to
operate the equipment under FCC rules.
This device complies with part 15 of the FCC Rules. Operation is subject to the following two
conditions: (1) this device may not cause harmful interference, and (2) this device must accept
any interference received, including interference that may cause undesired operation.
European Union Compliance Statement
This Information Technologies Equipment has been tested and found to comply with the
following European directives:
European Standard EN55022 (1998) Class B
European Standard EN55024 (1998)

3
Table of Contents
Product Overview ....................................................................................................................... 5
Kit Contents.................................................................................................................................. 5
Section 1: Hardware Installation .............................................................................................. 7
Preparing the Enclosure ...............................................................................................................8
Preparing the HBA (Host Bus Adapter) .....................................................................................8
Connecting the HBA with the Enclosure ...................................................................................9
LED Activity .................................................................................................................................. 10
Section 2: Drivers ...................................................................................................................... 12
Installing Drivers on an Existing Operating System ................................ 错误!未定义书签。
Checking your Driver Version ....................................................................... 错误!未定义书签。
Loading Drivers onto a Bootable Array ....................................................... 错误!未定义书签。
Updating the Drivers ....................................................................................... 错误!未定义书签。
Uninstalling the Drivers.................................................................................. 错误!未定义书签。
Section 3: Navigating the HighPoint WebGUI ........................................... 错误!未定义书签。
Installing HighPoint WebGUI ......................................................................... 错误!未定义书签。
How to Login HighPoint WebGUI .................................................................. 错误!未定义书签。
Global Tab .......................................................................................................... 错误!未定义书签。
Viewing HBA Properties .............................................................................. 错误!未定义书签。
Viewing Storage Properties ........................................................................ 错误!未定义书签。
Physical Tab ....................................................................................................... 错误!未定义书签。
Updating BIOS/Firmware ............................................................................ 错误!未定义书签。
Obtaining Physical Device Information ................................................... 错误!未定义书签。
Logical Tab ......................................................................................................... 错误!未定义书签。
Creating an Array ......................................................................................... 错误!未定义书签。
Adding Spare Disks...................................................................................... 错误!未定义书签。
Obtaining Logical Device Information ..................................................... 错误!未定义书签。
Normal Status................................................................................................ 错误!未定义书签。
Critical Status ................................................................................................ 错误!未定义书签。

4
Disabled Status ............................................................................................. 错误!未定义书签。
Expanding an Existing Array ..................................................................... 错误!未定义书签。
Setting Tab ......................................................................................................... 错误!未定义书签。
System Settings ............................................................................................. 错误!未定义书签。
Password Setting .......................................................................................... 错误!未定义书签。
Changing your WebGUI password ............................................................ 错误!未定义书签。
Recovering your WebGUI password ......................................................... 错误!未定义书签。
Email Setting .................................................................................................. 错误!未定义书签。
Recover Tab ....................................................................................................... 错误!未定义书签。
How to Backup your Recover List ............................................................. 错误!未定义书签。
How to Reload your Backup Recover List ............................................... 错误!未定义书签。
Event Tab ........................................................................................................... 错误!未定义书签。
Table 3. Event Log Icon Guide ................................................................... 错误!未定义书签。
SHI (Storage Health Inspector) ...................................................................... 错误!未定义书签。
How to Enable SMART Monitoring ........................................................... 错误!未定义书签。
How to Change HDD Temperature Threshold ...................................... 错误!未定义书签。
How to Use the Health Inspector Scheduler .......................................... 错误!未定义书签。
How to Create a New Verify Task ............................................................. 错误!未定义书签。
Section 6: Formatting the RAID Volumes .................................................. 错误!未定义书签。
Section 7: Troubleshooting ........................................................................... 错误!未定义书签。
Handling Critical Arrays ................................................................................. 错误!未定义书签。
Rebuilding Stops Due to Bad Sectors ...................................................... 错误!未定义书签。
Critical array becomes disabled when you removed faulty disk ...... 错误!未定义书签。
Handling Disabled Arrays .............................................................................. 错误!未定义书签。
Your PC hangs when card is installed ......................................................... 错误!未定义书签。
Help .................................................................................................................... 错误!未定义书签。
Table 4. WebGUI Icon Guide .......................................................................... 错误!未定义书签。
Table 5. RAID Level Quick Reference .......................................................... 错误!未定义书签。
HighPoint Recommended List of Hard Drives ........................................... 错误!未定义书签。
Contacting Technical Support ....................................................................... 错误!未定义书签。

5

6
Product Overview
The RocketStor 6422TS bundle package includes a enclosure for housing your physical
drives and a RAID Controller to manage and create RAID arrays of different levels.
NetStor 2U 8-bay SAS/SATA JBOD Enclosure
HighPoint RocketRAID 2722 Controller
Kit Contents
Before getting started, check to see if any items are missing, damaged, or incorrect. For
any discrepancy contact your reseller or go to www.highpoint-tech.com for online
support.
Item
Count
NetStor NA341A-R Enclosure
1
HighPoint RocketRAID 2722
1
HDD Trays
8
mini-SAS (SFF-8088) Cable
2
Power Cord
1
NetStor Manual CD-ROM
1
HDD mounting screws
32
HDD lock keys
2
Quick Installation Guide
1
Feature
Specifications
RocketStor 6422TS
Host Port
2x Mini-SAS
RAID Controller /Bus
Interface
RocketRAID 2722 / PCIe 2.0 x8
RAID Level
0, 1, 5, 6, 10, 50, JBOD

7
Max. Capacity
Up to 64 TB
Number Of drives
Up to 8
Drive Interface
SAS, SATA
Drive Form Factor
3.5"
Chassis Material
Heavy-duty cold-rolled steel housing
Dimension
18” (D) ×19” (W) × 3.5” (H)
Weight
36.85 lbs.
UPC
643653642229
Warranty
2 Years
Advanced RAID Features
Flash ROM for Upgradeable Firmware
Storage Health Inspector
Redundant RAID Configurations
Multiple RAID Partitions supported
Online Array Roaming
Online RAID Level Migration (ORLM)
Online Capacity Expansion (OCE)
RAID Initialization Background/Foreground/Quick
Global Hot Spare Disk support
Automatic and configurable RAID Rebuilding Priority
Disk Format compatible: 512, 512e, 4Kn
Larger than 2 TB Drive and RAID Array support
Spin down Massive Arrays of Idle Disks support
Native Command Queuing
Stagger Drive Spin Up
Write Back and Write Through
Storage Monitoring and Management Suite
RAID Management Suites:
RAID Management Suites, BIOS/Firmware configuration
tool, Browser-Based management tool,
CLI(Command Line Interface) - scriptable configuration tool,
API package
SMTP
Email Alert notification
Cooling Fan:
Two 60×60×25 mm
Power Supply
Redundant 400 W 100-240 V AC, 50/60 Hz universal
LED Display for Each Tray
White - Power-On Indicator / Blue -Busy (HDD Access)
Indicator

8
LED Display For Enclosure
POWER on LED (white) / FAN (Normal – green; Fail – red)
/ TEMP (Normal – green; over 55°C – red)
Operating System Support
Window
2008 and Window 7 and later
Linux:
RedHat Enterprise, Open SuSE, Fedora Core, Debian,
Ubuntu
FreeBSD
9.3 and Later
Mac OS X
OS X 10.6 and later
Driver embedded
OS X 10.10 ( apply for RocketStor 6422TS)
Operating Environment
Temperature
(Operating) 5°C – 45°C / (Non-operating) -40°C – 65°C
Relative Humidity
(operating) 8% – 90% RH (Non-condensing) / (Non-
operating) 5% – 95% RH (Non-condensing)
Certification
CE, FCC, RoHS
Getting Started
Thank you for purchasing HighPoint Technologies RocketStor 6422TS. You are only a
few steps away from utilizing RAID storage using the industry’s most affordable
hardware RAID solution.
To start using your RocketStor 6422TS take the following steps:
1. Setting up the Hardware (pg. 7)
2. Install/Update drivers (pg. 12)
3. Install HighPoint RAID Management (WebGUI) (pg. 18)
4. Create RAID Arrays (pg. 21)
5. Initialize and format RAID Volumes (pg. 25)
Step 1: Setting Up the Hardware
This section covers the following topics:
1. Setting up the Enclosure
2. Setting up the HBA (Host Bus Adapter)
3. LED Activity

9
Preparing the Enclosure
You can refer to the NetStor 2U 8-Bay Rackmount Quick Installation Guide for details
on how to set up the enclosure.
1. Take out the HDD tray and place your hard drive in the tray as shown below. Then
install the tray back into the enclosure. Repeat for all your hard drives.
2. (Optional) Lock your HDD tray with the included disk tray key.
3. Place the enclosure on a server rack or another stable, flat surface.
4. Connect the enclosure to a power source with the AC Power Cord.
5. Connect the enclosure to the included RocketRAID HBA using the mini-SAS to mini-
SAS cable (SFF-8088).
Preparing the HBA (Host Bus Adapter)
The following instructions describe how to prepare your RocketRAID 2722 HBA for use.
To install your RocketRAID 2722:
Important: Before installing the RocketRAID 2722 Controller, ensure that your system
is powered OFF.
1. Locate a PCIe 2.0 x8 slot (or compatible slot) on your PC motherboard.
Note 1: Refer to your PC manual for instructions on how to access your
motherboard.
Note 2: Refer to your motherboard manual for instructions on how to locate
your PCI Express slot.
2. Align the RocketRAID 2722 with the PCIe slot and push straight down until card is
fully seated.
3. Tighten the connection by fastening the RocketRAID bracket and enclosure
together.

10
A PCI-Express 2.0 x8 card is compatible with PCI-Express 2.0 x16 and PCI-Express 3.0
x16 slots.
Connecting the HBA with the Enclosure
Use the mini-SAS (SFF-8088) cables provided to connect the enclosure ports to the
RocketRAID ports.
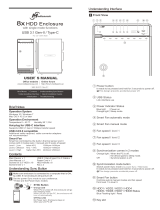
Enclosure Front Panel

11
Enclosure Back Panel
Key
1
HDD Power LED
5
Temperature LED
GREEN- normal temperatures
RED – over 55°𝐶
2
HDD Status LED
6
Power Cord Receptacle
3
Mute Button :
Resets alarm
7
dual mini-SAS (SFF-8088) Connectors
4
FAN Status LED:
GREEN – normal
status
RED – FAIL status
8
DB9 Connector (Connecting SGPIO signal for HDD fail
display) (Not Applicable for RocketRAID 2722)
LED Activity
The following information tells you how to interpret LED activity seen on the enclosure
and disk trays.
Present
Active
Failed
Identify
Disk Tray
WHITE
BLUE
N/A
N/A
Enclosure
LEDs
WHITE
N/A
N/A

12
Fans LEDs
GREEN
RED
N/A
Temperature
LEDs
GREEN
RED
N/A
Present – Indicates that the disk is present and available.
Active – Indicates the disk is performing disk I/O
Failed – Indicates disk failure (Not available for RocketStor 6422TS enclosure)
Identify – Identify LED is a setting that can be enabled in Physical > devices. This
setting will bring up a RED LED for the drive that is enabled for easy identification.
Identify LEDs are not available on the RocketStor 6422TS enclosure.
RocketRAID 2722 Key
PORT2
mini-SAS (SFF-8088) Connection
Corresponds to channel 1-4
PORT3
mini-SAS (SFF-8088) Connection
Corresponds to channel 5-8
BEEP1
Alarm/Beeper

13
Step 2: Install/Update Drivers
Installing Drivers on an Existing Operating System
Drivers provide a way for your operating system to communicate with your new
hardware. Updating to the latest drivers ensures your product has the latest
performance, stability, and compatibility improvements. Drivers are updated regularly
at www.highpoint-tech.com
For Windows Users:
1. Download the latest driver files from our website www.highpoint-tech.com >
Support > Documents and Downloads > RocketStor 6422TS.
2. Extract the downloaded files onto your PC and note the location of the files.
3. Open Windows Device Manager (Control Panel > Hardware and Sound > Devices
and Printers > Device Manager).
4. Under Other devices, right-click RAID Controller.
5. Click Update Driver Software.

14
6. Click Browse my computer for driver software.
7. Navigate to where you saved the driver files.

15
8. Click OK.
9. Click Next, Windows security will prompt to ask if you are sure you want to
install HighPoint Software.
10. After clicking Install, driver will be installed.

16
11. Reboot for changes to take effect.
For Mac Users:
HighPoint Mac Drivers have file extension .dmg; make sure the file extension for the
files you downloaded are the same.
1. Obtain latest driver online at www.hptmac.com >PCIe Controller Card > 6 Gb/s
SAS/SATA RAID HBA > RocketRAID 2722 >Download
Navigate to your specific HBA controller page (Refer to How to View HBA
Properties to find model name)

17
2. Click the downloaded file.
3. A mounted volume (HighPointRR) will appear on the desktop. Click to open the
volume.
4. Click the driver package to start installation (~.pkg file)

18
5. Follow the on-screen instructions of the installer.
6. Reboot computer for changes to take effect.

19
7. Make sure Driver Installed is Yes. Click Apple Icon > About this Mac... > System
Report > PCI to check this
Click Apple Icon > About this Mac... > System Report > PCI
Step 3: Install HighPoint RAID Management (WebGUI)

20
The HighPoint RAID Management (WebGUI) software is necessary to create, maintain,
and view your RAID arrays.
For Windows Users:
1. Download the latest WebGUI from our website at www.highpoint-tech.com >
Support > Documents and Downloads > RocketStor 6422TS > Windows WebGUI
2. Extract and open the contents of the downloaded file.
3. Double-click HighPoint RAID Management.exe
/