Page is loading ...

Due to continual improvement in design or otherwise, the product you
purchase may differ slightly from the illustration in this book. Issue B14
Kambrook - New Zealand
Private Bag 94411
Botany, Manukau
Auckland 2163
New Zealand
Customer Service Line/
Spare Parts 0800 273 845
Customer Service Fax 0800 288 513
www.kambrook.co.nz
Kambrook - Australia
Building 2, Port Air Industrial Estate
1A Hale Street
Botany NSW 2019
Australia
Customer Service Line 1300 139 798
Customer Service Fax 1800 621 337
www.kambrook.com.au

KPR820 INSTRUCTION BOOKLET

Important
Please retain your instruction
book for future use.
In the event that you need some assistance with your
Kambrook appliance, please contact our Customer Service
Department on 1300 139 798 (Australia) or 0800 273 845
(New Zealand). Alternatively, visit us on our website at
www.kambrook.com.au or www.kambrook.co.nz

Contents
Kambrook Recommends p4
Safety First
Your Kambrook Pressure p7
Express Multi
Pressure Express Multi p11
Quick Start Guide
Using Your Kambrook p15
Pressure Express Multi
Functions of Your Kambrook p16
Pressure Express Multi
Pressure Express Multi Cooking p20
Guide
Troubleshooting Guide p33
Care, Cleaning and Storage p34
Handy Hints for Pressure Cooking p37
Recipes p38

4
Kambrook Recommends Safety First
IMPORTANT: Please retain your
instruction book for future use.
At Kambrook, we believe that safe performance is the first priority in any
consumer product, so that you, our valued customer can confidently
use and trust our products. We ask that any electrical appliance that
you use be operated in a sensible fashion with due care and attention
placed on the following important operating instructions.
Important Safeguards For Your Kambrook
Pressure Express Multi Pressure Cooker
• Carefully read all instructions before operating
the Pressure Cooker for the first time and save
for future reference.
• Remove and safely discard any packaging
material and promotional labels before using
the Pressure Cooker for the first time.
• To eliminate a choking hazard for young
children, remove and safely discard the
protective cover fitted to the power plug of
this Pressure Cooker.
• Do not place the Pressure Cooker near the
edge of a bench or table during operation.
Ensure that the surface is level, clean and free
of water and other substances.
• Position the Pressure Cooker so that the steam
vent/pressure relief valve is directed away
from yourself. Lift and remove the lid carefully
to avoid scalding from escaping steam.
• Do not operate the Pressure Cooker on a sink
drain board.
• Always ensure the Pressure Cooker is properly
assembled before use. Follow the instructions
provided in this book.
• Always operate the Pressure Cooker on a
stable and heat resistant surface.
• Do not leave the Pressure Cooker unattended
when in use.
• This Pressure Cooker cooks under pressure.
Improper use may result in injury.
• When using this Pressure Cooker, ensure the lid
is properly assembled and locked into position
before use.
• Use the removable cooking bowl supplied with
the Pressure Cooker only. Do not use any other
bowl inside the Pressure Cooker housing.
• Do not use a damaged or dented removable
cooking bowl. If damaged or dented, replace
bowl before using.
• Ensure the removable cooking bowl is
correctly positioned in the Pressure Cooker
base before you commence cooking.
• Never plug in or switch on the Pressure Cooker
without having the removable cooking bowl
placed inside the Pressure Cooker housing.
• Do not place food or liquid in the Pressure
Cooker housing. Only the removable cooking
bowl is designed to contain food or liquid.
• Never operate the Pressure Cooker without
food and liquid in the removable cooking
bowl. Ensure that the level of food and
liquid inside the removable cooking bowl
is not below ‘2’ level mark before cooking
commences. Always follow the maximum
and minimum quantities of liquid stated in
instructions and recipes.
• Always have the lid placed correctly into
position on the Pressure Cooker throughout
operation unless it states in the recipe to have
it removed.
• Do not place your face or any other body part
over the Pressure Cooker whilst in use as the
steam can cause serious burns.
• Do not touch hot surfaces. Use handles on
the sides of the Pressure Cooker for lifting and
carrying the Pressure Cooker.

5
• Do not touch hot surfaces; use oven mitts to
remove the lid and removable cooking bowl.
Lift and remove the lid carefully and away
from yourself to avoid scalding from escaping
steam.
• Extreme caution must be used when Pressure
Cooker contains hot food and liquids and/or
is under pressure. Improper use may result in
injury. When using this Pressure Cooker, make
sure the lid is properly locked and aligned
before operating.
• Do not allow water from the lid to drip into
the Pressure Cooker housing, only into the
removable cooking bowl.
• Do not place anything on top of the lid when
assembled, when in use and when stored.
• Before placing removable cooking bowl into
stainless steel housing, ensure base of bowl
and base of Pressure Cooker is dry by wiping
with a dry soft cloth.
• The removable cooking bowl can be
extremely heavy when full of ingredients.
Care should be taken when lifting from
Pressure Cooker housing.
• Do not use the lid handle to carry Pressure
Cooker when in use and after use. The lid
handle is for opening and closing the lid.
• Always ensure that the removable cooking
bowl has cooled sufficiently before handling
and use oven mitts when removing from the
steel housing.
• Do not adjust the “Pressure Release Valve”
whilst in use.
• Use only recommended “Pressure Steam
Release” options found on page 18 to
depressurise cooker after use.
• Do not exceed maximum fill level. Some foods
expand during pressure cooking such as rice
and legumes; do not fill removable cooking
bowl over ½ full for such items. Over filling may
cause a risk of clogging both the pressure
release valve and the lid lock actuator.
It may also lead to the development of excess
pressure.
• The temperature of accessible surfaces will be
high when the Pressure Cooker is operating
and for some time after use.
• Care should be taken when handling the
Pressure Cooker after cooking, ensuring that
the pressure cooker body and parts are not
touched as these may still be hot due to
residual heat.
• Do not place the removable cooking bowl
when hot on any surface that may be
affected by heat.
• Avoid sudden temperature changes. Do not
place frozen or very cold foods into
the removable cooking bowl when it is hot.
Do not place hot removable cooking bowl
into cold water.
• Do not use the removable cooking bowl for
food storage. The removable cooking bowl is
not designed for storing food in the freezer.
• To prevent scratching the non-stick surface
of the removable cooking bowl, always use
wooden or plastic utensils.
• Steam vents from the pressure release valve.
Always position steam vent on lid away from
yourself to avoid scalding from escaping
steam.
• Steam vents from the pressure release valve.
Check the ducts in the pressure release valve
regularly to ensure they are not blocked. The
pressure cooker must not be opened until the
pressure has decreased sufficiently and the lid
unlocks easily.
• Do not attempt to open the Pressure Cooker
lid after pressure cooking until all internal
pressure has been released and is slightly
cooled. If the lid will not turn to unlock, this
indicates that Pressure Cooker is still under
pressure – do not force the lid open. Any
pressure remaining can be hazardous. See
operating instructions for “steam release”
directions in this instruction book.
• Recommended cooking times in this
instruction booklet may vary depending on
the ingredients and quantities of food used for
recipes.
• Always check the pressure release valve, the
removable metal basket and the pressure
safety valve for clogging before use and
clean if necessary. Check to make sure the lid
locking pin and lid lock actuator move freely
in and out of the lid.
• Do not immerse Pressure Cooker housing/
base, power cord or plug in water or any other
liquid.
• Never move the Pressure Cooker when in
use or whilst the cooker is still under pressure.
Movement may result in inadvertent
movement of the pressure regulator/release
valve resulting in unexpected steam or hot
liquid being released from the pressure
release valve or the side of the lid which
may cause scalding.
• Keep the Pressure Cooker clear of walls,
curtains and other heat or steam sensitive
materials.
• Use the pressure release valve to release
steam pressure.
• Never use the removable cooking bowl to
sauté ingredients on a ceramic, electric or gas
stove.
• Ensure that the safety locking lid is properly
aligned, locked and closed before operating.
• Do not use chemicals, steel wool, metal
scouring pad or abrasive cleaners to clean
the outside of the Pressure Cooker housing
or cooking bowl as these can damaged the
housing or the coating of the cooking bowl.

6
• Do not place anything, other than lid, on top
of Pressure Cooker when assembled, when in
use and when stored.
• Do not use the Pressure Cooker for anything
other than its intended use. Do not attempt to
operate Pressure Cooker by any method other
than those described in this instruction book.
• Some foods to avoid when pressure cooking
are; apple sauce, cranberries, pearl barley,
oatmeal and other cereals, potatoes, noodles
and pasta, and rhubarb; these foods can
foam, froth and splatter and clog the pressure
release valve and/or the lid lock actuator.
• The Pressure Cooker is not intended to be
operated by means of an external timer or
separate remote control system.
• Always ensure that the power is off at the
power outlet and remove power plug from the
power outlet before attempting to move the
appliance and before cleaning and storing.
Important Safeguards For All Electrical
Appliances
• This appliance is for household use only.
Do not use this appliance for anything other
than its intended use. Do not use in moving
vehicles or boats. Do not use outdoors.
Misuse may cause injury.
• The installation of a residual current device
(safety switch) is recommended to provide
additional safety protection when using
electrical appliances. It is advisable that a
safety switch with a rated residual operating
current not exceeding 30mA be installed in
the electrical circuit supplying the appliance.
See your electrician for professional advice.
• Always turn the appliance to the OFF position,
switch off at the power outlet and unplug at
the power outlet when the appliance is not
in use.
• Before cleaning, always turn the appliance
to the OFF position, switch off at the power
outlet, unplug at the power outlet and
remove the power cord, if detachable, from
the appliance and allow all parts to cool.
• Do not place this appliance on or near a heat
source, such as hot plate, oven or heaters.
• Position the appliance at a minimum distance
of 20cm away from walls, curtains and other
heat or steam sensitive materials and provide
adequate space above and on all sides for
air circulation.
• Fully unwind the power cord before use.
• Connect only to a 230V or 240V power outlet.
• Do not let the power cord hang over the edge
of a bench or table, touch hot surfaces or
become knotted.
• To protect against electric shock, do not
immerse the power cord, power plug or
appliance in water or any other liquid or
allow moisture to come in contact with the
part, unless it is recommended in the
cleaning instructions.
• The appliance is not intended for use by
persons (including children) with reduced
physical, sensory or mental capabilities, or
lack of experience and knowledge, unless
they have been given supervision or
instruction concerning use of the appliance
by a person responsible for their safety.
• Children should be supervised to ensure that
they do not play with the appliance.
• It is recommended to regularly inspect the
appliance. To avoid a hazard, do not use
the appliance if power cord, power plug or
appliance becomes damaged in any way.
Return the entire appliance to the nearest
authorized Kambrook service centre for
examination and / or repair.
• Any maintenance other than cleaning should
be performed at an authorised Kambrook
Service Centre.
• Keep the Pressure Cooker clean. Follow the
cleaning instructions provided in the book.
WARNING: Never move
the Pressure Cooker when
in use, especially when
the unit is under pressure.
This may result in steam
or hot liquid being
released from the side
of the lid or the pressure
safety valve causing
scalding or burns.
Important Safeguards For Your Kambrook
Pressure Express Multi Pressure Cooker
continued

7
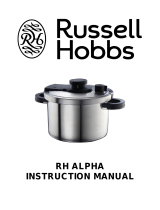
Your Kambrook Pressure Express Multi
1. Cool touch lid handle
2. Pressure release valve
- controls the steam release
from Pressure Express Multi and
degree of pressure inside
3. Safety locking lid – cannot be
opened during pressure cooking
4. 6 litre non-stick removable
cooking bowl (Not visible)
5. Digital control panel with pre-set
cooking functions, allowing you
to select the desired cooking
setting and displays the indicative
pre-set cooking time (see Note).
6. Cool touch handles which also
act as a lid holder
7. Brushed stainless steel housing
NOTE: For Pressure Cooking
settings, cooking times will only
start to count down once the
cooker has pressurised. It may
take up to 20 minutes for the unit
to pressurise depending on the
amount of food and liquid.
Accessories Included
(not shown):
• Stainless steel trivet raises food
out of the liquid
• Rice measuring cup
• Heat resistant serving spoon
and ladle
• Condensation collector

8
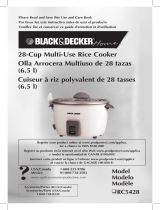
8. Pressure Release Valve:
a) ‘Sealing’ – valve closed
position for pressurisation when
pressure cooking.
b) ‘Venting’ – valve open
position for fast release venting
of steam (depressurisation).
c) Clean any debris or residue
from around the pressure
release valve located on the
underside of the lid (under
the removable metal basket
(see point 11). Poking a skewer
through the opening assists
in keeping the valve clear of
debris or residue.
d) The cover on the pressure
release valve cover should
also be removed to clean.
Your Kambrook Pressure Express Multi continued
Pressure
release valve
(underside of lid view)
Removable
cover
Pressure release valve
(top of lid view)

9
11. Lid Locks
a) The lid lock actuator freely
moves up and down until the
unit is pressurised and then
locks the lid, preventing the lid
from being opened while under
pressure. It is located beneath
the removable metal basket
on the underside of the lid and
should be cleaned regularly.
b) This lid locking pin moves in
and out at the side of the lid. It
prevents the lid from opening
when the unit is under pressure.
c) The removable metal basket
helps to prevent debris from
getting to the pressure release
valve and lid lock actuator
causing blockage. It should be
cleaned regularly.
9. Pressure Safety Valve 10. Rubber Gasket:
The pressure safety valve
provides an additional level
of safety. In the remote case
that the pressure release valve
cannot release pressure due
to blockage, the safety valve
will activate and release the
excessive pressure.
a) The rubber gasket helps seal
the lid so that pressure can
build within the pressure cooker.
The gasket fits snugly around
the metal gasket ring located
on the underside of the lid and
should be removed regularly
for cleaning and to check for
wear.
b) To refit the rubber gasket
around the metal gasket ring,
press down on the gasket
with your thumbs whilst
simultaneously turning the lid.
NOTE: The rubber gasket has
no top or bottom and can be
fitted either way.
Lid lock
actuator
(underside
of lid view)
Lid lock actuator
(top of lid view)

10
Sound What It Means
Ascending
Chime*
With the lid sitting flat within the rim of the housing,
the lid is moved to the ‘locked’ position
Descending
Chime*
With the lid sitting flat within the rim of the housing,
the lid is moved to the ‘unlocked’ position
3 Beeps Indicates that the cooking function has
commenced
Continuous
Beeps
Indicates when the lid has been opened after the
cooking function has commenced. Beeps will stop
once lid is locked or START/CANCEL is pressed to
cancel cooking function
15. Audible Alerts
Ascending and descending
chimes and warning beeps
are audible alerts built into the
Pressure Express Multi. Audible
alerts will only work when the
unit is plugged into a power
outlet and the power outlet is
turned on.
Your Kambrook Pressure Express Multi continued
12. Lid Markings 13. Lid Holder
14. Condensation Collector
Clearly indicate the direction
to Open and Close the lid.
With the lid sitting flat within
the rim of the housing, align the
‘
’ symbol marking on the lid
between the Open and Close
markings with the ‘
’ symbol
markings on the housing.
Using the handle, turn the lid
clockwise to close.
The ‘
’ symbol will now align
the ‘
’ symbol markings on the
housing.
Slots are located in the handles
on the sides of the pressure
cooker allowing the lid to be
stored upright on the unit for
stirring or removing food. It
also allows any condensation
from the lid to drip into the
condensation collector.
Condensation collector
attaches to the side of the
pressure cooker and collects
any excess water during
cooking or when the lid is
sitting upright in the lid holder. It
should be removed after each
use, emptied and replaced
before next use.
Ascending and Descending Chimes are operated by a magnetic control that will also sound when
the lid is placed close to the Lock/Unlock positions but not correctly fitted. To correctly lock the lid into
position, the lid must sit flat within the rim of the housing and then moved from open to close.
Other Features

11
Before Using Any Setting on the Pressure Express Multi
Place the Pressure Express Multi
on a dry, level surface away
from curtains and walls. Turn the
lid handle counter-clockwise
from ‘locked’ to ‘unlock’
position and remove lid.
Ensure the unit and all parts, including the removable cooking
bowl and rubber gasket, are cleaned and properly fitted back
into the unit before use.
Place ingredients to be
cooked into the removable
cooking bowl. Ingredients
should never exceed the
‘MAX’ marking and should
have a minimum of 250ml of
combined food and liquid for
all cooking settings except
‘SAUTÉ’ (see Note).
Plug the power cord into the
power outlet and switch outlet
on.
Pressure Express Multi Quick Start Guide
NOTE: Never exceed the ‘MAX’
marking inside the removable
cooking bowl as some foods
may expand when cooking.
The minimum pressure cooking
combined food and liquid
amount is 250ml however, for
longer cooking periods, such
as the Pot Roast or Soup/Curry
Settings, more liquid may be
required.

12
How to Sauté - Using the Sauté Setting
With food in the cooking bowl
and the lid remaining off, press
the SAUTÉ button on the digital
display panel.
Press the START/CANCEL button
to commence cooking. Three
“Beeps” will be heard and the
red lights on both the SAUTÉ
and the START/CANCEL buttons
will illuminate.
The digital display screen will
flash ‘- -’ while the Sauté setting
is operating.
Press the START/CANCEL button
once sautéing is complete
(see Note below).
NOTE: The ‘SAUTÉ’ setting will
operate for 60 minutes unless
START/CANCEL button is pressed
Pressure Express Multi Quick Start Guide continued

13
How to Pressure Cook - Using the White Rice, Brown Rice, Soup/Curry,
Pot Roast Settings
Lock the lid into place by
turning clockwise from ‘unlock’
to ‘locked’ position. An
ascending chime will be heard.
Move pressure release valve to
the ‘sealing’ position.
Select the desired pressure
cooking setting on the digital
display panel.
Press the SET TIMER button to
adjust the pre-set cooking time
(if required or as per recipe
recommendations).
Press the START/CANCEL button
to commence cooking (see
Note below).
Three “Beeps” will be heard
and the red lights on both the
START/CANCEL and the chosen
pressure cooking setting will be
illuminated during cooking.
Once the cooking time has
counted down, the cooker will
beep 10 times and the timer
display will flash ‘--’ to signal
that cooking has finished.
To manually release pressure
(fast release), using a heat
resistant spoon or oven mitt,
turn the pressure release valve
to the ‘venting’ position. Allow
approx. 10 minutes for steam to
release.
Remove the lid by turning the
handle counter-clockwise from
the ‘locked’ to ‘unlocked’
position. A descending chime
will be heard.
NOTE: The cooking time countdown will only commence once the
Pressure Express Multi reaches full pressure. This may take up to 20
minutes. The Pressure Express Multi will only pressurise on the pressure
cooking settings and with the lid correctly locked in place.

14
How to Slow Cook - Using the Slow Cook Setting
Lock the lid into place by turning
clockwise from ‘unlock’ to
‘locked’ position. An ascending
chime will be heard (see Note
below).
Press the ‘SLOW COOK’ button
on the digital display panel. 8
hours will display.
Press the ‘START/CANCEL’
button to commence cooking.
The red lights on both the SLOW
COOK and START/CANCEL
buttons will be illuminated.
Once the cooking time has
counted down, remove the
lid by turning the handle
counter-clockwise from the
‘locked’ to ‘unlocked’ position.
A descending chime will be
heard.
Pressure Express Multi Quick Start Guide continued
HINT: The lid can be removed during the slow cooking time to stir contents
however continuous ‘beeps’ will be heard while the lid is unlocked and the
unit is in operation. Ensure the lid is replaced and locked into position when
done stirring – cooking will recommence.
NOTE: Slow Cook will only operate with the lid locked in place however the
Pressure Express Multi will NOT pressurise on the Slow Cook setting.

15
Using Your Kambrook Pressure Express Multi
Before First Use
Remove and safely discard any
packaging material and promotional
labels before using the Pressure Express
Multi for the first time.
To eliminate a choking hazard for
young children, remove and safely
discard the protective cover fitted
to the power cord of this appliance.
1. Clip the condensation collector on
the housing body.
2. Make sure that the power outlet is
switched off and that the power
cord is unplugged from the power
outlet before starting.
3. Remove the lid by turning the
handle counter-clockwise from
the locked position to the unlock
position and lift the lid up and
off the Pressure Express Multi
(See Fig. 1).
NOTE: The Pressure Express Multi is
equipped with audible chimes to
alert you on lid positions.
Fig. 1
4. Remove the silicone rubber gasket
from the underside of the safety
locking lid (See Fig. 2) and wash with
warm soapy water. Dry thoroughly.
Wash the lid in warm soapy water
and dry thoroughly.
Fig. 2
5. Return the dry and clean silicone
rubber gasket so that it sits securely
around the gasket ring (See Fig. 3).
Ensure that it is fitted correctly. See
Care, Cleaning and Storage section
in this booklet for more details.
Fig. 3
NOTE: If the silicone rubber
gasket is not correctly fitted
back into the gasket ring, the lid
will not close properly and it will
prevent the Pressure Express Multi
from operating correctly.
6. Wipe the inside and the outside of
the stainless steel housing with a soft,
damp cloth and dry thoroughly.

16
7. Remove and wash the removable
cooking bowl in warm soapy
water, rinse and dry thoroughly.
Make sure there is no unwanted
material on the exterior surface
of the removable cooking
bowl. Replace the bowl into the
pressure cooker housing.
The removable cooking bowl
must sit flat on the temperature
sensor on the base of the housing
to ensure proper contact.
Cooking Methods
The Pressure Express Multi allows you
to use 3 different methods of cooking:
pressure cooking, sautéing and slow
cooking.
The Pressure Express Multi also has
digital pre-set cooking settings that
relate to each of the 3 cooking
methods. These settings each have a
default cooking time as per the table
below.
Cooking
Method
Pre-Set
Setting
Default
Cooking
Time*
Sauté Sauté Up to 60 min^
Pressure Cook White Rice 12 min
Pressure Cook Brown Rice 18 min
Pressure Cook Soup/Curry 33 min
Pressure Cook Pot Roast 24 min
Slow Cook Slow Cook 8 hours
*The time above is only an indication and does
not include the time it takes for the pressure
cooker to reach full pressure. Timer will not start
until the cooker is pressurised.
^The Pressure Express Multi Sauté setting will
operate for up to 60 minutes. If more time is
required, press the Sauté digital setting again. No
time will display when this setting is operating; the
display screen will flash while on.
NOTE: Never operate the Pressure
Express Multi without food and
liquid in the removable cooking
bowl. Before proceeding, ensure
that the minimum combined
food and liquid amount placed
into the removable cooking
bowl is 250ml with at least 50ml
of liquid for every 200 grams of
food. Always follow the maximum
and minimum quantities of liquid
stated in instructions and recipes.
NOTE: The time it takes for the unit
to pressurise will vary depending
on the amount of food and liquid
used in the recipe.
HINT: Depending on the quantity
of food being cooked, it could
take the Pressure Express Multi up
to 20 minutes to pressurise. To help
speed this time up, use boiling,
not cold, liquid.
WARNING: Do not use
oil or milk as a liquid.
Functions of Your Kambrook Pressure
Express Multi

17
NOTE: If the pressure release valve
is not manually moved to the
‘venting’ position when cooking
is finished, the steam will vent
slowly out of the pressure release
valve automatically. This ‘slow
release’ method is recommended
for recipes containing larger
quantities of liquid such as soups
and casseroles to prevent liquid
being forced out with the steam.
Alternatively, using a heat proof
spatula, move the pressure
release valve from the ‘Sealing’ to
the ‘Venting’ position and allow
the pressure to ‘fast release’.
Digital Pre-Set Settings
The Digital Control Panel has 6 settings
including Sauté, White Rice, Brown
Rice, Soup/Curry, Slow Cook, and Pot
Roast (See Fig. 4). The table following
provides a summary of the cooking
setting and function of each setting.
Fig. 4
Pre-Set
Setting
Cooking
Function
Suitable for
Sauté Sautéing Vegetables,
simmer sauces
and to seal meat
White Rice Pressure
Cooking
White rice, rice
pudding, porridge
Brown Rice Pressure
Cooking
Brown Rice
Soup/Curry Pressure
Cooking
Soup, legumes
(e.g. chickpeas,
dried beans),
casseroles
and curries
Slow Cook Slow
Cooking
Soups, casseroles,
curries and stews
Pot Roast Pressure
Cooking
Beef, lamb, pork,
veal, whole
chicken, silverside
(corned beef)
NOTE: Foods to avoid when
pressure cooking include; pearl
barley and other cereals, root
vegetables on their own, noodles
and pasta, and rhubarb; as these
foods can foam, froth, splatter
and clog the pressure release
valve and lid lock actuator.
NOTE: Do not exceed ‘MAX’ fill
level in the removable cooking
bowl as some foods expand
during pressure cooking such as
rice and legumes.

18
Using the Set Timer Function
The Pressure Express Multi offers
suggested pre-set cooking times
against each pressure cooking setting
(White Rice, Brown Rice, Soup/Curry,
and Pot Roast). The Set Timer allows
you to manually adjust the length of
these pre-set cooking times.
The Set Timer must be set before the
Start/Cancel button is selected to
commence cooking.
All the pressure cooking pre-set settings
have a ‘minimum to maximum’ time
range that can be cycled through by
pressing the SET TIMER button. Each
press of the SET TIMER button increases
the time in one minute increments as
per the table following:
Cooking
Setting
Pre-Set
Cooking
Time
Minimum
Time
Cycle
Maximum
Time
Cycle
White
Rice
12 min 8 min 16 min
Brown
Rice
18 min 14 min 33 min
Soup/
Curry
33 min 20 min 45 min
Pot Roast 24 min 15 min 60 min
NOTE: The Set Timer CANNOT be
changed on the Sauté or Slow
Cook setting.
Using the Start/Cancel
Function
The Start/Cancel Button starts and
finishes the cooking process after the
desired cooking setting is selected.
If the Start/Cancel button is selected
and interrupts the cooking process,
to recommence cooking you will
need to re-select the previous chosen
cooking setting.
NOTE:
The Pressure Express Multi
will not operate unless the Start/
Cancel button has been selected
after selecting a cooking setting on
the digital display.
Pressure Steam Release
(Venting)
For pressure cooking only, pressurised
steam can be released in two ways
when pressure cooking has finished.
1. If the pressure release valve
is NOT manually moved from
the ‘sealing’ to the ‘venting’
position, the steam will release
slowly out of the pressure release
valve automatically. This ‘slow
release’ method is recommended
for recipes containing larger
quantities of liquid such as soups
and casseroles to prevent liquid
being forced out with the steam.
2. Alternatively, use a heat proof
spatula to manually move the
pressure release valve from the
‘sealing’ to the ‘venting’ position.
Steam will escape very quickly
from the valve in this ‘fast release’
method.
NOTE:
The safety locking lid will not
open until all the steam has been
released. Do not force the lid to
open.
Functions of Your Kambrook Pressure
Express Multi continued

19
Keep Warm Function
The Keep Warm Function works only
on the Slow Cook setting. Once
the slow cooking time is counted
down, the Keep Warm function will
automatically activate keeping the
food above 60°C for up to 4 hours.
The Keep Warm function will not
activate if the Start/Cancel button is
pressed to stop the cooking process.
Using the Stainless
Steel Trivet
The stainless steel trivet is for any food,
that needs to be raised above the
liquid level (See Fig. 5). Ensure that
the stainless steel trivet is placed in
the removable cooking bowl before
plugging the power cord into the
power outlet. The trivet is especially
useful for cooking roasts.
Fig. 5
/