Page is loading ...

Futuro Futuro
Futuro Futuro
RANGE HOOD
INSTALLATION MANUAL
MODEL: NATALIE ISLAND
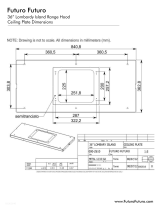
Recommended
Installation
Height
26” - 28”
from cooktop
to bottom
of hood
Height X
variable according
to ceiling height
(Ceiling height
minus 36” countertop
minus 26”-28” spacing)
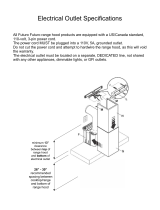
NOTE: PRIOR TO INSTALLATION
Please inspect range hood visually,
as well as connect it to power supply
and test its operation.
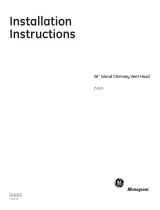
1.) Loop supporting wire through lock-nut.
2.) Tighten the screw so the wire is secure.
2
1
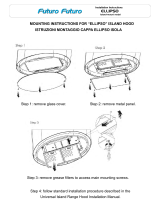
1.) Positioning: range hood should be centered over the cooking area.
2.) Place mounting ring on ceiling & mark location of holes with marker/awl.
3.) Remove mounting ring & drill holes according to markings.
4.) Secure mounting ring to ceiling with screws (and if needed, anchors).
3
4
1.) Thread the supporting wire
through tabs of mounting ring,
with lock-nut/screw combination
INSIDE the ring, as shown.
2.) Secure the lock-nut/screw
combinations to the ceiling.
1.) Thread supporting wires through trim plate.
2.) Raise trim plate to ceiling & secure with screws.
3.) Bring range hood body to supporting wires.
5

1.) Unscrew trim plate from mounting ring.
2.) Lower trim plate.
3.) Connect power cord to power line.
4.) Replace trim plate & secure screws.
7
Attach body panels (8 screws total).
Make sure to use the supplied nuts/washers,
to avoid possibility of damaging the surface.
8
1.) Loosen lock nuts on top of hood body.
2.) Thread supporting wire into lock nut.
3.) Level & adjust the hood body.
(Excess wire can be left hanging inside hood body).
4.) Tighten the lock nuts.
6
/