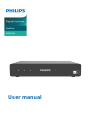
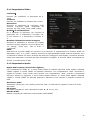
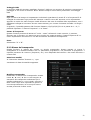
Philips DSR3131H/EU User manual
- Category
- TV set-top boxes
- Type
- User manual
Page is loading ...

2
Register your product and get support at
www.philips.com/welcome
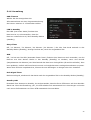
Dear client: Thank you for choosing the digital terr
estrial receiver and smart-box IP model Philips
DSR3131H. In this guidance, information of appliance use, connection, control and protection are
provided, with which you can know your new receiver better. To make the reference easier, the
manual has been divided into several sections. 1. The first part is about installation, connection of the
receiver with other apparatus and how to use the remote control. 2. The second part is about basic
usage, where is provided the necessary and principal information for daily use. 3. The third part is
about advanced usage, with the customized usage and the more complex characteristics.
Warning
When using the receiver, you shall know at least the
basic knowledge in this guidance. Therefore, a
careful reading of the manual is recommended. In this method, you can use the device in an optimal
way, without any problems or malfunctions.
Note: Due to updates or errors, the contents in this manual may not exactly correspond with the
actual product.

3
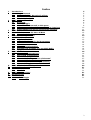
Index
1 I
nitiation ................................................................................................................... 5
1.1 Thanks .............................................................................................................. 5
1.2 Information on this Manual .............................................................................. 5
1.3 Explanation of safety ........................................................................................ 5
1.4 Intended Use .................................................................................................... 5
2 First steps.................................................................................................................. 6
2.1 Safety ............................................................................................................... 6
2.2 Unpacking ........................................................................................................ 7
2.3 Controls and ports ............................................................................................ 8
2.4 Connecting the necessary connections ........................................................... 10
2.5 Optional cable connections ............................................................................. 11
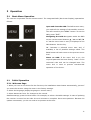
3 Operation ................................................................................................................ 12
3.1 Basic Menu Operation ..................................................................................... 12
3.2 Initial Operation ............................................................................................. 12
4 Daily operation ........................................................................................................ 13
4.1 Program Change ............................................................................................. 13
4.2 Volume ........................................................................................................... 13
4.3 EPG - Electronic Programme Guide ................................................................. 13
4.4 Favorites list ................................................................................................... 14
4.5 Teletext .......................................................................................................... 14
4.6 Info button ..................................................................................................... 14
4.7 Switching between TV and radio mode ........................................................... 14
4.8 Automatic shutdown....................................................................................... 15
5 Menu Selection ........................................................................................................ 16
5.1 The OSD menu "Settings" ............................................................................... 16
5.2 The OSD menu "Installation".......................................................................... 21
5.3 The OSD menu "Organizer" ............................................................................ 25
5.4 The OSD menu "System Configuration" .......................................................... 27
5.5 The OSD menu "CA Information" .................................................................... 28
5.6 The OSD menu "Connectivity" (optional)........................................................ 28
5.7 The OSD menu "Software Update" ................................................................. 28
6. Trouble-shooting guide ........................................................................................... 29
7. Service and Support ................................................................................................ 31
7.1 Warranty / Guarantee .................................................................................... 31
7.2 Version ........................................................................................................... 31
8. Cleanse .................................................................................................................... 31
9. Decommissioning / camps ...................................................................................... 31
10. Dispose .................................................................................................................... 31
10.1 Packing ....................................................................................................... 31

4
10.2 Old appliance .............................................................................................. 31
10.3 Battery cells ................................................................................................ 31
11. Features .................................................................................................................. 32

5
1 I
nitiation
1.1 Thanks
You have purchased a quality receiver. Our products are subject to constant strict quality controls. So
we make sure you enjoy our products.
The receiver is a digital receiver for the reception of free radiated and the encrypted HD+ satellite
channels in SD and HDTV formats. Note that you need a digitally-compatible satellite antenna to
operate, which must be equipped with a digital LNB.
Now not only the TV reception is digital! The HD Receiver has the quality, digital HDMI output for
connecting to Plasma and LCD Television. The digital image signal to ensure maximum image quality.
To receive the encrypted HD + HD + programs a prepaid smart card of HD PLUS GmbH is included.
With this card, you can test the HD + programs for a period of 12 months is currently free after first.
Would you then continue to look at the HD + programs, the credit card on the HD Plus GmbH needs
to be recharged. In view of the HD + function of the receiver and the HD + prepaid smart card, see the
terms and conditions of the HD PLUS GmbH application (see page 33)
.
1.2 Information on this Manual
Read the manual carefully. Keep the manual for later use. If you pass the device on to anyone else,
please ensure that you or the user manual.
1.3 Explanation of safety
The manual contains the following categories of safety instructions:
Danger: These statements alert you to potential personal injury
Warning: These instructions warn against possible property or environmental damage
1.4 Intended Use
This device is suitable for satellite reception of unencrypted and encrypted HD + digital TV and radio
signals in private households.

6
2 First steps
2.1 Safety
Read the safety instructions before using the appliance carefully!
Suffocation: Keep plastic bags away from babies, children and animals.
Danger of swallowing: Let small parts out of the reach of children or animals.
Handling battery cells: Do not reverse polarity, the battery cells. Only use battery cells of the same
type. Do not mix old and new battery cells. Follow the safety instructions of the battery manufacturer.
Remove the battery cells and store in a safe when the remote for a long time is not used. This can
prevent damage by leaking battery cells.
Mains voltage: Do not operate the appliance only to power supply systems with the mains voltage
and frequency indicated on the device housing! Connect the device to only after all connection and
installation work on the power grid. The power plug must always be accessible to disconnect the
appliance quickly in an emergency from the mains can. Unplug the appliance immediately from the
power supply when the device or the power cable is damaged.
Site: Do not operate the device in a moderate climate. Place the unit only within dry and closed rooms
with equipment feet down on a straight and level surface. In order to protect them from discoloration
caused by the natural heat generated by the device, place the device on a suitable underlay. Select a
location that protects the device against heavy dirt.
External influences: Prevent the device is exposed to dripping or splashing. Do not expose the
appliance to moisture (eg condensation or splash water) or direct sunlight. Do not place objects filled
with liquids such as Vases on or above the unit. Place the appliance should be situated away from heat
sources, such as Heaters or devices that heat up. Make no open flames like candles or the like on the
device or in the vicinity thereof. Never cover the ventilation slots. Do not place blankets, newspapers
or the like on or under the unit.
Explosive atmosphere: Do not operate the unit not under a very dusty or contaminated with
flammable gases environment (eg workshops).
Earthing: Antenna systems must always be earthed, paying the relevant local and VDE regulations
must be observed.
Objects in the device: Make sure that no objects can enter the ventilation slots. There is risk of a
fatal electric shock! Adequate ventilation: The ventilation slots on the device must never be obscured.
Make sure that the device to the side and above a minimum clearance of 10 cm and that the heat has
to be fully discharged by airflow upwards.
Cleaning: Before cleaning the device, always disconnect or remove the battery cells from the mains.
Use a dry or slightly damp cloth, making sure that no moisture penetrates into the device.

7
Repair: Never open the housing of the device yourself: Even when power disconnection acute risk of
a fatal electric shock. Internal components may be damaged by contact. Repairs may only be carried
out by qualified personnel. Through improper tampered with the warranty, and the safety of the
device can no longer be guaranteed!
Extended absence / thunderstorms: In case of prolonged absence or thunderstorms, remove the
power plug from the outlet. Also disconnect the antenna connections to avoid damage during
thunderstorms.
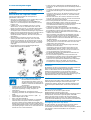
2.2 Unpacking
2.2.1 Packing
Leave the unit until ready for use in the packaging. If you have Brought the unit from a cold to a hot
environment, leave it Possible Because of the formation of condensation in the device are in the closed
package about an hour! Remove the packaging of the receiver, the remote control and the battery
cells. For have to ship it may help keep the transport packaging.
Danger: Note for the environmentally sound disposal of materials, read the chapter 10 - "Disposal"!
2.2.2 Battery Cells remote
Use the first installation and the replacement of spent cells always two new e battery cells (AAA)
1. Open the battery cover on the back of the handset by gently lifting the closure.
2. Remove possibly discharged battery cells and then put the two battery cells in the polarity
shown in the battery compartment of the remote control (+/-) as indicated.
3. Replace the battery cover then again carefully in the original position, so that snaps into the
last of the closure.
Danger: Note for the disposal of the battery cells, read the chapter 10 - Dispose!
Warning: Batteries must not be exposed to excessive heat such as sunshine fire or the like.
Caution: Do not throw batteries into fire, short or disassemble.

8
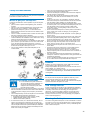
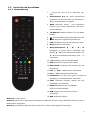
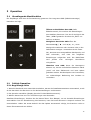
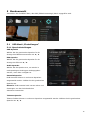
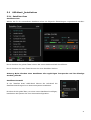
2.3 Controls and ports
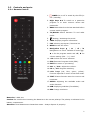
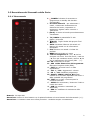
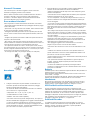
2.3.1 Remote Control
1. POWER On or off in stand-by the STB (in
use / standby).
2. Digit keys 0-9 To switch to a particular
program or to enter numeric values and
passwords.
3. BACK Switch back to the last-watched before
context switch program.
4. TV/RADIO Switch between TV and radio
mode.
5. Muting / activating the sound.
6. INFO Displays program information.
7. FAV selecting a program / favorites list
8. MENU Access the menu.
9. Navigation keys ▲ / ▼ / ◄ / ►
Navigation in a menu. Outside of menus ▲ /
▼ is for the program switch and
◄ / ► for
volume setting (VOL - / +) used.
10. OK Confirm the menu selection.
11. EPG Electronic Program Guide (EPG).
12. EXIT Exit menu or quit setting.
13. VOL + / VOL- Adjust the volume.
14. CH + / CH- Program switching.
15. color keys (red, blue, green, yellow).
Function depends on menu screen and mode.
16. TEXT Teletext function start the receiver and
terminate.
17. AUDIO Adjusting the available audio and
audio channels.
18. SUB Displaying subtitles (if available).
19. RES Change resolution.
Batteries: 2 AAA size
Caution: Be careful when inserting the batteries in the correct polarity! The polarity is indicated in the
battery compartment.
Attention: Used batteries are hazardous waste - always dispose of properly!

9
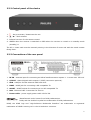
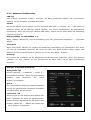
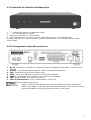
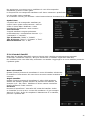
2.3.2 Control panel of the device
1. - Key to activate / deactivate the unit.
2. ▲ / ▼ - Task switcher.
3. Infrared receiver for the remote control.
4. GREEN when the receiver is switched on RED when the receiver is turned on in standby mode
(standby) is.
The HD + smart card must be inserted pointing in the direction of arrow and with the metal contact
facing down.
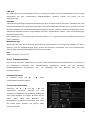
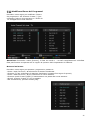
2.3.3 Connections of the rear panel
1. RF IN - antenna input for connecting an LNB of satellite antenna system. 1. Current max. 350 mA.
2. S/PDIF - Optical digital audio output S / PDIF (connection optional).
3. USB - USB port for fast external USB hard drive.
4. HDMI - HDMI jack for connecting a HD compatible TV.
5. SCART - SCART socket for connecting a non-HD compatible TV.
6. LAN - Ethernet RJ45. Connection for service.
7. Power cable - power supply power cable 12V DC 2A.
Manufactured under license from Dolby Laboratories.
Dolby and the double-D symbol are trademarks of Dolby Laboratories.
HDMI, the HDMI logo and "High-Definition Multimedia Interface" are trademarks or registered
trademarks of HDMI Licensing LLC in the US and other countries.

10
2.4 Connecting the necessary connections
The following output of the receiver must be connected for commissioning. To do this, through the
described steps. Connect the receiver only after the connection of all necessary connections to the
mains.
Danger: Connect the receiver only after the connection of all necessary connections to the mains.
2.4.1 Antenna connect (page 3 · 1 point)
Connect a double shielded F-connector antenna line of the satellite system to the socket "RF IN".
Note that during the initial installation or if the device was disconnected from the mains, the antenna
19.2 ° East has to be aligned for the required HD + Software Update on the Astra satellite.
2.4.2 TV Connect device (Page 3 · 2 point)
Connect a "Standard HDMI" line, the "HDMI" socket on the receiver with your TV.
If you have no HD-compatible television or problems with the HDMI connection, connect a SCART cable
to "SCART" socket of the receiver to your TV. Note, however here is that you then take the picture with
the high HD dissolution only with the normal SD-Au can see dissolution. If the currently set HD +
program are sent due to copyright issues with copy, images are not output via the SCART socket can be
done. Then turn to if necessary on the identical program with SD dissolution.
2.4.3 Mains power supply (Page 3 · 3 point)
If no further optional connections (hereinafter in Section 2.5 above) are made, insert the plug of power
line into an empty socket.
Danger: Do not operate the appliance only to power supply systems with the mains voltage and
frequency indicated on the device housing! Connect the device only after all connection and installation
work on the mains.

11
2.5 Optional cable connections
2.5.1 SPDIF
If an external audio amplifier or a stereo digital SPDIF input are connected, connect with a shielded
coaxial RCA cable, the "S / PDIF coaxial" RCA jack on the receiver to the external audio device.
2.5.2 USB (Chargeable Activation Needed)
USB port (Type A) for connecting an external USB storage device.
Connected USB devices may connect with a maximum current of 500 mA charge to damage to the
receiver and the To prevent USB device! Do not connect hard drives without its own power supply.
If the USB storage device to be removed from the receiver, select Always the menu item "Media
Manager" / Media Information "and then press to log off the storage medium the yellow button" Safely
Remove " Note that for technical reasons, it may result in data errors relating to an external USB storage
device. As the manufacturer of the receiver assume no liability for data loss or damage related to the
use of the USB interface and recommend against the use of media to the receiver always a backup to
perform.

12
3 Operation
3.1 Basic Menu Operation
The receiver is operated via the remote control. The integrated OSD (On Screen Display) operated as
follows:
Open and close the OSD: The OSD screen menu,
you make all the settings of the satellite receiver.
The call is made by the "MENU" button. To exit the
OSD, press "EXIT".
Navigating the OSD: Navigation within the OSD
occurs via the control buttons ▲ / ▼ and ◄ / ►
to "mark a menu item or entry or displayed in the
OSD buttons. Use the key.
OK "activates a selected menu item and, if
available, a list of possible settings called. The
BACK button will each return to the previous menu
level.
Notes on OSD: If the menu lock is on, the
required password has been factory "0000" on the
numerical code and can be changed later. The
menu lock is used to prevent unauthorized
operation of the device.
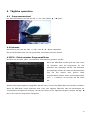
3.2 Initial Operation
3.2.1 Welcome Page
1. When you turn on the device for the first time, the installation wizard starts automatically, just as if
you reset the receiver using the menu in the factory settings.
2. Select the language (display language on-screen menu).
3. Select Astra scan from. For changes to the normal.
Satellite settings, press the blue button. For example, to select a Unicable settings. In case of updating
the receiver is turned on can take 20 to 60 minutes to complete. Have some patience. Because the
update is automatic, you do not need to be present at this time.

13
4 Daily operation
4.1 Program Change
The context switch is done with the CH + / CH- or ▲ / ▼ Buttons.
4.2 Volume
The volume is adjusted with the VOL + / VOL- or ◄ / ► Buttons.
With the MUTE button, the sound can be muted and activated again.
4.3 EPG - Electronic Programme Guide
Press the "EPG" Various information are called.
If the EPG button once, an overview of the
programs for the current day can be displayed.
The overview of subsequent days and again the
index can be attributed to the current day with
the yellow or green button. If a program list is
marked with ▲ / ▼, an with the OK button.
Infotext be accessed through the program and with the BACK button that can be left again. If the EPG
button is pressed again, a daily overview can be shown on the broadcasts of the various programs. With
◄ / ► can be navigated in the daytime. With ▲ / ▼ you can navigate in the list of programs.

14
4.4 Favorites list
With of the Button FAV becomes the Favorites feature called. The favorite lists for example can be filled
with the favorite programs of different users. As long as the List is displayed, can by repeatedly pressing
the FAV button to select the list to be set. When switching is then switched only within the selected
favorites list. With the TV / RADIO button can be returned to the overall channel list. The configuration
of the favorite lists is explained in section 5.3.
4.5 Teletext
Many programs broadcast additional information and services. Teletext pages are "electronic
magazines", from which one can get the latest news, sports results, weather forecasts, commercial
offers and much more. The scope and content is defined by the respective program provider. The
teletext function of the receiver is started with the TEXT button. The home page is always the page 100.
There is a most.
Overview of the further sub-pages (eg page 200, sports overview) displayed. The page numbers always
have three digits with the numeric buttons 0 – 9 be entered. Alternatively, you can navigate with the
arrow keys. Here, with the UP / DOWN buttons to select a teletext page up / down to scroll and buttons
to scroll in the bottoms of a teletext page with the Left / Right. By renewed pressing the TEXT button,
the teletext function of the receiver can be completed.
Note: Loading especially teletext subpages may take some time due to the system.
4.6 Info button
If the INFO button appear information about the current and next programs. Standing information
about the broadcasting times available, the bar graph displays the remaining term of the current
program. Use the arrow key can then be called the info text of the following program.
4.7 Switching between TV and radio mode
With the TV / RADIO button can be switched to radio mode and return to the TV mode. The receiver
always turns it back into the overall program list.

15
4.8 Automatic shutdown
Due to a legal regulation, an automatic shutdown after long periods of inactivity (for example, because
you are asleep) is preset with this receiver. Should the receiver so after a long time, is in no operation
(eg program change) occurs, stop automatically, there is no fault in the device! This function is
convenient, easy on your receiver and possibly save unnecessary electricity costs.

16
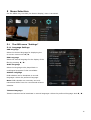
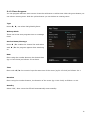
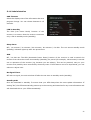
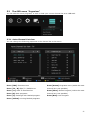
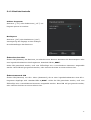
5 Menu Selection
Use the MENU key, the OSD (On Screen Display) menu is accessed.
5.1 The OSD menu "Settings"
5.1.1 Language Settings
OSD language
Select the desired language for displaying the
on-screen menus with ◄ / ►.
EPG Language
Select the desired language for the display of the
EPG by pressing ◄ / ►.
Audio language
Select the language to be played back in
multilingual programs if this is available.
Subtitle Language
DVB subtitles can be broadcast in several
languages. Select the preferred language.
Note: DVB subtitles are extremely rare and
transmitted differ from the conventional teletext
subtitles.
Teletext Language
Teletext contents can be broadcast in several languages. Select the preferred language with ◄ / ►.

17
5.1.2 Parental Control
Lock program
Enabling ("On") or disable ("Off") of the program
locks made.
Menu Lock
Enabling ("On") or disable ("Off") denial of access
to the important basic settings of the receiver
Change Receiver PIN
Changing the PIN (password) of the receiver, which is requested enabled Receiver lock or a
youth-protective barrier of the program. The default PIN is "0000".
Should the PIN be changed, a digit sequence of 4 different numbers must be selected. Memorize the
new PIN well or write it down in a safe place.
Change SmartCard PIN
Changing the PIN (password) of the HD + card (smart card) that is queried at a youth protection barrier
of a HD + program. The default PIN is "0000". Should the PIN be changed, a digit sequence of 4
different numbers must be selected. Memorize the new PIN well or write it down on a safe place

18
5.1.3 Timer Program
You can program different time events. Press the red button to add a timer. With the green button you
can edit an existing timer. With the yellow button you can delete an existing timer.
Type
Press ◄ / ►, can select Daily/Weekly/Once.
Wakeup Mode
These can be set as a program timer or message
timer.
Service Name/Message
Press ◄ / ► enable the channel list and select
with ◄ / ► the program appear after switching
on.
Date
Enter using the number buttons, the desired date
(eg 01 June 2014) as follows: 01.06.2014.
Time
Enter with ◄ / ► the numeric keys the start time of the event (eg 20:15 clock) as follows: 20:1
Duration
Enter using the number buttons, the duration of the event (eg 01:00 clock) as follows: 01:00.
Standby
Select "ON", after event the STB will automatically enter standby

19
5.1.4 Video Settings
Brightness
0-100%. Here you can adjust the brightness.
Contrast
0-100%. Here you can adjust the contrast.
Resolution
e.g. 576i, 576p, 720p, 1080i, 1080p You can
optimize the screen resolution on the HDMI
output.
Aspect Ratio
have a TV unit with a 16: 9 screen, select the "16:
9". For 4: 3 screens select the setting "4: 3"
Scaling Method
Here you can adjust the screen display to your
needs. The substance may have the settings "TV
scaling", "Pillar box", "Pan & Scan" or “Combined”
HDCP
Determines whether the HDMI jack on the receiver is to represent the HDCP function is available ("On")
or not ("Off"). HDCP stands for High-Bandwidth Digital Content Protection and is an encryption system
that serves the rights holders to protect digital video and audio content against unauthorized use.
Depending on the device type connected and received the program HDCP Function is needed so that can
take place a transfer of data
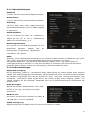
5.1.5 Audio Settings
Digital Audio Output
With the setting "Dolby D", the existing Dolby Digital sound on Coaxial digital audio output "SPDIF" and
"HDMI" output on the rear panel. With the setting "PCM" converted to PCM format audio signal is output
at. With the "Auto" setting, when the activated TV program supports it, the existing Dolby Digital sound
on Coaxial digital audio output "SPDIF" and "HDMI" output on the rear panel. Otherwise, a converted in
the PCM format audio signal is output at.
Audio Descriptor
Select audio for the visually impaired, if select
“ON”, can able to adjust the AD mix-level value.
AD mix-level
You can set the value by pressing ◄ / ► button
between 1 and 100.
SPDIF delay
Signal delay to keep SPDIF audio synchronized
with video.

20
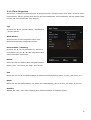
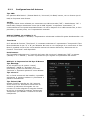
5.1.6 Administration
OSD Timeout
Select the display time of the information bar at a
program change. You can choose between 2-15
seconds.
LPM in Standby
The LPM (Low Power Mode) function of the
receiver is to ensure that the receiver consumes
only 0.5W in standby mode (standby).
Sleep timer
Off / 10 minutes / 30 minutes / 60 minutes / 90 minutes / 120 Min. The unit enters standby mode
(standby) indicator lights up after the preset time.
APD
Off / 10-240 min The APD (Automatic Power Down) function of the receiver is used to switch the
receiver from the active mode into standby (Standby) if a period (for example, 180 minutes) is carried
out no operation of the receiver (eg, because you are asleep). This can be practical, easy on your
receiver and possibly save unnecessary electricity costs. If this feature out to be impractical, you can
silence or adjust here.
No Signal Timer
Off with no signal, the unit switches off after the set time in standby mode (standby).
Standby OAD
Over Air Download in standby. To ensure that your STB always has the most update information. If
setting “On”, the STB automatically powers up in the morning and searches for any new information and
will download this to your STB automatically.

21
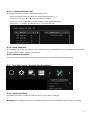
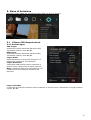
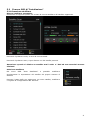
5.2 The OSD menu "Installation"
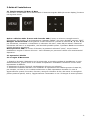
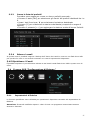
5.2.1 Satellite Scan
Satellite Scan
Select for which supported satellite the following settings should be made.
By pressing the green button, you can perform a channel scan.
By pressing the red button you can delete a satellite.
Caution: when deleting a satellite all associated transponder and their entries will be
deleted.
satellite selection
In the "Satellite Scan" OSD menu you can individually edit the
satellite settings of your antenna system.
Pressing the yellow button to add a new satellite, edit or adjust your
antenna configuration.
Page is loading ...
Page is loading ...
Page is loading ...
Page is loading ...
Page is loading ...
Page is loading ...
Page is loading ...
Page is loading ...
Page is loading ...
Page is loading ...
Page is loading ...
Page is loading ...
Page is loading ...
Page is loading ...
Page is loading ...
Page is loading ...
Page is loading ...
Page is loading ...
Page is loading ...
Page is loading ...
Page is loading ...
Page is loading ...
Page is loading ...
Page is loading ...
Page is loading ...
Page is loading ...
Page is loading ...
Page is loading ...
Page is loading ...
Page is loading ...
Page is loading ...
Page is loading ...
Page is loading ...
Page is loading ...
Page is loading ...
Page is loading ...
Page is loading ...
Page is loading ...
Page is loading ...
Page is loading ...
Page is loading ...
Page is loading ...
Page is loading ...
Page is loading ...
Page is loading ...
Page is loading ...
Page is loading ...
Page is loading ...
Page is loading ...
Page is loading ...
Page is loading ...
Page is loading ...
Page is loading ...
Page is loading ...
Page is loading ...
Page is loading ...
Page is loading ...
Page is loading ...
Page is loading ...
Page is loading ...
Page is loading ...
Page is loading ...
Page is loading ...
Page is loading ...
Page is loading ...
Page is loading ...
Page is loading ...
Page is loading ...
Page is loading ...
Page is loading ...
Page is loading ...
Page is loading ...
Page is loading ...
Page is loading ...
Page is loading ...
Page is loading ...
Page is loading ...
Page is loading ...
Page is loading ...
Page is loading ...
Page is loading ...
Page is loading ...
Page is loading ...
Page is loading ...
Page is loading ...
Page is loading ...
Page is loading ...
Page is loading ...
Page is loading ...
Page is loading ...
Page is loading ...
-
 1
1
-
 2
2
-
 3
3
-
 4
4
-
 5
5
-
 6
6
-
 7
7
-
 8
8
-
 9
9
-
 10
10
-
 11
11
-
 12
12
-
 13
13
-
 14
14
-
 15
15
-
 16
16
-
 17
17
-
 18
18
-
 19
19
-
 20
20
-
 21
21
-
 22
22
-
 23
23
-
 24
24
-
 25
25
-
 26
26
-
 27
27
-
 28
28
-
 29
29
-
 30
30
-
 31
31
-
 32
32
-
 33
33
-
 34
34
-
 35
35
-
 36
36
-
 37
37
-
 38
38
-
 39
39
-
 40
40
-
 41
41
-
 42
42
-
 43
43
-
 44
44
-
 45
45
-
 46
46
-
 47
47
-
 48
48
-
 49
49
-
 50
50
-
 51
51
-
 52
52
-
 53
53
-
 54
54
-
 55
55
-
 56
56
-
 57
57
-
 58
58
-
 59
59
-
 60
60
-
 61
61
-
 62
62
-
 63
63
-
 64
64
-
 65
65
-
 66
66
-
 67
67
-
 68
68
-
 69
69
-
 70
70
-
 71
71
-
 72
72
-
 73
73
-
 74
74
-
 75
75
-
 76
76
-
 77
77
-
 78
78
-
 79
79
-
 80
80
-
 81
81
-
 82
82
-
 83
83
-
 84
84
-
 85
85
-
 86
86
-
 87
87
-
 88
88
-
 89
89
-
 90
90
-
 91
91
-
 92
92
-
 93
93
-
 94
94
-
 95
95
-
 96
96
-
 97
97
-
 98
98
-
 99
99
-
 100
100
-
 101
101
-
 102
102
-
 103
103
-
 104
104
-
 105
105
-
 106
106
-
 107
107
-
 108
108
-
 109
109
-
 110
110
-
 111
111
-
 112
112


Philips DSR3131H/EU User manual
- Category
- TV set-top boxes
- Type
- User manual
Ask a question and I''ll find the answer in the document
Finding information in a document is now easier with AI
in other languages
- italiano: Philips DSR3131H/EU Manuale utente
- Deutsch: Philips DSR3131H/EU Benutzerhandbuch
Related papers
Other documents
-
SAB 3606 User manual
-
Televes ZASHD User manual
-
Medion P24003 MD 24115 User manual
-
Samsung DSB-H370 Owner's manual
-
Philex HDSR 400 User manual
-
Megasat Digital 1 User manual
-
Silvercrest SE 32 A1 User manual
-
Silvercrest SSR 1080 A1 User Manual And Service Information
-
-
Blade BM-7000s User manual