Page is loading ...

© 2018 RISE, a Hobbico company. RISE0300 v1.5
WARNING
INSTRUCTION
MANUAL
Please read and understand this manual, the operation and all safety aspects
required for the safe operation of the product. Before use, if you feel that this
product is not for you, please return it to the place of purchase.
Manual Specications and Description Changes
The instruction manual, warranties, and other associated documentation are
subject to change without notice. Hobbico assumes no responsibility for
inadvertent errors to this manual.
™
explore-rise.com
WARNING! This product includes a lithium polymer (LiPo) battery.
Improper handling may result in FIRE! You are responsible for following all safety
precautions as outlined in this instruction manual.

2
INTRODUCTION
Thank you for purchasing the Archon. We want the time you spend with your new
R/C quadcopter to be fun and successful so please read the entire manual before
beginning setup. If for any reason you think this R/C model is not for you, return
it to the dealer immediately. Your dealer cannot accept returns on any model after
final assembly.
For the latest technical updates or manual corrections for the Archon please visit
the RISE web site at www.explore-rise.com. If there is any new technical information,
changes or important updates to this model, a “tech notice” box will appear on
the page. Click the “tech notice” box to learn more.
SAFETY PRECAUTIONS
Failure to follow these safety precautions may
result in injury to yourself and others.
● Keep your face and body as well as all spectators away from the rotating plane
of the propellers whenever the battery is connected. Keep loose clothing, shirt
sleeves, ties, scarfs, long hair or loose objects such as pencils or screwdrivers
that may fall out of shirt or jacket pockets away from the propellers. The spinning
propellers of a model quadcopter can cause serious injury. When choosing a
flying site for your Archon, stay clear of obstacles, trees and power lines. AVOID
flying in or near crowded areas. DO NOT fly close to people or pets. Maintain
a safe distance from the quadcopter.
● Your Archon should not be considered a toy. Because of its performance
capabilities, the Archon, if not operated correctly, could cause injury to you or
spectators and damage to property.
● DO NOT alter or modify the model. Doing so may result in an unsafe or
unflyable model.
● When and if repairs are necessary you must correctly install all components
so that the model operates properly on the ground and in the air. Please check
the operation of the model before every flight to ensure that all equipment is
operating and that the model has remained structurally sound. Be sure to check
the propellers before each flight. Replace them if they show any signs of wear
or fatigue.
LITHIUM BATTERY WARNING!
This product includes a lithium polymer (LiPo) battery. Improper
handling could result in FIRE! A lithium battery fire has the potential
to ignite surrounding areas and may cause property damage or cause
personal injury.
For safe LiPo handling, follow all of these guidelines. If you are unable to follow
these guidelines, return this product to the place of purchase.

3
● MOST IMPORTANT! NEVER leave the charger and LiPo battery unattended
while charging.
● Keep out of reach of children!
● NEVER charge a LiPo battery on a flammable surface or near combustible
materials.
● NEVER charge inside a vehicle or at a location that could be damaged in the
event of a LiPo fire.
● Do not charge or use a battery that is deformed, bent, crushed or has any type
of visible damage.
● Only use the included factory approved charger with this LiPo battery.
● ALWAYS keep a supply of sand accessible when charging. Dumping sand on
the battery will assist in extinguishing a LiPo chemical fire.
● It is normal for the charger to become warm to the touch. However, disconnect
the battery and unplug the charger immediately if either becomes hot, begins
to swell, or smoke!
● Disconnect the battery and unplug the charger if the charge time exceeds 3 hours.
● ALWAYS disconnect the battery and unplug the charger after the charge
is complete.
● ALWAYS disconnect and remove the battery from your model immediately
following operation.
● ALWAYS store/transport LiPo batteries in a fireproof container away from
combustible materials.
● NEVER put a LiPo battery in the pocket of any clothing.
● Keep LiPo batteries out of reach of animals. A punctured battery may cause a fire.
● Do not use the included charger for any other battery other than the one
included with this model.
● In the event of a crash, place the battery into a fireproof container immediately.
Examine the battery for damage before further use.
● Only operate and store batteries between 40-110° F (4-43° C).
● NEVER allow the battery temperature to exceed 140° F [60° C] during operation.
● NEVER disassemble or modify a battery, its wiring, or puncture cells, as this
may result in fire.
● Do not allow the battery to short circuit by touching exposed wires together.
● Stop the operation of your model immediately when the battery power
is low. A battery failure can occur when attempting to recharge an over-
discharged battery.
● LiPo batteries must always be recycled or disposed of properly.
WARRANTY
RISE™ guarantees this kit to be free from defects in both material and workmanship
at the date of purchase. This warranty does not cover any component parts
damaged by use or modification. In no case shall RISE’s liability exceed the original
cost of the purchased kit. Further, RISE reserves the right to change or modify this
warranty without notice. In that RISE has no control over the final assembly or
material used for final assembly, no liability shall be assumed nor accepted for any

4
damage resulting from the use by the user of the final user assembled product. By
the act of using the user assembled product, the user accepts all resulting liability.
If the buyer is not prepared to accept the liability associated with the use of this
product, the buyer is advised to return this kit immediately in new and unused
condition to the place of purchase.
To make a warranty claim, please contact our support team at http://www.explore-
rise.com/support.php
CONTENTS
● RISE Archon FPV Quadcopter
● 2.4 GHz 6– Channel Transmitter
● Extra Propellers
● Prop Guards
● FPV Monitor with Antenna
● 2200mAh 2S LiPo
● LiPo Charger w/ AC Charge Adapter
● 4 AA Batteries
● Screwdriver
● Instruction Manual
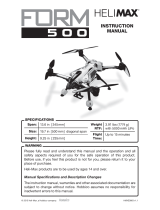
FEATURES
● Entry Level 370 mm GPS FPV Quad
● Ready to Fly, no building required
● 200 mW VTX
● GPS Stability and Return-To-Home
DIMENSIONS
Size: 370 mm (14.6 in)
diagonally motor to
motor
Width*: 300 mm (11.8 in)
Length*: 304 mm (12.0 in)
Height: 110 mm (4.3 in)
Prop: 203 mm (8.0 in)
Empty Weight: 430.9 g (15.2 oz.)
without battery
*without prop guards
MONITOR SPECIFICATIONS
Input power: 5 volts
Channels: 40
Frequencies: 5.725 – 5.945 GHz
Charge jack: micro USB
Dimensions 150 x 79 x 13 mm
with case: (5.91 x 3.11 x 0.51in)
Weight w/o
antenna: 145 g (5.11 oz.)
KNOW BEFORE YOU FLY
As a new owner of an unmanned aircraft system (UAS), you are responsible for
the operation of this vehicle and the safety of those around you. Please contact
your local authorities to find out the latest rules and regulations.

5
SETUP
Unboxing
Remove the contents of the
box and become familiar with
the included parts. To easily
remove the transmitter from the
packaging, push outward at the
location shown while lifting up on
the transmitter from the same side.
Battery Charging
Plug the AC wall adapter into a 120V outlet
and connect the balance charger to the wall
adapter. The power LED will illuminate solid
RED. Plug the white balance plug on the
battery to the 2S port on the charger. When
charging, the charge status LED will illuminate
solid RED. When charge is complete the LED
will change to solid GREEN. Typical charge
time of a depleted battery is approximately
2 hours.
NOTE: A blinking red charge status LED indicates a charging error.
● NEVER leave the battery unattended while charging.
● ALWAYS unplug the charger from the outlet and the battery when
charging is complete.
● NEVER charge a puffed or damaged battery.
NOTE: It is normal for the charger to get warm during the charging process.
See the battery precautions at the front of this manual.
Battery Installation
Insert the flight battery into the
battery tray on the underside
of the Archon. Be sure that the
battery is slid as far back into
the tray as allowed. A battery
not properly installed may fall out
during flight and may affect the
center of gravity of the Archon.

6
Prop Guard Installation
NOTE: Prop guards are included to help protect the propellers from accidental
contact with obstacles. We recommend they be installed prior to your rst ight.
Fit the bottom prop guard retainer over the alignment pin on the motor cover.
Press the prop guard in place as shown with the pins in the alignment holes. It
should fit snugly over the screw bosses on the retainer. Secure the prop guard
and retainer using three screws included in the package. Repeat this procedure
for the other three prop guards.
RADIO SYSTEM
Remove the battery door screw and slide the door down to access the battery
compartment. Install the included AA batteries and replace the door.
Flight Mode Switch
Altitude Hold sets the Archon to just maintain its altitude
when the left stick is centered. In this mode, the drone
can drift with the wind. The right stick and the rotate
control may be needed to keep the Archon in position.
GPS Hold enables the GPS system to keep the Archon in
position when the sticks are centered. The drone must be
in an open area where it is receiving GPS signals for this function to work correctly.

7
Home enables the Return-To-Home function (RTH). When the switch is moved to
Home, the Archon will climb to 8 meters if at or below that altitude, fly back to
the launch point, and then initiate auto-land. When it has completed the landing,
the Archon will stop the propellers.
D/R Switch
This switch controls the sensitivity of the controls. When
the switch is pushed toward the back of the transmitter,
the controls are in the high setting. This setting is
recommended for flying in moderate winds (5+ mph)
or higher.
Pull the switch forward to enter the low rate setting. This setting is best for calm
conditions or when beginning pilots are learning to fly the Archon.
Picture Button
Push this button to capture a still picture on a memory
card (*not included) that has been installed in the camera.
Video Button
Push this button to record a video on a memory card
(*not included) that has been installed in the camera.
Transmitter LED Indicators
There are LED indicators on
the transmitter and the Archon.
The behavior and color of
the LEDs will communicate to
you the current status of the
Archon. Read and understand
the different LED behaviors
before attempting to fly the
Archon. A quick reference chart
is also provided for future use.
GPS - This LED will flash slowly
when at least six satellites have
been detected for GPS mode. The LED will remain off if there are not enough
satellites to fly in GPS (Global Positioning System) mode.
*Memory card not included. Maximum storage 32GB. Class 10 or higher recommended.

8
TX - This LED is illuminated solid when the transmitter is turned on and the transmitter
batteries have enough voltage to safely fly. This LED will flash and the transmitter
will beep when the transmitter battery voltage reaches 4.5V. If this occurs during
flight, land the Archon and replace the transmitter batteries.
LVC - When the Archon is powered on and the transmitter is on and properly
linked to the Archon, this LED will be solid as long as the Archon battery voltage
is above 7.5V. The LED will flash and the transmitter will continuously emit a series
of beeps when the Archon battery voltage falls below 7.5V. If flying in altitude
mode, the Archon will begin the auto-land feature in 3 seconds after LVC (Low
Voltage Cutoff) occurs. If flying in GPS mode the Archon will initiate the RTH
(Return-to-Home) function which will cause it to fly back to the home point at 8
meters in altitude and in a direct line of flight at which point the Archon will auto-
land. NOTE: To cancel the RTH function when initiated by a low voltage cutoff
condition, move the flight control switch to ALTITUDE HOLD. The Archon will stop
its flight back to the point and immediately descend straight down from its current
position for landing.
PREPARING FOR FLIGHT
NOTE: Do not try to fly at this time. You must calibrate the Archon before your
first flight.
Powering the Archon
1. Turn on the transmitter by
pressing the power button.
The TX and LVC LEDs will
illuminate and the
transmitter will emit a
continuous series of beeps
until the Archon is powered.
2. Connect a charged battery
to the Archon. The transmitter
will stop beeping when it
detects the radio connection
to the Archon. If the
transmitter continues to beep
then the Archon may not be
linked to the transmitter. See
LINKING THE TRANSMITTER.
3. Place the Archon in an
open area free of any
people or obstacles.

9
Rear Archon LED
The rear Archon LED will relay the
following information to the pilot:
Pre-flight LED status
Fast Flash RED - Searching for GPS satellites.
Slow Flash RED - GPS acquired, home position not yet set.
Solid RED - GPS acquired and home position set.
Fast Flash GREEN - Begin compass calibration. See Compass Calibration
for complete description.
Slow Flash GREEN - Awaiting vertical rotation for compass calibration
procedure.
Compass Calibration
When the Archon is powered on, it will automatically take magnetic readings of
the surroundings and compare them to its current compass settings. If the Archon
determines that the compass needs to be calibrated, it will initiate the compass
calibration procedure indicated by the Archon rear LED flashing fast green.
Compass calibration should be done in an open area, free of any large metal
objects such as automobiles, fences, buildings, etc.
Fast Flash GREEN - The Archon
should be placed on a flat, level
surface. Rotate the Archon as
shown while keeping it level
until the LED changes to slow
flash green.

10
Slow Flash GREEN - Pick the
Archon up and hold it vertically
with the nose pointing down.
Rotate the Archon as shown until
the LED no longer flashes green.
If at any time the Archon appears to be flying erratically
or is unable to maintain position during hover in GPS
mode, compass calibration can be manually initiated
when the Archon and transmitter are powered on and
propellers are un-armed (not rotating). Move both
transmitter sticks simultaneously to the bottom left
corners and hold until the Archon rear LED flashes fast
green. Release the sticks. Then, continue with the procedure described in this section.
Accelerometer Calibration
Accelerometer calibration can be performed whenever the Archon is placed on
a flat, level surface and the propellers are un-armed (not rotating). This calibration
should be performed regularly to help ensure that the sensors are operating
correctly during flight.
To perform accelerometer calibration, the Archon and
transmitter must be powered on and the propellers
must be un-armed (not rotating). Place the Archon on
a flat, level surface and move both transmitter sticks
to the bottom right corners and hold until the Archon
rear LED alternates quickly between red and green.
Motor Arming and Disarming
When you are ready for flight and the Archon is in
a safe, open area, arm the motors by moving both
transmitter sticks to the bottom inside corners and
hold until the propellers begin to rotate. WARNING:
The props will rotate at a moderately slow, idle
speed when armed. Moving the throttle stick above
the middle stick position after the motors are armed will cause the propellers to
accelerate for flight.

11
To stop the propellers from rotating after they have
been armed, or at any time after landing if the
propellers fail to automatically stop, you can disarm
them by moving both transmitter sticks to the bottom
outside corners and hold until the propellers stop.
Emergency Stop -
The emergency stop
function can be used
any time during flight
to stop the motors
from rotating. We
recommend that the
emergency stop function only be used when
necessary to preserve the safety of surrounding things and people or to prevent
the imminent loss of your Archon due to pilot error or malfunction.
To activate the Emergency Stop, press and hold the PICTURE and VIDEO buttons
simultaneously for at least 2 seconds.
NOTE: The Archon motors will stop spinning when the emergency stop is activated.
This will cause the Archon to fall freely to the ground. Care should be taken to
ensure that causing the Archon to fall to the ground uncontrolled, likely damaging
both it (the Archon) and possibly what it lands on, is preferable to a controlled
descent and landing. Use the emergency stop only when necessary. The transmitter
LEDs will indicate that the emergency stop was activated by flashing repeatedly
in a consecutive order. This indication can be cancelled by arming the motors
again or cycling the power of the transmitter.
FLYING THE ARCHON
Flight Modes
The Archon can be flown with or without GPS assist.
The altitude hold function is always operational
regardless if GPS is assisting your flight.
Altitude Hold - Moving the flight mode switch to ALTITUDE HOLD disables GPS
assist. In this mode the Archon can be flown anywhere even if there is no GPS
signal present. The barometric sensor will still provide information to the Archon
about its altitude which will
allow it to automatically maintain
the current altitude when the
throttle stick (left stick) is released.
Because GPS is not assisting with
the flight, the Archon is free to

12
drift with the wind or other external factors. In this mode, the pilot will need to
continue to make corrections using the transmitter sticks in all directions in order
to hold position (hover).
GPS Hold - With GPS assist turned on, the Archon benefits from having its current
position detected by satellites and therefore can automatically make the necessary
control corrections to hold that position. When the sticks are released, wind will
not cause the Archon to move from its current position in this mode. (Some
adjustment is to be expected in windy conditions as the Archon makes the
necessary pitch corrections to maintain position.) This mode is very useful when
using the Archon to take pictures or record video. In order for the Archon to fly
with GPS assist, the Archon must be in an area free of any obstruction that would
interfere with satellite communication as well as any large metal objects that
might affect the Archon’s geomagnetic readings.
HOME - The home function is
used when you would like the
Archon to fly automatically to the
position where the Archon set
the home point. When the flight
mode switch is moved to Home,
the Archon will climb to 8 meters
in altitude (if below 8 meters)
and then fly a direct path to the
position directly above the home
point. The Archon will then slowly
descend straight down until touch
down is detected at which point
the Archon will automatically
stop the propellers. To cancel RTH (Return-To-Home), move the flight mode switch
out of Home.
NOTE: If the GPS signal is lost or the motors were armed before the home point
was set, then the Archon cannot return to the set home point automatically.
8 meters
Home
Climb
to 8 m
Direct path to the
position directly above
the home point
Slowly
descend
straight
down

13
Stick Controls
The VERTICAL movement of the LEFT stick controls the ascent/descent of the Archon.
When released, the left stick will return to the center neutral position and the
Archon will hold its current altitude. The stick deflection from the center position
is proportional to the rate at which the Archon ascends or descends.
The HORIZONTAL movement of the LEFT stick controls the direction the Archon is
pointing. Moving the left stick in the horizontal directions will cause the Archon
to rotate around its center axis (yaw). The stick deflection from the center position
is proportional to the rate at which the Archon rotates.
The RIGHT stick controls the pitch angle of the Archon. The right stick is used to fly
the Archon in the direction that the right stick is moved. Moving the right stick up
will cause the Archon to move in the direction that the nose (camera) is pointing.
This direction is considered FORWARD flight. Moving the right stick in any other
direction will cause the Archon to fly in that stick direction relative to the nose
direction. Remember, if you rotate the Archon using the left stick, moving the right
stick up for forward flight will cause the Archon to fly in the new direction the
nose is pointing. This is common sense. However, it can be difficult to adapt to
this during flight for beginner pilots. The stick deflection from the center position
is proportional to the rate at which the Archon flies.
Dual Rates (D/R)
The dual rate (D/R) switch on the transmitter adjusts
the sensitivity of the stick controls. The low rate setting
is with the switch toward the front of the transmitter.
Low rates are recommended for calm winds and are
desirable rates for smooth video recording. Low rates
are also recommended for beginner pilots. The high
rate setting is with the switch toward the back of the
transmitter. High rates are recommended for winds greater than 5mph.

14
Trim Buttons
The trim buttons make small adjustments to the neutral
position for each of the four corresponding stick
directions. Because the Archon has accelerometers
and a compass, it will automatically correct for any
unintended pitch or rotation when the transmitter
sticks are in the neutral position. So, it is unlikely that
adjustments to the trim buttons from their default, centered location will improve
flight performance. We recommend leaving the trim buttons in the centered location.
If your trim buttons have been moved from the centered location, use the image
below to return them to the default position.
“Beeeeep” “Beep-Beep-Beep”“Beep-Beep-Beep”
Altitude Holding
The Archon has a built-in barometer on the flight control board that detects
the surrounding air pressure which enables the quad to maintain a set altitude
automatically. After takeoff, the Archon maintains the current altitude whenever the
throttle stick is released to the center position. Move the throttle stick up or down
to change the set altitude position. When the stick is released back to center, the
Archon’s current height will be the new set altitude.
NOTE: It is normal to see slight deviations from the set altitude. Windy conditions
or sensors that are out of calibration may increase the deviation from the set
altitude. Recalibrate the accelerometers if the Archon is flying erratically or does
not appear to be maintaining altitude well.
Taking Off
ATTENTION! Before flying your Archon for the first time, be sure that you have
read this manual and are familiar with the operation of your Archon or injury to
yourself or others may result.
1. Ensure your flight battery is fully charged and your flying site is free of
anything that may interfere with your intended flight path.
2. Turn on the transmitter and connect the flight battery to the Archon.
3. IMPORTANT! If flying in a new area (or automatically initiated by the
Archon), perform compass calibration.
4. Perform accelerometer calibration.
5. Select your desired flight mode using the flight mode switch on the
transmitter. If GPS mode is selected, the Archon cannot be armed until the
GPS signal has been acquired and the home point has been set (indicated
by a solid red LED at the rear of the Archon).

15
NOTE: It is recommended that you take off in GPS mode. You must wait to take
off in GPS mode until GPS has been acquired and the home point is set (solid
red LED at the rear of the Archon). The Archon will not be able to return to home
automatically using the HOME function if you take off in Altitude Hold mode
regardless of the GPS signal status.
6. Do a final check of your surroundings and confirm that it is safe to take off.
The pilot (you) should be standing a safe distance from the Archon of at
least 15 feet (5 meters). Ideally you should be facing away from the sun.
7. Arm the motors by moving both sticks down and inward and hold them
there until the motors start to rotate.
8. Slowly move the throttle stick (left transmitter stick) up to increase the
propellers’ rotation. The Archon will then lift off the ground and climb in
altitude as long as the throttle stick is up. Releasing the throttle stick to the
center position will cause the Archon to stop climbing and hover at its
current altitude. Move the throttle stick down to cause the Archon to descend.
Landing
Manual Landing - Move the throttle stick to its lowest position when the Archon is
hovering over your desired landing spot. The Archon will descend until it detects
that landing has occurred and will then automatically stop the propellers. Continue
to hold the throttle stick in the lowest position until the propellers stop rotating.
RTH Landing - Move the flight mode switch to HOME. The Archon will initiate the
RTH function by climbing to 8 meters (if currently below that altitude), flying to the
set home point, descending until landed, and then automatically stopping the
propellers. If a home position was not set prior to takeoff or takeoff was done in
Altitude Hold mode, the Archon will not take any action in the HOME flight mode.
Landing must be done manually.
NOTE: If the Archon has landed but the propellers
do not stop, move the transmitter sticks to the lowest,
outside positions and hold until the propellers stop.
Transmitter Signal Failure
If at anytime during the flight the signal between the transmitter and the Archon
is lost (external interference, loss of transmitter battery power, etc.), the Archon
will wait for 3 seconds to recover the signal. If there is still signal loss after 3
seconds the Archon will automatically return to the set home position (see RTH
landing details). If no home point was set or the Archon does not have a GPS
signal then the Archon will descend straight down from its current position to
land. If the signal is recovered during the automatic landing procedure, then the
Archon will cancel the RTH function and will stabilize itself in its current position
where the transmitter signal was resumed.

16
MONITOR AND CAMERA
Battery Charging
This monitor has a micro USB charge port on the right side of the monitor to charge
the internal battery. A micro-USB cable and an AC to USB adapter (not included)
will be needed. Connecting the cable will start the charge process, as indicated by
the glowing red LED which will turn off when charge is complete. For best results,
use a 1 amp or larger adapter. The typical charge time will be around 3 hours.
WARNING! Charging lithium-polymer batteries poses a risk of FIRE!
Follow all care and handling instructions in this manual to avoid severe
and permanent damage to the batteries and all surroundings which
could result quickly from improper use and function.
● Do not leave the monitor unattended while being charged!
● Immediately disconnect the USB charge cable if the monitor becomes
hot (over 140°F, 60°C), begins to swell or emits smoke. Wear re
protective materials on your hands to move the monitor to a reproof
location as it may be hot! Leave the monitor until it cools.
● Always provide adequate ventilation around the monitor during charge.
● Always keep LiPo batteries away from children.
● Do not place the monitor on ammable surfaces or near combustible materials
(carpet, paper, wood, plastic, vinyl, foam, etc.) while charging.
DVR
The FPV-RM2 monitor has a DVR that will record and playback avi format video
clips. A memory card (not included) must be installed in the monitor before the DVR
will operate. The DVR will save the video to the memory card every 4 minutes. A
timer in the lower left corner of the screen will indicate the length of the video file
being recorded. To avoid losing any part of the video file, always stop the recording
and wait at least 15 seconds before turning off the monitor. The quality of the
file recorded by the DVR will not be as sharp as a file recorded by an on-board
camera because the data is compressed when transmitted to the FPV receiver.
Holding the M button puts the DVR in playback mode. Press the or buttons
to select the video le to be played. Press the V button to start and stop playback
of the selected video clip. Hold the M button for 2 seconds to exit the playback
mode. The DVR will only recognize AVI les in the “Video” folder that are named
“RECXXXXX” where XXXXX is a 5 digit number.

17
Receiver
The FPV-RM2 monitor has a 40 channel receiver that uses FPV bands A, B, E, F
and R. A specific Band and Channel can be selected or the receiver can search
for a nearby FPV signal.
5865
CH1
5733
5705
5740
5658
5845
CH2
5752
5685
5760
5825
CH3
5771
5665
5780
5805
CH4
5790
5645
5800
5785
CH5
5809
5885
5820
5765
CH6
5828
5905
5840
5745
CH7
5847
5925
5860
5725
CH8
5866
5945
5880
5695 5732 5769 5806 5843 5880 5917
A: FPV A Band
BAND
B: FPV B Band
C: FPV C Band
D: Fatshark Band
E: Raceband
Frequency in MHz
Monitor Control
Total Time
Main
Menu
Video Clip Timer
Power
Channel
Select
Band Select
DVR
Start/Stop
FPV Band
FPV Channel
FPV Frequency
Memory Card
Battery Charge
The screen has status indicators for
● Total Time the monitor has been on
● FPV Band
● FPV Channel
● FPV Frequency
● Memory Card is installed
● Battery Charge Level
● Video Clip Timer indicates the length
of a video that has not been saved to
the memory card.
● POWER: The On/Off switch is on the
right side of the monitor
● CH: Press repeatedly to manually
scroll through the 8 channels that are
available for the current band. The
current channel will be indicated at
the top of the screen.
● B: Press repeatedly to manually scroll
through the bands A – E shown at the
top of the screen. Hold the button to
scan all bands and channels for the
strongest FPV signal.
● V: Press to start or stop the DVR.
● M: Press to access the Main Menu
and see the functions listed below.
Repeatedly press “M” to scroll through
the list of options. Press the or to
adjust the selected setting.
Brightness, Contrast, Color
Language (English or Chinese)
Backlight
Reset – all settings including
frequency are reset

18
● Do not apply cleaning uid to the monitor such as alcohol, ammonia-based
cleaners such as window cleaning uid, etc.
● Do not clean the monitor with paper towels, facial tissue, or materials which
include abrasives such as nylon, polyester, etc. as it could scratch the screen.
● With the monitor off and the screen cool, lightly dust the screen with
compressed air from a distance of at least 12 inches away. Then lightly wipe
the screen with a micro- ber cloth (not included). Wipe the screen slowly
and in horizontal or vertical straight lines (not circular patterns).
Using the Monitor Cradle and Sun Shield
A cradle is included on the top of the
transmitter to hold the monitor in
place while you fly your Archon. The
cradle acts like a spring clamp so the
top section of the cradle must be
pushed up to separate the grips far
enough to fit the monitor between
them. Release the grips and confirm
the monitor is held securely in place.
A detachable sun shield is included to
help shield the display from sunlight for
optimum viewing. Align the tabs on the
top and bottom of the sun shield with
the notches on the monitor. Carefully
press the tabs into place to affix the
shield to the monitor.
The monitor cradle is adjustable
so you can change the angle of
the monitor to your liking. Use a
screwdriver to loosen one of the
plastic cradle nuts as shown. Adjust
the angle of the cradle and then
re-tighten the cradle nut.

19
CAMERA OPERATION
IMPORTANT NOTICE! The Archon with the 200mW VTX requires
a HAM Technicians license to operate legally in the USA. This involves
a 35-question multiple-choice test and a small fee. You can contact an amateur radio club in your
area for assistance or visit these links:
http://wireless.fcc.gov/services/index.htm?job=licensing_2&id=amateur
arrl.org/getting-licensed
Customers outside of the USA should understand and follow all telecommunications or other regulations
in your area.
Camera Frequencies
The 1080P 200mW 5.8GHz camera can operate on one of 5 channel bands (A,
B, C, D, and E) with 8 channels in each band. These 40 channels match the
included Tactic monitor channels (see channel frequency chart in Receiver).
The channel display screen on the camera always
displays the current band and channel setting by
alternating the display between the band letter
designation and the channel number. Pressing the
CH button on the camera will change either the
channel band to the next letter or change the channel to the next number. When
the last letter or channel has been reached (E or 8), pressing the CH button again
will return that value back to the beginning of the list. Press CH and hold for 1.5
seconds to toggle between changing the band and channel values. The channel
display screen will flash for 4 seconds to indicate the change.
CH Button
Short
Press
CH Button
Long
Press
Change Band Number or
Channel Number
Toggle Between Band Change
and Channel Number Change
CH Button

20
Memory Card
The 1080P camera has the ability
to save photos and video clips
to a micro memory card (*not
included). Playback of stored
photos and videos can be seen
on the included monitor (see
Playback) or can be viewed on
any other device that will read
and display photos and videos
from a micro card or USB memory
card reader (**not included).
NOTE: Both the camera and
the monitor have the ability to
record pictures and video to a micro card. It is preferable to use the camera
to record because the recording quality of the monitor is limited to the reduced
video transmission resolution and the clarity of the video signal between camera
and monitor.
The micro memory card slot is located on the side of the camera as shown. Insert
a memory card (not included) with the contact points facing the channel display
screen. Push in on the memory card until you hear it click into place. DO NOT
FORCE THE CARD INTO THE MEMORY SLOT! If there appears to be resistance
when inserting the card, remove it and confirm that you are installing it in the
correct orientation and you have the card properly positioned in the memory card
slot. To eject the card from the memory card slot, push inward on the card until
you hear a click and the card will spring outward some. You can now pull the
memory card out of the memory card slot.
* Micro card not included. Maximum storage 32GB. Class 10 or higher recommended.
** Use DIDZ1501 for optional USB micro memory card reader.
/