Page is loading ...


install - concepts - PixMaster - switcher - CG - clips - controls - team - appendix
FLINT V2.0 0.1
Made in the United States of America
© 2014 Copyright Broadcast Pix, Inc. January, 2014
Broadcast Pix, Flint, PixButtons, PixMaster, PixPad, iPixPad, iPixPanel, and SoftPanel are trademarks of Broadcast Pix, Inc.
Other trademarks are owned by their respective companies.
Warranty on all Flint Switchers
The Products will be of a professional quality, meet the specifications set forth in the
Product descriptions and are warranted to be free from defects in materials and
workmanship for a period of fourteen (14) months from shipment from Manufacturer.
Broadcast Pix will repair or, at its sole option, replace any component found to be faulty on
any system returned to the service center of Broadcast Pix in the USA for repair. The costs
of any visit to the customer's site are not included in the warranty. The cost of returning
Product to Broadcast Pix is the responsibility of the end user or the Dealer. Dealer is
authorized to deliver the Broadcast Pix warranty, as described above, to purchasers of the
Products and the Future Products. No software is to be added to the product from any
other source than Broadcast Pix, unless approved by Broadcast Pix, or it will invalidate this
warranty.
BROADCAST PIX MAKES NO OTHER WARRANTY, EXPRESSED OR IMPLIED, AND
PARTICULARLY EXCLUDES ANY IMPLIED WARRANTIES OF MERCHANTABILITY OR
FITNESS FOR A PARTICULAR PURPOSE.

install - concepts - PixMaster - switcher - CG - clips - controls - team - appendix
FLINT V2.0
Section 1 Installation and Getting Started
1.1 Flint Switcher
1.1.1 Flint Server
1.2 Flint System Installation
1.3 Broadcast Pix Flint LE
1.3.1 System Contents
1.3.2 Wiring Diagram for a Flint LE
1.3.3 Flint LE Connections
1.4 Broadcast Pix Flint LS
1.4.1 System Contents
1.4.2 Wiring Diagram for a Flint LS
1.4.3 Flint LS Connections
1.5 Tally/GPIOs on Flint
1.5.1 Optional Tally Box
1.5.2 Installing Optional 8 port Tally Box
1.5.3 Installing Optional 24 port Tally Box
1.5.4 Installing Tally Box Drivers
1.5.5 Installing Multiple Tally Boxes
1.6 Audio I/O
1.6.1 Flint LE Audio
1.6.2 Flint LS Audio
1.6.3 Clip Audio Advance
1.7 Running a Show
1.7.1 Restoring a Show
1.8 Flint I/O Assignments
1.8.1 Network Inputs
1.9 System Status
1.10 Input Timing
1.11 System Settings
1.11.1 Changing the Startup Show
1.11.2 Selecting between 60 and 50 Hz
1.11.3 Changing the Switching Boundary
1.11.4 Restoring the System Settings
1.12 Control Panel Installation
1.13 Back-Up Software
0.1
Table of Contents

install - concepts - PixMaster - switcher - CG - clips - controls - team - appendix
FLINT V2.0
Section 2 Broadcast Pix Concepts
2.1 Broadcast Pix Switcher Features
2.2 Devices
2.3 Device Controls
2.3.1 Assigning the Device Controls
2.4 Multi-View PixPad
2.4.1 PixPad Navigation
2.4.2 PixPad Order Controls
2.4.3 Floating PixPads
2.5 Multi-View
2.5.1 Overview of the Multi-View
2.5.2 Sources on Multi-View
2.5.3 Keyer Windows on the Multi-View
2.5.4 Program/Preview Overlays on the Multi-View
2.5.5 Counters
2.5.6 Switching on Multi-View
2.5.7 Multi-View System Settings
2.5.8 Floating Monitors
2.5.9 Labeling the Multi-View
2.5.10 Multi-Lingual Multi-View
2.5.11 Clocks on the Multi-View
2.5.12 Controlling Timer on the Multi-View
2.6 List of Screen Resolutions
2.6.1 Adjusting the Windows Desktop Screen Resolution
0.2
Table of Contents

install - concepts - PixMaster - switcher - CG - clips - controls - team - appendix
FLINT V2.0 0.3
Table of Contents
Section 3 PixMaster Show Editor
3.0 PixMaster Storage System
3.1 Creating a New Show
3.2 Selecting an Existing Show to Edit
3.3 Editing a Show
3.4 Editing a Show’s Content
3.5 Reordering, Adding or Removing Content
3.5.1 To Reorder Content
3.5.2 To Reorder a Group of Content
3.5.3 Adding content from the central Library
3.5.4 Adding a group of content from the central library
3.5.5 Manually Importing Content
3.5.6 Importing Content into a Subfolder
3.5.7 Fluent Watch Folders
3.5.8 Cloud-Based Watch Folders
3.5.9 Resizing and Softening Images
3.5.10 Previewing Content
3.5.11 Renaming Content
3.5.12 Removing Content from a Show
3.5.13 Permanently Deleting Content from the Library
3.5.14 Searching for Content in the Library
3.5.15 Modifying Attributes
3.6 Show Content Summary
3.7 Editing Show Settings
3.7.1 Switcher Sources Assignments
3.7.2 Adding Wildcard Devices
3.7.3 Show Memories
3.7.4 Global Naming of Memories
3.7.5 Custom Images on Memory PixButtons
3.7.6 Macro Row Assignments
3.8 Tally Remapping
3.9 Show Linking

install - concepts - PixMaster - switcher - CG - clips - controls - team - appendix
FLINT V2.0
Section 4 Production Switcher
4.0 Switcher Controls
4.0.1 Tally
4.1 Video Sources
4.1.1 Accessing Inputs 10-18 with Shift
4.1.2 Lock Shift
4.2 Transitions
4.2.1 Transition Preview
4.2.2 Background Cut Transition
4.2.3 Background Mix Transition
4.2.4 Background Effects Transition
4.3 Transition Effects
4.3.1 Effects Styles and PixButtons
4.3.2 Selecting a New Effect by Number
4.3.3 Changing Effect Transition Rates
4.3.4 Reversing an Effect
4.3.5 Modifying an Effect
4.3.6 Fade to Black
4.4 Keys
4.4.1 Key Controls
4.4.2 Assigning a Source to Keys 1-3
4.4.3 Direct Keys Control
4.4.4 Transitioning Keys with other keys or with the Background
4.4.5 Pro Transition Mode
4.4.6 Modifiers for Keyers
4.4.7 To Change the Key Fade Rate
4.4.8 Key Priority
4.5 DVE Boxes (Picture in Picture)
4.5.1 To Create a DVE Box:
4.5.2 Modifying a DVE Box
4.5.3 Multiple DVE Boxes
4.6 Source Controls
4.7 Chromakey
4.7.1 Activating the Chromakey
4.7.2 Settings for the Chromakey
4.7.3 Adjusting the Chromakey
4.8 Luma Key
4.8.1 Activating & Adjusting the Luma key
4.9 Fluent Controls
4.9.1 Virtual Sets
4.9.2 Image Editor
0.4
Table of Contents

install - concepts - PixMaster - switcher - CG - clips - controls - team - appendix
FLINT V2.0
Section 4 Production Switcher
4.10 Optional Remote Panels
4.10.1 Remote Panel Wiring
4.10.2 Remote Panel Configuration
4.10.3 Remote Panel Setup
4.10.4 Remote Panel Operation
4.11 SnapShot Memories
4.11.1 Saving a Mem
4.11.2 Recalling a Mem
4.11.3 Recalling a Mem by number
4.12 Fluent Macros
4.12.1 Opening the Macros Interface
4.12.2 Recording a Macro
4.12.3 Editing a Macro
4.12.4 Inserting Actions
4.12.5 Reviewing Macro
4.12.6 Assigning Macros in the Macro Player
4.12.7 Running Macros in the Macro Player
4.12.8 Playing back files not in shows
4.12.9 Alpha Wipes
4.13 Capture of Stills
4.13.1 To Capture an Output Image
4.13.2 To Capture an Input Image
4.13.3 Changing the Capture Folder Destination
0.5
Table of Contents

install - concepts - PixMaster - switcher - CG - clips - controls - team - appendix
FLINT V2.0 0.6
Section 5 CG and Graphics
5.1 CG Installation
5.1.1 TitleMotion GS Canvas
5.2 Creating Still CG Graphics
5.2.1 Exporting a Still Graphic from Inscriber to Broadcast Pix
5.2.2 Exporting Graphics from Photoshop to Broadcast Pix
5.3 CG Rolls and Crawls
5.3.1 To Create CG Rolls or Crawls
5.3.2 Playing a Roll or Crawl
5.3.3 Motion Controls for Rolls and Crawls
5.3.4 Modifiers for Rolls and Crawls
5.4 Updating CG Graphics On-the-Fly
5.4.1 Quick .Scribe Editing
5.4.2 Overwriting a File
5.5 Animation Store
5.5.1 Creating an Animated CG Graphic
5.5.2 Creating Animations in 3rd Party Applications
5.5.3 Basic Animation Store Operation
5.5.4 Modifiers for Animations
5.6 Basic CG & Stills Operation
5.7 Preparing Still Content
5.8 Using International Characters with Inscriber
5.9 Optional Fluent Rapid CG Software
5.9.1 Rapid CG Installation
5.9.2 Rapid CG Setup
5.9.3 Adding the RTX Tags
5.9.4 Rapid CG Overview
5.9.5 Content Panel
5.9.6 Editor Panel
5.9.7 Data Panel
5.9.8 Action Buttons Panel
5.9.9 Project Files
5.9.10 EZNews Project Files
Table of Contents

install - concepts - PixMaster - switcher - CG - clips - controls - team - appendix
FLINT V2.0
Section 6 Clip Store
6.1 Clip Store Playout
6.1.1 To Select a Clip by Name
6.1.2 To Select a Clip by Number
6.1.3 Selecting a Clip with the Multi-View
6.1.4 Viewing More Clips in the Library
6.1.5 Creating Clip Thumbnails
6.2 Clip Motion Controls
6.2.1 Clip Counter
6.2.2 Clip Motion Controls on the Multi-View
6.3 Clip Modifiers
6.3.1 Mark In and Out Points
6.3.2 Auto Start
6.3.3 Auto Stop
6.3.4 Auto Rewind
6.3.5 Loop Clips
6.3.6 Cut Points
6.3.7 Auto Transition
6.3.8 Auto Next
6.3.9 AutoAspect Controls
6.3.10 Scrubbing a Clip
6.4 Compressed Clips
6.4.1 Exporting Compressed Clips from Final Cut Pro
6.5 Optional External DDR Control
6.5.1 Installing the External DDR Control Option
6.5.2 Verifying Installation of External DDR Control Software
6.5.3 Adding DDR Control to a Show
6.5.4 Selecting Clips to Access
6.5.5 Controlling External DDR
6.5.6 DDR Controls
6.5.7 Accessing More Channels
6.5.8 DDR Error Messages
0.7
Table of Contents

install - concepts - PixMaster - switcher - CG - clips - controls - team - appendix
FLINT V2.0
Section 7 Optional Device Controls
7.1 Camera Control Option
7.2 Installation of Sony Cameras
7.2.1 Sony Wiring Configurations
7.3 Installation of Hitachi Cameras
7.3.1 One Camera Installation
7.3.2 Multi-Camera Installation
7.4 Installation of Panasonic Cameras
7.4.1 Panasonic Wiring Configurations
7.5 Installation of Telemetrics Camera Systems
7.5.1 Telemetrics Wiring Configurations
7.5.2 Telemetrics Dip Switch Settings
7.6 Adding Camera Control Option to an Existing System
7.7 Camera Control Device Settings
7.7.1 Sony Camera Control Settings
7.7.2 Hitachi Camera Control Settings
7.7.3 Setting the Camera Numbers for Hitachi Camera Control
7.7.4 Panasonic Camera Control Settings
7.7.5 Telemetrics Camera Control Settings
7.8 Adding Camera Control to a Show
7.9 Selecting Camera Control in a Production
7.10 Controlling a Camera Manually
7.10.1 Motion Controls for Hitachi Camera Control
7.10.2 Motion Controls for Panasonic & Sony Camera Control
7.10.3 Motion Controls for Telemetrics Camera Control
7.11 Setting Camera Preset Positions
7.11.1 Recalling Preset Camera Positions
7.11.2 Recall Speed for Hitachi Preset Positions
7.11.3 Camera Preset Thumbnails
7.12 Hitachi Camera Control Settings
7.12.1 Travel Limits of Tilt and Pan
7.12.2 Adjusting CCU Functions
7.13 Sony Camera Control Settings
7.13.1 Adjusting CCU Functions
7.14 Panasonic Camera Control Settings
7.14.1 Adjusting CCU Functions
7.15 Telemetrics Camera Control Settings
7.15.1 Adjusting CCU Functions
0.9
Table of Contents

install - concepts - PixMaster - switcher - CG - clips - controls - team - appendix
FLINT V2.0
Section 7 Device Controls Continued
7.16 Optional Audio-Follow-Video Control
7.16.1 Enabling Audio Follow
7.16.2 Activating Audio Follow
7.16.3 Audio Follow Setup
7.16.4 Audio Follow Operation
7.17 Streamer Control
7.17.1 Installing Streamer Control
7.17.2 Adding Streamer Control to a Show
7.17.3 Streamer Control Settings
7.17.4 Selecting Streamer Control in a Production
7.17.5 Controlling a Streamer Group
7.18 KiPro Control
7.18.1 Installing KiPro Control
7.18.2 Adding KiPro Control to a Show
7.18.3 KiPro Control Settings
7.18.4 Selecting KiPro Control in a Production
7.18.5 Controlling a KiPro Unit
7.19 VOX Voice Automated Production
7.19.1 Installing VOX
7.19.2 Installing the Host Override Panel
7.19.3 Installing Multiple VOX Units
7.19.4 VOX Software Editor
7.19.5 Running VOX
7.20 Streaming
7.20.1 Creating a Flash Media Live Encoder Profile
7.20.2 Saving a Flash Profile
7.20.3 Creating a Microsoft Expression Job
7.20.4 Saving an Expression Job
7.20.5 Controlling the Streamer from the Multi-View
7.20.6 Adding Stream Control to a Show
7.20.7 Selecting Stream Control in a Production
7.20.8 Controlling a Stream
7.21 Recording
7.21.1 Controlling the Recorder from the Multi-View
7.21.2 Adding Record Control to a Show
7.21.3 Selecting Record Control in a Production
7.21.4 Controlling a Record
0.10
Table of Contents

install - concepts - PixMaster - switcher - CG - clips - controls - team - appendix
FLINT V2.0
Section 7 Device Controls Continued
7.22 Audio Mixer
7.22.1 Enabling the Audio Mixer
7.22.2 Opening the Audio Mixer
7.22.3 Audio Mixer Overview
7.22.4 Configuring Audio Inputs
7.22.5 Controlling the Audio Mixer
Section 8 Team Operation
8.1 Optional Multi-Panel Support
8.2 Opening a SoftPanel
8.3 Locking Panels Together
8.4 Viewing just a portion of the SoftPanel
8.5 Adding a Separate Graphics Operator
8.5.1 Two Operators with Separate Graphics Operator and 1 Panel
8.5.2 Two Operators with Separate Graphics Operator and 2 Panels
8.6 Two Operators with Two Computers
8.7 Remote Operator in the Back Room
8.8 Dual Panels for Back-Up Redundancy
8.9 Remote Control from a Distance
8.10 Remote Control from an iPhone/iPod/iPad
Appendix
A.1 Upgrading the Broadcast Pix Software
A.2 Installing System Options
A.3 Control Panel Internal Operation
A.4 Flint System Specifications
A.5 Broadcast Pix Contact Information
0.11
Table of Contents

install - concepts - PixMaster - switcher - CG - clips - controls - team - appendix
FLINT V2.0
Thank you for purchasing a Broadcast Pix Flint Video Production System, soon you will be
experiencing how we have redefined the video production switcher.
Take note of which model and/or option you have purchased and refer to that section in this
manual prior to using your Broadcast Pix Switcher.
There are a total of 8 Flint Switcher models, as shown below, all of which use the same BP
Switcher software, each with unique hardware to control the software.
Please refer to the Quick Start Guide for preliminary installation of your system, which is
included inside the Flint System box in the ‘Open Me First’ envelope.
Flint Configurations
There are 4 Flint LE configurations:
Flint LE Desktop
Flint LE 500
Flint LE 1000
Flint LE 2000
There are 4 Flint LS configurations:
Flint LS Desktop
Flint LS 500
Flint LS 1000
Flint LS 2000
All LE models have 3 Analog/HDMI inputs and 1 Analog/HDMI output.
All LS models 4 SDI inputs, 2 Analog/HDMI inputs and 6 Analog/HDMI/SDI outputs.
1.0
Section 1:
Installation and Getting Started

install - concepts - PixMaster - switcher - CG - clips - controls - team - appendix
FLINT V2.0
The Flint System has an integrated design, which includes both a Server and Video Switcher,
as shown below. Live video sources can be synchronous and/or asynchronous in the following
formats: 1080i/60, 1080i/59.94, 1080p/30, 1080p/29.97, 720p/60,
720p/59.94, 525i/59.94, 1080i/50, 1080p/25, 720p/50, and 625i/50. Depending on the the
model, HD/SD-SDI, HDMI, Analog/HD Component, Composite and Y/C video can be used.
All inputs can be at any format/resolution as all video will be scaled internally to 1920x1080i.
Back Panel Connections:
1.1 Flint Switcher
1.1
NOTE: It is not recommended to have long SDI cable runs over 200 meters (655 feet) for SD and 100 meters
(325 feet) for HD and 8 meters (25 feet) for HDMI, as signal quality will be degraded. For longer runs, it is
necessary to install video amplifiers/reclockers to boost the signal, although external components may
increase overall system delay.
(2) Multi-View
Outputs
DVI-I
HDMI
VGA
Autosensing
Power
Supply
(2) USB
3.0
Streaming Output &
Network Inputs
House Network
10/100/1000BASE
Control
Panel
Video/Audio
Output
(6) USB
2.0
Video/Audio
Inputs
HDMI
Output
(LS only)
Video/Audio
Input
Mixer Solo
Output

install - concepts - PixMaster - switcher - CG - clips - controls - team - appendix
FLINT V2.0
The Flint Server is the host machine that runs the BP Switcher application and the Fluent
Workflow Software on an embedded version of Microsoft Windows 7. All graphics,
animations, clips and show files are stored on the Server. All graphics and show files live
on the Systems C hard drive and all the clips live on the Video D drive, both of which are
mounted internally in the system.
The Flint System has a 2 front doors, which can be latched shut and also locked with the
supplied keys in the Accessories bag. The right side houses the Power and Reset
switches.
Front Panel:
1.1.1 Flint Server
1.1.1
NOTE: The internal hard drive is partitioned into 2 logical drives.
(2)
USB 2.0 Ports
Status Lights
Reset Switch
Power Switch
Door Lock

install - concepts - PixMaster - switcher - CG - clips - controls - team - appendix
FLINT V2.0
The Flint System is a 3 Rack Unit (RU) frame and can be mounted in a standard 19” rack
from the front. The optional supplied rack ears can be used to secure the system into a
rack with rear support. It is highly recommended to use a rear support/shelf or use the
available sliding rack rails to provide the proper rear support when attached with multiple/
heavy cables.
The rack ears are removable to make the system fit in various equipment racks. The top
cover is secured with 2 side screws that unscrew completely (1 on each side) and 1 rear
screw that simply loosens to allow for the cover to slide off, as circled below.
System Dimensions:
1.2 Flint System Installation
1.2
21 in
53.34 cm
(1 more inch
for connectors)
19 in
48 cm
16.88 in
42.88 cm
20.13 in
51.13 cm

install - concepts - PixMaster - switcher - CG - clips - controls - team - appendix
FLINT V2.0
1.3 Broadcast Pix Flint LE
This section covers the basic installation of a Broadcast Pix Flint LE system.
All LE models have the same Input/Output configuration, the only variable is the type of
control surface either desktop control or a physical control panel. Other options that require
installation are covered in their sections.
All LE models have 3 Analog/HDMI inputs and 1 Analog, 1 HDMI and 1 Stream output, which
simultaneously output Program
1.3.1 Flint LE System Contents
The Broadcast Pix Flint LE models are comprised of the following standard components:
Hardware
1ME Control Panel (if applicable)
Flint Server with I/O cards installed
4 Analog Breakout cables (for Analog I/O)
DVI-VGA Adaptor
Inscriber USB Dongle, installed internally in the Server at the factory
USB Keyboard
USB Mouse
Network Crossover Cable (to connect panel if supplied)
Software
Broadcast Pix Software
3 SoftPanel Licenses
Inscriber TitleMotion GS Character Generator
Microsoft Windows 7
Paragon Backup & Recovery Home 11
1.3

install - concepts - PixMaster - switcher - CG - clips - controls - team - appendix
FLINT V2.0
1.3.2 Wiring Diagram for Flint LE
1.3.2
Slot 4
File transfer for
clips/graphics
Network Inputs
Keyboard USB
Mouse USB
House
Network
10/100/1000BASE
Slot 1
In 3
Control Panel
100BASE
Flint LE
Slot 5
Multi-View 1
HDMI/DVI-D
Multi-View 2
VGA
Slot 6
Slot 2
Slot 3
Analog or HDMI Video/Audio
Analog or HDMI Video/Audio
RCA Unbalanced Analog
#14 & 15
Analog or HDMI Video/Audio
RCA Unbalanced Analog
#14 & 15
RCA Unbalanced Analog
#14 & 15
Out 1
Out 1
Clip Audio 1&2 Out
Program HDMI+Embed
Program Analog
RCA Unbalanced Analog
#12 & 13
Program Stream
Out
Loop Out
Loop Out
Loop Out
Same as input
Same as input
Same as input
Crossover Cat 5e
In 2
In1
Solo Out Stereo 1/8” from Mixer

install - concepts - PixMaster - switcher - CG - clips - controls - team - appendix
FLINT V2.0
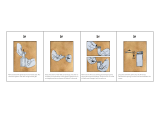
1.3.3 Flint LE Connections
All Analog I/O is through the provided multi-pin breakout cable using RCA connectors. If
replacement breakouts are needed please contact Technical Support. All HDMI I/O is
through the HDMI connectors on the I/O cards, please note that these are not locking HDMI
connections.
1.3.3
5(+7+
89+:+;+<+ =/2+:+
5(+:++++++++++++++++5(+<+ !)(%*+5(+
>()*#6+?"%)@#/2+
AB85+5(+
>/.'#C
9'.%#+
+5(+
>/.'#C
9'.%#+
+=/2++
AB85+,##D+=/2+
NOTE: The HDMI Inputs do not accept HDCP copy protected content. When using HDMI avoid going further
than 25ft without using a reclocker and use a thick gauge cable.
>/.'#C
9'.%#+
+5(+
>/.'#C
9'.%#+
+5(+

install - concepts - PixMaster - switcher - CG - clips - controls - team - appendix
FLINT V2.0
1.4 Broadcast Pix Flint LS
This section covers the basic installation of a Broadcast Pix Flint LS system.
All LS models have the same Input/Output configuration, the only variable is the type of
control surface either desktop control or a physical control panel. Other options that require
installation are covered in their sections.
All LS models have 4 HD/SD-SDI inputs and 2 Analog/HDMI inputs and 1 HDMI, 1 HD-SDI,
1 SD-SDI, 1 Composite, 1 Y/C , 1 HD/SD Component and 1 Stream output, which
simultaneously output Program
1.4.1 Flint LS System Contents
The Broadcast Pix Flint LS models are comprised of the following standard components:
Hardware
1ME Control Panel (if applicable)
Flint Server with I/O cards installed
4 BNC Female to DIN 1.0/2.3 Cable (for SDI In)
2 Analog Breakout cables (for Analog In)
DVI-VGA Adaptor
Inscriber USB Dongle, installed internally in the Server at the factory
USB Keyboard
USB Mouse
Network Crossover Cable (to connect panel if supplied)
Software
Broadcast Pix Software
3 SoftPanel Licenses
Inscriber TitleMotion GS Character Generator
Microsoft Windows 7
Paragon Backup & Recovery Home 11
1.4
/