Panasonic KV-S1046C User manual
- Category
- Scanner Transparancy Adapters
- Type
- User manual
This manual is also suitable for

Model No. KV-S1025C
KV-S1020C
These instructions contain information on operating the scanner. Before reading these
instructions, please read the Installation Guide enclosed with this unit.
Keep the CD-ROM in the protective case. Do not expose the CD-ROM to direct sunlight or
extreme heat, and do not scratch or smudge the surface of the CD-ROM.

2
Thank you for purchasing a Panasonic High Speed Color Scanner.
• Panasonic supports your imaging needs with a reliable and easy to use document scanner.
• Panasonic has developed Panasonic Image Enhancement Technology to improve the quality of your scanned
images even beyond the quality of your original document.
As an ENERGY STAR
®
Partner, Panasonic has determined that this product meets the ENERGY
STAR guidelines for energy efficiency.
• Microsoft and Windows are either registered trademarks or trademarks of Microsoft Corporation in the United
States and/or other countries.
• IBM and AT are trademarks of International Business Machines Corporation in the United States, other countries,
or both.
• ISIS, MultiStream, and QuickScan Pro are registered trademarks or trademarks of EMC Corporation.
• Adobe and Reader are registered trademarks of Adobe Systems Incorporated in the United States and/or other
countries.
• Pentium is a trademark or registered trademark of Intel Corporation or its subsidiaries in the United States and
other countries.
• Each company’s name or company product name is each company’s trademark or registered trademark.
Screen shot(s) reprinted with permission from Microsoft Corporation.
The information given in these Operating Instructions is subject to change without notice.
Illegal Duplication
It is unlawful to make duplication of certain documents.
Duplicating certain documents may be illegal in your country.
Penalties of fines and/or imprisonment may be imposed on those found guilty. The following are examples of
items that may be illegal to duplicate in your country.
• Currency
• Bank notes and checks
• Bank and government bonds, and securities
• Passports, licenses, official or private documents, identification cards, and the like
• Copyright materials, or trademarks without the consent of the owner
• Postage stamps, and other negotiable instruments
This list is not inclusive, and no liability is assumed for either its completeness or accuracy.
In case of doubt, contact your legal counsel.
Notice:
Install your machine near a supervised area to prevent illegal duplication from being made.

3
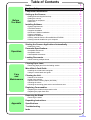
Notice . . . . . . . . . . . . . . . . . . . . . . . . . . . . . . . . . . . . . . . . . . . . . . . 4
For Your Safety. . . . . . . . . . . . . . . . . . . . . . . . . . . . . . . . . . . . . . . . 5
Component Identification . . . . . . . . . . . . . . . . . . . . . . . . . . . . . . . 9
Setting up the Scanner . . . . . . . . . . . . . . . . . . . . . . . . . . . . . . . . 10
• Setting and removing the feed tray . . . . . . . . . . . . . . . . . . . . . . . . . . . . . . . . 10
• Setting the exit tray . . . . . . . . . . . . . . . . . . . . . . . . . . . . . . . . . . . . . . . . . . . . 11
• Power turn-on sequence . . . . . . . . . . . . . . . . . . . . . . . . . . . . . . . . . . . . . . . . 12
• About LED . . . . . . . . . . . . . . . . . . . . . . . . . . . . . . . . . . . . . . . . . . . . . . . . . . . 12
Installing Software . . . . . . . . . . . . . . . . . . . . . . . . . . . . . . . . . . . . 13
• System requirements . . . . . . . . . . . . . . . . . . . . . . . . . . . . . . . . . . . . . . . . . . . 13
• CD-ROM Contents . . . . . . . . . . . . . . . . . . . . . . . . . . . . . . . . . . . . . . . . . . . . . 13
• Complete installation . . . . . . . . . . . . . . . . . . . . . . . . . . . . . . . . . . . . . . . . . . . 14
• All Drivers & Utilities installation. . . . . . . . . . . . . . . . . . . . . . . . . . . . . . . . . . . 14
• Custom installation. . . . . . . . . . . . . . . . . . . . . . . . . . . . . . . . . . . . . . . . . . . . . 15
• Application installation . . . . . . . . . . . . . . . . . . . . . . . . . . . . . . . . . . . . . . . . . . 16
• Viewing manuals from the Drivers&Utilities CD-ROM . . . . . . . . . . . . . . . . . . 16
• Viewing manuals installed on your computer. . . . . . . . . . . . . . . . . . . . . . . . . 17
Starting the Scanner Applications Automatically . . . . . . . . . . . 18
• Setting the event . . . . . . . . . . . . . . . . . . . . . . . . . . . . . . . . . . . . . . . . . . . . . . 18
Document Specifications. . . . . . . . . . . . . . . . . . . . . . . . . . . . . . . 20
• Acceptable documents. . . . . . . . . . . . . . . . . . . . . . . . . . . . . . . . . . . . . . . . . . 20
• Acceptable cards . . . . . . . . . . . . . . . . . . . . . . . . . . . . . . . . . . . . . . . . . . . . . . 20
• Unacceptable documents. . . . . . . . . . . . . . . . . . . . . . . . . . . . . . . . . . . . . . . . 20
Loading Documents . . . . . . . . . . . . . . . . . . . . . . . . . . . . . . . . . . . 21
• When scanning multiple sheets . . . . . . . . . . . . . . . . . . . . . . . . . . . . . . . . . . . 21
Clearing Paper Jams . . . . . . . . . . . . . . . . . . . . . . . . . . . . . . . . . . 23
• Removing paper jams from the feeding section. . . . . . . . . . . . . . . . . . . . . . . 23
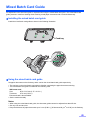
Mixed Batch Card Guide . . . . . . . . . . . . . . . . . . . . . . . . . . . . . . . 25
• Installing the mixed batch card guide. . . . . . . . . . . . . . . . . . . . . . . . . . . . . . . 25
• Using the mixed batch card guide . . . . . . . . . . . . . . . . . . . . . . . . . . . . . . . . . 25
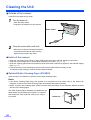
Cleaning the Unit . . . . . . . . . . . . . . . . . . . . . . . . . . . . . . . . . . . . . 26
• Outside of the scanner . . . . . . . . . . . . . . . . . . . . . . . . . . . . . . . . . . . . . . . . . . 26
• Inside of the scanner . . . . . . . . . . . . . . . . . . . . . . . . . . . . . . . . . . . . . . . . . . . 26
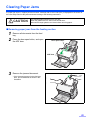
• Optional Roller Cleaning Paper (KV-SS03) . . . . . . . . . . . . . . . . . . . . . . . . . . 26
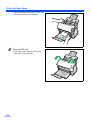
• Cleaning the rollers . . . . . . . . . . . . . . . . . . . . . . . . . . . . . . . . . . . . . . . . . . . . 27
• Cleaning the scanning glass section and reference area . . . . . . . . . . . . . . . 30
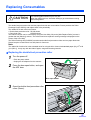
Replacing Consumables . . . . . . . . . . . . . . . . . . . . . . . . . . . . . . . 31
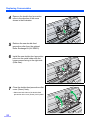
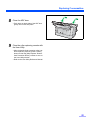
• Replacing the double-feed prevention roller . . . . . . . . . . . . . . . . . . . . . . . . . 31
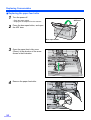
• Replacing the paper feed roller . . . . . . . . . . . . . . . . . . . . . . . . . . . . . . . . . . . 34
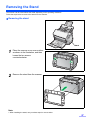
Removing the Stand. . . . . . . . . . . . . . . . . . . . . . . . . . . . . . . . . . . 37
• Removing the stand . . . . . . . . . . . . . . . . . . . . . . . . . . . . . . . . . . . . . . . . . . . . 37
Repacking Instructions . . . . . . . . . . . . . . . . . . . . . . . . . . . . . . . . 38
Specifications . . . . . . . . . . . . . . . . . . . . . . . . . . . . . . . . . . . . . . . . 39
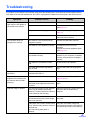
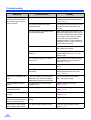
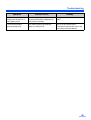
Troubleshooting . . . . . . . . . . . . . . . . . . . . . . . . . . . . . . . . . . . . . . 41
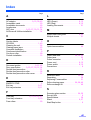
Index . . . . . . . . . . . . . . . . . . . . . . . . . . . . . . . . . . . . . . . . . . . . . . . 43
Page
Table of Contents
Before
You Start
Care
and
Maintenance
Appendix
Operation

4
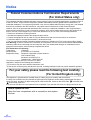
Notice
Federal Communications Commission Requirements
(For United States only)
This equipment has been tested and found to comply with the limits for a Class B digital device, pursuant to Part 15
of the FCC Rules. These limits are designed to provide reasonable protection against harmful interference in a
residential installation. This equipment generates, uses, and can radiate radio frequency energy and, if not installed
and used in accordance with the instructions, may cause harmful interference to radio communications.
However, there is no guarantee that interference will not occur in a particular installation. If this equipment does
cause harmful interference to radio or television reception, which can be determined by turning the equipment off
and on, the user is encouraged to try to correct the interference by one or more of the following measures:
• Reorient or relocate the receiving antenna.
• Increase the separation between the equipment and receiver.
• Connect the equipment into an outlet on a circuit different from that to which the receiver is connected.
• Consult the dealer or an experienced radio/TV technician for help.
• The user may find the booklet “Something About Interference” available from FCC local regional offices helpful.
FCC Warning: To assure continued FCC emission limit compliance, the user must use the recommended shielded
interfacing cable when connecting to a host computer. Also, any unauthorized changes or modifications to this
equipment would void the user's authority to operate this device.
FCC Declaration of Conformity
Trade Name: Panasonic
Model Number: KV-S1025C or KV-S1020C
Responsible Party: Panasonic Corporation of North America
One Panasonic Way
Secaucus, NJ 07094 U.S.A.
Telephone No.: 1-800-726-2797
This device complies with Part 15 of the FCC Rules.
Operation is subject to the following two conditions:
(1)This device may not cause harmful interference, and
(2) this device must accept any interference received, including interference that may cause undesired operation.
For your safety please read the following text carefully.
(For United Kingdom only)
This appliance is supplied with a moulded three pin mains plug for your safety and convenience.
A 5 amp. fuse is fitted in this plug. Should the fuse need to be replaced, ensure that the replacement fuse has a
rating of 5 amps. and that it is approved by ASTA or BSI to BS1362. Check for the ASTA mark or the BSI mark
on the body of the fuse.
And you must refit the fuse cover when the fuse is replaced. If you lose the fuse cover, the plug must not be use.
ASA
How to replace the fuse:
Open the fuse compartment with a screwdriver and replace
the fuse.

5
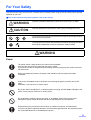
For Your Safety
To prevent severe injury and loss of life, read this section carefully before using the unit to ensure proper and safe
operation of your unit.
This section explains the graphic symbols used in this manual
Power
Denotes a potential hazard that could result in serious injury or death.
Denotes hazards that could result in minor injury or damage to the unit.
These symbols are used to alert operators to a specific operating procedure
that must not be performed.
These symbols are used to alert operators to a specific operating procedure
that must be emphasized in order to operate the machine safely.
The power source voltage of this unit is listed on the nameplate.
Only plug the unit into an AC outlet with the proper voltage.
If you use a cord with an unspecified current rating, the unit or plug may emit smoke or become
hot to the touch.
When you operate this product, the power outlet should be near the product and easily
accessible.
Connect the AC adaptor firmly to the power cord, and plug the power cord firmly into an AC
outlet.
Otherwise, it can cause fire or electric shock.
Do not pull, bend, rest objects on, or chafe the power cord, plug, and AC adaptor. Damage to the
power cord or plug can cause fire or electric shock.
Do not attempt to repair the power cord, plug, or AC adaptor. If the power cord or plug is
damaged or frayed, contact an authorized service representative for a replacement.
Ensure that the plug connection is free of dust. In a damp environment, a contaminated
connector can draw a significant amount of current that can generate heat, and eventually cause
fire if left unattended over an extended period of time.
WARNING
CAUTION
WARNING

For Your Safety
6
Operation Safeguards
Power
Never touch the plug or AC adaptor with wet hands.
Danger of electric shock exists.
Stop operation immediately if the unit emits smoke, excessive heat, abnormal smell, or unusual
noise. These conditions can cause fire or electric shock. Immediately turn the unit off, and unplug
the power cord, and contact your dealer for service.
When disconnecting the unit, grasp the plug instead of the cord. Pulling on a cord forcibly can
damage it, and cause fire or electric shock.
If metal fragments or water gets into the unit, turn the unit off, and unplug the unit immediately.
Contact your dealer for service. Operating the contaminated unit can cause fire or electric shock.
Do not open covers, and do not attempt to repair the unit yourself. Contact your dealer for
service.
Do not alter the unit or modify any parts. Alteration or modification can cause fire or electric
shock.
During thunderstorms, do not touch the unit, plug and AC adaptor. It may cause an electric
shock.
The unit should be used only with the power cord and AC adaptor enclosed with the unit.
When the unit is not used over an extended period of time, switch it off, and unplug it. If an
unused unit is left connected to a power source for a long period, degraded insulation may cause
electric shock, current leakage, or fire.
CAUTION

For Your Safety
7
Installation Relocation
Operating Safeguards
Do not position the unit in a location where it is unstable.
To prevent fire or shock hazard, do not expose this unit to rain or any type of moisture.
Do not place the unit in a hot humid or dusty environment.
Prolonged exposure to these adverse conditions may cause fire or electric shock.
When moving the unit, be sure to unplug the power cord from the AC outlet. If the unit is moved
with the power cord attached, it can cause damage to the cord which could result in fire or
electric shock.
If the unit falls down or gets damaged, turn the unit off, and unplug the power cord. Otherwise, it
may cause fire or electric shock.
Do not place any liquids near the unit.
Accidental spillage of liquid into the unit may cause severe damage. If this occurs, turn the unit
off, unplug the power cord, and contact your dealer for service.

For Your Safety
8
• Do not place the scanner in direct sunlight, in a cold draft, or near heating apparatus.
• Do not place the scanner near apparatus which generate electronic or magnetic noise.
• Protect the scanner from static electricity.
• Do not move the scanner immediately from a cold place to a warm place. It may cause dew.
• Handle a CD-ROM carefully.
• Prevent a CD-ROM from damage, and keep clean.
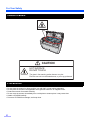
Caution Labels
Precautions
HOT SURFACE
DO NOT TOUCH.
The glass in the scanning section become very hot.
Exercise care not to touch heated areas, or you may get burned.
CAUTION

9
Component Identification
LED (Green)
LED (Red)
Start/Stop
button
Exit tray
Exit tray extension
ADF door
Feed tray extension
Feed tray
Document guides
Door open button
Stand
Security slot
Scanning lamp(s)
The scanning lamp(s) periodically lights up in sleep
mode. This is not an unusual event.
For details on sleep mode, refer to the User Utility
Reference Manual.
Connects the scanner unit to
the host computer.
Open this door if a
paper jam occurs.
ADF door
USB port
AC adaptor
Power cord
Power switch
Power connector
USB cable
Door open button
Stand
Mixed batch card guide

10
Setting up the Scanner
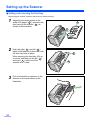
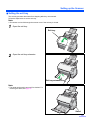
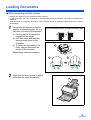
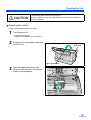
Setting and removing the feed tray
Before using the scanner, follow the steps below to set the feed tray.
1
Adjust the document guides to the
width of A5 paper ( ), and insert the
feed tray into the scanner ( ) as
shown in the illustration.
2
Push the right ( ) and left ( )
sides of the feed tray in that order until
the feed tray locks in place.
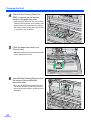
When removing the feed tray, lift it up
to unlock, and then pull the left ( )
and right ( ) sides out of the
scanner in that order.
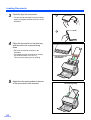
3
Pull out the feed tray extension in the
direction of the arrow shown in the
illustration.
A
B
A
B
A
B
A
B
B
A

Setting up the Scanner
11
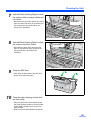
Setting the exit tray
The exit tray prevents documents from dropping after they are scanned.
Follow the steps below to set the exit tray.
Note:
• Documents can be fed through the scanner even if the exit tray is closed.
1
Open the exit tray.
2
Open the exit tray extension.
Note:
• The stand can be easily removed if so desired. For
removing the stand, see page 37.
Exit tray
Exit tray extension
Stand

Setting up the Scanner
12
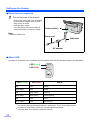
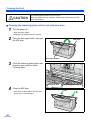
Power turn-on sequence
1
Turn on the power of the scanner.
• Connect the power cord to the AC adaptor.
• Connect the AC adaptor to the scanner.
• Plug into an AC outlet.
• Push the power switch.
• The LED (Green) will blink for about 30
seconds and then it will become steady.
Note:
• Install the software first.
About LED
The status of the scanner can be established by the condition of the two LED indicators shown in the table below:
*1
The scanning lamp(s) periodically lights up in sleep mode. This is not an unusual event.
For details on sleep mode, refer to the User Utility Reference Manual.
*2
It will take about 30 seconds to initialize the scanner.
LED (Green)LED (Red)Status
ON OFF Ready
Blink (Slow) OFF Sleep
*1
ON Blink (Slow) Warning
Blink (Slow) Blink (Slow) Warning/Sleep
ON ON Error
Blink (Fast) OFF Warming up
*2
AC adaptor
Power cord
Power switch ( )
USB cable
Ready
Error
Start / Stop
LED (Green)
LED (Red)

13
Installing Software
System requirements
*1
Microsoft
®
Windows
®
2000 operating system (hereafter Windows 2000)
*2
Microsoft
®
Windows
®
XP operating system (hereafter Windows XP)
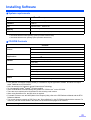
CD-ROM Contents
• RTIV (Reliable Throughput Imaging Viewer) is a Panasonic original application software, and does not require
either TWAIN driver nor ISIS driver.
• PIE is an acronym for Panasonic Image Enhancement Technology.
• To view manuals, Adobe
®
Reader
®
must be installed.
• If the CD-ROM does not automatically start, please run
“CDRun.exe” on the CD-ROM.
• There are some restrictions for QuickScan Pro due to being a trial version.
• When using QuickScan Pro, the ISIS driver is required.
• For details on how to use the MCD (Multi-Color Dropout) Utility, refer to the PIE Reference Manual and the RTIV
Reference Manual.
• The control sheets are stored as PDF files on the “Drivers&Utilities” in the CD-ROM provided with the scanner. For
use them, print the control sheets in the same size as the document pages to be scanned.
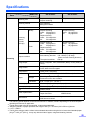
Computer
IBM
®
PC/AT
®
or compatible machine with a CD-ROM drive
CPU
Pentium lll, 1GHz or higher
Interface
USB 2.0
OS
Windows 2000
*1
, Windows XP
*2
Memory
256 MB or higher
HDD
At least 200 MB free space (except for data file)
Contents
Drivers
Device Driver
TWAIN
ISIS
Applications
RTIV
QuickScan Pro
TM
Demo
Utilities
MCD (Multi-Color Dropout) Utility
User Utility
Manuals
PIE Reference Manual
RTIV Reference Manual
Operating Instructions
User Utility Reference Manual
Installation Guide
Others
Control Sheet
Warranty Information (U.S.A. Only)
Make sure to login to Windows 2000 / Windows XP as an administrator.

Installing Software
14
Complete installation
All drivers, applications, utilities, and manuals can be installed at the same time using the Complete installation.
1
Turn off the power of the scanner.
2
Insert the CD-ROM into your CD/DVD drive on your computer.
3
If you have a feature called ’Autorun’ activated, this will start the installation process
automatically.
Note:
• If the program does not automatically start, click [Start], click [Run...], click [Browse...], and select the CD/
DVD drive containing the installation software, double-click on “CDRun.exe” in the root directory to
manually start the installation routine, then click [OK].
4
Select your scanner.
5
Select the [Complete] from the [Installation] list.
6
Follow the instructions on the screen.
7
Turn on the power of the scanner.
8
Follow the instructions of the hardware wizard to complete the installation.
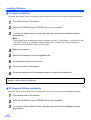
All Drivers & Utilities installation
All drivers, utilities, and manuals can be installed at the same time using the All Drivers & Utilities installation.
1
Turn off the power of the scanner.
2
Insert the CD-ROM into your CD/DVD drive on your computer.
3
If you have a feature called ’Autorun’ activated, this will start the installation process
automatically.
Even if the screen ‘Digital Signature was not found for this driver’, or ‘has not passed Windows Logo testing···’
appears, continue with the installation.

Installing Software
15
Note:
• If the program does not automatically start, click [Start], click [Run...], click [Browse...], and select the CD/
DVD drive containing the installation software, double-click on “CDRun.exe” in the root directory to
manually start the installation routine, then click [OK].
4
Select your scanner.
5
Select the [All Drivers & Utilities] from the [Installation] list.
6
Follow the instructions on the screen.
7
Turn on the power of the scanner.
8
Follow the instructions of the hardware wizard to complete the installation.
Custom installation
Each driver, utility, and manual can be installed using the Custom installation selection, as required.
1
Turn off the power of the scanner (only when installing Device Driver).
2
Insert the CD-ROM into your CD/DVD drive on your computer.
3
If you have a feature called ’Autorun’ activated, this will start the installation process
automatically
Note:
• If the program does not automatically start, click [Start], click [Run...], click [Browse...], and select the CD/
DVD drive containing the installation software, double-click on “CDRun.exe” in the root directory to
manually start the installation routine, then click [OK].
4
Select your scanner.
5
Select the [Custom] from the [Installation] list.
6
Select a driver, an utility, or a manual.
7
Follow the instructions on the screen.

Installing Software
16
Application installation
RTIV and/or QuickScan Pro Demo can be installed as follows.
1
Insert the CD-ROM into your CD/DVD drive on your computer.
2
If you have a feature called ’Autorun’ activated, this will start the installation process
automatically.
Note:
• If the program does not automatically start, click [Start], click [Run...], click [Browse...], and select the CD/
DVD drive containing the installation software, double-click on “CDRun.exe” in the root directory to
manually start the installation routine, then click [OK].
3
Select your scanner.
4
Select the [RTIV] or the [Quick Scan Pro Demo] from the [Installation] list.
5
Follow the instructions on the screen.
Viewing manuals from the Drivers&Utilities CD-ROM
All manuals on the CD-ROM can be viewed using the Adobe Reader.
1
Insert the CD-ROM into your CD/DVD drive on your computer.
2
If you have a feature called ’Autorun’ activated, this will start the installation process
automatically.
Note:
• If the program does not automatically start, click [Start], click [Run...], click [Browse...], and select the CD/
DVD drive containing the installation software, double-click on “CDRun.exe” in the root directory to
manually start the installation routine, then click [OK].
3
Select your scanner.
4
Select a manual from the list.

Installing Software
17
Viewing manuals installed on your computer
All manuals installed on your computer can be viewed as follows.
1
Click [Start], and then click [All Programs] - [Panasonic] - [Scanner Manuals].
• For Windows 2000, click [Program] instead of [All Programs].
Note:
• To install manuals on your computer, see page 15.
2
Select the desired manual.

18
Starting the Scanner Applications Automatically
The scanner application can be configured to start automatically when pressing the Start/Stop button, and/or placing
documents on the feed tray. To accomplish this, follow the steps below.
Setting the event
1
Click [Start], and then click [Control Panel] - [Printers and Other Hardware].
• For Windows 2000, click [Start], and then click [Setting] - [Control Panel].
2
Select your scanner in the [Scanners and Cameras], and then display the scanner
property dialog box by right clicking on the scanner icon.
• For Windows 2000, select your scanner in the [Scanners and Cameras Properties], and then display the
scanner property dialog box by clicking [Properties] button.
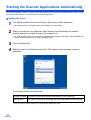
3
Click the [Events] tab.
4
Select an event in the [Scanner events] list. The selected event activates a scanner
application.
The following events can be selected.
* If the unit goes into sleep mode, you must press the Start button twice.
Feeder Loaded An event occurs when placing documents on the feed tray.
Start Button * An event occurs when pressing the Start/Stop button of the scanner.

Starting the Scanner Applications Automatically
19
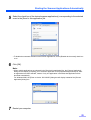
5
Select the check box of the desired scanner application(s) corresponding to the selected
event in the [Send to this application] list.
• To disable the automatic activation of the scanner applications, set the [Disable device events] check box
to on.
6
Click [OK].
Note:
• When multiple applications are selected in the [Send to this application] list, the [Choose Application]
dialog box will display, prompting you to select an application in the [Registered Applications] list. After
an application has been selected, it starts. If only one application is selected, that application will be
launched automatically.
For Windows 2000, the [Event on device: KV-S1025C] dialog box will display instead of the [Choose
Application] dialog box.
7
Restart your computer.

20
Document Specifications
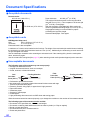
Acceptable documents
Document size:
Paper thickness: 40~209 g/m
2
(11~55 lb.)
The height of all the documents on the tray should be
less than 5 mm (0.2 in.). This compares to 50 sheets (80
g/m
2
or 20 lb.) of new paper.
With the exception of ISO Magnetic Stripe cards, the
minimum guaranteed feeding length is 70 mm (2.76 in.).
Single paper feeding is recommended for papers
exceeding the legal size length.
Recommended paper: Plain paper
Acceptable cards
ISO Magnetic Stripe card:
Size: 85.6 x 54.0 mm (3.37 x 2.13 in.)
Thickness: 0.76 mm (0.03 in.)
Embossed card is also acceptable.
A maximum of 3 cards can be loaded on the feed tray. The height of the total cards (the total thickness including
the embossing on each card) should be less than 5 mm (0.2 in.). Additionally, the embossing on each card must
not get entangled with others.
Use the landscape orientation when scanning an embossed card. If the scanning fails, place the card upside
down, and then try again.
Use the mixed batch card guide
(See
page 25
) when scanning mixed media (cards and papers) at the same time
.
Unacceptable documents
The following types of documents may not scan properly:
• Damaged or notched document
• Irregular document thickness, such as envelopes
• Curled, wrinkled, or folded documents
• Perforated or punched documents
• Not rectangular or irregularly shaped documents like documents with tags
• Thermal or photosensitive paper
• Extremely smooth, shiny paper, or paper that is highly textured
• Paper with carbon
• Carbonless paper
• Creased or ripped paper
• Coated paper
• Light penetrating documents such as OHP sheet and tracing paper
When documents cannot be scanned properly, try to change the resolution or the number of documents scanned.
The following types of documents must
be avoided:
• Documents out of specified size, thickness, and weight
• Documents containing hard attachments such as metal or plastic (ex. Clips or staples)
• Bound or glued documents
• Document with wet ink or cinnabar seal ink
• Cloths and plastic films
70~2540 mm (2.76~100 in.)
48~216 mm (1.89~8.5 in.)
Less than
5 mm (0.2 in.)
Less than
5 mm (0.2 in.)
Curl:
Fold:
Feeding direction
Feeding direction
Page is loading ...
Page is loading ...
Page is loading ...
Page is loading ...
Page is loading ...
Page is loading ...
Page is loading ...
Page is loading ...
Page is loading ...
Page is loading ...
Page is loading ...
Page is loading ...
Page is loading ...
Page is loading ...
Page is loading ...
Page is loading ...
Page is loading ...
Page is loading ...
Page is loading ...
Page is loading ...
Page is loading ...
Page is loading ...
Page is loading ...
Page is loading ...
Page is loading ...
Page is loading ...
-
 1
1
-
 2
2
-
 3
3
-
 4
4
-
 5
5
-
 6
6
-
 7
7
-
 8
8
-
 9
9
-
 10
10
-
 11
11
-
 12
12
-
 13
13
-
 14
14
-
 15
15
-
 16
16
-
 17
17
-
 18
18
-
 19
19
-
 20
20
-
 21
21
-
 22
22
-
 23
23
-
 24
24
-
 25
25
-
 26
26
-
 27
27
-
 28
28
-
 29
29
-
 30
30
-
 31
31
-
 32
32
-
 33
33
-
 34
34
-
 35
35
-
 36
36
-
 37
37
-
 38
38
-
 39
39
-
 40
40
-
 41
41
-
 42
42
-
 43
43
-
 44
44
-
 45
45
-
 46
46


Panasonic KV-S1046C User manual
- Category
- Scanner Transparancy Adapters
- Type
- User manual
- This manual is also suitable for
Ask a question and I''ll find the answer in the document
Finding information in a document is now easier with AI
Related papers
-
Panasonic Camescope KV-S1025C Owner's manual
-
Panasonic KV-SS080 User manual
-
Panasonic KV-S1045C-U User manual
-
Panasonic KV-S4085CL User manual
-
Panasonic Scanner KV-S7075C User manual
-
Panasonic KV-SL1066 User manual
-
Panasonic KC-S1026C User manual
-
-
-
Panasonic KV-S2045C SERIES User manual
Other documents
-
Xerox Documate 765 Owner's manual
-
Kodak Truper 3210 User manual
-
Xerox DocuMate 262i Owner's manual
-
Xerox Documate 162 User guide
-
Visioneer 3640 User guide
-
Xerox Documate 632 Owner's manual
-
-
Xerox 752 User manual
-
-
Visioneer 450 User manual