Page is loading ...

Light is rything
™
Light is everything"'
XMSFlash
UserGuide

page le intentionally blank
Congratulations on purchasing your new Bowens
product.
Thank you for choosing the XMS range flash system.
The Bowens XMS monolight has been designed to meet the
exacting high standards demanded by today's working
professionals, whilst remaining simple and intuitive to use.
Engineered for speed, power and reliability, the XMS
system is the result of combined state-of-the-art technology,
cutting-edge aesthetics and years of working closely
alongside photographers.
The XMS1000 is a 1000WsA/C powered flash system, with
integrated radio trigger, remote control functionality and high
speed sync mode. lt operates on the worldwide 2.4GHz
radio frequency band and has 32 channels and 5 groups
available. The XMS can also be controlled via optical/lR
transmissions.
This unit is fully digital, ensuring consistent flash to flash
power, colour temperature and short flash durations.
In order to obtain the full benefit from your purchase, please
take a few moments to familiarise yourself with this user
manual.

4
Table of Contents
Safety Instructions
Electrical Safety
Precautions
Environmental Safety
XMS
XMS
- Display
Quick Start Guide
Functions Overview
Reflector Removal
and
Mounting
Umbrella Mounting
Power
Charging
Stable Color Temperatur Funct.
Sync Options
Wireless Sync
Photocell
High-Speed Sync
Wired Sync
Flash Modes
M
Multi
Wireless Flash Shooting
Flash Modes and Modeling
Advanced Menu
Protection, Errors and Updates
Error Codes
Specifications
Safety lnstructions
Electrical Safety
This unit should only be connected to a mains socket outlet with a protective earth
connection or to a suitably protected battery/mains inverter.
Only use Bowens mains cables or extension cables.
The mains cable and plug is regarded as an emergency disconnect device and should
always be readily accessible so that it can be quickly removed.
Do not open or disassemble the unit as it operates with a high voltage and contains
capacitors that can remain electrically charged for a considerable time after the
unit is turned off or is disconnected from the mains.
Always disconnect the unit from the mains and avoid touching the flash tube or
modelling LED when changing reflectors or fitting an umbrella.
Precautions
Always study and understand this user guide and accompanying safety instruction s before
using this unit.
Make sure that the Bowens lnstruction and Safety lnstructions always accompany this unit.
Bowens products are intended for professional photographic use only and should not be
used
for any other purpose.
Always remove the protective cap from the unit before use.
Do not point the unit too close to persons or use the unit without the supplied protective
glass dome.
Do not use the unit if the glass dome has become visibly damaged to
such an extent that
its effectiveness is impaired. e.g. cracks or deep scratches.
Do not touch any hol parts with bare fingers. The glass dome, modelling LED, flash tube
and certain metal parts can become very hot. Allow the unit to cool before touching
any user changeable parts.
Equipment should only be serviced, modified or repaired by authorised and
competent service personnel.
Environmental Safety
Do not place or use the unit where it could be exposed to moisture, dripping, splashing,
extreme electromagnetic fields or in areas with flammable liquids, gases or dust.
Do not expose the unit to rapid temperature changes in humid conditions as this can
lead
to internal condensation.
When transporting the unit between cold and warm conditions alw ays allow the unit to
acclimatise for at least two hours before connecting to the mains.
Do not obstruct the ventilation slots in any way with filters, diffusing materials, etc.
Do not place any form of material over or close to the glass dome, modeling lamp or
flash tube.
Radio Frequency - This equipment makes use of the radio spectrum for triggering and
remote control and therefore receives and emits radio frequency energy. Ensure that all
specification s within this document are followed, especially those concerning operating
temperature and supply voltage range. Make sure that the unit is operated according to
local regulations. The frequency spectrum that this unit uses is shared with other users so
interference either with this unit or with other users is possible.
Final Disposal - This unit contains electrical and electronic components that could be
harmful to the environment . Fellow local legal requirements for disposal of waste, for
instance WEEE directive for electrical and electronic equipment an the European market
at the end of the product life.
u

6
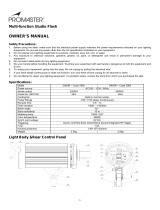
XMS
__
1.
Display Screen
2.
BEEP ON/OFF
3.
Flash Mode / User Menu
4.
Open/ Test Flash
5.
Rotary Control Dial
6.
SyncMode / High-Speed Sync
7.
Group / Channel
8.
Modeling Lamp
9.
Modifier Release Latch
10.
Light Sensor
11.
Power Switch
12.
AC Power Socket
13.
Fuse
14.
Angle Adjustment Handle
15.
3.5mm Jack sync
16.
Glass protective cover
17.
Mounting Bracket
12
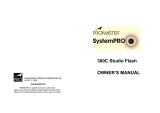
XMS - Display
12
1.
Flash Power
2.
Sync Mode
3.
Optic Slave Flash
4.
High-Speed Sync
5.
Sync Delay
6.
Beep
7.
Over-Temperature
Protection
8.
Flash Duration
9.
Modeling Lamp
Multi 1
�H sa
speed
10.
Modeling lamp step
11.
Radio Group
12.
2.4G wireless
transmission
13.
Radio Channel
7
10
09
14
15
11
16
13
17
_____
02
03 04
05
06 07
08
13
01
02
03
04
05
06
07
08
09
10
11

8
�
0
Quick Start Guide
PUSH BUTTONS:
Primary (Top) Functions:
BUZZ
- ON/OFF
MODE
TEST
SYNC
GROUP
LAMP
Selects flash mode (M,Multi)
Open / test flash.
Selects syncmode (2.4 Ghz radio, Optical transmission,
Photocell).
Toggles through available radio group settings (A-E).
Toggles through available modelling lamp output settings.
Secondary (Bottom) Functions:
MENU
HSS
CHANNEL
Selects advanced user menu
system.
Selects High-Speed Sync mode.
Selects radio channel settings (1-32).
Unless specified all buttons operate as follow:
Single press to toggle through available options for primary (top)
function.
Press and hold to select secondary function.
ROTARY CONTROL DIAL:
Turn the Rotary Control Dial clockwiseor anti-clockwise to adjust function / setting
values. Push to confirm setting / values.
Quick Start Guide
FUNCTIONS OVERVIEW:
Unscrew the Angle Adjustment Handle to unlock the Stand Mount.
Remove the Stand Mount from the storage channel.
Place the XMS1000 on top of a suitable support stand.
Secure the XMS1000 in place by tuming the Stand Mount Thumcscrew.
Ad just the XMS 1000 to the desired angle and tighten the Angle Adjustment Handle to
lock in place.
1.
To remove a reflector/ light modifier, pull the Modifier Release Laich away from the
front end of the unit.
2.
Turn the modifier and pull away from the main unit.
3.
To attached a modifier, align the reflector mount with the mount on the flash head
push together and turn to click/lock in place.
1.
Open your chosen umbrella and slide it into the umbrella mount.
To turn the power ON, press and hold the POWER button.
To turn the power OFF, press and hold the POWER button.
Power Connection
Use the power cord to connect the flash to an AC power source and turn on
the power switch.
9
�
0

.
0
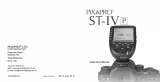
Quick Start
Stable Colour Temperature Function
When using this function, the colour temperature changes within ± 1 00 K
over the entire power range: enter MENU C.Fn-F1 and set it as OFF.
which means the colour temperature function is turned on. When
adjusting the power output from high to low in M mode,
�
Flash Ready
lndicator will blink (the beeper will alarm for 10 times). Now press the Test
Button
to discharge, and the flash can be used as normal.
C<f
>
l
/, n
�, 1
s
r
,�
s
f
DFF
1 OFF
Fo •
This function can only supported in M non-high-speed mode.
Sync Options
Wireles.; Sync
2.4GHz Radio Sync
The XMS1000 has a built-in 2.4GHz radio receiver to enable full control
over the flash via a XMTR radio Trigger.
To set up and use a XMTR radio Trigger 2.4GHz:
1.
Press the SYNC button until the radio/ symbol is displayed on the LCD screen.
2.
To set the radio channel press and hold the CHN button to select the channel options.
3.
Turn the rotary encoder to select the desired channel (1-32).
4.
Press the Rotary Control Dial to select the required channel.
5.
To set the radio group press the GRP button to scroll through the available groups (A-E).
11
C
0
0
C
_

12
C
0
�
0
C
Sync Options
Photocell
The XMS1000 features a built-in light sensitive photocell for flash sync hronisation.
The XMS1000 Photocell can be set to fire an the first or second flash detected.
Ta set up and use the Photocell to trigger the XMS 1000:
1. First select either S1 (1st flash) or S2 (2nd flash) Photocell option with in the Advanced
Menu.
High-Speed Sync
High-Speed Sync allows the flash to sync with shutter speeds up to 118000th
sec. Ta setup and use High-Sync:
1.
Press and hold the HSS button to turn an High-Speed Sync.
2.
Adjust the shutter speed an your camera.
3.
Ta turn off High-Speed Sync press and hold the HSS button.
Further information:
•
lf the shutter speed an your camera is set to it's X-Sync or slower High-Speed Sync
will not work.
•
High-Speed Sync will not work in Multi mode.
1.
At 1/1 full power, the recycling time of the flash reaches 2 seconds when firing consecutively
within 30 times, 3 seconds when from 30 times to 60 times, and 4 seconds when over 60 times.
While its recycling time will revert to 2 seconds when the flash stops firing and keep in standby
mode for 6 minutes.
2.
lf the recycling time of the flash becomes slow, please keeps the flash in the standby mode for 6
minutes to prevent the flash being overheated due to consecutive firing.
Wired Sync
3.5 mm PC Sync
The XMS can be triggered via a standard 3.5 mm PC sync lead. Wired sync is always an.
Flash Modes
The XMS has two different flash modes including M,Multi. Ta select one
of the three flash modes press the MODE button an the rear panel of the
XMS.
M
Ta set up and use mode:
1.
Press the MODE button an the rear panel until M is displayed an the LCD screen.
2.
Turn the Rotary Control Dial to adjust the flash power to the desired level.
3.
Press the Rotary Control Dial to set and confirm the desired flash power.
Multi
In Multi mode the XMS can rapidly fire a predetermined number of flashes at set time
intervals. This feature can be used to capture multiple images of a single event an one
exposure.
Ta set up and use Multi mode:
1.
Press the MODE button an the rear panel until Multi is displayed an the LCD screen.
2.
Turn the Rotary Control Dial to ad just the flash power to the desired level.
3.
Press the Rotary Control Dial to set and confirm the desired flash power.
4.
Ta set the number of flashes and time interval press the Rotary Control Dial.
5.
The time interval value (Hz) will then be highlighted and can be adjusted. Press the
rotary dial to confirm desired time interval value and to select the number of flashes required.
6.
Turn the Rotary Control Dial to ad just the number of flashes required.
7.
Press the Rotary Control Dial to confirm the number of flashes.
8.
When the unit is fired it will Multi, with the set number offlashes at the set time interval.
Calculating your shutter speed when using Multi mode - When in Multi mode, your
cameras shutter will need to remain open lang enough to capture all of the flashes. The
formula below will help you calculate the required shutter speed.
Number of flashes / Flash frequency = Shutter speed
Example: number of flashes @ 20 / flash frequency @ 5 (Hz), then the shutter speed =
4 seconds.
Further information:
•
In Multi mode only 8.0 flash power or lower can be selected. Full or 9.0 power can not be
selected.
•
Ta prevent overheating and component deterioration, da not use Multi mode repetitively in
excess of 10 times. lf Multi mode is used in excess of 10 bursts the XMS may
automatically disable all flash modes to allow the components to cool down. lf all flash
modes are disabled due to excessive Multi bursts allow at least 15-20 minutes for the unit
to cool sufficiently.
13
0

14
C
0
Wireless Flash Shooting: Radio (2.4G) Transmission
XMS1000 adopts the 2.4GHz wireless frequancy.
As a slave unit, XMS 1000 can be controlled by the following master units:XMTRC/N/S
,nn
fUU%
1. Wireless Settings
Press < 9'CH
1
> Wireless Setting Button again until < 9'CH
1
> is displayed on the panel.
I
'
n
[H]
f
U
,nn
fUU%
2. Setting the Communication Channel
lf there are other wireless flash systems nearby,
The channel of the master unit and the slave unit(s) must be set to the same.
I
'
n
[H]
f
U
,nn
fUU%
Wireless Flash Shooting: Radio (2.4G) Transmission
3. Setting the Communication Group
Short press the < GR/CH > Button to choose group from A to E.
,nn
fUU%
C
0

_
16
-�
0
Flash Modes and Modeling
Maximum Flashes in Multi mode:
it�
H,
XMS1000 is equipped with a 38W LED modeling lamp which has !wo continuous lighting modes.
•
There are two modes: Percentage and PROP. Short press the Modeling Lamp Button,
•
and the !wo mode will be displayed on the LCD panel in sequence:
1.
Percentage: 10%-100%
2.
PROP: The modeling lamp's power changes with the flash's power. The bigger power the
flash has, the brighter the modeling lamp is.
•
Long press the modeling lamp for 2 seconds to adjust the percentage of modeling lamp from
10% to 100%.
•
When the over-temperature protection is started, the Modeling Lamp Symbol and Overheating
Protection signal will be flashed alternately.
Advanced Menu
(1
T
'
l
9
,
n
[HJ
c
.
u
3
9
2
0
Advanced Menu
The advanced menu allows users to custom sei functions on the
XMS: To access the advanced menu and functions:
Advanced Menu Functions:
17
1. Press and hold the MENU bullon to access the advanced menu syst!
2. Turn the rotary encoder to highlight the required function.
Modelling LED
3. Press the rotary encoder to access the required function options.
4. Turn the rotary encoder to highlight the required function option.
5. Press the rotary encoder to select the required option.
6. Press the ME
NU bullon to exit the advanced menu.

18
�
C
0
2
e
Protection and Errors
Overheat Prevention
To prevent the internal high power consumption components from overheating and
deteriorating, once the temperature reaches
over
85
°
C,
the flash will not fire until the
flash body cools down when the thermal protection signals ( ) disappears and the
indicator turn on.
Error Codes
In case of failure the following is a list of unit error codes:
E1
E3
Recycling error.
Flashtube error.
Restart the unit.
Restart the unit.
Specifications
Part Code:
Flashtube:
Modeling Lamp:
Rated Energy:
Energy Range:
Power Control:
Flash Duralion (shortest):
Guide Number.
Flash Modes:
Colour Temperature:
Recycle Time:
Flash Delay:
Flash Sync:
Photocell:
Flash Exposure
Compensation: MLT Flash:
Ready lndications:
Modeling Control:
Fan Cooled:
Display:
Sync Voltage:
Sync Input:
WIRELESS OPERATION
Wireless Control Options:
2.4 GHz Transmission Range:
Optical Transmission Range:
Remote Groups:
Remote Channels:
Operating Voltage
Operating Voltage
Fuse
Dimensions (L x W x H):
Quartz tube
38W LED
1000Ws
9-stops (full - 2.01 1000Ws-2Ws )
1 /1 0 rd-stop adjustment
1/20832sec
128 (100 ISO, with high-efficiency standard
reflector) M,Multi
5600 °K ± 100
1 sec ( to full / 1 000Ws )
0.01 - 30 sec.
High-Speed-Sync (up to 1/8,000 sec), 1st curtain
sync, 2nd curtain sync.
Yes. Sync on 1 st or 2nd fiash.
±3-stops in 1/3rd-stop increments
Max 40 fiashes (@2.0 power & 5Hz). Max 100Hz
(@40 fiashes & 2.0 power)
llluminated lest bu tton, beep
10%-100%,PROP
Yes
DOT matrix
5V
3.5 mm jack sync input
2.4 GHz receiver mode I Optical receiver mode
<80m
lndoors: 12-15m (39.4 -49.2/t)
Outdoors: 8-10 m (26.2 -32.8ft)
2.4GHz operation: 5 (A- E)
2.4GHz operation: 32 (1-32)
AC220V-240V-50Hz
5A
432x174.5x142mm
19
�
C
0
u
·
BW-6550
Errors
/