Page is loading ...

HP StorageWorks
X9000 File Serving Software File System
User Guide
Abstract
This guide describes how to configure and manage X9000 Software file systems and how to use NFS, CIFS, FTP, and HTTP
to access file system data. The guide also describes the following file system features: quotas, remote replication, snapshots,
data tiering, and file allocation. The guide is intended for system administrators managing X9300 Network Storage Gateway
systems, X9320 Network Storage Systems, and X9720 Network Storage Systems.
HP Part Number: TA768-96035
Published: April 2011
Edition: Sixth

© Copyright 2009, 2011 Hewlett-Packard Development Company, L.P.
Confidential computer software. Valid license from HP required for possession, use or copying. Consistent with FAR 12.211 and 12.212, Commercial
Computer Software, Computer Software Documentation, and Technical Data for Commercial Items are licensed to the U.S. Government under
vendor's standard commercial license.
The information contained herein is subject to change without notice. The only warranties for HP products and services are set forth in the express
warranty statements accompanying such products and services. Nothing herein should be construed as constituting an additional warranty. HP shall
not be liable for technical or editorial errors or omissions contained herein.
Acknowledgments
Microsoft, Microsoft® and Windows® are U.S. registered trademarks of Microsoft Corporation.
UNIX® is a registered trademark of The Open Group.
Revision History
DescriptionSoftware
Version
DateEdition
Initial release of HP StorageWorks X9000 File Serving Software5.3.1November 2009First
Updated license and quotas information5.3.2December 2009Second
Added information about file cloning, CIFS, directory tree quotas, the
Statistics tool, and GUI procedures
5.4.0April 2010Third
Removed information about the Statistics tool5.4.1July 2010Fourth
Added information about authentication, CIFS, FTP, HTTP, SSL certificates,
and remote replication
5.5.0December 2010Fifth
Updated CIFS, FTP, HTTP, and snapshot information5.6April 2011Sixth

Contents
1 Using X9000 Software file systems...............................................................8
File system organization and access............................................................................................8
File system building blocks.........................................................................................................9
Configuring file systems.............................................................................................................9
Accessing file systems.............................................................................................................10
2 Creating and mounting file systems.............................................................11
Creating a file system..............................................................................................................11
Using 32-bit or 64-bit mode................................................................................................11
Using the New Filesystem Wizard........................................................................................11
Creating a file system using the CLI......................................................................................14
Spillover files..........................................................................................................................15
Managing mountpoints and mount/unmount operations..............................................................15
GUI procedures.................................................................................................................15
CLI procedures..................................................................................................................16
Creating mountpoints.....................................................................................................16
Deleting mountpoints.....................................................................................................16
Viewing mountpoint information......................................................................................16
Mounting a file system ..................................................................................................16
Unmounting a file system................................................................................................16
Mounting and unmounting file systems locally on Linux/Windows X9000 clients........................17
Limiting file system access for X9000 clients...............................................................................17
Using Export Control...............................................................................................................18
3 Setting up quotas.....................................................................................19
How quotas work...................................................................................................................19
Enabling quotas on a file system...............................................................................................19
Setting user and group quotas .................................................................................................19
Setting directory tree quotas.....................................................................................................21
Using a quotas file..................................................................................................................22
Importing quotas from a file................................................................................................22
Exporting quotas to a file....................................................................................................22
Format of the quotas file.....................................................................................................22
Using online quota check........................................................................................................23
Configuring email notifications for quota events..........................................................................24
Deleting quotas......................................................................................................................24
Deleting user and group quotas...........................................................................................24
Deleting directory tree quotas or usage limits.........................................................................24
4 Maintaining file systems............................................................................25
Viewing information about file systems and components...............................................................25
Viewing physical volume information....................................................................................25
Viewing volume group information.......................................................................................25
Viewing logical volume information......................................................................................26
Viewing file system information............................................................................................26
Lost+found directory......................................................................................................28
Viewing disk space information from a Linux X9000 client.......................................................29
Extending a file system............................................................................................................29
Rebalancing segments in a file system.......................................................................................30
Contents 3

How rebalancing works......................................................................................................30
Rebalancing segments on the management console GUI.........................................................30
Rebalancing segments from the CLI......................................................................................31
Tracking the progress of a rebalance task.............................................................................32
Viewing the status of rebalance tasks....................................................................................32
Stopping rebalance tasks....................................................................................................32
Disabling 32-bit mode on a file system......................................................................................32
Deleting file systems and file system components.........................................................................33
Deleting a file system..........................................................................................................33
Deleting segments, volume groups, and physical volumes........................................................33
Deleting file serving nodes and X9000 clients.......................................................................34
Checking and repairing file systems..........................................................................................34
Analyzing the integrity of a file system on all segments...........................................................34
Clearing the INFSCK flag on a file system.............................................................................35
Troubleshooting file systems......................................................................................................35
ibrix_pv -a discovers too many or too few devices..................................................................35
Cannot mount on an X9000 client.......................................................................................35
NFS clients cannot access an exported file system..................................................................35
User quota usage data is not being updated.........................................................................35
SegmentNotAvailable is reported.........................................................................................35
SegmentRejected is reported...............................................................................................36
5 Using NFS...............................................................................................38
Exporting a file system............................................................................................................38
Unexporting a file system....................................................................................................39
Autoconnecting NFS clients......................................................................................................40
Adding mount points to the autoconnect table.......................................................................40
Deleting mount points from the autoconnect table...................................................................40
Setting up NFS clients.............................................................................................................40
6 Configuring authentication for CIFS, FTP, and HTTP.......................................42
Selecting an authentication method...........................................................................................42
X9000 management console requirement for Local Users authentication........................................44
Configuring local groups and local users...................................................................................45
Configuring local group accounts.........................................................................................45
Configuring local users.......................................................................................................47
7 Using CIFS..............................................................................................49
Configuring file serving nodes for CIFS......................................................................................49
Starting or stopping the CIFS service and viewing CIFS statistics....................................................49
CIFS shares............................................................................................................................50
Managing CIFS shares with the X9000 management console GUI or CLI..................................50
Configuring SMB signing...............................................................................................51
Adding a CIFS share ....................................................................................................52
Modifying a CIFS share.................................................................................................54
Deleting a CIFS share....................................................................................................54
Managing CIFS shares with Microsoft Management Console...................................................54
Connecting to cluster nodes............................................................................................54
Saving MMC settings.....................................................................................................56
Granting share management privileges............................................................................56
Adding CIFS shares.......................................................................................................57
Deleting CIFS shares......................................................................................................59
Linux static user mapping with Active Directory...........................................................................59
4 Contents

Configuring Active Directory................................................................................................59
Assigning attributes............................................................................................................61
Consolidating SMB servers with common share names................................................................62
CIFS clients............................................................................................................................63
Differences in locking behavior............................................................................................64
Permissions in a cross-protocol CIFS environment.........................................................................64
How the CIFS server handles UIDs and GIDs.........................................................................64
Permissions, UIDs/GIDs, and ACLs.......................................................................................64
Pre-existing directories and files.......................................................................................65
New directories and files...............................................................................................65
Changing the way CIFS inherits permissions on files accessed from Linux applications................66
X9000 Windows Clients and Windows ACLs........................................................................66
Troubleshooting CIFS...............................................................................................................66
8 Using FTP................................................................................................68
Best practices for configuring FTP..............................................................................................68
Managing configuration profiles...............................................................................................69
Adding a configuration profile.............................................................................................69
Modifying a configuration profile.........................................................................................70
Viewing configuration profiles..............................................................................................70
Deleting a configuration profile............................................................................................70
Managing FTP shares..............................................................................................................70
Adding an FTP share..........................................................................................................70
Modifying an FTP share......................................................................................................72
Viewing FTP shares............................................................................................................72
Deleting an FTP share.........................................................................................................72
The vsftpd service...................................................................................................................72
Starting or stopping the FTP service manually.............................................................................73
Accessing shares....................................................................................................................73
9 Using HTTP..............................................................................................75
Best practices for configuring HTTP...........................................................................................75
Configuring HTTP with the HTTP Wizard....................................................................................76
Managing configuration profiles...............................................................................................78
Adding a configuration profile from the CLI...........................................................................78
Modifying a configuration profile.........................................................................................78
Viewing configuration profiles..............................................................................................78
Deleting a configuration profile............................................................................................78
Managing virtual hosts............................................................................................................78
Adding a virtual host..........................................................................................................78
Modifying a virtual host......................................................................................................79
Viewing a virtual host.........................................................................................................79
Deleting a virtual host.........................................................................................................79
Managing HTTP shares...........................................................................................................79
Adding an HTTP share.......................................................................................................80
Modifying an HTTP share....................................................................................................80
Viewing HTTP shares..........................................................................................................80
Deleting an HTTP share......................................................................................................80
Starting or stopping the HTTP service manually...........................................................................80
Accessing shares....................................................................................................................81
10 Managing SSL certificates........................................................................83
Creating an SSL certificate.......................................................................................................83
Contents 5

Adding a certificate to the cluster..............................................................................................85
Exporting a certificate.............................................................................................................86
Deleting a certificate...............................................................................................................86
11 Using remote replication..........................................................................87
Overview..............................................................................................................................87
Continuous or run-once replication modes.............................................................................87
Remote cluster or intracluster................................................................................................88
Many-to-many or many-to-one replications.............................................................................88
Configuring the target for remote replication..............................................................................89
GUI procedure..................................................................................................................89
CLI procedure....................................................................................................................90
Registering source and target clusters...............................................................................90
Exporting the target file system........................................................................................90
Identifying host and NIC preferences on the target cluster...................................................91
Configuring and managing replication tasks on the GUI..............................................................91
Configuring and managing replication tasks from the CLI.............................................................93
Starting a remote replication task to a remote cluster..............................................................93
Starting an intra-cluster remote replication task.......................................................................93
Starting a run-once directory replication task.........................................................................93
Stopping a remote replication task.......................................................................................93
Pausing a remote replication task.........................................................................................93
Resuming a remote replication task......................................................................................93
Querying remote replication tasks........................................................................................94
Viewing replication status and activity...................................................................................94
Configuring remote failover/failback.........................................................................................94
Troubleshooting remote replication............................................................................................94
12 Creating snapshots.................................................................................96
Setting up snapshots...............................................................................................................96
Preparing the snapshot partition..........................................................................................96
Registering for snapshots....................................................................................................97
Discovering LUNs in the array..............................................................................................97
Reviewing snapshot storage allocation..................................................................................97
Automated snapshots..............................................................................................................97
Creating automated snapshots using the GUI........................................................................98
Creating automated snapshots from the CLI.........................................................................101
Creating a snapshot scheme.........................................................................................101
Scheduling and starting automated snapshots.................................................................102
Other automated snapshot procedures................................................................................102
Modifying an automated snapshot scheme.....................................................................103
Viewing automated snapshot schemes............................................................................103
Deleting an automated snapshot scheme........................................................................103
Managing snapshots............................................................................................................103
Creating a snapshot.........................................................................................................103
Mounting a snapshot........................................................................................................103
Recovering system resources on snapshot failure...................................................................103
Deleting snapshots...........................................................................................................103
Viewing snapshot information............................................................................................104
Listing snapshot information for all hosts.........................................................................104
Listing detailed information about snapshots...................................................................104
Accessing snapshot file systems..............................................................................................105
Troubleshooting snapshots.....................................................................................................107
6 Contents

13 Using data tiering.................................................................................108
Overview............................................................................................................................108
Moving files between tiers.................................................................................................108
Writing a rule to implement a policy...................................................................................108
Tiered file systems.................................................................................................................109
Creating a file system that uses data tiering.........................................................................109
Expanding a file system....................................................................................................110
Allocation policy..............................................................................................................110
Managing a tiered file system and tiering policy.......................................................................111
Assigning segments to tiers...............................................................................................111
Removing tier assignments................................................................................................111
Deleting a tier.................................................................................................................111
Listing tier information.......................................................................................................111
Listing tiering policy information.........................................................................................111
Deleting a tiering policy rule.............................................................................................112
Starting and stopping a tiering operation............................................................................112
Reviewing tiering job status...............................................................................................112
Writing tiering rules..............................................................................................................112
Operators and date/time qualifiers....................................................................................112
Rule keywords.................................................................................................................113
Migration rule examples...................................................................................................114
Ambiguous rules..............................................................................................................114
14 Using file allocation..............................................................................116
Overview............................................................................................................................116
File allocation policies......................................................................................................116
How file allocation settings are evaluated...........................................................................117
Using hostgroups for file allocation settings.........................................................................117
When file allocation settings take effect on X9000 clients......................................................117
Guidelines for using file allocation CLI commands................................................................117
Setting file and directory allocation policies.............................................................................117
Setting a file allocation policy............................................................................................118
Setting a directory allocation policy...................................................................................118
Setting segment preferences...................................................................................................118
Creating a pool of preferred segments................................................................................118
Restoring the default segment preference.............................................................................119
Tuning allocation policy settings.............................................................................................119
Listing allocation policies.......................................................................................................119
15 Support and other resources...................................................................120
Contacting HP......................................................................................................................120
Related information...............................................................................................................120
HP websites.........................................................................................................................120
Subscription service..............................................................................................................120
Glossary..................................................................................................121
Index.......................................................................................................123
Contents 7

1 Using X9000 Software file systems
File system organization and access
The following diagram shows how data is organized on a file system and how it is accessed.
The diagram includes the following items:
1. The file system is a collection of segments (logical volumes) that organize data for faster access.
Each segment is a repository for files and directories with no implicit namespace relationships
among them. (A segment need not be a complete, rooted directory tree.) Segments can be of
any size, and different segments can be of different sizes. A file can span several segments
and multiple segments can be accessed in parallel within the same namespace.
2. The location of files and directories within segments is independent of their physical locations.
A directory can be located on one segment, while the files in that directory are spread over
other segments. Segments for new files and directories are selected dynamically according
to an allocation policy. This policy is set by the system administrator based on anticipated
access patterns and criteria such as performance and manageability.
3. File serving nodes, or servers, manage the individual segments of the file system. Each segment
is assigned to one server, and each server can “own” multiple segments, as shown by the
colors in the diagram. Segment ownership can be migrated from one server to another while
the file system is in use. When servers are added to the cluster, the ownership of existing
segments is distributed for proper load balancing and utilization by all servers. When storage
is added, ownership of the new segments is distributed among existing servers.
4. Clients run the applications that use the file system. Clients can access the file system either
as a locally mounted cluster file system using the X9000 client driver, or by using standard
NAS protocols such as NFS, CIFS, HTTP, and FTP. Based on the file or directory being
accessed, X9000 client requests are routed directly to the correct node. A client using NAS
8 Using X9000 Software file systems

protocols must mount the file system from a file serving node. All requests are sent to the
mounting server, which performs the required routing.
5. A client request can be made for a file on a segment that is either owned by the server, owned
by another server but accessible by this server over the SAN, or owned by another server and
not accessible by this server over the SAN. In the second scenario, the server obtains the
relevant metadata from the owning server and performs the I/O directly over the SAN. In the
third scenario, the I/O is performed through the owning server over the IP network.
File system building blocks
A file system is created from building blocks. The first block comprises the underlying physical
volumes, which are combined in volume groups. Segments (logical volumes) are created from the
volume groups. The built-in volume manager handles all space allocation considerations involved
in file system creation.
Configuring file systems
You can configure your file systems to use the following features:
• Quotas. This feature allows you to assign quotas to individual users or groups, or to a directory
tree. Individual quotas limit the amount of storage or the number of files that a user or group
can use in a file system. Directory tree quotas limit the amount of storage and the number of
files that can be created on a file system located at a specific directory tree. See “Setting up
quotas” (page 19).
• Remote replication. This feature provides a transparent method to replicate changes in a source
file system on one cluster to a target file system on either the same cluster or a second cluster.
See “Using remote replication” (page 87).
• Snapshots. This feature allows you to capture a point-in-time copy of a file system for online
backup purposes and to simplify recovery of files from accidental deletion. The snapshot
replicates all file system entities at the time of capture and is managed exactly like any other
file system. See “Creating snapshots” (page 96).
• Data tiering. This feature allows you to set a preferred tier where newly created files will be
stored. You can then create a tiering policy to move files from initial storage, based on file
File system building blocks 9

attributes such as such as modification time, access time, file size, or file type. See “Using
data tiering” (page 108).
• File allocation. This feature allocates new files and directories to segments according to the
allocation policy and segment preferences that are in effect for a client. An allocation policy
is an algorithm that determines the segments that are selected when clients write to a file
system. See “Using file allocation” (page 116).
Accessing file systems
Clients can use the following standard NAS protocols to access file system data:
• NFS. See “Using NFS” (page 38) or more information.
• CIFS. See “Using CIFS” (page 49) for more information.
• FTP. See “Using FTP” (page 68) for more information.
• HTTP. See “Using HTTP” (page 75) for more information.
You can also use X9000 clients to access file systems. Typically, these clients are installed during
the initial system setup. See the HP StorageWorks X9000 File Serving Software Installation Guide
for more information.
10 Using X9000 Software file systems
2 Creating and mounting file systems
This chapter describes how to create file systems and mount or unmount them.
Creating a file system
You can create a file system using the New Filesystem Wizard provided with the management
console GUI, or you can use CLI commands. The New Filesystem Wizard also allows you to create
an NFS export or a CIFS share for the file system.
Using 32-bit or 64-bit mode
A file system can be created to use either 32-bit or 64-bit mode. In 32-bit mode, clients can run
both 32-bit and 64-bit applications. In 64-bit mode, clients can run only 64-bit applications. If all
file system clients (NFS, CIFS, and X9000 clients) will run only 64-bit applications, HP recommends
that you enable 64-bit mode because more inodes will be available per segment for the applications.
File systems created with 32-bit mode compatibility can be converted later to allow clients to run
64-bit applications (see “Disabling 32-bit mode on a file system” (page 32)). This is a one-time-only
operation and cannot be reversed. If clients may need to run a 32-bit application, do not disable
32-bit mode.
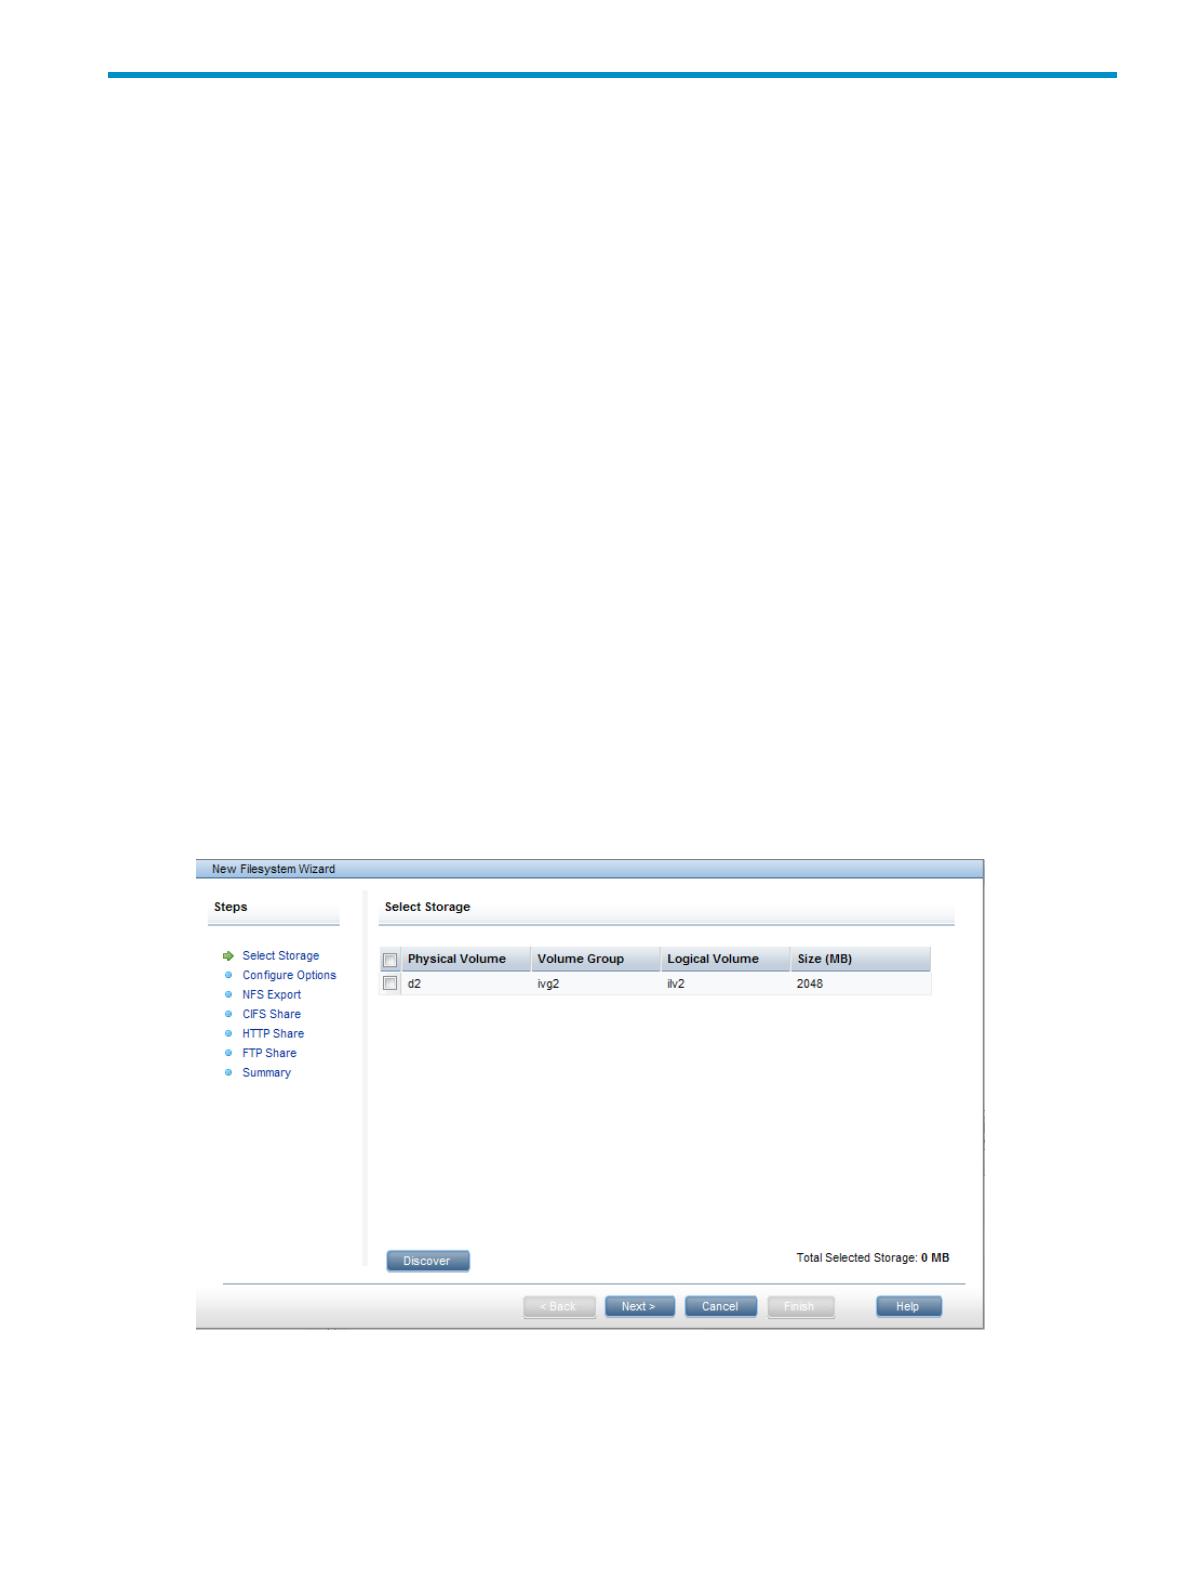
Using the New Filesystem Wizard
To start the wizard, click New on the Filesystems page. The wizard includes six steps and a
summary, starting with selecting the storage for the file system. For details about completing each
step, see the GUI online help.
On the Select Storage dialog box, select the storage that will be used for the file system. The total
size of the storage is displayed at the bottom of the screen. If your cluster includes storage that has
not yet been discovered by the X9000 software, click Discover.
On the Configure Options dialog box, supply a name for the file system, and specify the appropriate
configuration options.
Creating a file system 11

If the file system will be exported through NFS, configure an NFS export record on the NFS Export
dialog box.
If the file system will be made available to Windows clients through a CIFS share, create a share
on the CIFS Share dialog box. For more information, see “Using CIFS” (page 49).
12 Creating and mounting file systems

If clients will access the file system using HTTP or HTTPS, create an HTTP share on the HTTP Export
dialog box. An HTTP configuration profile and an HTTP Vhost must already exist. If the Directory
Path includes a subdirectory, be sure to create the subdirectory on the file system and assign
read/write/execute permissions to it. (X9000 Software does not create the subdirectory if it does
not exist, and instead adds a /pub/ directory to the share path.) For more information, see “Using
HTTP” (page 75).
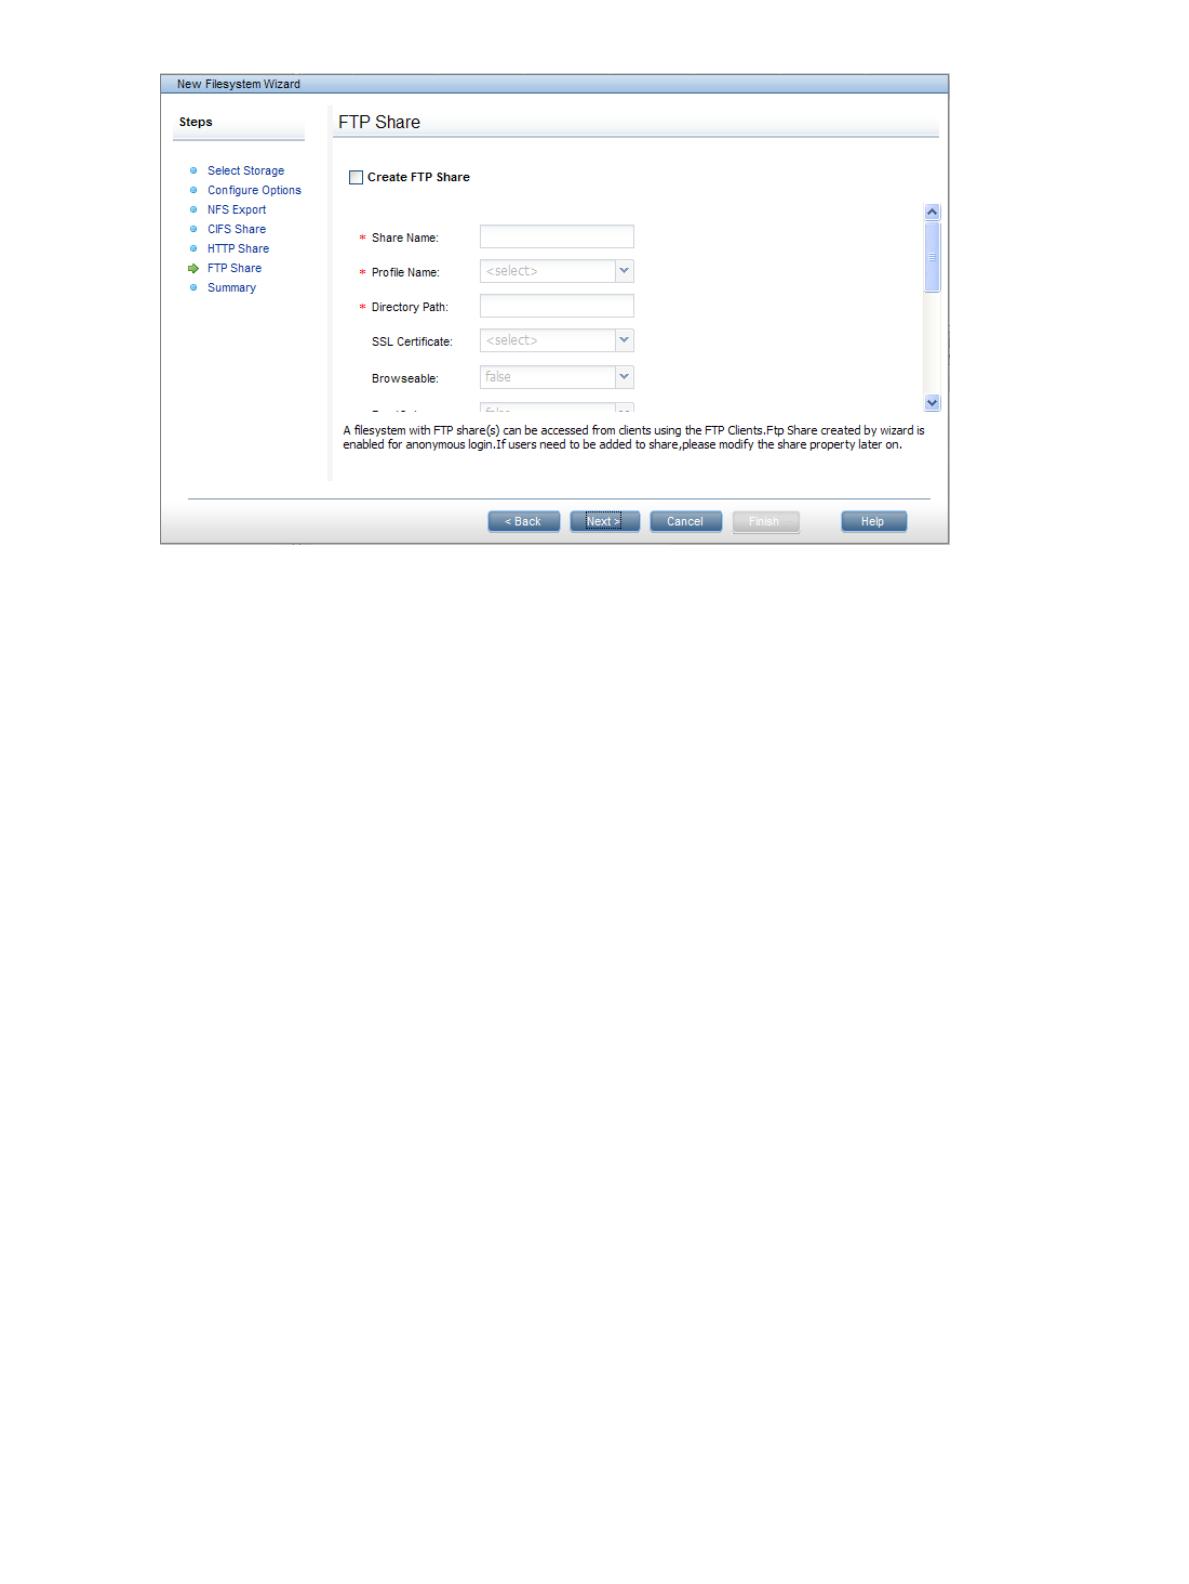
If clients will access the share using FTP or FTPS, create an FTP share on the FTP Share dialog box.
An FTP configuration profile and an SSL certificate, if used, must already exist. If the Directory Path
includes a subdirectory, be sure to create the subdirectory on the file system and assign
read/write/execute permissions to it. (X9000 Software does not create the subdirectory if it does
not exist, and instead adds a /pub/ directory to the share path.) For more information, see “Using
FTP” (page 68).
Creating a file system 13
Review the Summary to ensure that the file system is configured properly. If necessary, you can
return to a dialog box and make any corrections.
Creating a file system using the CLI
The ibrix_fs command is used to create a file system. It can be used in the following ways:
• Create a file system with the specified segments (segments are logical volumes):
ibrix_fs -c -f FSNAME -s LVLIST [-t TIERNAME] [-a] [-q] [-o
OPTION1=VALUE1,OPTION2=VALUE2,...] [-t TIERNAME] [-F
FMIN:FMAX:FTOTAL] [-D DMIN:DMAX:DTOTAL]
• Create a file system and assign specify segments to specific file serving nodes:
ibrix_fs -c -f FSNAME -S LV1:HOSTNAME1,LV2:HOSTNAME2,... [-a] [-q]
[-o OPTION1=VALUE1,OPTION2=VALUE2,...] [-t TIERNAME] [-F
FMIN:FMAX:FTOTAL] [-D DMIN:DMAX:DTOTAL]
• Create a file system from physical volumes in a single step:
ibrix_fs -c -f FSNAME -p PVLIST [-a] [-q] [-o
OPTION1=VALUE1,OPTION2=VALUE2,...] [-t TIERNAME] [-F
FMIN:FMAX:FTOTAL] [-D DMIN:DMAX:DTOTAL]
Creating a file system manually from physical volumes
This procedure is equivalent to using ibrix_fs to create a file system from physical volumes in
a single step. Instead of a single command, you build the file system components individually:
1. Discover the physical volumes in the system. Use the ibrix_pv command.
2. Create volume groups from the discovered physical volumes. Use the ibrix_vg command.
3. Create logical volumes (also called segments) from volume groups. Use the ibrix_lv
command.
4. Create the file system from the new logical volumes. Use the ibrix_fs command.
See the HP StorageWorks X9000 File Serving Software CLI Reference Guide for details about
these commands.
14 Creating and mounting file systems

Spillover files
The X9000 Software file system supports spilling over sequentially written files from one segment
to another.
Managing mountpoints and mount/unmount operations
GUI procedures
When you use the New Filesystem Wizard to create a file system, you can specify a name for the
mountpoint and indicate whether the file system should be mounted after it is created. The wizard
will create the mountpoint if necessary. Click Mount or Unmount as necessary to mount or unmount
the file system.
To view the mountpoint information for a file system, select the file system on the GUI Filesystems
page, and click Mountpoints in the lower Navigator. The Mountpoints section shows the hosts that
have mounted the file system, the name of the mountpoint, the access (RW or RO) allowed to the
host, and whether the file system is mounted.
You can also view mountpoint information for a particular server. Select that server on the Servers
page, and then select Mountpoints from the lower Navigator. To delete a mountpoint, select that
mountpoint and click Delete.
Spillover files 15

CLI procedures
The CLI commands are executed immediately on file serving nodes. For X9000 clients, the command
intention is stored in the management console. When X9000 Software services start on a client,
the client queries the management console for any commands. If the services are already running,
you can force the client to query the management console by executing either ibrix_client or
ibrix_lwmount -a on the client, or by rebooting the client.
If you have configured hostgroups for your X9000 clients, you can apply a command to a specific
hostgroup. For information about creating hostgroups, see the administration guide for your system.
Creating mountpoints
Mountpoints must exist before a file system can be mounted. To create a mountpoint on file serving
nodes and X9000 clients, use the following command.
<installdirectory>/bin/ibrix_mountpoint -c [-h HOSTLIST] -m MOUNTPOINT
To create a mountpoint on a hostgroup , use the following command:
<installdirectory>/bin/ibrix_mountpoint -c -g GROUPLIST -m MOUNTPOINT
Deleting mountpoints
Before deleting mountpoints, verify that no file systems are mounted on them. To delete a mountpoint
from file serving nodes and X9000 clients, use the following command:
<installdirectory>/bin/ibrix_mountpoint -d [-h HOSTLIST] -m MOUNTPOINT
To delete a mountpoint from specific hostgroups, use the following command:
<installdirectory>/bin/ibrix_mountpoint -d -g GROUPLIST -m MOUNTPOINT
Viewing mountpoint information
To view mounted file systems and their mountpoints on all nodes, use the following command:
<installdirectory>/bin/ibrix_mountpoint -l
Mounting a file system
File system mounts are managed with the ibrix_mount command. The command options and
the default file system access allowed for X9000 clients depend on whether the optional Export
Control feature has been enabled on the file system (see “Using Export Control” (page 18) for
more information). This section assumes that Export Control is not enabled, which is the default.
NOTE: A file system must be mounted on the file serving node that owns the root segment (that
is, segment 1) before it can be mounted on any other host. X9000 Software automatically mounts
a file system on the root segment when you mount it on all file serving nodes in the cluster. The
mountpoints must already exist.
Mount a file system on file serving nodes and X9000 clients:
<installdirectory>/bin/ibrix_mount -f FSNAME [-o {RW|RO}] [-O MOUNTOPTIONS] -h HOSTLIST
-m MOUNTPOINT
Mount a file system on a hostgroup:
<installdirectory>/bin/ibrix_mount -f FSNAME [-o {RW|RO}] -g GROUP -m MOUNTPOINT
Unmounting a file system
Use the following commands to unmount a file system.
NOTE: Be sure to unmount the root segment last. Attempting to unmount it while other segments
are still mounted will result in failure. If the file system was exported using NFS, you must unexport
it before you can unmount it (see “Exporting a file system” (page 38)).
To unmount a file system from one or more file serving nodes, X9000 clients, or hostgroups:
16 Creating and mounting file systems

<installdirectory>/bin/ibrix_umount -f FSNAME [-h HOSTLIST | -g GROUPLIST]
To unmount a file system from a specific mountpoint on a file serving node, X9000 client, or
hostgroup:
<installdirectory>/bin/ibrix_umount -m MOUNTPOINT [-h HOSTLIST | -g GROUPLIST]
Mounting and unmounting file systems locally on Linux/Windows X9000 clients
On both Linux and Windows X9000 clients, you can locally override a mount done on the
management console. For example, if the configuration database on the management console has
a file system marked as mounted for a particular client, that client can locally unmount the file
system, thus overriding the management console.
Linux X9000 clients
To mount a file system locally, use the following command on the Linux X9000 client. A management
console name (fmname) is required only if this X9000 client is registered with multiple management
consoles.
ibrix_lwmount -f [fmname:]fsname -m mountpoint [-o options]
To unmount a file system locally, use one of the following commands on the Linux X9000 client.
The first command detaches the specified file system from the client. The second command detaches
the file system that is mounted on the specified mountpoint.
<installdirectory>/bin/ibrix_lwumount -f [fmname:]FSNAME
<installdirectory>/bin/ibrix_lwumount -m MOUNTPOINT
Windows X9000 clients
Use the Windows X9000 client GUI to mount file systems locally. Click the Mount tab on the GUI
and select the cluster name from the list (the cluster name is the management console name). Then,
enter the name of the file system, select a drive, and click Mount.
If you are using Remote Desktop to access the client and the drive letter is not displayed, log out
and log back in. This is a known limitation of Windows Terminal Services when exposing new
drives.
To unmount a file system on the Windows X9000 client GUI, click the Umount tab, select the file
system, and then click Umount.
Limiting file system access for X9000 clients
By default, all X9000 clients can mount a file system after a mountpoint has been created. To limit
access to specific X9000 clients, create an access entry. When an access entry is in place for a
file system (or a subdirectory of the file system), it enters secure mode, and mount access is restricted
to clients specified in the access entry. All other clients are denied mount access.
Select the file system on the Filesystems page, and then select Client Exports in the lower navigator.
On the Create Client Export(s) dialog box, select the clients or hostgroups that will be allowed
access to the file system or a subdirectory of the file system.
Limiting file system access for X9000 clients 17

To remove a client access entry, select the affected file system on the GUI, and then select Client
Exports from the lower Navigator. Select the access entry from the Client Exports display, and click
Delete.
On the CLI, use the ibrix_exportfs command to create an access entry:
<installdirectory>/bin/ibrix_exportfs –c –f FSNAME –p CLIENT:/PATHNAME,CLIENT2:/PATHNAME,...
To see all access entries that have been created, use the following command:
<installdirectory>/bin/ibrix_exportfs –c –l
To remove an access entry, use the following command:
<installdirectory>/bin/ibrix_exportfs –c —U –f FSNAME –p CLIENT:/PATHNAME,
CLIENT2:/PATHNAME,...
Using Export Control
When Export Control is enabled on a file system, by default, X9000 clients have no access to the
file system. Instead, the system administrator grants the clients access by executing the
ibrix_mount command on the management console.
Enabling Export Control does not affect access from a file serving node to a file system (and thereby,
NFS/CIFS client access). File serving nodes always have RW access.
To determine whether Export Control is enabled, run ibrix_fs -i or ibrix_fs -l. The output
indicates whether Export Control is enabled.
To enable Export Control, include the -C option in the ibrix_fs command:
<installdirectory>/bin/ibrix_fs -C -E -f FSNAME
To disable Export Control, execute the ibrix_fs command with the -C and -D options:
<installdirectory>/bin/ibrix_fs -C -D -f FSNAME
To mount a file system that has Export Control enabled, include the ibrix_mount -o {RW|RO}
option to specify that all clients have either RO or RW access to the file system. The default is RO.
In addition, when specifying a hostgroup, the root user can be limited to RO access by adding
the root_ro parameter.
18 Creating and mounting file systems

3 Setting up quotas
Quotas can be assigned to individual users or groups, or to a directory tree. Individual quotas
limit the amount of storage or the number of files that a user or group can use in a file system.
Directory tree quotas limit the amount of storage and the number of files that can be created on a
file system located at a specific directory tree.
Although it is best to set up quotas when you create a file system, you can configure them at any
time. You can assign quotas to a user, group, or directory on the management console or from
the CLI. You can also import quota information from a file.
If a user has a user quota and a group quota for the same file system, the first quota reached takes
precedence.
The existing quota configuration can be exported to a file at any time.
NOTE: HP recommends that you export the quota configuration and save the resulting file
whenever you update quotas on your cluster.
How quotas work
A quota is delimited by hard and soft storage limits for both the megabytes of storage and the
number of files allotted to a user, group, or directory tree. The hard limit specifies the maximum
allotted storage in terms of file size and number of files. The soft limit specifies the number of
megabytes or files that, when reached, causes the file serving node to start a countdown timer.
The timer runs until either the hard storage limit is reached or seven days elapse. When the timer
stops, the user, group, or directory tree for which the quota was set cannot store any more data,
and the system issues Disk quota exceeded messages at each write attempt.
NOTE: Quota statistics are updated on a regular basis (at one-minute intervals). At each update,
the file and storage usage for each quota-enabled user, group, or directory tree is queried, and
the result is distributed to all file serving nodes. Users or groups can temporarily exceed their quota
if the allocation policy in effect for a file system causes their data to be written to different file
serving nodes during the statistics update interval. In this situation, it is possible for the storage
usage visible to each file serving node to be below or at the quota limit while the aggregate storage
use exceeds the limit.
There is a delay of several minutes between the time a command to update quotas is executed
and when the results are displayed by the ibrix_edquota -l command. This is normal behavior.
Enabling quotas on a file system
Before you can set quota limits, quotas must be enabled. If you did not enable quotas when you
created the file system, unmount the file system and then take one of these actions:
• On the management console, select the file system and then select Quotas from the lower
Navigator. On the Quota Summary page, click Enable.
• From the CLI, run the following command:
<installdirectory>/bin/ibrix_fs -q -E -f FSNAME
Setting user and group quotas
Before configuring quotas, the quota feature must be enabled on the file system and the file system
must be mounted.
How quotas work 19

NOTE: For the purpose of setting quotas, no UID or GID can exceed 2,147,483,647.
Setting user quotas to zero removes the quotas.
NOTE: When a new NIS user is added, you need to restart the Fusionmanager services before
assigning quotas to the user:
/etc/init.d/ibrix_fusionmanager restart
GUI procedure
To configure a user quota, select the file system where the quotas will be configured. Next, select
Quotas > User Quotas from the lower Navigator, and then, on the User Quota Usage Limits page,
click Set. User quotas can be specified by either the user name or ID. Specifying quota limits is
optional.
To configure a group quota, select the file system where the quotas will be configured. Next, select
Quotas > Group Quotas from the lower Navigator, and then, on the Group Quota Usage Limits
page, click Set. Group quotas can be identified by either the group name or GID. Specifying quota
limits is optional.
To change user or group quotas, select the appropriate user or group on the Quota Usage Limits
page, and then click Modify.
CLI procedure
Use the following commands to set quotas for users and groups:
• Set a quota for a single user:
20 Setting up quotas
/