HP 280 G2 Small Form Factor PC Operating instructions

Category
Computer cases
Type
Operating instructions

HP 280 G2 Small Form Factor PC: Your compact powerhouse for seamless multitasking, reliable data processing, and everyday computing needs. With its efficient design, powerful hardware, and versatile features, this PC is the ideal choice for small businesses, offices, and home users seeking a dependable and capable desktop solution.

HP 280 G2 Small Form Factor PC: Your compact powerhouse for seamless multitasking, reliable data processing, and everyday computing needs. With its efficient design, powerful hardware, and versatile features, this PC is the ideal choice for small businesses, offices, and home users seeking a dependable and capable desktop solution.

900897-121 1
Optical Drive Replacement Instructions
Before you be
g
in
Observe the following requirements before removing and
replacing the optical drive.
WARNING: Never open the cover while the power cord
is attached. You might damage your computer or be
injured by the spinning fan blades.
WARNING: Avoid touching sharp edges inside the
computer.
CAUTION: Static electricity can damage the electronic
components inside the computer. Discharge static
electricity by touching the metal cage of the computer
before touching any internal parts or electronic
components.
Tools needed
Phillips #2 screwdriver
Removing the optical drive
1. Disconnect the power cord and all attached cables from
the back of the computer.
2. To remove the access panel, loosen the captive Phillips
screw (1), lift the rear of the access panel upward (2),
and then slide the access panel off the computer (3).
3. Locate the optical under the hard drive:
1. Hard drive
2. Optical drive
3. Memory modules
4. Remove the fan duct to access the cables connected to
the rear of the optical drive. Pull the tabs away from
each other (1), and then lift the duct off the fan sink (2).
*900897-121*
900897
-121
900897-121 2
5. To remove the optical drive, disconnect the power and
data cables from the rear of the drive (1), and then
press the green lever to disengage the drive from the
drive bay (2).
6. Slide the optical drive out of the front of the computer.
7. Touch the replacement optical drive bag to the metal of
the computer, and then remove the replacement optical
drive from the bag.
Replacing the optical drive
1. To replace the optical drive, insert the drive into drive
bay in the front of the computer until it locks into place.
2. Connect the power and data cable to the back
of the optical drive.
900897-121 3
3. To replace the fan duct, align the duct with the fan sink,
and then push the duct down onto the fan sink until it
locks into place.
CAUTION: Be careful not to damage the optical drive
connectors.
4. To replace the access panel, position the access panel
on the computer and slide the panel downward onto
the computer (1). Slide the access panel toward the
front of the computer until seated (2), and then tighten
the captive screw (3).
5. Plug the power cord and any additional cables into
the back of the computer.
6. Press the power button to turn on the computer.
900897-121 4
Instructions pour le remplacement du
lecteur optique
Avant de commence
r
Respectez les exigences suivantes avant de retirer et de
remplacer le lecteur optique.
AVERTISSEMENT : N'ouvrez jamais le capot lorsque le
cordon d'alimentation est branché. Vous pourriez
endommager votre ordinateur ou être blessé par les pales
du ventilateur en rotation.
AVERTISSEMENT : Évitez de toucher les bords tranchants
à l'intérieur du châssis.
ATTENTION : L'électricité statique peut endomma
g
er les
composants électroniques à l'intérieur de l'ordinateur.
Déchargez l'électricité statique en touchant la cage
métallique de l'ordinateur avant de toucher tout
composant interne ou tout composant électronique.
Outils nécessaires
Tournevis cruciforme nº 2
Retrait du lecteur o
p
ti
q
ue
1. Débranchez le cordon d'alimentation et tous les autres
câbles à l'arrière de l'ordinateur.
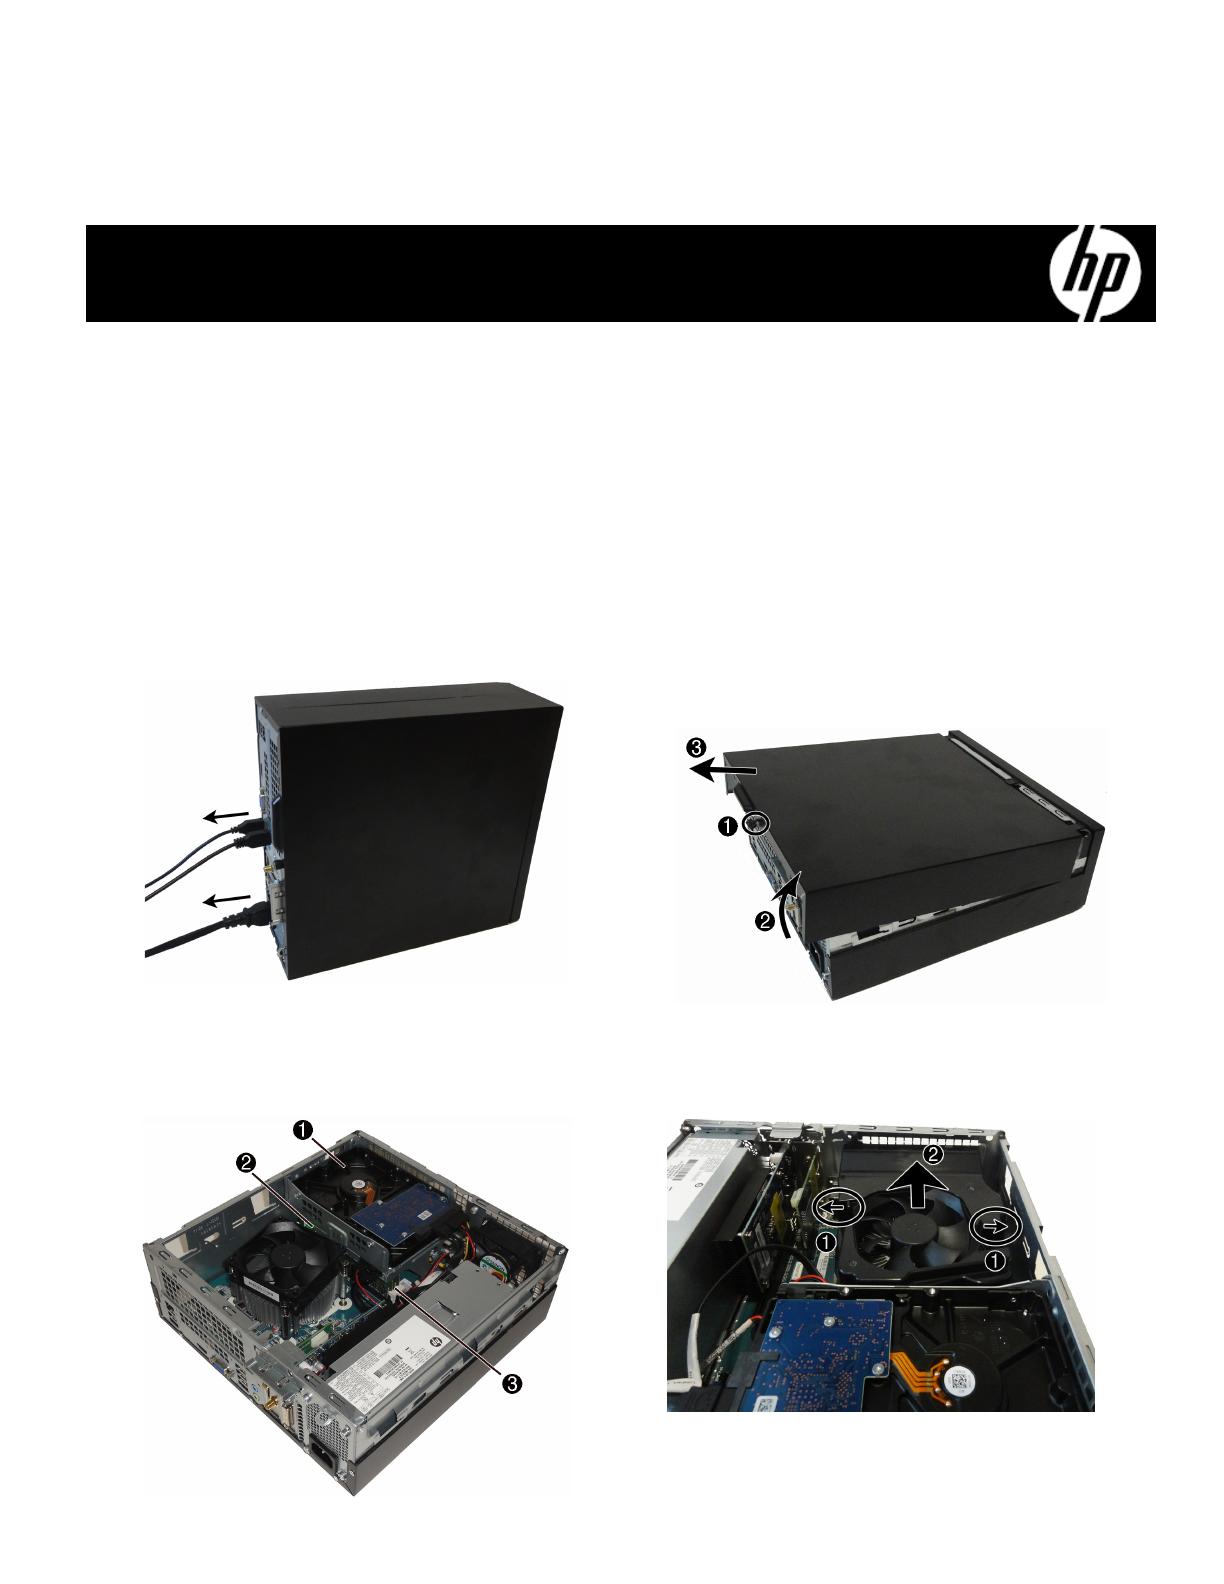
2. Pour ôter le panneau d'accès, dévissez la vis
imperdable (1), puis soulevez l'arrière du panneau
d'accès vers le haut (2), et faites-le glisser vers l'arrière
pour le dégager de l'ordinateur (3).
3. Repérez l'unité optique sous le disque dur :
1. Disque dur
2. Lecteur optique
3. Modules mémoire
4. Retirez le conduit du ventilateur afin d'accéder aux
câbles connectés à l'arrière de l'unité optique. Poussez
les taquets vers l'extérieur (1), puis extrayez le conduit
du système de refroidissement (2).
900897-121 5
5. Pour ôter l'unité optique, débranchez les câbles
d'alimentation et de données à l'arrière de l'unité (1),
puis appuyez sur le levier vert pour dégager l'unité du
compartiment d'unité (2).
6. Faites glisser le disque optique pour l'extraire par
l’avant de l’ordinateur.
7. Mettez en contact le paquet du lecteur optique de
remplacement avec la partie métallique de l'ordinateur,
puis retirez-en le lecteur optique de remplacement.
Réinstallation du lecteur optique
1. Pour remettre l'unité optique, insérez cette dernière
dans le compartiment d'unité à l'avant de l'ordinateur
jusqu'à ce qu'elle s'enclenche.
2. Connectez les câbles d'alimentation et de données
à l'arrière du lecteur optique.
900897-121 6
3. Pour remettre le conduit du ventilateur, alignez le
conduit avec le système de refroidissement, puis insérez
le conduit dans le système de refroidissement jusqu'à ce
qu'il s'enclenche.
ATTENTION : Veillez à ne pas endommager les
connecteurs de l'unité optique.
4. Pour remettre le panneau d'accès, placez ce dernier
sur l'ordinateur et faites glisser le panneau vers le
bas (1). Faites glisser le panneau d'accès vers l'avant
de l'ordinateur jusqu'à ce qu'il se mette en place (2),
puis serrez la vis imperdable (3).
5. Branchez le cordon d'alimentation et tous les autres
câbles à l'arrière de l'ordinateur.
6. Appuyez sur l'interrupteur d'alimentation pour
allumer l'ordinateur.
© Copyright 2016 HP Development Company, L.P.
The information contained herein is subject to change without notice. The only warranties for
HP products and services are set forth in the express warranty statements accompanying such
products and services. Nothing herein should be construed as constituting an additional warranty.
HP shall not be liable for technical or editorial errors or omissions contained herein.
First Edition: August 2016
PRINTER: Replace this box with Printed- In (PI)
Statement(s) as per spec.
NOTE: This box is simply a placeholder. PI
Statement(s) do not have to fit inside the box
but should be placed in this area.
1 / 1

HP 280 G2 Small Form Factor PC Operating instructions

Category
Computer cases
Type
Operating instructions

HP 280 G2 Small Form Factor PC: Your compact powerhouse for seamless multitasking, reliable data processing, and everyday computing needs. With its efficient design, powerful hardware, and versatile features, this PC is the ideal choice for small businesses, offices, and home users seeking a dependable and capable desktop solution.

Ask a question and I''ll find the answer in the document

Finding information in a document is now easier with AI

Ask the document

in other languages