854126-121 1
Hard Drive Replacement Instructions
Before you begin
Observe the following requirements before removing and
replacing the hard drive.
WARNING: Never open the cover with the power cord
attached or power applied. You might damage your
computer or be injured by the spinning fan blades.
WARNING: Avoid touching sharp edges inside
the computer.
WARNING: Keep fingers and tools clear of the
moving fan when the power is applied.
CAUTION: Static electricity can damage the electronic
components inside the computer. Discharge static electricity
by touching the metal cage of the computer before touching
any internal parts or electronic components.
CAUTION: A hard drive is extremely sensitive to shock
and impact. Do not bang or drop it.
Tools needed
Phillips #2 screwdriver
Small screws are easily lost. Remove screws over a
surface that enables you to retrieve them if they fall.
NOTE: Computer appearance and features may vary
by model.
Removing the hard drive
1. Disconnect the power cord and all attached cables
from the back of the computer.
2. Remove the access panel by loosening the captive
screw (1), sliding the access panel back, and then
lifting it off the computer (2).
854126-121
854126-121 2
3. Locate the hard drive:
1. Memory modules
2. Optical drive
3. Hard drive
4. Remove the front bezel by lifting the three tabs that
secure the top of the bezel to the front of the computer
(1), and then rotating the bezel downward and off the
computer (2).
5. Remove the three Phillips screws that secure the drive
cage to the front of the computer and the Phillips screw
that secures the drive cage to the inside of the computer.
6. Disconnect the data and power cables from the rear of
the hard drive (1), and then slide the drive cage away
from the front and lift it out of the computer (2).
7. Remove the four Phillips screws that secure the hard
drive to the hard drive cage (1), and then slide the
hard drive out of the hard drive cage (2).
8. Touch the replacement hard drive bag to the metal of
the computer, and then remove the replacement hard
drive from the bag.
854126-121 3
Replacing the hard drive
1. Insert the hard drive into the drive cage and align the
screw holes in the drive with the holes in the cage (1).
Replace the four Phillips screws (2).
2. Insert the drive cage into the computer (1), and then
connect the power and data cables to the back of the
hard drive (2).
3. Replace the three Phillips screws that secure the drive
cage to the front of the computer and the Phillips screw
that secures the drive cage to the inside of the computer.
4. Replace the bezel by inserting the tabs at the bottom of
the bezel into the slots in the front of the computer (1),
and then rotating the bezel upward and snapping it
into place (2).
854126-121 4
5. Position the access panel on the computer and slide it
into place (1). Tighten the captive screw in the rear of
the cover (2).
6. Press the power button to turn on the computer.
System recovery
NOTE: If your hard disk drive was shipped without an operating
system installed, you must reinstall the operating system using the
system recovery discs. To install the operating system, refer to the
instructions included with your system recovery discs, or for U.S.
product support, go to http://www.hp.com/go/contactHP.
For worldwide product support, go to
http://welcome.hp.com/country/us/en/wwcontact_us.html.
IMPORTANT:
Do not turn off the computer during the initial
setup process. Please allow the process to complete to
ensure that everything that is necessary to operate the
computer is installed properly. The system recovery process
will take approximately 3 hours. When system recovery is
complete, the computer will reboot and the Windows Setup
screen will be displayed.
After the operating system has been installed, you must reinstall
any applications and restore any data that you backed up.
After the setup has been completed, you must reinstall any
applications and restore any data that you backed up. If you
need further assistance, please call 1-800-474-6836 (1-800-HP
Invent) if in the U.S. For worldwide product support, see
http://welcome.hp.com/country/w1/en/support.html.
If your hard drive was shipped with an operating system (image)
installed, system recovery disks are not required for setup. Turn
on the computer and allow the initial startup process to
completely set up the operating system.
IMPORTANT:
Do not turn off the computer during the initial
startup process. Please allow the startup process to complete
to ensure that everything that is necessary to operate the
computer is installed properly.
After the setup has been completed, you must reinstall any
applications and restore any data that you backed up. If you
need further assistance, please call 1-800-474-6836 (1-800-HP
Invent) if in the U.S. For worldwide product support, see
http://welcome.hp.com/country/w1/en/support.html.
854126-121 5
Instructions pour le remplacement du disque dur
Avant de commencer
Respectez les exigences suivantes avant de retirer et de
remplacer le disque dur.
AVERTISSEMENT : N'ouvrez jamais le capot lorsque le
cordon d'alimentation est branché ou lorsque l'ordinateur
est sous tension. Vous pourriez endommager votre
ordinateur ou être blessé par les pales du ventilateur en
rotation.
AVERTISSEMENT : Évitez de toucher les bords
tranchants à l'intérieur du châssis.
AVERTISSEMENT : N'approchez ni vos doigts ni des
outils du ventilateur lorsque l'ordinateur est sous tension.
ATTENTION : L'électricité statique peut endommager
les composants électroniques à l'intérieur de l'ordinateur.
Déchargez l'électricité statique en touchant la cage
métallique de l'ordinateur avant de toucher tout
composant interne ou tout composant électronique.
ATTENTION : Un disque dur est extrêmement sensible
aux chocs et aux impacts. Ne le laissez pas tomber et ne
le heurtez pas.
Outils nécessaires
Tournevis cruciforme #2
Les petites vis peuvent être facilement égarées. Retirez les
vis sur une surface qui vous permet de les récupérer en
cas de chute.
REMARQUE : L'apparence et les fonctions de
l'ordinateur peuvent varier selon le modèle.
Retrait du disque dur
1. Débranchez le cordon d'alimentation et tous les
autres câbles à l'arrière de l'ordinateur.
2. Retirez le panneau d'accès en dévissant la vis
imperdable (1), en faisant glisser le panneau
d'accès vers l'arrière et en le soulevant pour
l'extraire de l'ordinateur (2).
854126-121 6
3. Repérez le disque dur :
1. Modules mémoire
2. Lecteur optique
3. Disque dur
4. Retirez la face avant en soulevant les trois attaches qui
fixent la partie supérieure de la face avant à l'avant de
l'ordinateur (1), puis en faisant pivoter la face avant
vers le bas pour la retirer de l'ordinateur (2).
5. Retirez les trois vis cruciformes qui fixent le boîtier du
disque à l'ordinateur et la vis cruciforme qui fixe le
boîtier du disque à la partie interne de l'ordinateur.
6. Débranchez les câbles d'alimentation et de données
de l'arrière du disque dur (1), puis faites glisser
le boîtier du disque pour le retirer par l'avant et
soulevez-le pour le retirer de l'ordinateur (2).
7. Retirez les quatre vis cruciformes qui fixent le disque
dur au boîtier du disque (1), puis faites glisser le disque
dur hors du boîtier (2).
8. Mettez en contact le paquet du disque dur de
remplacement avec la partie métallique de
l'ordinateur, puis retirez-en le disque dur
de remplacement.
854126-121 7
Réinstallation du disque dur
1. Insérez le disque dur dans le boîtier du disque et
alignez les trous de vis sur le disque avec les trous
dans le boîtier (1). Remettez les quatre vis cruciformes
en place (2).
2. Insérez le boîtier du disque dans l'ordinateur (1),
puis connectez les câbles d'alimentation et de
données à l'arrière du disque dur (2).
3. Remettez en place les trois vis cruciformes qui fixent
le boîtier du disque à l'ordinateur et la vis cruciforme
qui fixe le boîtier du disque à la partie interne
de l'ordinateur.
4. Replacez la face avant en insérant les attaches en bas
de la face avant dans les emplacement à l'avant de
l'ordinateur (1), puis en faisant pivoter la face avant
vers le haut jusqu'à ce qu'elle s'enclenche (2).
854126-121 8
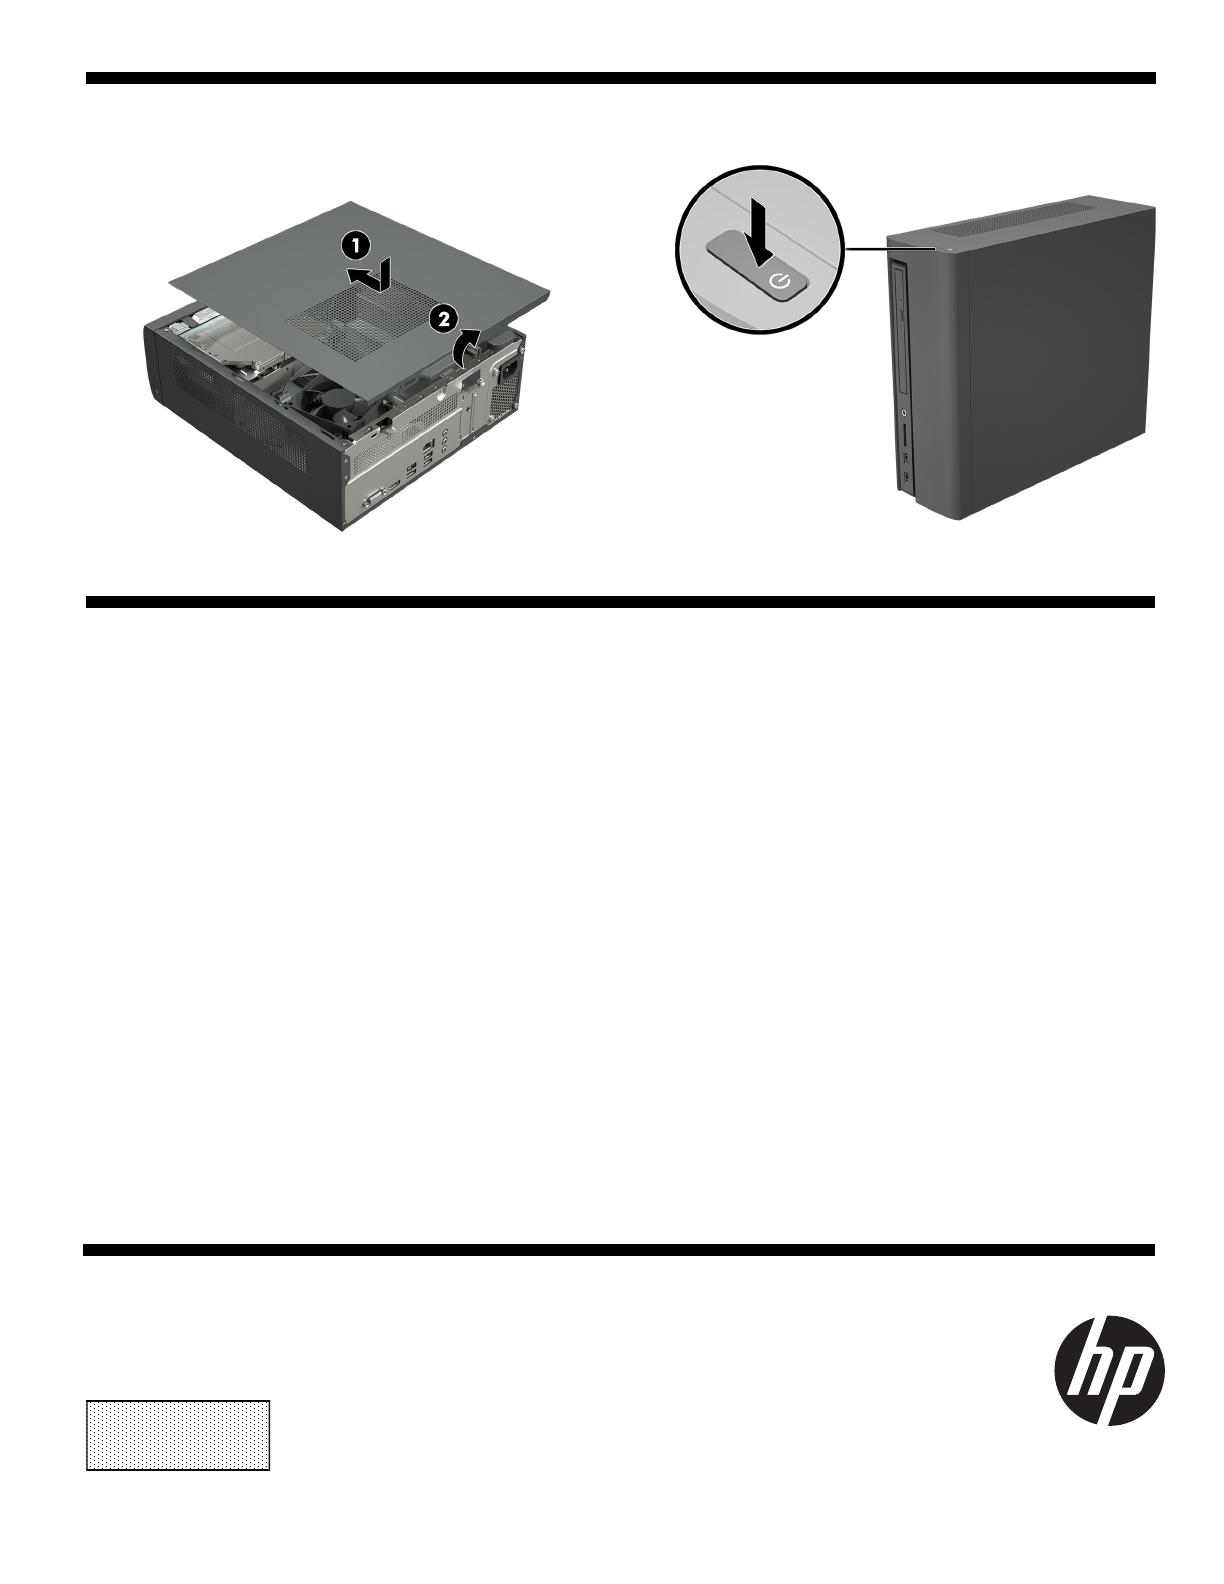
5. Placez le panneau d'accès sur l'ordinateur et faites-le
glisser à sa place (1). Resserrez la vis imperdable
située à l'arrière du cache (2).
6. Appuyez sur l'interrupteur d'alimentation pour
allumer l'ordinateur.
Réinstallation du système
REMARQUE : Si votre disque dur a été livré sans système
d'exploitation, vous devez réinstaller le système d'exploitation
à l'aide des disques de restauration système. Pour installer le
système d'exploitation, reportez-vous aux instructions fournies
avec vos disques de restauration système, ou pour obtenir
l'assistance technique aux États-Unis, rendez-vous sur
http://www.hp.com/go/contactHP.
Pour une assistance dans le reste du monde, rendez-vous sur
http://welcome.hp.com/country/us/en/wwcontact_us.html.
IMPORTANT :
N'éteignez pas l'ordinateur pendant le
processus de configuration initiale. Laissez le processus se
terminer pour être certain que tous les éléments nécessaires
au fonctionnement de l'ordinateur sont correctement
installés. Le processus de restauration du système prend
environ 3 heures. Une fois la restauration du système
terminée, l'ordinateur redémarre et l'écran Installation
de Windows s'affiche.
Une fois le système d'exploitation installé, vous devez réinstaller
les applications et restaurer toutes les données que vous avez
sauvegardées.
Une fois la configuration terminée, vous devez réinstaller les
applications et restaurer toutes les données que vous avez
sauvegardées. Pour obtenir une aide supplémentaire, veuillez
appeler le 1-800-474-6836 (1-800-HP Invent) si vous résidez aux
États-Unis. Pour une assistance dans le reste du monde, rendez-
vous sur http://welcome.hp.com/country/w1/en/support.html.
Si votre disque dur a été livré avec un système d'exploitation
(image), les disques de restauration du système ne sont pas
nécessaires à l'installation. Allumez l'ordinateur et attendez
que le processus de démarrage initial configure entièrement
le système d'exploitation.
IMPORTANT :
N'éteignez pas l'ordinateur pendant le
processus de démarrage initial. Laissez le processus de
démarrage se terminer pour être certain que tous les
éléments nécessaires au fonctionnement de l'ordinateur
sont correctement installés.
Une fois la configuration terminée, vous devez réinstaller les
applications et restaurer toutes les données que vous avez
sauvegardées. Pour obtenir une aide supplémentaire, veuillez
appeler le 1-800-474-6836 (1-800-HP Invent) si vous résidez aux
États-Unis. Pour une assistance dans le reste du monde, rendez-
vous sur http://welcome.hp.com/country/w1/en/support.html.
© Copyright 2016 HP Development Company, L.P.
The information contained herein is subject to change without notice. The only warranties for
HP products and services are set forth in the express warranty statements accompanying such
products and services. Nothing herein should be construed as constituting an additional warranty.
HP shall not be liable for technical or editorial errors or omissions contained herein.
First Edition: March 2016
PRI NTER: Repl ac e thi s bo x with Pr int ed- I n (PI )
St at ement(s) as p er sp ec.
NOTE: This box is simply a placeholder. PI
St at ement(s) do n ot ha ve to fit ins id e the b ox
but sh ould be pl aced in t hi s area .
  • Page 1 1
  • Page 2 2
  • Page 3 3
  • Page 4 4
  • Page 5 5
  • Page 6 6
  • Page 7 7
  • Page 8 8