Page is loading ...

Non-contact Infrared
Thermometer
Operation Instructions
Thank you for choosing our product. Before using this product, please read these Operation
Instructions carefully. They will provide you with guidance on how to use the product correctly and
how to examine it and solve common problems to best exploit its excellent performance. You will
find many advantages of this portable infrared thermometer, including its small size, admirable
endurance and user-friendliness. Just point it at the object and pull the trigger. Within less than a
second, you will be able to get the reading of the surface temperature of any object that is too hot,
too dangerous or too difficult to contact safely without the need of physical contact.
WARNING
Do not point the light beam of the instrument at or have it reflected into the eyes of
people or animals to avoid injury.
I. Performance
Non-contact accurate temperature measuring
Built-in laser aiming
White backlight liquid crystal display
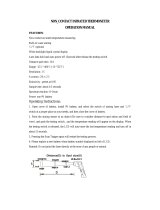
Distance spot ratio 12:1 (see Figure 1)
O
C/
O
F optional
MAX, MIN, AVG and storage functions
Extensive usage, including food, security inspection, train, diesel engine and injection molding
applications
II. Technology Specification:
Resolution: 0.2
O
C or 0.5
O
F
Temperature range: -25
O
C~600
O
C(-13
O
F~1112
O
F)
Sample rate: about 0.5 seconds
Spectrum reaction: 6~14um
Emissivity: optional, 0.99, 0.95, 0.89, 0.85, 0.79 or 0.75
Power: one 9v battery
Figure 1

Accuracy: -25℃~-10℃): ±3℃
(-13℉~14℉): ±5℉
(-10℃~30℃): ±2℃
(-14℉~86℉): ±4℉
(30℃~560℃): 1%±1℃
(-86℉~1040℉): 2%±2℉
Operating environment: temperature: 0
O
C~50
O
C (32
O
F~122
O
F)
Relative humidity: 10~80%RH
Weight: about 195g (including battery)
Dimension: 180x48x96mm
III. Panel Description (see Figure 2)
A: infrared sensor
B: laser sight
C: liquid crystal display
D: backlight selection button
E: emissivity selection button
F: MAX, MIN and AVG selection button
G: Scan trigger
H: ℃/℉ switch button
I: laser selection switch
Ⅳ Display ( see Figure3)
1. Scan mode symbol
2. Low voltage symbol
3. Backlight symbol
4. Laser on symbol
5. Emissivity (6 options)
6.
O
C/
O
F symbol
7. Data storage symbol
8. MAX symbol
9. MIN symbol
10. AVG symbol
IV. How it works
Infrared thermometers measure the surface temperature of an object. An optical component
of the unit collects energy emitted, reflected and transmitted and focuses it onto a detector. Then an
electronic component translates the information into a temperature reading which is displayed on
the unit. The laser is used for aiming purpose only.
VI. Operating Instructions:
1. Install a 9v battery and pull the “Scan Trigger” to turn the power on. If the backlight is needed
but it's not on, press the “Backlight Button” (Button L) at the bottom right corner to turn on the
backlight. Press the button again to turn it off.

2. To provide the user with more options, this unit offers 6 emissivity modes, including 0.99, 0.95,
0.89, 0.85, 0.79 and 0.75. Press the “Emissivity Selection” Button (Button in the middle of the
panel) to select the mode sequentially. Each press results in a change in the emissivity mode. As
different objects have different emissivities, it is necessary to select the right emissivity setup to
ensure accurate measurement.
3. To use
O
C/
O
F switch mode, open the cover of the battery holder and use the built-in switch
(which is at the upper part of the battery holder and visible as soon as the cover is removed) to
select the mode needed; to activate the laser aiming function, open the cover of the battery
holder and use the built-in switch to select the function needed (the laser is used for aiming
purpose only).
4. To measure a temperature, point the unit at an object and pull the Scan Trigger. (Be sure to
consider distance-to-spot ration and field of view.) The temperature reading will appear on the
display. When the trigger is released, the unit will automatically store the last temperature
reading and turn off in about 15 seconds. Pressing the Scan Trigger again will restart the
scanning process.
5. The unit provides MAX, MIN and AVG reading display functions. Press the button at the left of
the panel (Button M) to get the maximum, minimum and average readings measured.
VII.How to accurately measure the temperatures
1. The unit gets temperature compensation automatically from the ambient temperature. After
measuring a high-temperature object, the unit needs at least 15 minutes to adapt to the
ambient temperature of the next object to be measured. In addition, it needs a few minutes
of preparation after measuring a low-temperature object and before measuring a
high-temperature object too.
2. Locating a hot or cold spot: To find a hot or cold spot, aim the thermometer at the area of
interest. Then slowly scan across the area with up and down motions until you locate the
hot or cold spot.
3. Field of view: Make sure that the target is larger than the unit’s spot size. The smaller the
target, the closer you should be to it. In cases where accuracy is of particular importance,
make sure that the target is at least twice as large as the spot size. When the laser aiming
function is activated, the laser spot indicates the area to be measured.
4. How to use the AVG function: scan a number of spots in the measurement area of the object;
press the button at the left (Button M) and select AVG. The reading obtained is the average
value of the measurement, which is closer to the real temperature of the object.
VIII. Reminders
This product is designed for the measurement of surface temperatures of objects. If it is used
to mesure body temperatures, the results are for reference only. Any forehead temperature reading
within the range of 33
O
C~35
O
C is normal. The readings should be used for temperature
comparisons among individuals only, instead of as the basis of any medical activity. In the event of
any abnormal forehead temperature, please use a clinical thermometer to measure again. Make sure
that the laser function is turned off when using the product to measure the temperature of a human
body.
1. Do not point the laser directly at the eyes of any people or animal, or at the surface of a polished
metal (e.g., stainless steel, aluminum) object.
2. This thermometer cannot measure the temperature of an object through a transparent object, e.g.,

a piece of glass. Otherwise the reading obtained would be the temperature of the glass.
3. Steam, dust and smoke could block the infrared from the object being measured and affect the
result of measurement.
4. When using the infrared thermometer, try to avoid the following:
(1) static electricity;
(2) electromagnetic field generated by welding operation or induction heating;
(3) thermal shock (due to drastic or abrupt changes in ambient temperatures, in which case, the
product would need 15 minutes of preparation before being used for temperature measurement.)
(4) Please keep the thermometer away from the objects with high temperature.
(5) This is a sophisticated optical device for temperature measurement. Please keep it clear of water
or any corrosive liquid.
5. If the product is not to be used for a long period of time, please remove the battery to avoid a
battery leak and damage to the product.
IX. How to replace the battery
1. When the voltage of the battery is below the rated voltage, the Low Voltage Symbol will appear
on the screen. In this case, the voltage is too low for normal operation. Please replace the
battery.
2. Open the cover of the battery holder and take out the battery. Wait for 3 seconds and then install
the button battery. Make sure the anode and the cathode of the battery are installed at the right
positions.
X. Applications of the infrared thermometer
General Fields of application includes electricity, petrochemicals, metallurgy, automobiles,
electronics, tobacco, pharmaceuticals, hotels, machinery, plastics and moulds. Notably, it could be
used in the following fields:
1. Industrial electronics: to measure the loose/hot spots of electronic panels, fuse units, engines
/gearboxes, bearings/bearing boxes, power distribution cabinets and electronic components.
2. Heating or cooling systems: to examine or monitor the status of gas supply, air conditioning or
ventilation pipe systems.
3. Automobiles: to examine the status of motors, cylinder heads, heating/cooling systems, or to
scan the temperatures of jammed radiators, power trains, or bearings/bearing shells, etc.
4. Food safety: to monitor or control food temperature in acceptance, storage, transportation and
production processes, for example in supermarkets (cold storage), hotels and kitchens.
XI. Emissivity
The emissivities of most organic materials and painted/oxidized surfaces are 0.95. Use of the
product on bright or polished surfaces will lead to inaccurate readings. The right way is to cover the
surface with black tape or paint it with black paint. Wait for a period of time sufficient for the black
tape to reach the same temperature as the material covered before measuring the surface
temperature.

Emissivities of Some Objects
Object
Emissivity
Object
Emissivity
Bitumen
0.90~0.98
Clothing (black)
0.98
Concrete
0.94
Human skin
0.98
Cement
0.96
Soap bubble
0.75~0.80
Sand
0.90
Charcoal
0.96
Soil
0.92~0.96
Paint
0.80~0.95
Water
0.92~0.96
Textile
0.90
Ice
0.96~0.98
Rubber (black)
0.94
Snow
0.83
Plastics
0.85~0.95
Glass
0.90~0.95
Wood
0.90
China
0.90~0.94
Paper
0.70~0.94
Marble
0.94
Chromium oxide
0.81
Gesso
0.80~0.90
Copper oxide
0.78
Mortar
0.89~0.91
Iron oxide
0.78~0.82
Brick
0.93~0.96
/