Barco F50 Panorama Quick start guide

Type
Quick start guide

This manual is also suitable for

Barco F50 Panorama, your new motorized iris accessory, offers precise lens control and enhanced image quality for Barco's EN51, EN55, and EN56 lenses. Experience seamless integration with your existing setup via USB connectivity and RS-232 control interface.

Barco F50 Panorama, your new motorized iris accessory, offers precise lens control and enhanced image quality for Barco's EN51, EN55, and EN56 lenses. Experience seamless integration with your existing setup via USB connectivity and RS-232 control interface.

F50-series Motorized Iris Quick Start Guide
Installation
Printed on FSC certied paper (www.fsc.org)
601-0386-02
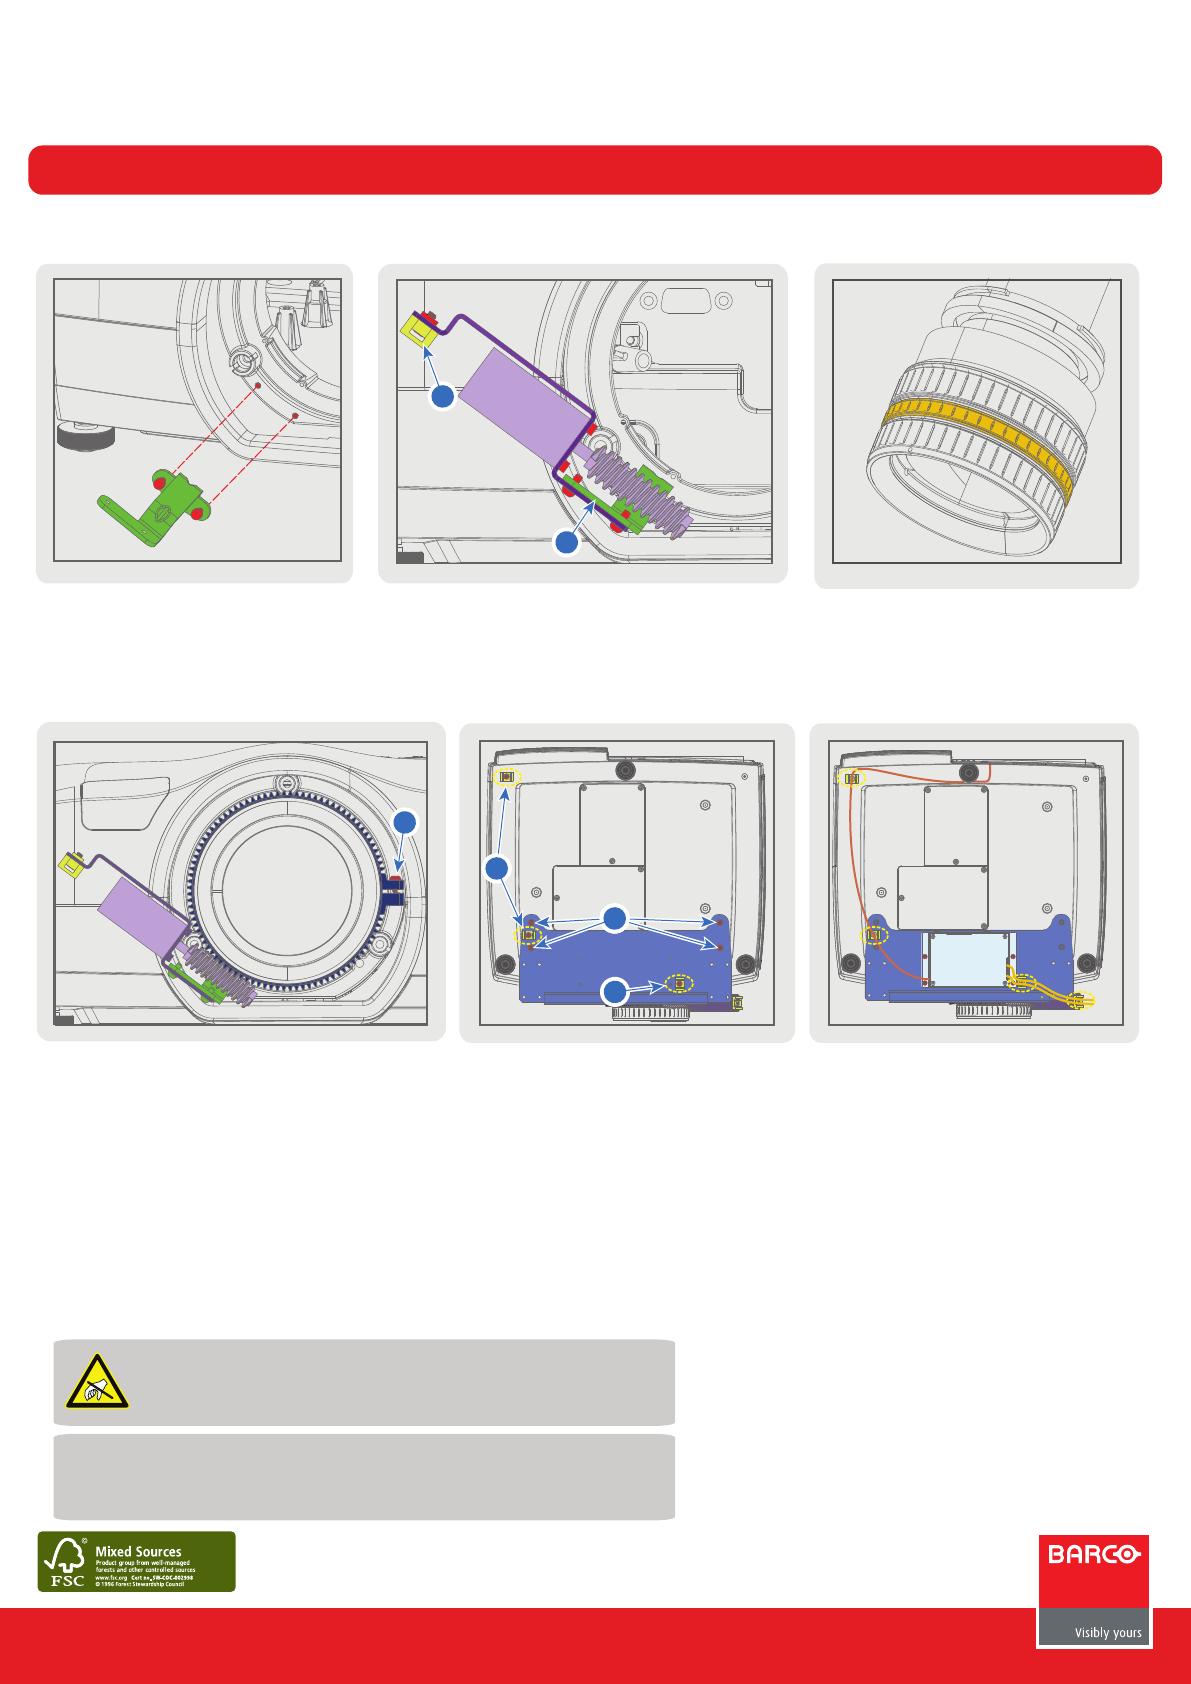
1. Mount support bracket to lens
plate (2xM2.5).
2. Install cable tie mount to motor bracket (1xM3).
3. Install motor bracket to support bracket (2xM2.5).
4. Remove iris ring (gray rubber)
from selected lens.
NB! Store for future use!
5. Install lens to the projector.
6. Position lens gear in place of iris ring.
7. Rotate lens gear manually and verify it
engages drive motor cleanly.
8. Hand tighten the fastening screw.
9. Install baseplate to bottom of the
projector (4xM6), as described in the
enclosed Lens Support Kit.
10. Install 3 cable tie mounts (3xM3) to
baseplate and projector bottom.
A1
1
ATTENTION!
ELECTROSTATIC SENSITIVE DEVICE. OBSERVE HANDLING PRECAUTIONS FOR ESD.
NOTE!
THIS UNIT IS ONLY COMPATIBLE WITH THE BARCO EN51, EN55 AND EN56 LENSES.
11. Mount PCB box to baseplate
(4xM3).
12. Raise rear projector foot (A3) to
15mm (from projector body).
13. Connect USB B connector to PCB
box.
14. Run USB cable through cable tie
mounts A1 and A2, and under the rear
projector foot (A3). Plug in USB A
connector to the source panel. Fasten
cable ties. Lower projector foot to 6mm
from projector body. Make sure the
cable is not pinched or squashed!
15. Plug in the two driver motor cable
to PCB box and motor. One of the
cables are already attached to the
motor, the other cable are supplied in
the kit. Route cables via cable tie
mounts B1 and B2. Fasten cable ties.
16. The unit is
now ready for use.
NOTE: The Motorized Iris kit also include the Lens Support Kit, 400-0860-01, enclosed in the box. Installation of this are
described in the bundled User and Installation Manual.
A2
A3
B1
B2
2
3
1119
10
10
8
F50-series Motorized Iris Quick Start Guide
Operation
The Iris Position functions in the OSD PICTURE Menu will automatically become visible when the
PCB box is successfully connected.
As protection against uncontrolled operation, the driver motor will automatically stop running
after 60 seconds. There is no minimum rest period. Normal operation will resume with a new
serial command.
The motorized iris function can also be controlled via the RS-232 control interface.
ASCII Protocol commands are as follows:
Iris Position: IRPO - Set/Get. Value: 0 – 100
Iris motor calibration: IRPC – Set
ASCII Commands Example*:
:IRPO 60 ’CR’ [Set Iris Position to 60%]
:IRPO? ‘CR’ [Get current value Iris Position]
* ‘CR’ = ASCII value carriage return, hex value 0x0D.
To adjust iris position via the OSD, go to MAIN MENU - PICTURE - LENS IRIS POSITION and use
the keypad or remote control navigation keys to change the LENS IRIS POSITION values.
A slider bar (0 – 100%) shows the current LENS IRIS POSITION. The default setting for the lens iris
position is 100% (maximum light).
2
The unit will automatically calibrate and return to the last used setting when the projector is
powered up/restored from standby mode.
  • Page 1 1
  • Page 2 2

Barco F50 Panorama Quick start guide

Type
Quick start guide
This manual is also suitable for

Barco F50 Panorama, your new motorized iris accessory, offers precise lens control and enhanced image quality for Barco's EN51, EN55, and EN56 lenses. Experience seamless integration with your existing setup via USB connectivity and RS-232 control interface.

Ask a question and I''ll find the answer in the document

Finding information in a document is now easier with AI