Page is loading ...

TCADTP1OH Rev. AD 6/18
© 2015 Avery Dennison Corp. All rights reserved.
Monarch
®
Products
OPERATOR’S
HANDBOOK
TABLETOP PRINTER
1

ii Operator’s Handbook
Each product and program carries a respective written warranty, the only warranty on which the
customer can rely. Avery Dennison Corp. reserves the right to make changes in the product, the
programs, and their availability at any time and without notice. Although Avery Dennison Corp.
has made every effort to provide complete and accurate information in this manual, Avery
Dennison Corp. shall not be liable for any omissions or inaccuracies. Any update will be
incorporated in a later edition of this manual.
2015 Avery Dennison Corp. All rights reserved. No part of this publication may be reproduced,
transmitted, stored in a retrieval system, or translated into any language in any form by any
means, without the prior written permission of Avery Dennison Corp.
Trademarks
Monarch and MPCL are trademarks of Avery Dennison Retail Information Services LLC.
Avery Dennison® is a trademark of Avery Dennison Corp.

TOC-i
TABLE OF CONTENTS
GETTING STARTED .................................................................................................................. 1-1
Audience ............................................................................................................................. 1-1
Printer Overview .................................................................................................................. 1-1
Connecting the Power Cable ................................................................................................. 1-3
Establishing Communications................................................................................................ 1-3
Using the Control Panel ........................................................................................................ 1-4
Selecting a Function ......................................................................................................... 1-4
Exiting a Function ............................................................................................................. 1-4
Sleep Delay ..................................................................................................................... 1-4
Selecting the Printer’s Language ....................................................................................... 1-5
Printing a Test Label ............................................................................................................ 1-5
LOADING SUPPLIES ................................................................................................................. 2-1
Using String Tags ............................................................................................................. 2-1
Loading Labels or Tags ........................................................................................................ 2-2
For String Tags ................................................................................................................ 2-4
For Fan-Fold Labels ......................................................................................................... 2-4
Loading Labels for Peel Mode (Optional) ............................................................................ 2-7
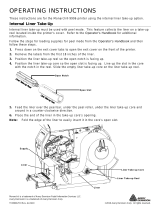
Loading Labels for Peel Mode with Liner Take-Up (Optional) .............................................. 2-13
Removing a Full Liner Take-Up Roll .................................................................................. 2-15
LOADING RIBBON .................................................................................................................... 3-1
About Ribbons .................................................................................................................. 3-1
PRINTING ................................................................................................................................. 4-1
About RFID Supplies ............................................................................................................ 4-1
Printing ............................................................................................................................... 4-1
Pausing While Printing ......................................................................................................... 4-2
Canceling Printing................................................................................................................ 4-2
Repeating a Batch ............................................................................................................... 4-2
CARE & MAINTENANCE ............................................................................................................ 5-1
Clearing Label Jams............................................................................................................. 5-1
Cleaning ............................................................................................................................. 5-2
Replacing the Printhead ....................................................................................................... 5-3

ii Operator’s Handbook
TROUBLESHOOTING ................................................................................................................ 6-1
Adjusting the Print Quality .................................................................................................... 6-1
Setting the Print Contrast .................................................................................................. 6-1
Adjusting the Printhead Pressure Dials .............................................................................. 6-2
Troubleshooting ................................................................................................................... 6-3
Error Messages ................................................................................................................... 6-4
SPECIFICATIONS ..................................................................................................................... A-1
Printer ................................................................................................................................ A-1
Supplies (Media) .................................................................................................................. A-2
Ribbon ................................................................................................................................ A-2

Getting Started 1-1
GETTING STARTED
The Avery Dennison® Monarch® Tabletop Printer 1 prints on thermal transfer
(ribbon) and thermal direct labels or tags. The printer prints labels continuously (in one
strip) or on-demand (one label at a time). You can print on aperture, die cut, black mark,
or continuous (non-indexed) supplies.
This chapter explains how to:
♦ connect the power cord and communication cable.
♦ use the printer's control panel.
A power cord and ribbon take-up core (may already be on take-up reel) are included.
Keep the box and packaging material in case the printer ever needs repair.
Note: Review the Safety Document included with your printer and the Regulatory
information found on our Web site.
Audience
This Operator's Handbook is for the person who prints and applies labels.
For advanced printer setup (configuring the printer, changing RFID settings), refer to the
System Administrator’s Guide.
Printer Overview
1 Antenna, if installed 4 Exit Cover
2 Cover 5 Navigation Buttons
3 Liner Tear Edge 6 Function Buttons
1
1
2
3
5
6
4

1-2 Operator's Handbook
User touch parts are red.
1 Roll Guides 9 Die Cut Sensor
2 Supply Holder 10 Printhead
3 Liner Take-up Reel (optional) 11 Deflector Tab
4 Tension Bar 12 Printhead Tab
5 Supply Guides 13 Ribbon Guides
6 Supply Lever 14 Ribbon Reel
7 Printhead Latch 15 Ribbon Take-up Reel
8 Platen Roller 16 Printhead Release
1
2
3
4
7
5
6
8
11
10
9
12
13
14
15
16

Getting Started 1-3
Connecting the Power Cable
The power supply
automatically switches
between 115V or 230V. No
operator settings are required.
1. Plug the power cable into
the connection located on
the back of the printer.
Plug the cable into a
grounded electrical outlet.
Note: Only use a certified
power cable with
proper voltage for the
country of installation.
In facilities with power
spikes/outages, we
recommend using a
certified surge
protector with proper
voltage for the country
of installation.
2. Turn on the printer. Press
( I ) to turn on and ( O ) to
turn off the printer.
Establishing Communications
Before you print, make sure supply is loaded, the printer is connected to a host (a PC or
a network) and is ready to receive data.
The printer can establish communications using the serial port, device USB port, Ethernet
port, or wirelessly (optional). Before the printer can accept print jobs from the host, you
must:
♦ connect the communication cable between the printer and host or connect wirelessly.
♦ set the communication values on the printer to match those at the host (System
Administrator only).
Ask your System Administrator which communication method to use.
For Serial Communications:
Secure the serial cable with the connecting screws. Make sure the printer's
communication values match those at the host. The printer’s default values are 9600
Baud, 8 bit data frame, 1 stop bit, no parity, and DTR flow control.
For USB Communications:
The printer has three USB 2.0 ports. Drivers are available on our Web site.
Device port Connect to a PC and transfer data
Host ports (2) Connect external devices, such as a keyboard, scanner, or thumb drive
Serial Port
Device USB
Host USB (2)
Power Switch
Ethernet
Power
Cable

1-4 Operator's Handbook
MPCL
READY
192.0.0.192
FEED TLABEL MENU
For Ethernet Communications:
If you are using Ethernet communications, you can
monitor the status using the LEDs as shown:
Top LED:
Blinking
green
network activity/receiving data
Bottom LED:
Orange a connection is present
Using the Control Panel
The control panel has an LCD display and five buttons. The top three buttons are
function buttons, which vary depending on the task shown above the button. The two
bottom buttons are navigation buttons; use these to scroll through menus.
The LCD
♦ uses a red background when immediate attention (jam or error)
is required. For more information see Chapter 6 "
Diagnostics &
Troubleshooting."
♦ uses a green background when the printer is active
(printing or receiving data).
♦ uses a white background when viewing menu prompts,
printer settings, button functions, etc.
Selecting a Function
Your System Administrator can access the MENU to configure the printer.
♦ Press MENU.
♦ Press or to see the menu options.
♦ Press SELECT when you see the menu option you need.
Exiting a Function
There are two ways to exit an option. Pressing BACK once returns to the previous menu
and saves any changes. Pressing CANCEL exits to the previous menu; however,
changes are not saved.
Sleep Delay
When the printer is idle for a selected period of time, it goes into sleep mode to conserve
power. Your System Administrator can adjust the Sleep Delay setting. The default setting
is 60 minutes. The printer wakes from sleep mode when it receives a print job, a button is
pressed, or the printhead is opened or closed.
Green LED
Orange LED

Getting Started 1-5
Selecting the Printer’s Language
To change the printer’s menu language:
1. Press MENU.
2. Press or until you see SETUP. Press SELECT.
3. Press or until you see LANGUAGE. Press CHANGE.
4. Press or until you see the language you need, then press SET.
5. Press BACK until you see “Ready,” then press SELECT.
Printing a Test Label
Before you call Technical Support, print a test label.
1. From the Main Menu select TLABEL.
2. Press or to scroll through the test label options:
Printer Information MPCL Label
Contains generic information, including inch
counts and printhead resolution.
Contains the printer’s MPCL packet
configuration.
3. When you see the test label you need, press PRINT. Press BACK to return to the
previous menu without printing a test label.

1-6 Operator's Handbook

Loading Supplies 2-1
LOADING SUPPLIES
This chapter describes how to load:
♦ a roll of labels, tags, or string tags
♦ fan-fold supply
♦ peel mode supplies with and without internal liner take-up.
Ask your System Administrator which type of supply to use:
Thermal Direct heat activated supplies that do not use a ribbon for printing
Thermal Transfer standard supplies that require a ribbon for printing
Note: Your System Administrator must set the printer for the correct supply type.
If you are using thermal direct supplies, do not load a ribbon.
Using String Tags
Follow these guidelines for string tags:
♦ maximum print speed is 6.0 inches per second.
♦ thermal direct printing and a cutter are not supported.
♦ A non-print zone of 0.250 inches (6.4 mm) exists on the string side of the tag.
2

2-2 Operator's Handbook
Loading Labels or Tags
1. Open the cover.
2. Turn the printhead latch to unlock the printhead.
3. Lift the printhead assembly until it
locks into place.

Loading Supplies 2-3
4. Adjust the roll guides to fit your supply roll. The supply roll must move freely.
5. Place rolled supply on the supply holder. Label supply can unroll from the top or the
bottom; tag supply should unroll from the bottom only (tag rolls are wound face in).
6. Feed the supply under the tension bar and into the supply path.

2-4 Operator's Handbook
For String Tags
Shake the roll of string tags down to untangle the roll.
Make sure the strings face out.
For Fan-Fold Labels
Place a fan-fold supply stack behind the printer, label side facing up. Lay the label strip
over the supply holder.

Loading Supplies 2-5
7. Turn the supply lever to unlock the supply guides.
8. Feed the supply through the supply path so a few inches extend past the front of the
printer. Tuck the supply under the nibs and die cut sensor.
9. Adjust the supply guides so they barely touch the supply. Turn the supply lever up to
lock it in place.
10. Push the printhead release.
Supply Lever locked (up)
Supply Lever unlocked (down)
Supply Guide
Nibs
Die Cut Sensor

2-6 Operator's Handbook
11. Close the printhead assembly until you hear it click into place.
12. Close the cover.
13. Press FEED to position the supply under the printhead.
You may need to adjust the printhead pressure dials depending on the width of
your supply. See "Adjusting the Printhead Pressure Dials”
for more information.
Note: Leave the printhead unlatched if the printer will be unused for extended periods
of time. This prevents platen roller damage which can cause a jam.

Loading Supplies 2-7
Loading Labels for Peel Mode (Optional)
In peel mode, the printer separates the liner from the label. This is known as on-demand
mode printing. The next label is not printed until the completed one is removed from the
printer or when you press FEED. The display shows "Printing X of Y" until all labels print.
♦ minimum feed length is 1.5 inches.
♦ maximum speed is 8.0 inches per second.
♦ use non-perforated supplies.
Notes: Your System Administrator must set the printer for on-demand mode and the
correct supply type.
1. Open the cover.
2. Turn the printhead latch to unlock the printhead.

2-8 Operator's Handbook
3. Lift the printhead assembly until it locks into place.
4. Adjust the roll guides to fit your supply roll. The supply
roll must move freely.
5. Place rolled supply on the supply holder. Label supply
can unroll from the top or the bottom.
6. Feed the supply under the tension bar and into the supply path.

Loading Supplies 2-9
7. Turn the supply lever to unlock the supply guides.
8. Feed the supply through the supply path so a few inches extend past the front of the
printer. Tuck the supply under the nibs and die cut sensor.
9. Adjust the supply guides so they barely touch the supply. Turn the supply lever up to
lock it in place.
Supply Guide
Nibs
Die Cut Sensor
Supply Lever locked (up)
Supply Lever unlocked (down)

2-10 Operator's Handbook
10. Press down on the exit cover tabs to open the exit cover on the front of the printer.
/