LifeSpan TR5000-DT7 Owner's manual
- Category
- Treadmills
- Type
- Owner's manual
LifeSpan TR5000-DT7 offers an electric height adjustment feature, allowing you to effortlessly transition between sitting and standing positions. The spacious desktop provides ample room for your laptop, paperwork, and other essentials. The integrated console displays essential workout metrics such as speed, time, distance, and calories burned, so you can track your progress and stay motivated.
With its whisper-quiet operation, the TR5000-DT7 won't disrupt your surroundings, making it ideal for home offices, corporate settings, or shared workspaces.


-
 1
1
-
 2
2
-
 3
3
-
 4
4
-
 5
5
-
 6
6
-
 7
7
-
 8
8
-
 9
9
-
 10
10
-
 11
11
-
 12
12
-
 13
13
-
 14
14
-
 15
15
-
 16
16
-
 17
17
-
 18
18
-
 19
19
-
 20
20
-
 21
21
-
 22
22
-
 23
23
-
 24
24
-
 25
25
-
 26
26
-
 27
27
-
 28
28
-
 29
29
-
 30
30
-
 31
31
-
 32
32
-
 33
33
-
 34
34
-
 35
35
-
 36
36
-
 37
37
-
 38
38
-
 39
39
-
 40
40
-
 41
41
-
 42
42
-
 43
43
-
 44
44


LifeSpan TR5000-DT7 Owner's manual
- Category
- Treadmills
- Type
- Owner's manual
LifeSpan TR5000-DT7 offers an electric height adjustment feature, allowing you to effortlessly transition between sitting and standing positions. The spacious desktop provides ample room for your laptop, paperwork, and other essentials. The integrated console displays essential workout metrics such as speed, time, distance, and calories burned, so you can track your progress and stay motivated.
With its whisper-quiet operation, the TR5000-DT7 won't disrupt your surroundings, making it ideal for home offices, corporate settings, or shared workspaces.
Ask a question and I''ll find the answer in the document
Finding information in a document is now easier with AI
Related papers
-
LifeSpan Workplace DT-5 Owner's manual
-
LifeSpan Workplace DT-5 Owner's manual
-
-
-
LifeSpan Workplace DT-5 Owner's manual
-
-
-
-
-
Other documents
-
AllSee L55HD9 Installation guide
-
Kmart 42498582 User manual
-
MyBinding Luxor SPN48F BK TK User manual
-
-
FLEXISPOT E7CB-CA User manual
-
Alvin Drawing Table "Caddy" TT499 User manual
-
Philips 8500 User manual
-
Home Decorators Collection 9530300910 Installation guide
-
 Cubiker Computer Desk 47" Home Office Writing Study Laptop Table, Modern Simple Style Desk User guide
-
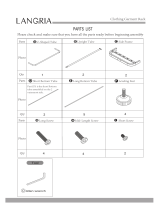 LANGRIA Clothing Garment Rack Heavy Duty Commercial Grade Clothes Stand Rack User manual

