Legrand Owner's Manual for Outdoor Wireless Access Point - DA2131-V1 User manual
- Category
- Networking
- Type
- User manual
This manual is also suitable for

- i -
Outdoor 802.11n
Wireless Access Point
(P/N DA2131-V1)
Owner’s Manual
1308197 Rev. B

- ii -
Federal Communications Commission Statement
This device complies with Part 15 of the FCC Rules and RSS-210 Issue 8 of Canada. Operation is
subject to the following two conditions:
• This device may not cause harmful interference, and
• This device must accept any interference received, including interference that may cause
undesired operation.
This equipment has been tested and found to comply with the limits for a class B digital device,
pursuant to Part 15 of the Federal Communications Commission (FCC) rules. These limits are
designed to provide reasonable protection against harmful interference in a residential installation.
This equipment generates, uses, and can radiate radio frequency energy and, if not installed and used
in accordance with the instructions, may cause harmful interference to radio communications.
However, there is no guarantee that interference will not occur in a particular installation. If this
equipment does cause harmful interference to radio or television reception, which can be determined
by turning the equipment off and on, the user is encouraged to try to correct the interference by one or
more of the following measures:
• Reorient or relocate the receiving antenna.
• Increase the separation between the equipment and receiver.
• Connect the equipment into an outlet on a circuit different from that to which the receiver is
connected.
• Consult the dealer or an experienced radio/TV technician for help.
Reprinted from the Code of Federal Regulations #47, part 15.193, 1993. Washington DC: Office of the Federal Register,
National Archives and Records Administration, U.S. Government Printing Office.
Canadian Department of Communications
This digital apparatus does not exceed the Class B limits for radio noise emissions from digital
apparatus set out in the Radio Interference Regulations of the Canadian Department of
Communications.
This Class B digital apparatus complies with Canadian ICES-003. Cet appareil numérique de la classe
B est conforme à la norme NMB-003 du Canada.
FCC Radio Frequency Exposure Caution Statement
In order to maintain compliance with the FCC RF exposure guidelines, this equipment should be
installed and operated with minimum distance 20cm between the radiator and your body. Use only
with supplied antenna. Unauthorized antenna, modification, or attachments could damage the
transmitter and may violate FCC regulations. Any changes of modifications not expressly approved by
the grantee of this device could void the users authority to operate the equipment.
Installation and use of this Wireless LAN device must be in strict accordance with the instructions
included in the user documentation provided with the product. Any changes or modifications (including
the antennas) made to this device that are not expressly approved by the manufacturer may void the

- iii -
user’s authority to operate the equipment. The manufacturer is not responsible for any radio or
television interference caused by unauthorized modification of this device, or the substitution or
attachment of connecting cables and equipment other than manufacturer specified. It is the
responsibility of the user to correct any interference caused by such unauthorized modification,
substitution or attachment. Manufacturer and its authorized resellers or distributors will assume no
liability for any damage or violation of government regulations arising from failing to comply with these
guidelines.
This device and its antenna(s) must not be co-located or operating in conjunction with any
other antenna or transmitter.
Declaration of Conformity (R&TTE directive 1999/5/EC)
The following items were completed and are considered relevant and sufficient:
• Essential requirements as in [Article 3]
• Protection requirements for health and safety as in [Article 3.1a]
• Testing for electric safety according to [EN 60950]
• Protection requirements for electromagnetic compatibility in [Article 3.1b]
• Testing for electromagnetic compatibility in [EN 301 489-1] & [EN 301]
• Testing according to [489-17]
• Effective use of the radio spectrum as in [Article 3.2]
• Testing for radio test suites according to [EN 300 328-2]
WARNING: TO PREVENT FIRE OR SHOCK HAZARD, DO NOT EXPOSE THIS PRODUCT TO
RAIN OR MOISTURE. THE UNIT MUST NOT BE EXPOSED TO DRIPPING OR SPLASHING
WATER.
CAUTION: DO NOT OPEN THE UNIT. DO NOT PERFORM ANY SERVICING OTHER THAN THAT
CONTAINED IN THE INSTALLATION AND TROUBLESHOOTING INSTRUCTIONS. REFER ALL
SERVICING TO QUALIFIED SERVICE PERSONNEL.
CAUTION: THIS DEVICE MUST BE INSTALLED AND USED IN STRICT ACCORDANCE WITH
THE MANUFACTURER’S INSTRUCTIONS AS DESCRIBED IN THE USER DOCUMENTATION
THAT COMES WITH THE PRODUCT.
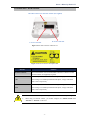
WARNING: POSTPONE INSTALLATION UNTIL THERE IS NO RISK OF THUNDERSTORM OR
LIGHTNING ACTIVITY IN THE AREA.
When using this device, basic safety precautions should always be followed to reduce the risk of fire,
electric shock and injury to persons, including the following:
• Read all of the instructions {listed here and/or in the user manual} before you operate this
equipment.
• Give particular attention to all safety precautions.

- iv -
• Retain the instructions for future reference.
• Comply with all warning and caution statements in the instructions.
• Observe all warning and caution symbols that are affixed to this equipment.
• Comply with all instructions that accompany this equipment.
• Avoid using this product during an electrical storm. There may be a risk of electric shock from
lightning. For added protection for this product during a lightning storm, or when it is left
unattended and unused for long periods of time, unplug the power supply, and disconnect the Cat
5e to the N-WAP at the POE Injector. This will prevent damage to the product due to lightning and
power surges. It is recommended that the customer install an AC surge protector in the AC outlet
to which this device is connected. This is to avoid damaging the equipment by local lightning
strikes and other electrical surges. Operate this product only from the type of power source
indicated on the product’s marking label.
• If you are not sure of the type of power supplied to your home, consult your dealer or local power
company.
• Upon completion of any service or repairs to this product, ask the service technician to perform
safety checks to determine that the product is in safe operating condition.
Installation of this product must be in accordance with national wiring codes and conform to local
regulations.
Place POE Injector to allow for easy access when disconnecting the power cord/adapter of the device
from the AC wall outlet.
Wipe the unit with a clean, dry cloth. Never use cleaning fluid or similar chemicals. Do not spray
cleaners directly on the unit or use forced air to remove dust.

- v -
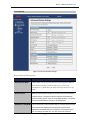
TABLE OF CONTENTS
Chapter 1 Introduction ....................................................................................................................... 1
Overview ....................................................................................................................................... 1
Product Features .......................................................................................................................... 1
Package Content .......................................................................................................................... 1
Physical Details ............................................................................................................................ 2
Chapter 2 Physical Installation .......................................................................................................... 5
Physical Installation Steps .......................................................................................................... 5
Chapter 3 Network Settings ............................................................................................................. 10
Configuring and monitoring your DA2131-V1 from web browser .......................................... 10
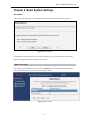
Chapter 4 Basic System Settings .................................................................................................... 16
Setup Wizard ............................................................................................................................... 16
DHCP ........................................................................................................................................... 16
Static ........................................................................................................................................... 17
PPPOE ......................................................................................................................................... 18
L2TP ............................................................................................................................................ 19
PPTP ......................... .................................... ..................................... .......................................... 20
Configure Wireless Settings ...................................................................................................... 22
Operation Mode .......................................................................................................................... 23
Internet Settings ......................................................................................................................... 24
LAN Settings ............................................................................................................................... 26
VPN Passthrough ....................................................................................................................... 28
Advanced Wireless Settings ..................................................................................................... 31
Security ....................................................................................................................................... 33
WDS ..................... ..................................... ..................................... .............................................. 42
Status .......................................................................................................................................... 49
Firewall ........................................................................................................................................ 52
Port Forwarding .......................................................................................................................... 53
Administration ............................................................................................................................ 57
Firmware Update ........................................................................................................................ 58
Settings Management ................................................................................................................ 59
System Log ................................................................................................................................. 61
Appendix A DA2131-V1 Specifications ..................................................................................... 62

- vi -

Owner’s Manual of DA2131-V1
- 1 -
Chapter 1
Introduction
Overview
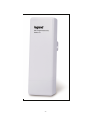
The DA2131-V1 Outdoor Wireless Access Point from Legrand now extends your home network’s
wireless reach to locations outside the home, such as patios or pool areas. With its environmental
protection, the DA2131-V1 can perform under rigorous weather conditions including heavy rain and
wind. With its Power over Ethernet (PoE) design, it can be easily installed in the areas where power
outlets are not available.
With built-in IEEE 802.11b/g/n wireless network capability, the Outdoor N-WAP allows any computer
and wireless enabled network client connect to it without additional cabling. With an 802.11n
compatible wireless adapter installed in your PC, the files can be transferred at speeds up to
150Mbps. The radio coverage is also designed specifically for outdoor use.
To secure the wireless communication, the Outdoor N-WAP supports the most up-to-date encryption:
64/128- bit WEP, WPA / WPA2, WPA-PSK / WPA2-PSK and 802.1x authority to secure and protect
your wireless LAN. MAC filtering and SSID broadcast control are provided to consolidate the wireless
network security and prevent unauthorized wireless connection.
The DA2131-V1 supports multiple modes, including AP/Client, WDS Bridge and WDS Repeater.
Product Features
IEEE 802.11b/g/n wireless standard compliant
10/100Mbps RJ-45 ports with auto MDI/MDI-X supported
Supports 64/128-bit WEP, WPA, WPA-PSK, WPA2, WPA2-PSK and 802.1x encryption
Package Content
The contents of your product package should include the following items:
DA2131-V1 802.11n Outdoor Wireless Access Point
POE Injector with reset button
Power Adaptor (12V, 1A)
Mounting Tie x 2
Installation/Instruction Sheet
A CD containing this manual.

Owner’s Manual of DA2131-V1
- 2 -
Physical Details
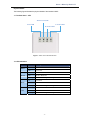
The following figures illustrate the physical details of the Outdoor N-WAP.
1.1 The Rear Panel – LED
Figure 1-1 Rear Panel LED Identification
1.2 LED Indications
LED State Meaning
Power
On System On
Off System Off
WLAN
On Wireless Radio ON.
Off Wireless Radio Off.
Blinking Data is transmitting or receiving on the wireless.
WAN
On Port linked.
Off No link.
Blinking Data is transmitting or receiving on the WAN interface.
LAN
On Port linked.
Off No link.
Blinking Data is transmitting or receiving on the LAN interface.
Power LED
Wireless LAN LED
WAN Port LED
LAN Port LED

Owner’s Manual of DA2131-V1
- 3 -
1.3 The Rear Panel – Port & Connector
Figure 1-2 Port and Connector of DA2131-V1
Figure 2-3 Port and Connector description label
Interface Function
RP-SMA Connector
For external antenna. You can use the SMA connector to connect a 2.4GHz
external antenna (not supplied by Legrand).
LAN
The RJ-45 jack allows LAN connection through a Category 5 cable. Supports
auto-sensing on 10/100M speed and half/ full duplex; complys with IEEE
802.3/ 802.3u respectively.
WAN
The RJ-45 jack allows WAN connection through a Category 5 cable. Supports
auto-sensing on 10/100M speed and half/ full duplex; complys with IEEE
802.3/ 802.3u respectively.
1. For External Antenna Mode, you MUST physically attach antenna before powering on.
2. When using an external antenna, you should configure the Antenna Switch from
“Internal” to “External” via Web UI.
LAN Port with PoE
WAN Port with PoE
RP-SMA Connector for External Antenna (not supplied)

Owner’s Manual of DA2131-V1
- 4 -
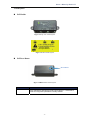
1.4 PoE Injector
PoE Module
Figure 1-4 Top view of PoE Injector
Figure 1-5 Label of PoE Injector
PoE Reset Button
Figure 1.6 Reset Button of PoE Injector
Active
Time
Reset
Push and hold the reset button of POE injector about 5 ~ 10 seconds to
reset the configuration parameters to factory defaults.
Reset Button
3. Use only for DA2131-V1

Owner’s Manual of DA2131-V1
- 5 -
Chapter 2
Physical Installation
Physical Installation Steps
2.1 Preparation before Installation
2.1.1 Professional Installation Required
Please seek assistance from a professional installer who is well trained in Wireless data product installation and
knowledgeable in the local regulations.
2.1.2 Safety Precautions
1. To keep you safe and install the hardware properly, please read and follow these safety precautions.
2. If you are installing the DA2131-V1 for the first time, for your safety as well as others’, please seek
assistance from a professional installer who has received safety training on the hazards involved.
3. Keep safety as well as performance in mind when selecting your installation site, especially where there
are electric power and phone lines.
4. When installing the DA2131-V1, please note the following things:
♦ Do not use a metal ladder;
♦ Do not work on a wet or windy day;
♦ Wear shoes with rubber soles and heels, rubber gloves, long sleeved shirt or jacket.
5. When the system is operational, avoid standing directly in front of it. Strong RF fields are present when
the transmitter is on.
2.1.3 Installation Precautions
To avoid damage to the DA2131-V1 while you are installing it, please read and follow these installation
precautions.
1. Users MUST use a proper and well-installed surge arrestor with the DA2131-V1; otherwise, a random
lightening strike could easily cause fatal damage to the product. EMD (Lightning) DAMAGE IS NOT
COVERED UNDER WARRNTY.
2. Users MUST use the “Power cord & PoE Injector” shipped in the box with the DA2131-V1. Use of
other options may cause damage to the product.
3. Users MUST power off the DA2131-V1 first before connecting any external antenna to it. Do not
switch from built-in antenna to the external antenna from WEB management without physically attaching
the external antenna onto the device first; otherwise, damage might be caused to the DA2131-V1.

Owner’s Manual of DA2131-V1
- 6 -
2.2 Hardware Installation
2.2.1 Installation Steps
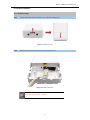
Step 1. Push the latch in the bottom of DA2131-V1 to remove the sliding cover.
Figure 2-1 Move the cover
Step 2. Plug the RJ-45 Ethernet cable into the LAN Port of DA2131-V1.
Figure 2-2 Cable Connection
RJ-45 8P8C Ethernet cable is required.

Owner’s Manual of DA2131-V1
- 7 -
Step 3. Slide the cover back to seal the bottom of the DA2131-V1.
Figure 2-3 Seal the bottom
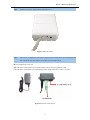
Step 4. Take out the AC adapter and PoE injector, plug the power cord into the DC port and plug the other
side of the RJ-45 cable from STEP 2 into the POE port of the PoE injector.
DC: Insert adapter DC power cord
POE: This jack is connected to LAN port of the Outdoor N-WAP with the supplied Cat5 cable.
LAN: This jack is connected to LAN side PC/Hub or Router/ADSL modem device with a Cat5 cable
Figure 2-4 Connect to PoE Injector
To DA2131-V1

Owner’s Manual of DA2131-V1
- 8 -
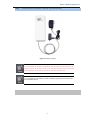
Step 5. Complete the hardware installation as indicated on the illustration below.
Figure 2-5 Cabling complete
It will take about 50 seconds to complete the boot up sequence after powering on the
Outdoor N-WAP; Power LED will be active, and after that the WLAN Activity LED
will be flashing to show the WLAN interface is enabled and working now.
To avoid lightening strike damage, consider installing a lightening arrestor between the
NWAP and PoE injector.

Owner’s Manual of DA2131-V1
- 9 -
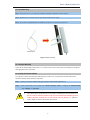
2.2.2 Pole Mounting
Step 1. Turn the DA2131-V1 over. Feed a pole mounting tie through the middle hole of the rear structure.
Step 2. Mount DA2131-V1 securely to the pole by fastening both mounting ties tightly.
Step 3. Now you have completed the hardware installation of DA2131-V1 as shown in the figure below.
Figure 2-6 Pole Mounting
2.2.3 Surface Mounting
Notice the rear bracket flange of the DA2131-V1 contains a screw hole in each corner for mounting to a flat surface
with appropriate screws (provided).
2.2.4 Using an External Antenna
If you prefer to use the external antenna with SMA-type connector for your application instead of the built-in
directional antenna, please follow the steps below.
Step 1. Connect your antenna with the SMA-type connector on the bottom of DA2132-V1.
Step 2. Power on the DA2131-V1, and then go to Wireless Settings-> Basic to configure the Antenna Switch
from “Internal” to “External”.
1. If you are going to use an external antenna on DA2131-V1, get some cable in advance.
2. Users MUST power off the DA2131-V1 first before connecting the external antenna to it.
Do not switch from built-in antenna to the external antenna from WEB management
without physically attaching the external antenna onto the DA2131-V1; otherwise,
damage might be caused to the Outdoor NWAP itself.
Mounting Tie

Owner’s Manual of DA2131-V1
- 10 -
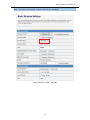
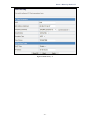
Chapter 3
Network Settings
Configuring and monitoring your DA2131-V1 from a web browser
The DA2131-V1 integrates a web-based graphical user interface that can cover most configurations
and machine status monitoring. Via a standard web browser, you can configure and check machine
status from anywhere around the world.
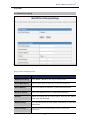
NOTE: The DA2131-V1 comes from the factory with the following IP configuration:
Default IP Address: 192.168.40.252
Default IP Subnet Mask: 255.255.255.0
WEB login User Name; admin
WEB login Password: admin
3.1 Connecting to the Outdoor NWAP
For OS of Microsoft Windows 2000/ XP:
1. Click the Start button and select Settings, then click Control Panel. The Control Panel window will
appear.
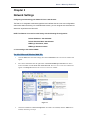
2. Move mouse and double-click the right button on Network and Dial-up Connections icon. Move
mouse and double-click the Local Area Connection icon. The Local Area Connection window will
appear. Click Properties button in the Local Area Connection window.
Figure 3-1
3. Check the installed list of Network Components. If TCP/IP is not installed, click the Add button to
install it; otherwise go to step 6.

Owner’s Manual of DA2131-V1
- 11 -
4. Select Protocol in the Network Component Type dialog box and click Add button.
5. Select TCP/IP in Microsoft of Select Network Protocol dialog box then click OK button to install the
TCP/IP protocol, it may need the Microsoft Windows CD to complete the installation. Close and go
back to Network dialog box after the TCP/IP installation.
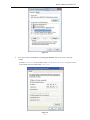
6. Select TCP/IP and click the properties button on the Network dialog box.
Figure 3-2
7. Select Specify an IP address and type in values as following example.
IP Address: 192.168.40.2, or any IP address within 192.168.40.2 to 192.168.40.251 is good to connect
to the Outdoor NWAP.
IP Subnet Mask: 255.255.255.0

Owner’s Manual of DA2131-V1
- 12 -
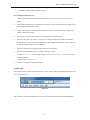
Figure 3-3
8. Click OK to complete the IP parameters setting.
For OS of Microsoft Windows Vista / 7:
1. Click the Start button and select Settings, then click Control Panel. The Control Panel window will
appear.
2. Move mouse and double-click the right button on Network Connections item. The Network
Connections window will appear. Double click Local Area Connection icon, then User Account
Control window shown. Right click Continue button to set properties.
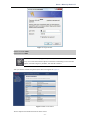
3. In Local Area Connection Properties window, Choose Networking tab, move mouse and click
Internet Protocol Version 4 (TCP/IPv4), then click Properties button.
40
2

Owner’s Manual of DA2131-V1
- 13 -
Figure 3-4
4. Move mouse and click General tab, Select Specify an IP address and type in values as following
example.
IP Address: 192.168.40.2, or any IP address within 192.168.40.2 to 192.168.40.251 is good to connect
to the Outdoor NWAP. IP Subnet Mask: 255.255.255.0
Figure 3-5
40
2

Owner’s Manual of DA2131-V1
- 14 -
5. Click OK to complete the IP parameters setting.
For OS of Microsoft Windows NT:
1. Click the Start button and select Settings, then click Control Panel. The Control Panel window will
appear.
2. Move mouse and double-click the right button on Network icon. The Network window will appear. Click
Protocol tab from the Network window.
3. Check the installed list of Network Protocol window. If TCP/IP is not installed, click the Add button to
install it; otherwise go to step 6.
4. Select Protocol in the Network Component Type dialog box and click Add button.
5. Select TCP/IP in Microsoft of Select Network Protocol dialog box then click OK button to install the
TCP/IP protocol, it may need the Microsoft Windows CD to complete the installation. Close and go back
to Network dialog box after the TCP/IP installation.
6. Select TCP/IP and click the properties button on the Network dialog box.
7. Select Specify an IP address and type in values as following example.
IP Address: 192.168.40.2, or any IP address within 192.168.40.2 to 192.168.40.251 is good to connect to
the Outdoor NWAP.
IP Subnet Mask: 255.255.255.0
8. Click OK to complete the IP parameters setting.
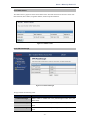
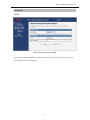
3.2 Web Login
Open a WEB browser, i.e. Microsoft Internet Explore 6.1 SP1 or above, then enter 192.168.40.252 on the URL
to connect the DA2131-V1.
Figure 3-6
After a moment, a login window will appear. Enter the User Name and Password. Then click the OK button.
DA2131-V1
40.252
Page is loading ...
Page is loading ...
Page is loading ...
Page is loading ...
Page is loading ...
Page is loading ...
Page is loading ...
Page is loading ...
Page is loading ...
Page is loading ...
Page is loading ...
Page is loading ...
Page is loading ...
Page is loading ...
Page is loading ...
Page is loading ...
Page is loading ...
Page is loading ...
Page is loading ...
Page is loading ...
Page is loading ...
Page is loading ...
Page is loading ...
Page is loading ...
Page is loading ...
Page is loading ...
Page is loading ...
Page is loading ...
Page is loading ...
Page is loading ...
Page is loading ...
Page is loading ...
Page is loading ...
Page is loading ...
Page is loading ...
Page is loading ...
Page is loading ...
Page is loading ...
Page is loading ...
Page is loading ...
Page is loading ...
Page is loading ...
Page is loading ...
Page is loading ...
Page is loading ...
Page is loading ...
Page is loading ...
Page is loading ...
Page is loading ...
-
 1
1
-
 2
2
-
 3
3
-
 4
4
-
 5
5
-
 6
6
-
 7
7
-
 8
8
-
 9
9
-
 10
10
-
 11
11
-
 12
12
-
 13
13
-
 14
14
-
 15
15
-
 16
16
-
 17
17
-
 18
18
-
 19
19
-
 20
20
-
 21
21
-
 22
22
-
 23
23
-
 24
24
-
 25
25
-
 26
26
-
 27
27
-
 28
28
-
 29
29
-
 30
30
-
 31
31
-
 32
32
-
 33
33
-
 34
34
-
 35
35
-
 36
36
-
 37
37
-
 38
38
-
 39
39
-
 40
40
-
 41
41
-
 42
42
-
 43
43
-
 44
44
-
 45
45
-
 46
46
-
 47
47
-
 48
48
-
 49
49
-
 50
50
-
 51
51
-
 52
52
-
 53
53
-
 54
54
-
 55
55
-
 56
56
-
 57
57
-
 58
58
-
 59
59
-
 60
60
-
 61
61
-
 62
62
-
 63
63
-
 64
64
-
 65
65
-
 66
66
-
 67
67
-
 68
68
-
 69
69


Legrand Owner's Manual for Outdoor Wireless Access Point - DA2131-V1 User manual
- Category
- Networking
- Type
- User manual
- This manual is also suitable for
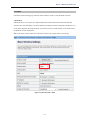
Ask a question and I''ll find the answer in the document
Finding information in a document is now easier with AI
Related papers
Other documents
-
 Amar Sun Technology Wireless Router User manual
-
EnGenius EAP350 User manual
-
 Eusso UGL2430-UHM User manual
-
EnGenius EVR100 User manual
-
Displays2go DGTCH22KS Assembly Instructions
-
LevelOne WBR-6012 User manual
-
-
-
Zonet ZSR4154WS User manual
-
Abocom Systems WR5205 User manual

