
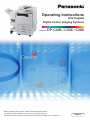
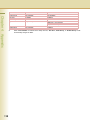
Operating Instructions
Before operating this machine, please carefully read this manual
and keep this documentation in a safe place for future reference.
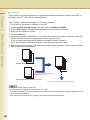
(Illustration shows optional accessories that may not be installed on your machine.)
English
Digital Colour Imaging Systems
(For Copier)
Model No.
DP-C406 / C306 / C266

2
Operating Instructions
The following Operating Instruction manuals are included with this machine. Please refer to the appropriate manual
and keep all manuals for future reference. If you lose the manual, contact the authorised Panasonic dealer.
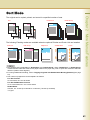
Accessories
Quick Reference Guide
Describes the basic procedures for each function, and
introduces various settings for Copy function.
Operating Instructions (For Basic)
Describes the overview of this machine.
For a detailed explanation of functions, please refer to
the Operating Instruction manuals included on two CD-
ROMs as illustrated below.
Operating Instructions CD
Contains manuals with detailed information for
Administrator Setup, User Setup, Copy, Facsimile/
Internet Fax, Scan/Email, Print functions, Function
Parameters, User Authentication, and Maintenance.
Document Management System CD
Contains the Panasonic Document Management
System Application software, and manuals for the
Panasonic Document Management System Application
software.
Operating Instructions CD
Setup Guide For Administrator
Describes how to set up the machine.
Setup Guide For User
Describes how to install the printer driver
and application software to client PC.
Copy Function
Describes how to make a Colour Copy
with creative features.
Facsimile and Internet Fax
Function
(The Facsimile function is available when
the optional G3 Fax Communication
Board is installed.)
Describes how to send/receive a
Facsimile/Internet Fax, and describes the
course of action to take when a trouble
message appears, etc.
Scan and Email Function
Describes how to scan and how to send
Email through the machine.
Print Function
Describes how to print using the Control
Panel of the machine.
Function Parameters
Describes how to change the default
settings of each function using the Control
Panel of the machine.
User Authentication
Describes how to enable and use the
User Authentication function.
Maintenance Guide
Describes how to maintain the machine,
and the course of action to take when a
problem message appears.
Document Management System CD
Application Software
Describes how to use the application
software.
Ex: Printer Driver, Fax Driver, Quick
Image Navigator, Device Monitor/
Device Explorer, Network
Configuration and Address Book
Editor

3
Conventions
Icons
The following icons are used in this manual.
Notation
The following notations are used in this manual.
Icon Description
Indicates important information that must be read in detail.
Indicates reference information.
Notation Description
For Keys and Buttons Hard buttons on the Control Panel are depicted as **** key, and soft buttons on the Touch
Panel Display are depicted as “xxx”.
Ex:
Press the Start key and select “More Menus”.

4
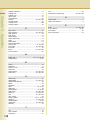
Table of Contents
Chapter 1 Basic Menu Features
Placing Originals.................................................................................................................. 6
How to Place Originals.................................................................................................... 6
Basic Operation Procedure ................................................................................................. 9
Copying with Preset Ratios (Reduction/Enlargement) ........................................................ 11
Selecting the Colour Mode .................................................................................................. 12
Black Mode ......................................................................................................... “Black”14
Full Colour Mode........................................................................................ “Full Colour”14
2 Colour Mode................................................................................................ “2 Colour”15
1 Colour Mode................................................................................................ “1 Colour”17
New Colour Registration ..........................................................................“Add Custom”19
Selecting Original Type and Adjusting the Density........................................ “Quality Adj.”21
Registering Quality Preset.........................................................................................“Save”23
Using Quality Preset............................................................................................... “Recall”25
Quality Adjusting........................................................................................ “More Settings”26
Background Removal............................................................... “Background Removal”28
Bleed-Through Prevention ...............................................“Bleed-Through Prevention”29
Tint ..........................................................................................................................“Tint”30
Contrast.......................................................................................................... “Contrast”31
Sharpness ...................................................................................................“Sharpness”32
Saturation.................................................................................................... “Saturation”33
Colour Balance....................................................................................“Colour Balance”34
Proof Copying.................................................................................................... “Proof Set”35
Confirming/Editing the Selected Copy Features................................... “Confirm Settings”36
Storing a Job in Memory................................................................................“Preset Jobs”37
Recalling a Preset Job Stored in Memory ........................................................................... 39
Checking the Waiting to Copy Job ............................................................ “Output Queue”40
Displaying a List of All Jobs ............................................................................................ 40
Displaying a List of Copy Jobs ........................................................................................ 40
Deleting Copy Jobs ......................................................................................................... 41
Completion Notice ............................................................................. “Completion Notice”42
Chapter 2 More Menus Features
2-Sided Copy Mode................................................................. “2-Sided / Original->Copy”43
Basic Operation for the 2-Sided Copy Mode................................................................... 43
Copying 1-Sided Originals onto 2-Sided Sheets..................................................“1 -> 2”44
Copying 2-Sided Original(s) onto Two Separate Sheets .....................................“2 -> 1”45

5
Copying 2-Sided Original onto 2-Sided Sheet......................................................“2 -> 2”46
Copying Facing Page Original onto Two Separate Sheets ............................... “2 Page”47
Copying Facing Page Original onto a 2-Sided Sheet ....................................“Book -> 2”48
Copying Multiple Pages onto a Single Sheet (N in 1 Copy) ................................ “N in 1”50
Copying Originals with Saddle-Stitch Binding (Booklet)...................................“Booklet”53
Copying Mixed Size Originals from the ADF .......................................“Multi-Size Feed”56
Copying Special Originals (Thin Paper, etc.) from the ADF ....... “Job Build and SADF”59
Sort Mode ..................................................................................................... “Sort / Finish”61
Zoom Mode............................................................................................... “Zoom / Effects”64
Variable Ratios .................................................................................................... “Zoom”64
Auto Zoom..................................................................................................“Auto Zoom”66
Effect Modes............................................................................................. “Zoom / Effects”68
Setting a Blank Edge............................................................................................ “Edge”68
Eliminating Dark Inner Binding Shadows ............................................................. “Book”70
Shifting Image to Right, Left, Up, or Down ........................................................ “Margin”71
Copying Mirror Image ......................................................................................... “Mirror”73
Copying with Stamping..................................................................................“Stamping”74
Centering...................................................................................................... “Centering”83
Image Repeat........................................................................................ “Image Repeat”85
Copying Inverse Image..................................................................................... “Inverse”87
Insertion Modes ................................................................................... “Insertion/Overlay”88
Adding a Cover Page to Copies ..........................................................................“Cover”88
Inserting Blank/Copied Pages Between Copies ................................... “Page Insertion”90
Inserting Blank Pages Between Transparency Films....... “Transparency Interleaving”92
Overlay Modes..................................................................................... “Insertion/Overlay”94
Overlaying an Image onto the Copies ..............................................................“Overlay”94
Overlay Copying with Registered Image ................................................“From Overlay”97
File Edit.............................................................................................................“Fill Edit”99
Double Exposure ............................................................................. “Double Exposure” 102
Chapter 3 Other Features
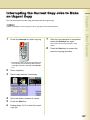
Making Copies with the ADF Opened.................................................................................. 104
Digital Skyshot Mode....................................................................................................... 104
Manual Skyshot Mode..................................................................................................... 105
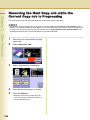
Reserving the Next Copy Job while the Current Copy Job is Progressing.
“
Reverse a Job
”
106
Interrupting the Current Copy Jobs to Make an Urgent Copy.............................................. 107
Chapter 4 Appendix
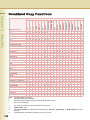
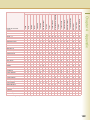
Combined Copy Functions .................................................................................................. 108
Index.................................................................................................................................... 111

6
Chapter 1 Basic Menu Features
1Basic Menu Features
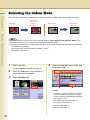
Placing Originals
How to Place Originals
On the ADF
Acceptable Paper Type
Notice for ADF
Do not use the following type / flawed originals.
• Drawing papers, Transparencies, Labeling paper, Heavy weight papers, Thin Art papers, Film,
Thermal papers.
• Papers which are curled, ripped, creased, folded, punched, glued, stapled, or self-adhesive.
• Pressure sensitive or carbon backed papers.
• Paper which is still wet with colour ink or white-out.
Original Size: A3, B4, A4, A4-R, A5, A5-R, FLS1, FLS2
Paper Weight:
1 sided : 50-105 g/m
2
2 sided : 64-105 g/m
2
Face up. Up to 100 sheets
(80 g/m
2
/ A4)
Originals can be set up to the
Upper Limit Indicator.
Original Guides
Adjust the Original
Guides to the original’s
width.
Upper Guide Upper Limit Indicator

7
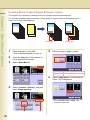
Chapter 1 Basic Menu Features
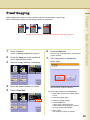
On the Platen Glass
Ex: Book Original (“Book -> 2” mode)
When copying A4 sized book
Ex: Sheet Original
Face down.
Align the centre of the book with the
“A4” indication.
Face down.
Align with top left corner.

8
Chapter 1 Basic Menu Features
Notice for Platen Glass
Align the original to the top left corner mark ( ).
• If the original is not positioned properly, a portion of the
original may not be copied.
• For originals smaller than A5 size, position the original
within the A5 area and select A5.
Original Orientation
Ex: A5
For Book -> 2 Copy
Ex: When copying A5 sized book, align the centre of the
book with the “A5” indication.
Copying a thick booklet
• If there are less than 5 mm of white margin on originals, the edge of the copied paper may get blurred
in white. To avoid the problem, change the setting of “Digital Skyshot Mode” to “No”. For setting of
“Digital Skyshot Mode”, refer to Copier Settings in the Operating Instructions (For Function
Parameters) of provided CD-ROM.
• After copying a thick booklet, open the ADF and verify that the ADF Hinge was returned to original
position in order to prevent the rear of the ADF from being raised.
• When copying with the ADF open, do not look directly at the exposure lamp.
Direct eye exposure can cause eye fatigue or eye injury.
• When copying a thick original, do not use excessive force to press it against the Platen Glass.
The Glass may break and cause injuries.
For Portrait Orientation
Original Guides
For Landscape Orientation
Original Guides
A5
A4A5R
A4R
B4
A3
A5 A5R
CAUTION
!

Chapter 1 Basic Menu Features
9
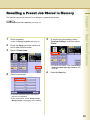
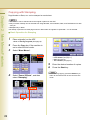
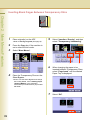
Basic Operation Procedure
The machine automatically detects original(s) and decides on the Copy Size and Colour mode to use.
If the detection fails, manually set the settings.
1
Place original(s).
z Refer to Placing Originals (See page 6).
2
Press the Copy key if the machine is
set to other function mode.
3
Select the required settings if
necessary.
z The original size is detected and a
corresponding Copy Size is automatically
selected.
z When the desired size of paper is not set in
the Paper Trays, use the Sheet Bypass. For
using the Sheet Bypass, refer to Adding
Paper <Printing Media> in the Operating
Instructions (For Maintenance) of provided
CD-ROM.
z The original’s colour is detected and the
corresponding colour mode is selected
automatically.
z If the orientation of original does not match
the orientation of copy paper, the image of
original is rotated automatically and copied.
z When copying A4 size originals, selecting
A4 for the Copy Size accelerates the
continuous copying speed. If the orientation
is not the same for both settings, the copied
image is automatically rotated by 90
degrees.
z For more details of the Basic Menu screen,
refer to Basic Menu Feature (See pages 6
to 42).
z When setting other features, refer to More
Menus Features (See pages 43 to 101).
Ex: 2-Sided Copy, Sort / Finish, Zoom /
Effects, etc.
Face up.
Up to 100 sheets (80 g/m
2
/ A4)
Face down. Align with the top left corner.
Close ADF.

Chapter 1 Basic Menu Features
10
4
Enter the desired number of copies.
(Up to 999)
z When inputting a number (4 to 8 digits) with
the optional Fax Communication Board
installed, the machine automatically
interprets it as a telephone number,
switches to the Fax mode, and displays the
Number Pad screen.
z The number of digits interpreted as a fax
number can be set from 4 to 8 digits in the
Function Parameter “118 Fax Function
Detect” (Fax/Email Settings > Fax
Parameters). For more details, refer to Fax/
Email Settings in the Operating Instructions
(For Function Parameters) of provided CD-
ROM.
5
Press the Start key.
z To stop the job while making copies, select
“Stop” on the above screen. To cancel the
job, select “Yes”.
z While and after making copies, the fan
motor may spin to cool down the machine.
z When copying from the Platen Glass, place
the next original and follow the instructions
described on the touch panel display.
z Depending on the More Menus settings, the
following screen may appear.
z After finishing copying, press the Reset key to
return to the initial screen of the current active
mode.

Chapter 1 Basic Menu Features
11
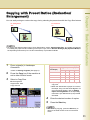
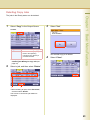
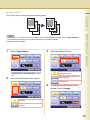
Copying with Preset Ratios (Reduction/
Enlargement)
You can easily enlarge or reduce the copy size by selecting the preset size with the Copy Size buttons.
z To change the assigned paper size of Copy Size buttons, select “Paper/Output Tray” and modify the settings.
For setting the paper size and media type for Paper Trays, refer to General Settings (Key Operator Mode) in
the Operating Instructions (For Function Parameters) of provided CD-ROM.
Ex: Enlargement
A4R
Ex: Reduction
A3
A3 A4R
1
Place original(s) in Landscape
Orientation.
z Refer to Placing Originals (See page 6).
2
Press the Copy key if the machine is
set to other function mode.
3
Select a Copy Size.
Ex: Enlargement
Original Size: A4R
Copy Size: A3
The exact ratio (%) is automatically selected.
z Paper Tray will be selected according to the
copy size.
z When the desired size of paper is not set in
the Paper Trays, use the Sheet Bypass. For
using the Sheet Bypass, refer to Adding
Paper <Printing Media> in the Operating
Instructions (For Maintenance) of provided
CD-ROM.
4
Enter the desired number of copies.
5
Press the Start key.
z After finishing copying, press the Reset key to
return to the initial screen of the current active
mode.
(%)
Original Size
(Landscape)
Copy Size (Landscape)
A3 B4 A4 A5
A3 100877150
B4 115 100 82 58
A4 141 122 100 71
A5 200 173 141 100

Chapter 1 Basic Menu Features
12
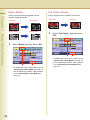
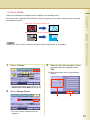
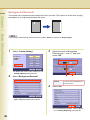
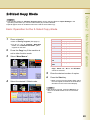
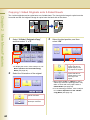
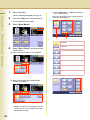
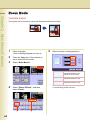
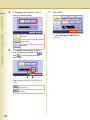
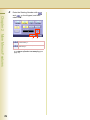
Selecting the Colour Mode
You can copy in the Colour mode selected by the machine, or select the Colour mode manually.
z The default Colour mode settings can be changed. Refer to Copier Settings (Key Operator Mode) in the
Operating Instructions (For Function Parameters) of provided CD-ROM.
z The manually selected Colour mode settings will return to the default settings under the following conditions.
- If the Reset key is pressed.
- If Auto Reset Time interval has lapsed (default = 1 min).
- If the power is turned OFF.
Ex: Full colour
Monochrome
1 Colour
MonochromeFull Colour
Full Colour
Monochrome
2 Colour
1 Colour
1
Place original(s).
z Refer to Placing Originals (See page 6).
2
Press the Copy key if the machine is
set to other function mode.
3
Select “Quality Adj.”.
4
Select the desired Colour mode, and
then select “OK”.
z Auto:
The colour original is copied in Full Colour
and the monochrome original is copied in
black and white by automatically detecting
the original’s colour.
z Black (Monochrome) (See page 14)
z Full Colour (See page 14)
z 2 Colour (See page 15)
z 1 Colour (See page 17)
12

Chapter 1 Basic Menu Features
13
5
Enter the desired number of copies.
6
Press the Start key.
z After finishing copying, press the Reset key to
return to the initial screen of the current active
mode.

Chapter 1 Basic Menu Features
14
Black Mode
Colour and monochrome originals can be
copied in black and white.
1
Select “Black”, and then select “OK”.
z To display this screen, refer to steps 1 to 3 of
Selecting the Colour Mode (see page 12).
z For the following procedure, refer to steps 5
to 6 of Selecting the Colour Mode (see
page 12).
Full Colour Mode
Colour original can be copied in Full Colour.
1
Select “Full Colour”, and then select
“OK”.
z To display this screen, refer to steps 1 to 3 of
Selecting the Colour Mode (see page 12).
z For the following procedure, refer to steps 5
to 6 of Selecting the Colour Mode (see
page 12).
Full Colour Black & White
Black & White Black & White
12
Full Colour Full Colour
12

Chapter 1 Basic Menu Features
15
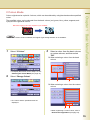
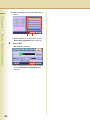
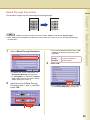
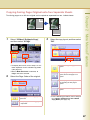
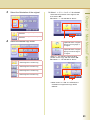
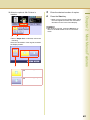
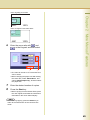
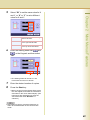
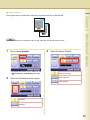
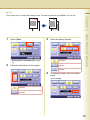
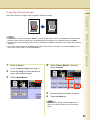
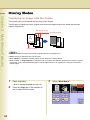
2 Colour Mode
Colour original can be copied in 2 colours, which can be achieved by using black and another specified
colour.
The specified colour can be selected from the basic colours (red, green, blue, yellow, magenta, and
cyan) and the registered colours.
z When the 2 Colour mode is selected, the Original Type setting selection is not available.
Ex: When copying a full colour original in cyan and black.
1
Select “2 Colour”.
z To display this screen, refer to steps 1 to 3 of
Selecting the Colour Mode (see page 12).
2
Select “Change Colour”.
z The colour and the specified name are
displayed.
3
Select a colour from the basic colours
or custom colours, and then select
“OK”.
When selecting a colour from the basic
colours
When selecting a colour from the custom
colours
z When registering a custom colour, refer to
New Colour Registration (see page 19).
12
21


Chapter 1 Basic Menu Features
17
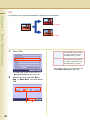
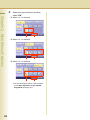
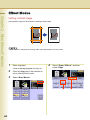
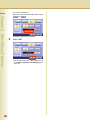
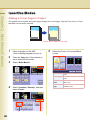
1 Colour Mode
Colour and monochrome originals can be copied in one specified colour.
The colour can be selected from the basic colours (red, green, blue, yellow, magenta, and cyan) and
the registered colours.
z When the 1 Colour mode is selected, the Original Type setting selection is not available.
Ex: Copying a full colour original in cyan.
Ex: Copying a monochrome original in cyan.
1
Select “1 Colour”.
z To display this screen, refer to steps 1 to 3 of
Selecting the Colour Mode (see page 12).
2
Select “Change Colour”.
z The colour and the specified name are
displayed.
3
Select a colour from the basic colours
or custom colours, and then select
“OK”.
When selecting a colour from the basic
colours
12


Chapter 1 Basic Menu Features
19
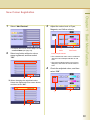
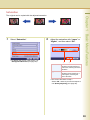
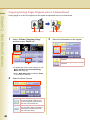
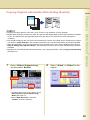
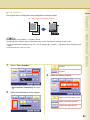
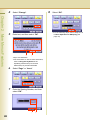
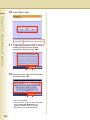
New Colour Registration
1
Select “Add Custom”.
z To display this screen, refer to steps 1 to 2 of
2 Colour Mode (see page 15).
2
Select any button without a colour
name registered, and then select
“OK”.
When changing the registered colour
Select the registered colour name button,
and then select “OK”.
3
Adjust the colour level of Cyan,
Magenta, and Yellow colours.
z The created new colour can be confirmed
with the Colour Sample Indicator in real
time.
z The total combined colour level of Cyan,
Magenta, and Yellow should be 240% or
less.
4
Check the adjusted colour, and then
select “OK”.
12
12
21
Colour RatioColour
Colour Sample Indicator
12

Chapter 1 Basic Menu Features
20
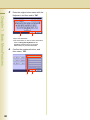
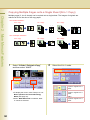
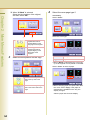
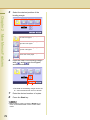
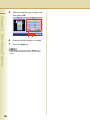
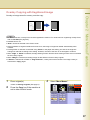
5
Enter the original colour name with the
Keyboard, and then select “OK”.
z Up to 20 characters.
z For instructions on how to enter characters,
refer to Using the Keyboard in the
Operating Instructions (For Function
Parameters) of provided CD-ROM.
6
Confirm the registered colour, and
then select “OK”.
12
12
Page is loading ...
Page is loading ...
Page is loading ...
Page is loading ...
Page is loading ...
Page is loading ...
Page is loading ...
Page is loading ...
Page is loading ...
Page is loading ...
Page is loading ...
Page is loading ...
Page is loading ...
Page is loading ...
Page is loading ...
Page is loading ...
Page is loading ...
Page is loading ...
Page is loading ...
Page is loading ...
Page is loading ...
Page is loading ...
Page is loading ...
Page is loading ...
Page is loading ...
Page is loading ...
Page is loading ...
Page is loading ...
Page is loading ...
Page is loading ...
Page is loading ...
Page is loading ...
Page is loading ...
Page is loading ...
Page is loading ...
Page is loading ...
Page is loading ...
Page is loading ...
Page is loading ...
Page is loading ...
Page is loading ...
Page is loading ...
Page is loading ...
Page is loading ...
Page is loading ...
Page is loading ...
Page is loading ...
Page is loading ...
Page is loading ...
Page is loading ...
Page is loading ...
Page is loading ...
Page is loading ...
Page is loading ...
Page is loading ...
Page is loading ...
Page is loading ...
Page is loading ...
Page is loading ...
Page is loading ...
Page is loading ...
Page is loading ...
Page is loading ...
Page is loading ...
Page is loading ...
Page is loading ...
Page is loading ...
Page is loading ...
Page is loading ...
Page is loading ...
Page is loading ...
Page is loading ...
Page is loading ...
Page is loading ...
Page is loading ...
Page is loading ...
Page is loading ...
Page is loading ...
Page is loading ...
Page is loading ...
Page is loading ...
Page is loading ...
Page is loading ...
Page is loading ...
Page is loading ...
Page is loading ...
Page is loading ...
Page is loading ...
Page is loading ...
Page is loading ...
Page is loading ...
Page is loading ...
Page is loading ...
Page is loading ...
-
 1
1
-
 2
2
-
 3
3
-
 4
4
-
 5
5
-
 6
6
-
 7
7
-
 8
8
-
 9
9
-
 10
10
-
 11
11
-
 12
12
-
 13
13
-
 14
14
-
 15
15
-
 16
16
-
 17
17
-
 18
18
-
 19
19
-
 20
20
-
 21
21
-
 22
22
-
 23
23
-
 24
24
-
 25
25
-
 26
26
-
 27
27
-
 28
28
-
 29
29
-
 30
30
-
 31
31
-
 32
32
-
 33
33
-
 34
34
-
 35
35
-
 36
36
-
 37
37
-
 38
38
-
 39
39
-
 40
40
-
 41
41
-
 42
42
-
 43
43
-
 44
44
-
 45
45
-
 46
46
-
 47
47
-
 48
48
-
 49
49
-
 50
50
-
 51
51
-
 52
52
-
 53
53
-
 54
54
-
 55
55
-
 56
56
-
 57
57
-
 58
58
-
 59
59
-
 60
60
-
 61
61
-
 62
62
-
 63
63
-
 64
64
-
 65
65
-
 66
66
-
 67
67
-
 68
68
-
 69
69
-
 70
70
-
 71
71
-
 72
72
-
 73
73
-
 74
74
-
 75
75
-
 76
76
-
 77
77
-
 78
78
-
 79
79
-
 80
80
-
 81
81
-
 82
82
-
 83
83
-
 84
84
-
 85
85
-
 86
86
-
 87
87
-
 88
88
-
 89
89
-
 90
90
-
 91
91
-
 92
92
-
 93
93
-
 94
94
-
 95
95
-
 96
96
-
 97
97
-
 98
98
-
 99
99
-
 100
100
-
 101
101
-
 102
102
-
 103
103
-
 104
104
-
 105
105
-
 106
106
-
 107
107
-
 108
108
-
 109
109
-
 110
110
-
 111
111
-
 112
112
-
 113
113
-
 114
114


Panasonic DPC266 Operating instructions
- Type
- Operating instructions
Ask a question and I''ll find the answer in the document
Finding information in a document is now easier with AI
Related papers
-
Panasonic Workio DP-C322 Operating instructions
-
Panasonic DPC354 Operating instructions
-
-
-
-
-
-
-
-
Other documents
-
KYOCERA KM-C4008 Quick start guide
-
Ricoh C2000 User manual
-
GBC CE011820E Datasheet
-
Ricoh DSC428 User manual
-
-
Lanier 5470 User manual
-
Toshiba e-STUDIO2500c/3500c/3510c User manual
-
Olivetti d_Color MF3200 Owner's manual
-
Xerox DocuColor 12 User manual
-
Xerox ColorSeries 50 User guide