3
FREEZING FOOD
Before freezing food inside the cavity please check that the
product is set as freezer (see “Temperature adjustment”
paragraph) and red light doesn’t light up.
Preparation of fresh food for freezing
• Before freezing, wrap and seal fresh food in: aluminium foil,
cling lm, air and water-tight plastic bags, polyethylene
containers with lids, provided they are suitable for freezing
foods.
• Food must be fresh, mature and of prime quality in order to
obtain high quality frozen food.
• Fresh vegetables and fruit should preferably be frozen
as soon as they are picked to maintain the full original
nutritional value, consistency, colour and avour.
• Always leave hot food to cool before placing in the
appliance.
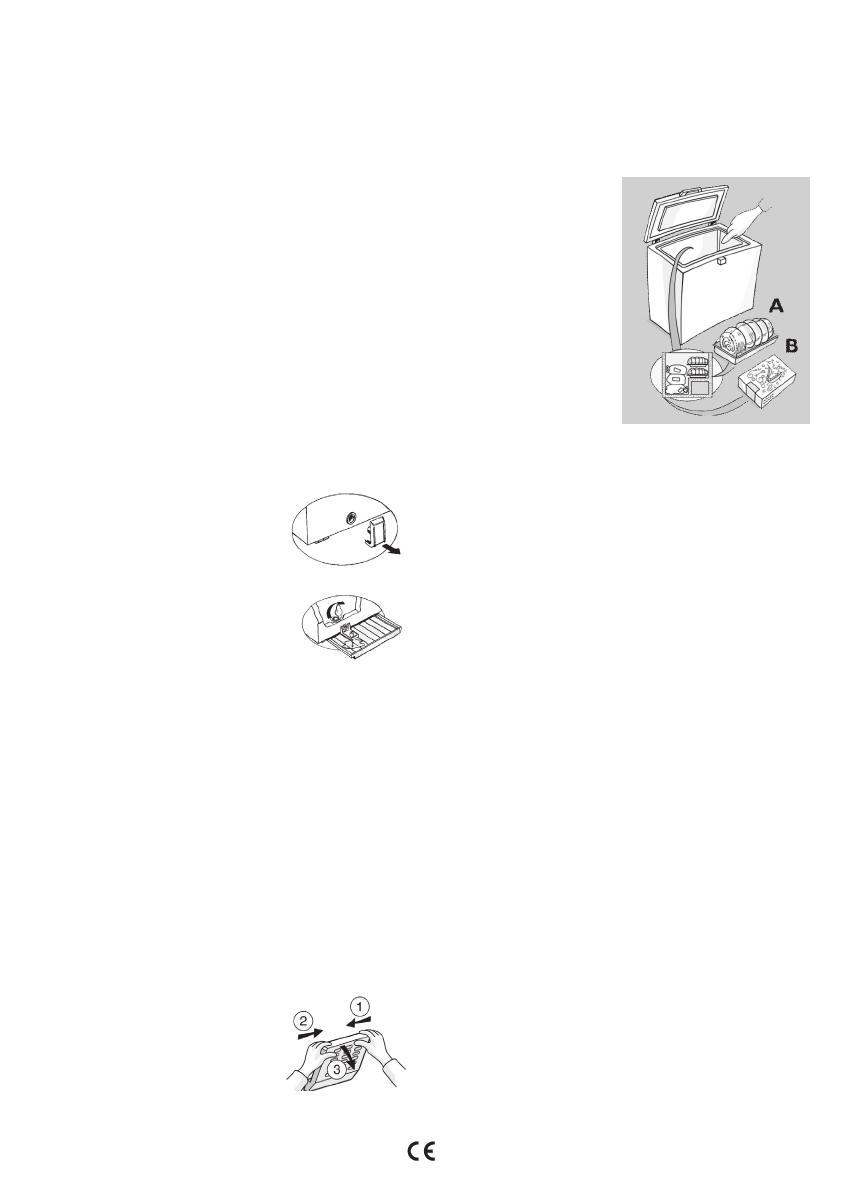
Freezing fresh food
• Place foods to be frozen in direct contact with the walls of
appliance:
A. foods to be frozen,
B. foods already frozen.
• Avoid placing foods to be frozen in direct contact with food
already frozen.
• For best and fastest freezing, foods should be split into
small portions; this will also be useful when the frozen items
are to be used.
1. At least 24 hours before
storing fresh food in the
appliance, press the fast
freeze button.
2. Place the food to be
frozen and keep the lid of
the appliance closed for
24 hours. The fast freeze
function automatically
deactivates after about 50
hours.
DEFROSTING THE APPLIANCE
The appliance should be defrosted
when the thickness of ice on the walls
reaches 5-6 mm.
• Disconnect the appliance from the
mains power supply.
• Remove the packs of food from
the appliance and wrap them close
together in newspaper and store
in a very cool place or thermally
insulated bag.
• Leave the appliance lid open.
• Remove the internal defrost water drain plug (depending
on model).
• Remove the external defrost water drain plug (depending
on model) and reposition it as shown in the gure.
• Place a bowl beneath the drainage channel to collect the
residual water. If available, use the divider.
• Speed up defrosting by using a spatula to detach the ice
from the appliance walls.
• Remove the ice from the bottom of the appliance.
• In order to avoid permanent damage to the appliance
interior, do not use pointed or sharp metal instruments for
removing the ice.
• Do not use abrasive products or heat up the interior
articially.
• Dry the interior of the appliance thoroughly.
• On completion of the defrosting, ret the plug.
CHANGING THE LID LIGHT BULB if provided)
• Disconnect the appliance from the
mains power supply.
• Remove the diuser by following
the sequence of steps shown in the
gure.
• Unscrew the light bulb and replace
it with an identical bulb of the same
wattage and voltage.
• Ret the diuser and plug in the appliance.
AFTERSALES SERVICE
Before contacting After-Sales Service:
1. See if you can solve the problem yourself.
2. Switch the appliance on again to see if the problem has
been solved. If it has not, disconnect the appliance from the
power supply and wait for about an hour before switching
on again.
3. If the problem persists after this course of action, contact
After- Sales Service.
TROUBLESHOOTING GUIDE
1. The red LED (if provided) remains alight.
• Is there a power failure?
• Is defrosting in progress?
• Is the appliance lid properly closed?
• Is the appliance positioned near a heat source?
• Is the thermostat setting correct?
• Are the ventilation grille and condenser clean?
2. The appliance is too noisy.
• Is the appliance perfectly horizontal?
• Is the appliance in contact with other furniture or objects
that may cause vibrations?
• Has the packaging been removed from under the
appliance?
Note: gurgling noises from the refrigerating circuit after the
compressor cuts out are perfectly normal.
3. The green LED (if provided) is o and the appliance is
not working.
• Is there a power failure?
• Is the plug properly inserted in the socket?
• Is the electric cable intact?
4. The green LED (if provided) is o and the appliance is
working.
• The green LED is not working. Contact the After Sales
Service for a replacement.
5. The compressor runs continuously.
• Have hot foods been put in the appliance?
• Has the appliance lid been left open for a long time?
• Is the appliance positioned in a very warm room or near
heat sources?
• Is the thermostat setting correct?


