Crown Boiler BIMINI BWC150 User manual

Category
Water heaters & boilers
Type
User manual
BWC Series
Direct Vent Condensing Boilers
INSTALLATION SUPPLEMENT FOR BOILERS
VENTED WITH CPVC/PVC PIPE
These instructions must be afxed on or adjacent to the boiler.
Models:
BWC070
BWC090
BWC120
BWC151
BWC150
BWC225
WARNING: Improper installation, adjustment, alteration,
service or maintenance can cause property damage, injury,
or loss of life. For assistance or additional information, con-
sult a qualied installer, service agency or the gas supplier.
This boiler requires a special venting system. Read these
instructions carefully before installing.
D ESIGNED TO L EAD
Manufacturer of Hydronic Heating Products
P.O. Box 14818 3633 I. Street
Philadelphia, PA 19134
Tel: (215) 535-8900 • Fax: (215) 535-9736 • www.crownboiler.com
1
1
Table of Contents
A. Vent System Design 2
B. Assembly of CPVC/PVC Concentric Venting 14
C. Condensate Trap and Drain 20
D. Removing An Existing Boiler From Common Chimney 22
E. Special Requirements For Side-Wall Vented Appliances
In The Commonwealth of Massachusetts 23
2
3
WARNING
Failure to vent this boiler in accordance with these instructions could cause ue gas to enter the building
resulting in severe property damage, personal injury, or death:
Use of the BWC boiler with CPVC/PVC venting requires a special vent kit available from Crown
Boiler Company. Do not attempt to vent the boiler using either CPVC/PVC without the use of the
appropriate vent kit called for in this manual.
Do not apply thermal insulation to vent pipe or ttings.
Do not interchange vent systems or materials unless otherwise specied.
Do not obtain combustion air from within the building.
Do not install a barometric damper, vent damper, or drafthood on this boiler.
Unless otherwise noted, the use of CPVC is required where the vent pipe passes through enclosed
spaces and through wall penetrations.
Do not use cellular core PVC (ASTM F891).
Pitch the vent piping as called for in these instructions to prevent condensate from pooling in the
venting.
Starting at the boiler, the rst 30” of straight pipe, and the rst 90 degree elbow, in the vent system
must be CPVC. PVC may only be used in the vent system downstream of this CPVC piping.
A. Vent System Design
There are several different ways to vent BWC series boilers. This installation supplement covers installation of
those vent systems that employ CPVC and PVC plastic pipe. Refer to the BWC installation manual when installing a
vent system using stainless steel or concentric PPs venting.
When CPVC/PVC pipe is used, there are two basic ways to vent a BWC boiler, each having several variations:
• Horizontal (“Side Wall”) Twin Pipe Venting (Table 1.1) - Vent system exits the building through an outside
wall. Combustion air and ue gas are routed between the boiler and the terminal using separate pipes.
• Vertical Twin Pipe Venting (Table 1.12) - Vent system exits the building through a roof. Combustion air and
ue gas are routed between the boiler and the terminal using separate pipes.
All of these systems are considered “direct vent” because in all of them air for combustion is drawn directly from
the outdoors into the boiler. A description of all of these venting options are shown in Tables 1.1 and 1.12. One of
the vent option columns in Tables 1.1 or 1.12 must match the planned vent and air intake system exactly. In addition,
observe the following guidelines:
CPVC/PVC Adaptor Kits1. - The use of CPVC/PVC venting on BWC boilers requires the use of a special kit. Each
kit consists of the following principle components:
Adaptor/s for the Vent and Intake Connections
30” Section of Straight CPVC Pipe
CPVC Elbow
(2) PVC Termination Tees
(2) Rodent Screens
(1 ea.) Can PVC/CPVC Primer and Cement
Part Numbers for each kit are shown in Table 1.5
NOTE: Models BWC070, 090, 120 and 151 may be ordered from the factory with the above components
packaged in the boiler. When this is done the vent adaptor may be shipped installed on the boiler.
CAUTION
Moisture and ice may form on the surfaces around the vent termination. To prevent deterioration,
surfaces should be in good repair (sealed, painted, etc.).
2
3
TABLE 1.1: SUMMARY OF HORIZONTAL VENTING OPTIONS
VENT OPTION # 1 2 3 4
CLASSIFICATION USED IN THIS
MANUAL
HORIZONTAL
TWIN PIPE
HORIZONTAL
TWIN PIPE
HORIZONTAL
TWIN PIPE
HORIZONTAL
TWIN PIPE
ILLUSTRATED IN FIGURE 1.2 1.3 1.4 1.4
VENT PIPE PENETRATION
THROUGH STRUCTURE
WALL WALL WALL WALL
AIR INTAKE PIPE PENETRATION
THROUGH STRUCTURE
WALL WALL WALL WALL
VENT PIPE SIZE
3” 3”
3” 4”
AIR INTAKE PIPE SIZE
3” 3”
4” 4”
MAXIMUM LENGTH
VENT
BWC070 100ft 100ft
BWC090 100ft 100ft
BWC120 100ft 100ft
BWC151 100ft 100ft
BWC150
55ft
BWC225
55ft
INLET
BWC070 100ft 100ft
BWC090 100ft 100ft
BWC120 100ft 100ft
BWC151 100ft 100ft
BWC150
60ft
BWC225
60ft
MINIMUM LENGTH
VENT
BWC070 2ft 2ft
BWC090 2ft 2ft
BWC120 2ft 2ft
BWC151 2ft 2ft
BWC150
2ft
BWC225
2ft
INLET
BWC070 2ft 2ft
BWC090 2ft 2ft
BWC120 2ft 2ft
BWC151 2ft 2ft
BWC150 2ft
BWC225 2ft
VENT TERMINAL TEE (Note #1)
CROWN
PN 230873
CONCENTRIC
TERMINAL
TEE (Note #1) TEE (Note #1)
AIR INTAKE TERMINAL TEE (Note #1) TEE (Note #1) TEE (Note #1)
VENT MATERIAL
CPVC + PVC
(Note #2)
CPVC + PVC
(Note #2)
CPVC + PVC
(Note #2)
CPVC + PVC
(Note #2)
AIR INTAKE MATERIAL PVC PVC PVC PVC
Note #1: TEEs may be offset on snorkels as shown in Figure 1.10
Note #2: First 30” and Elbow connected to boiler must be CPVC. Downstream vent pipe can be PVC, except as noted in text.
4
5
Approved vent components and materials - The adaptor kits listed in Table 1.5 are required to connect the venting 2.
to the boiler. Starting at the boiler, the rst 30 inches of the vent system, and the rst elbow, must be CPVC. In
addition, use only pipe that meets the following standards:
CPVC - ASTM F441
PVC - ASTM D2665
The primer and cement used must be designed for use with the venting materials being joined (PVC, CPVC or
CPVC to PVC).
Maximum Vent and Air Intake Lengths3. - The maximum length of the vent air intake piping depends upon the
vent option selected and the boiler size. See Table 1.1 or 1.12 for the maximum vent lengths. In horizontal
vent systems, the lengths shown in Table 1.1 are in addition to the rst 90 elbow. For vertical vent systems, the
maximum vertical vent lengths shown in Table 1.12 are in addition to two 90 elbows. If more elbows are desired, the
maximum allowable vent length must be reduced by the amount shown in Table 1.7 for each additional elbow used.
Termination ttings are never counted.
The elbows supplied in the CPVC/PVC vent kit are “standard radius” elbows. It is recommeded that all eld
supplied elbows must be “1/4 Bend” (Sanitary 90 El) or “Long Sweep 1/4 Bend” type elbows (Figure 1.8). In this
manual “sanitary” and “long sweep” elbows are treated as having the same equivalent length.
Example:
A 3” twin pipe horizontal CPVC/PVC vent system is planned for a horizontally vented BWC120 which has the
following components in the vent system:
1 ft CPVC Straight Pipe•
90 CPVC Elbow (Supplied in Crown vent kit)•
1-1/2 ft CPVC Straight Pipe•
Coupling•
10 ft PVC Straight Pipe•
90 PVC Elbow (Sanitary Elbow Design)•
15 ft PVC Straight Pipe•
PVC Tee Terminal•
The Vent Option #1 column in Table 1.1 describes a horizontal direct vent system using 3” CPVC and PVC pipe.
Fromthiscolumn,weseethataBWC120mayhaveaventlengthofupto100ft.TherstCPVC90degreeelbowis
not considered. From Table 1.7, we see that the equivalent length of the 90 PVC elbow is 4ft and that the equivalent
length of the coupling is 0ft. The total equivalent length of the planned venting system is therefore:
1ft(StraightCPVC)+0ft(rstCPVC90Elbow)+1.5ft(StraightCPVC)+0ft(Coupling)+10ft
(Straight PVC) +
4ft (PVC 90 Elbow) + 15ft
(Straight PVC)
+ 0ft (Tee Terminal) =
31.5ft.
Since Table 1.1 shows a maximum allowable vent length of 100ft, the planned vent system length is acceptable.
Minimum Vent and Air Intake Lengths 4. - Observe the minimum vent lengths shown in Table 1.1.
Permitted Terminals for Horizontal Venting (Vent Option #1-3)5. - Use one of the following terminals:
PVC Teesa. - PVC Tees are used for both the inlet and vent. They are the same size as the connected vent
or intake system and are installed with the run vertical as shown in Figures 1.2 and 1.4. Rodent screens are
installed in the side connection of the Tee where it is connected to the vent or intake pipe. Terminal Tees and
rodent screens are provided with the CPVC/PVC vent kit.
PVC Tees on Snorkelsb. - If desired, the PVC Tees terminations may be installed on snorkels as shown in Figure
1.10. When this is done, all exterior piping except for the termination Tees themselves must be counted when
calculating the equivalent length. The maximum vertical run of the snorkel is 5ft. Observe all restrictions on the
location of the Tee terminal described in Paragraph 6.
Crown Concentric Terminc. al (PN 230873 ) - This optional terminal may be used in place of the Tees on the
BWC070, 090, 120, and 151 (Figure 1.3). It may not be used on the BWC150 or 225.
CAUTION
The CPVC and PVC vent materials supplied with this boiler do not comply with B149.1.S1-07 and are not
approved for use in Canadian jurisdictions that require that vent systems be listed to ULC S636-2008. In
these jurisdictions, vent this boiler using one of the AL29-4c stainless steel vent systems shown in the BWC
installation manual or a listed ULC S636 Class II - 90°C venting system.
4
5
FIGURE 1.2: HORIZONTAL CPVC/PVC VENTING, BWC070/090/120/151 (Vent Option #1)
FIGURE 1.3: HORIZONTAL CPVC/PVC VENTING, BWC070/090/120/151 (Vent Option #2)
6
7
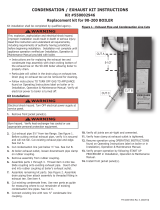
Horizontal Vent and Air Intake Terminal Location6. - Observe the following limitations on the vent terminal location
(also see Figure 1.9). When locating a concentric terminal, observe the limitations outlined below for “vent
terminals”.
Vent terminal must be at least 1 foot from any door, window, or gravity inlet into the building.
For Tee terminals, maintain the correct clearance and orientation between the vent and air intake terminal.
The vent and air intake terminals must be at the same height and their center lines must be between 12 and 36
inches apart. Both terminals must be located on the same wall.
The bottom of all terminals must be at least 12” above the normal snow line. In no case should they be less
than 12” above grade level.
The bottom of the vent terminal must be at least 7 feet above a public walkway.
Do not install the vent terminal directly over windows or doors.
The bottom of the vent terminal must be at least 3 feet above any forced air inlet located within 10 feet.
USA Only: A clearance of at least 4 feet horizontally must be maintained between the vent terminal and gas
meters, electric meters, regulators, and relief equipment. Do not install vent terminal over this equipment. In
Canada, refer to B149.1 Installation Code for clearance to meters, regulators and relief equipment.
Do not locate the vent terminal under decks or similar structures.
Top of vent terminal must be at least 5 feet below eves, softs, or overhangs. Maximum depth of overhang is 3
ft.
Vent terminal must be at least 6 feet from an inside corner.
Under certain conditions, water in the ue gas may condense, and possibly freeze, on objects around the vent
terminal including on the structure itself. If these objects are subject to damage by ue gas condensate, they
should be moved or protected.
If possible, install the vent and air intake terminals on a wall away from the prevailing wind. Reliable operation
of this boiler cannot be guaranteed if these terminals are subjected to winds in excess of 40 mph.
Air intake terminal must not terminate in areas that might contain combustion air contaminates, such as near
swimming pools. See the installation manual for more information on possible contaminates.
Permitted Terminals for Vertical Venting7. - Use either of the following terminals:
Coupling On Vent, 180 Bend On Inleta. - A coupling is installed in the end of the vent pipe. Install a rodent
screen between this coupling and the last piece of vent piping. Use a 180 bend or two 90 elbows to make the
inlet termination (Figures 1.14, 1.16). Rodent screens are provided with the CPVC/PVC vent kit. The elbow/s
and coupling must be procured locally.
Crown Concentric Terminal (PN b. 230873) - This optional terminal may be used in place of the coupling and
180 bend on the BWC070, 090, 120, and 151 (Figure 1.15). It may not be used on the BWC150 or BWC225.
Vertical Vent Terminal Locations (Vent Options 5,6)8. - Observe the following limitations on the location of all
vertical vent terminals (see Figures 1.14 - 1.16):
The top of the vent pipe must be at least 2 feet above any object located within 10 feet.
For Coupling/Elbow terminations, the vertical distance between top of the vent and air inlet terminal openings
must be at least 12”.
The bottom of the air inlet terminal must be at least 12” above the normal snow accumulation that can be
expected on the roof.
For Coupling/Elbow terminations, the air intake terminal must be located on the roof and must be no further
than 24” horizontally from the exhaust pipe.
Clearances to Combustibles9. - Maintain the following clearances from the vent system to combustible construction:
Vent - 1” (also observe clearances through both combustible and non-combustible walls - see 10 below)
Air Intake - 0”
Concentric Portion of Crown 230873 Terminal - 0”
Running PVC Vent Pipe Inside Enclosures and Through Walls10. - PVC vent pipe must be installed in a manner that
permits adequate air circulation around the outside of the pipe:
Do not enclose PVC venting - Use CPVC in enclosed spaces, even if PVC is installed upstream.
PVC venting may not be used to penetrate combustible or non-combustible walls unless all of the following
conditions are met:
The wall pentration is at least 66 inches from the boiler as measured along the vent.a.
The wall is 12” thick or lessb.
An airspace of at least that shown in Figure 1.13 is maintained around the OD of the vent.c.
If any of these conditions cannot be met, use CPVC for the wall pentetration.
6
7
TABLE 1.5: CROWN CPVC/PVC VENTING COMPONENTS
CROWN PN DESCRIPTION
USED ON
VENT
OPTION #
COMMENTS
230595 CPVC/PVC VENT KIT, BWC070/090/120/151 1,2,5,6
230596 CPVC/PVC VENT KIT, BWC150 3,7
230597 CPVC/PVC VENT KIT, BWC225 4,8
230873 PVC CONCENTRIC TERMINAL 2,6 Use with BWC070/090/120/151 Only
Note: BWC070/090/120/151 may be ordered with components in 230595 vent kit packaged inside the boiler
carton.
FIGURE 1.4: HORIZONTAL CPVC/PVC VENTING, BWC150/225 (Vent Option #3, 4)
Pitch of Horizontal Piping4. - Pitch all horizontal piping 1/4” per foot so that any condensate which forms in the
piping will run towards the boiler.
Supporting Pipe5. - Vertical and horizontal sections of pipe must be properly supported. Maximum support spacing is
four feet.
Allowing for Thermal Expansion6. - Design the vent system to allow 3/8” of thermal expansion for every 10ft of
CPVC/PVC pipe. The boiler will always act as an anchor to one end of the vent system. If at all possible, select and
install hangers and wall thimbles so that the vent system can expand towards the terminal. When a straight run of
pipe exceeds 20ft and must be restrained at both ends, an offset or expansion loop must be provided (Figures 1.11a,
1.11b). When a straight horizontal run of pipe exceeds 20ft and is restrained at one end with an elbow at the other,
avoid putting a hanger or guide less than “Y” inches from the elbow in the adjoining straight section (Figure 1.11c).
Thermal expansion ttings are not permitted.
8
9
TABLE 1.6: CROWN CPVC/PVC VENT KIT CONTENTS
CROWN PN DESCRIPTION SIZE
QTY PER VENT KIT
PN 230595
(BWC070/090/120/151)
PN 230596
(BWC150)
PN 230597
(BWC225)
230840 CPVC/PVC VENT/INTAKE ADAPTOR 3” 1 0 0
230843 CPVC VENT ADAPTOR 3” 0 1 0
230844 CPVC VENT ADAPTOR 4” 0 0 1
230854 INTAKE ADAPTOR 4” 0 1 1
230841 VENT/INTAKE ADAPTOR GASKET N/A 1 0 0
230855 FLUE GAS SAMPLE CAP N/A 1 1 1
230823 30” STRAIGHT CPVC SECTION 3” 1 1 0
230824 30” STRAIGHT CPVC SECTION 4” 0 0 1
230813 90 DEG CPVC ELBOW 3” 1 1 0
230814 90 DEG CPVC ELBOW 4” 0 0 1
230803 PVC TEE 3” 2 1 0
230804 PVC TEE 4” 0 1 2
230833 RODENT SCREEN 3” 2 1 0
230834 RODENT SCREEN 4” 0 1 2
230865 IPS MULTI-PURPOSE 790 CEMENT 4 oz 1 1 1
230860 IPS P-70 PRIMER 4 oz 1 1 1
240550 TAPPED CONDENSATE TRAP PLUG N/A 0 1 1
240560 66” OF 1/2” CLEAR PVC TUBING N/A 0 1 1
240555 90° HOSE BARB N/A 0 2 2
240557 1/2” HOSE CLAMP N/A 0 2 2
TABLE 1.7: VENT/ AIR INTAKE FITTING EQUIVALENT LENGTH
VENT FITTING EQUIVALENT LENGTH (ft)
3” 90 ELBOW (“SANITARY BEND”) 4.0
4” 90 ELBOW (“SANITARY BEND”) 5.5
3” 90 ELBOW (“SHORT BEND” ) 10.0
4” 90 ELBOW (“SHORT BEND”) 13.5
3” 45 ELBOW 2.0
4” 45 ELBOW 3.0
3” COUPLING 0.0
4” COUPLING 0.0
FIGURE 1.8: ELBOWS
8
9
FIGURE 1.9a: LOCATION OF VENT TERMINAL RELATIVE TO WINDOWS, DOORS, GRADE
FIGURE 1.9b: LOCATION OF VENT TERMINAL RELATIVE TO METERS AND FORCED AIR INLETS
FIGURE 1.9c: POSITIONING VENT TERMINAL UNDER OVERHANGS
10
11
FIGURE 1.10: SNORKEL TERMINAL CONFIGURATION
FIGURE 1.11: EXPANSION LOOPS
FIGURE 1.11.bFIGURE 1.11.a
FIGURE 1.11.c
10
11
FIGURE 1.11: EXPANSION LOOPS
TABLE 1.12: SUMMARY OF VERTICAL VENTING OPTIONS
VENT OPTION # 5 6 7 8
CLASSIFICATION USED IN THIS
MANUAL
VERTICAL
TWIN PIPE
VERTICAL
TWIN PIPE
VERTICAL
TWIN PIPE
VERTICAL
TWIN PIPE
ILLUSTRATED IN FIGURE 1.14 1.15 1.16 1.16
VENT PIPE PENETRATION
THROUGH STRUCTURE
ROOF ROOF ROOF ROOF
AIR INTAKE PIPE PENETRATION
THROUGH STRUCTURE
ROOF ROOF ROOF ROOF
VENT PIPE SIZE
3” 3”
3” 4”
AIR INTAKE PIPE SIZE
3” 3”
4” 4”
MAXIMUM LENGTH
VENT
BWC070 98ft 98ft
BWC090 98ft 98ft
BWC120 98ft 98ft
BWC151 98ft 98ft
BWC150
51ft
BWC225
49.5ft
INLET
BWC070 98ft 98ft
BWC090 98ft 98ft
BWC120 98ft 98ft
BWC151 98ft 98ft
BWC150
54.5ft
BWC225
54.5ft
MINIMUM LENGTH
VENT
BWC070 2ft 2ft
BWC090 2ft 2ft
BWC120 2ft 2ft
BWC151 2ft 2ft
BWC150
2ft
BWC225
2ft
INLET
BWC070 2ft 2ft
BWC090 2ft 2ft
BWC120 2ft 2ft
BWC151 2ft 2ft
BWC150 2ft
BWC225 2ft
VENT TERMINAL COUPLING
CROWN
PN 230873
CONCENTRIC
TERMINAL
COUPLING COUPLING
AIR INTAKE TERMINAL 180 ELBOW 180 ELBOW 180 ELBOW
VENT MATERIAL
CPVC + PVC
(Note #1)
CPVC + PVC
(Note #1)
CPVC + PVC
(Note #1)
CPVC + PVC
(Note #1)
AIR INTAKE MATERIAL PVC PVC PVC PVC
Note #1: First 30” and Elbow connected to boiler must be CPVC. Downstream vent pipe can be PVC, except as noted in text.
12
13
FIGURE 1.14: VERTICAL CPVC/PVC VENTING, BWC070/090/120/151 (VENT OPTION 5)
FIGURE 1.13: WALL PENETRATION CLEARANCES FOR PVC VENT PIPE
12
13
FIGURE 1.15: VERTICAL CPVC/PVC VENTING, BWC070/090/120/151 (VENT OPTION 6)
FIGURE 1.16: VERTICAL CPVC/PVC VENTING, BWC150/225 (VENT OPTIONS 7 & 8)
14
15
B. Assembly of CPVC/PVC Vent Systems
WARNING
Failure to follow the instructions could result in ue gas leakage into the combustion air or indoor air, resulting in
unsafe or unreliable operation.
All CPVC vent components (supplied with the boiler) must be used for near boiler vent piping before
transitioning to Schedule 40 PVC (ASTM 2665) components for the remainder of the system.
The use of cellular core PVC (ASTM F891) is prohibited.
The use of CPVC is required where venting passes through chase ways and through walls with clearances less
than shown in Figure 1.13.
Never leave the boiler in operation without the silicone gas sample cap in place (Figure 1.17, 1.18)
Install the vent adaptor and intake adaptor on the boiler. 1.
BWC070, 090, 120, 151 - If the CPVC/PVC vent/intake adaptor is not factory installed, install the vent/intake
adaptor as shown in Figure 1.17.
If the boiler has been supplied with a different vent adaptor, remove the six #10 sheet metal screws which a.
attach it to the boiler. Remove the old adaptor from the boiler (this may be easier if a twisting motion is
applied to the collar while removing it).
Attach the self adhesive gasket supplied with the stainless steel vent/intake adaptor to the bottom of the b.
adaptor.
Lubricate the brown gasket in the female end of the plastic vent stub (inside the boiler) with a few drops of c.
water.
Push the vent/intake adaptor onto the boiler with a slight twisting motion. Make sure that this vent adaptor d.
is inserted at least 1” into the boiler stub.
Secure the collar ange to the top of the boiler with the (6) #10 x 1/2” sheet metal screws supplied with the e.
vent kit or those removed in Step (a).
Verify that the silicone gas sample cap is in place (Figure 1.17).f.
BWC150, 225 - Install the vent and air inlet adaptors as shown in Figure 1.18.
Remove the hose clamp shipped on the BWC150 or 225 vent collar.a.
Bend the three hose clamp tabs on this collar outward slightly.b.
Clean the exterior of the male end of the CPVC adaptor with an alcohol pad.c.
Apply a ¼” wide bead of high temperature silicone approximately ½ inch from the male end of the adaptor. d.
Also apply a ¼” bead of silicone along the rst 2 ½” of the longitudinal weld.
Insert the male end of the adaptor into the boiler vent collar until it bottoms out.e.
Apply an additional bead of silicone over the outside of the joint and smooth out.f.
Replace and tighten the clamp on the vent collar.g.
Verify that the silicone gas sample cap is in place (Figure 1.18).h.
Attach the 1/2” ID Clear tubing provided to the condensate drain connection (Upper 1/2” tube) as shown in i.
Figure 1.18. Secure with one of the hose clamps provided.
Route the tubing down the right side panel and into the 1-3/8” knockout located in the lower portion of this j.
panel. Be sure to remove all burrs from the knockout to prevent the hose from being punctured.
Remove the plug and black gasket ring from the bottom of the condensate trap located under the boiler k.
(Figure 1.24)
Replace the original gray trap plug with the white tapped plug. Screw the 90 degree hose barb provided into l.
this white plug (Figure 1.24).
Attach the other end of the 1/2” ID tubing to the 90 degree hose barb and secure with the remaining hose m.
clamp (Figure 1.24).
Slip the air inlet adaptor into the intake collar on the top of the boiler as shown in Figure 1.18. Secure with n.
at least one #10 sheet metal screw.
14
15
FIGURE 1.17: INSTALLATION OF VENT/INTAKE ADAPTOR (BWC070/090/120/151)
FIGURE 1.18: INSTALLATION OF VENT AND INTAKE ADAPTORS (BWC150/225)
16
17
Assemble the vent system, starting at the boiler: 2.
The CPVC elbow and the 30” straight section of CPVC provided with the kit must be used before a.
transitioning to PVC. If necessary, the 30” straight section of CPVC may be cut at any location and the
CPVC elbow inserted between the two resulting segments.
When cutting CPVC or PVC pipe, use a miter saw or a saw designed to cut PVC pipe. Use a miter box or b.
other method to cut pipe squarely. De-burr both the inside and outside of the cut end.
Dry t all vent components before assembly. c.
Lubricate the gasket in the vent adaptor with water. Insert the rst straight section of CPVC into the vent d.
adaptor and tighten the hose clamp.
Clean all CPVC and PVC components with the appropriate primer before cementing. Cement the vent e.
system together, starting at the boiler and following the instructions provided on the cans of cement
and primer. Use the cement provided with the kit to assemble all CPVC components and to make all
connections between CPVC and PVC components. If additional cement/primer is needed, use cement/
primer that are designed for use with the plastics being joined (CPVC and/or PVC).
Depending on the layout of the vent system, the rst piece of PVC vent will be connected to either the f.
CPVC elbow or the end of a section of CPVC pipe. In the latter case, use a PVC coupling to connect the
rst piece of PVC to the last section of CPVC.
Assemble the rest of the vent system, being sure to pitch horizontal sections back towards the boiler 1/4”/ft. g.
Support the vent at intervals not exceeding 4ft.
Maintain the clearances from the vent pipe outlined in Part A of this manual. If exiting the exterior wall h.
using PVC pipe, use half of an appropriately sized wall thimble (or a sheet metal plate) on the exterior of
the building, to provide a weather tight seal while maintaining the proper clearance in the wall penetration.
Seal the joint between the pipe and the wall plate using RTV applied on the exterior side of the wall. This
sealant must not restrain the expansion of the vent pipe.
Installation of Air intake System3. - Start assembly of the air intake system at the boiler. Assembly of the air intake
system is done in the same manner as the vent system except as follows:
The rst piece of air intake pipe on the BWC150 and BWC 225 is installed over the intake adaptor installed a.
in Step (1i). This piece of pipe is secured to the adaptor using at least one sheet metal screw (drill a
clearance hole in the PVC intake pipe). Seal the joint between the intake pipe and the adaptor with RTV.
All intake piping may be PVC.b.
There is a 0” minimum clearance between the air intake piping and all types of construction.c.
To the extent possible, pitch horizontal air intake piping towards the outside . d.
FIGURE 1.19: INSTALLATION OF STANDARD HORIZONTAL TERMINALS
16
17
Installation of Standard Terminals:4.
Horizontal (Tee Terminals):
When using Tee terminals, the inside edge of the run of the Tee must be between 6 and 24” from the wall. a.
The run of the Tee must be vertical. (Figure 1.19). b.
If desired, the Tees can be attached to the end of the vent and/or intake pipes with eld supplied stainless c.
steel screws so that they can be later removed for cleaning and inspection. If this is done, drill a clearance
hole in the Tee and a tap hole in the end of the vent/intake pipes to accept these screws.
If Tee terminals are installed on snorkels, assemble the snorkels as shown in Figure 1.10. Brace the vertical d.
run of piping on the building exterior as required.
Vertical (Coupling on Exhaust, 180 Elbow on Intake):
See Figure 1.20a. for the proper orientation of twin pipe vertical terminals.
The coupling is used to secure the rodent screen to the end of the vent pipe. b.
A 180 bend (or two 90 elbows) are installed on the top of the air intake pipe. If two 90 elbows are used, c.
the rodent screen provided can be installed between them (Figure 1.20). If a 180 bend is used, install the
rodent screen in the open side of the bend, using a ring made of PVC pipe. (Figure 1.20). If desired, the
termination ttings can be attached to the end of the vent and/or intake pipes with eld supplied stainless
steel screws so that they can be later removed for cleaning and inspection. If this is done, drill a clearance
hole in these ttings and a tap hole in the end of the vent/intake pipes to accept these screws.
Use roof ashings and storm collars to prevent moisture from entering the building. Seal the roof ashing d.
to the roof using generally accepted practice for the type of roof on the installation. Apply RTV to seal the
storm collars to the vent and intake pipes.
FIGURE 1.20: INSTALLATION OF STANDARD VERTICAL TERMINALS
WARNING
Method of securing and sealing terminals to the outside wall must not restrain the expansion of vent pipe.
18
19
Installation of Optional Crown # 5. 230873 concentric vent terminal - This terminal may be used for either
horizontal or vertical venting. Do not attempt to use this terminal on a BWC150 or BWC225. All CPVC
supplied with the vent kit must be used prior to connection of the vent system to this terminal. If the vent system
is too short to permit this, do not use this terminal:
Horizontal Installations-
Cement the 4” diameter section of PVC pipe supplied with this kit to the Wye tting using a primer and a.
cement listed for use with PVC.
Cut a 4-5/8” dia round hole in the exterior wall at the location of the terminal (see Section A of this manual b.
for permitted terminal locations).
If desired, the terminal can be shortened. If this is done, cut the 4” (outer) pipe so that it protrudes between c.
1-1/4 and 2-1/4” from the exterior surface of the wall. Cut the pipe squarely and de-burr both the OD and
ID of the cut edge.
If the terminal is shortened, “dry-t” the inner pipe in the Wye tting. Cut the inner pipe so that it protrudes d.
between 5-1/8 and 5-1/4” from the outside edge of the outer pipe.
Cement the inner pipe to the Wye, being careful, to keep the opposite end centered inside the outer pipe.e.
Slip the partially assembled terminal through the wall from the inside and orient so that the side outlet on f.
the Wye is on or above the horizontal plane.
Seal the gap between the OD of the “outer pipe” and the exterior side of the wall with RTV sealant.g.
Cement the rain cap onto the inner pipe. If desired, the rain cap can be attached to the inner pipe with a eld h.
supplied stainless steel screw so that it can be later removed for cleaning and inspection. If this is done,
drill a clearance hole in the rain cap and a tap hole in the inner pipe to accept this screw. A 1/2” mesh eld
supplied rodent screen may also installed between the rain cap and the inner pipe (Figure 1.21)
Vertical Installations -
Cement the 4” diameter section of PVC pipe supplied with this kit to the Wye tting using a primer and a.
cement listed for use with PVC.
Cut a hole in the roof large enough to clear the concentric terminal at the location of the terminal (see b.
Section A of this manual for permitted terminal locations).
Use a roof ashing and storm collar to prevent moisture from entering the building. Seal the roof ashing to c.
the roof using generally accepted practice for the type of roof on the installation.
Slip the partially assembled terminal through the roof from the inside.d.
Install the storm collar after verifying that the bottom of the rain cap will be at least 12” above the normal e.
snow line. Apply RTV to seal the storm collars to the terminal.
Cement the inner pipe to the Wye, being careful, to keep the opposite end centered inside the outer pipe. f.
Cement the rain cap onto the inner pipe. If desired, the rain cap can be attached to the inner pipe with a eld
supplied stainless steel screw so that it can be later removed for cleaning and inspection. If this is done,
drill a clearance hole in the rain cap and a tap hole in the inner pipe to accept this screw. A 1/2” mesh eld
supplied rodent screen may also installed between the rain cap and the inner pipe (Figure 1.22)
WARNING
Do not attempt to use this terminal on a BWC150 or BWC225
All CPVC supplied with the vent kit must be used prior to connection of the vent system to this terminal. If
the vent system is too short to permit this, do not use this terminal
Do not operate boiler without the rain cap in place.
Method of securing and sealing terminals to the outside wall must not restrain the expansion of vent pipe.
  • Page 1 1
  • Page 2 2
  • Page 3 3
  • Page 4 4
  • Page 5 5
  • Page 6 6
  • Page 7 7
  • Page 8 8
  • Page 9 9
  • Page 10 10
  • Page 11 11
  • Page 12 12
  • Page 13 13
  • Page 14 14
  • Page 15 15
  • Page 16 16
  • Page 17 17
  • Page 18 18
  • Page 19 19
  • Page 20 20
  • Page 21 21
  • Page 22 22
  • Page 23 23
  • Page 24 24
  • Page 25 25
  • Page 26 26

Crown Boiler BIMINI BWC150 User manual

Category
Water heaters & boilers
Type
User manual

Ask a question and I''ll find the answer in the document

Finding information in a document is now easier with AI