Page is loading ...

BWC Series
INSTALLATION INSTRUCTIONS
BWC070
BWC090
BWC120
BWC151
: Improper installation, adjustment, alteration,
service or maintenance can cause property damage, injury,
or loss of life. For assistance or additional information, con-
sult a qualied installer, service agency or the gas supplier.
This boiler requires a special venting system. Read these
instructions carefully before installing.
D ESIGNED TO L EAD
Manufacturer of Hydronic Heating Products
P.O. Box 14818 3633 I. Street
Philadelphia, PA 19134
www.crownboiler.com


1
Table of Contents
I. Product Description 2
II. Specications 2
III. Before Installing 3
IV. Locating The Boiler 3
V. Mounting The Boiler 6
VI. Air For Ventilation 9
VII. Venting 11
A. Vent System Design 11
B. Removing An Existing Boiler From Common Chimney 21
C. Assembly of Crown 60/100mm Concentric Venting 22
D. Assembly of Crown 80/125mm Concentric Venting 26
E. Assembly of Stainless Steel Venting 35
F. Condensate Trap and Drain 40
VIII. Gas Piping 42
IX. System Piping 43
A. General System Piping Precaution 43
B. System Design 43
C. Standard Piping Installation Requirements 50
D. Piping For Special Situations 51
X. Wiring 54
XI. Start-up and Checkout 62
XII. Operation 68
XIII. Service and Maintenance 85
XIV. Troubleshooting 87
XV. Parts 91
Appendix A: OptionalMethodforRetrottingBWCBoilers104
into Existing Circulator Zone Systems
Appendix B: Special Requirements For Side-Wall 105
Vented Appliances In The Commonwealth
of Massachusetts

2
I Product Description
TheBWC070,BWC090,BWC120andBWC151arealuminumgasredcondensingboilersdesignedforusein
forced hot water heating systems requiring supply water temperatures of 180°F or less. These boilers are designed
forinstallationonawall,howevertheymaybeoormountedusinganoptionalpedestalkitavailablefromCrown.
This boiler may be vented vertically or horizontally with combustion air supplied from outdoors. This boiler is not
designedforuseingravityhotwatersystemsorsystemscontainingsignicantamountsofdissolvedoxygen.
Table 2.3: Maximum Vent Lengths
Using Concentric Vent System Supplied with the Boiler...................................................................................25 in.
Using Optional 60/100mm Concentric Vent Components:
BWC070........................................................................32 ft
BWC090........................................................................32 ft
BWC120........................................................................18 ft
Using Optional 80/125 Vertical Concentric Vent System...................................................................................95ft
Using Optional 80/125 Horizontal Concentric Vent System.............................................................................100ft
Using Approved 3” AL29-4C Horizontal Stainless Vent System and Optional Stainless Steel Vent Kit..........100 ft
See Vent Section for additional venting options and requirements.
Figure2.1:GeneralConguration
IISpecications
Table2.2:Specications
MODEL*
NO. OF
SECTIONS
MAXIMUM
INPUT
(BTU/hr)
MINIMUM
INPUT
(BTU/hr)
D.O.E.
HEATING
CAPACITY
(BTU/hr)
AHRI NET
RATING
(BTU/hr)
WATER
VOLUME
(Gal.)
SUPPLY &
RETURN
CONNECTION
SIZE (NPT)
GAS
CONNECTION
SIZE (NPT)
APPROX.
NET
WEIGHT
(lb)
BWC070 mono block 70,000 30,000 63,000 55,000 0.41 1” 1/2” 102
BWC090 mono block 90,000 30,000 80,000 70,000 0.41 1” 1/2” 102
BWC120 mono block 120,000 40,000 107,000 93,000 0.62 1” 1/2” 110
BWC151 mono block 150,000 50,000 135,000 119,000 1.13 1” 1/2” 133
*Addsufx“EN”fornaturalgasand“EL”forpropane.Ratingsarethesameforbothfuels.

3
III Before Installing
1) Safe, reliable operation of this boiler depends upon installation by a professional heating contractor in strict
accordance with this manual and the authority having jurisdiction.
• Intheabsenceofanauthorityhavingjurisdiction,installationmustbeinaccordancewiththismanual
and the National Fuel Gas Code, ANSI Z223.1. In Canada, installation must be in accordance with the
B149.1 Installation Code.
• Whererequiredbytheauthorityhavingjurisdiction,thisinstallationmustconformtotheStandardfor
Controls and Safety Devices for Automatically Fired Boilers (ANSI/ASME CSD-1).
2) BWC boilers utilize aluminum heat exchangers constructed, tested, and stamped in accordance with ASME
Boiler and Pressure Vessel Code Case 2382. Some jurisdictions which require ASME boiler construction do
not recognize this Code Case and may not approve the installation of an aluminum boiler. Consult the author-
ity having jurisdiction before installing this boiler.
3) Read Section VII to verify that the maximum combustion air and exhaust pipe lengths will not be exceeded in
the planned installation. Also verify that the vent terminal can be located in accordance with Section VII.
4) Make sure that the boiler is correctly sized:
• Forheatingsystemsemployingconvectionradiation(baseboardorradiators),useanindustryaccepted
sizing method such as the I=B=R Heat Loss Calculation Guide (Pub. #H21 or #H22) published by the
Hydronics Institute in Berkely Heights, NJ.
• Fornewradiantheatingsystems,refertotheradianttubingmanufacturer’sboilersizingguidelines.
• ForsystemsincludingaCrownMega-Storindirectwaterheater,sizetheboilertohaveeithertheDOE
Heating Capacity required for the Mega-Stor or the net rating required for the heating system, whichever
results in the larger boiler.
• Forsystemsthatincorporateotherindirectwaterheaters,refertotheindirectwaterheatermanufacturer’s
instructions for boiler output requirements.
5) Makesurethattheboilerreceivedisconguredforthecorrectgas(naturalorLP).
6) Makesurethattheboilerisconguredforuseatthealtitudeatwhichitistobeinstalled.
IV Locating the Boiler
1) Observe the minimum clearances shown in Figure 4.1. These clearances apply to both combustible and non-
combustible materials. Observe the minimum clearances to combustibles for vent pipe shown in Table 4.2.
2) Note the recommended service clearances in Figure 4.1. These service clearances are recommended, but may
be reduced to the combustible clearances provided:
a. Access to the front of the boiler is provided through a door.
b. Access is provided to the condensate trap and transformer located underneath the boiler.
3) Whentheboilerisinstalledontheoorusingtheoptionalpedestalkit,theboilermaybeinstalledonanon-
carpeted combustible surface.
4) Thereliefvalvemustbeinstalledinthefactoryspeciedlocation.
NOTICE
Thisproductmustbeinstalledbyalicensedplumberorgastterwheninstalledwithinthe
Commonwealth of Massachusetts. See Appendix A for additional important information about
installing this product within the Commonwealth of Massachusetts.

4
Figure 4.1: Clearances To Combustible Or Non-Combustible Material
5) The boiler should be located so as to minimize the length of the vent system.
6) The combustion air piping must terminate where outdoor air is available for combustion and away from areas that
will contaminate combustion air. Avoid areas near chemical products containing chlorine, chloride based salts,
chloro/uorocarbons,paintremovers,cleaningsolventsanddetergents.

5
Table 4.2: Clearances From Vent Piping To Combustible Construction
TYPE OF VENT PIPE PIPE DIRECTION ENCLOSURE
MINIMUM CLEARANCE
TO COMBUSTIBLE
MATERIAL
80/125 and 60/100mm
CONCENTRIC VENTING
VERTICAL OR
HORIZONTAL
ENCLOSED ON ALL FOUR SIDES 0” (0mm)
HEAT FAB SAF-T VENT
PROTECH FASNSEAL
Z-FLEX Z-VENT III
METAL-FAB CORR/GUARD
VERTICAL OR
HORIZONTAL
AT LEAST ONE SIDE OPEN,
COMBUSTIBLE MATERIAL ON A
MAXIMUM OF THREE SIDES
1” (26mm)
HEAT FAB SAF-T VENT
PROTECH FASNSEAL
Z-FLEX Z-VENT III
METAL-FAB CORR/GUARD
HORIZONTAL OR VERTICAL
WITH OFFSETS
ENCLOSED ON ALL FOUR SIDES
2-1/2” (64mm)
HEAT FAB SAF-T VENT
PROTECH FASNSEAL
Z-FLEX Z-VENT III
METAL-FAB CORR/GUARD
VERTICAL WITH NO OFFSETS ENCLOSED ON ALL FOUR SIDES
2-1/2” (64mm)

6
V Mounting The Boiler
A. Wall Mounting
1) If the boiler is installed on a framed wall, minimum acceptable framing is 2 x 4 studs on 16” centers. The
boiler mounting holes are on 16” centers for installation between two studs at the standard spacing. In
cases where the boiler cannot be centered between the studs, or where the studs are spaced closer than 16”
apart, the boiler may be anchored to ¾” plywood or horizontal 2 x 4s anchored to the studs.
2) 5/16” x 2” lag screws and washers are provided for mounting this boiler. These lag screws are intended
for mounting the boiler directly onto studs covered with ½” sheet rock. When the boiler is attached to
other types of construction, such as masonry, use fasteners capable of supporting the weight of the boiler
and attached piping in accordance with good construction practice and applicable local codes.
3) Make sure that the surface to which the boiler is mounted is plumb.
4) Before mounting the boiler, make sure that wall selected does not have any framing or other construction
that will interfere with the vent pipe penetration.
5) Onceasuitablelocationhasbeenselectedfortheboiler,andanyneededmodicationshavebeenmade
tothewall,useFigure5.1tolocateholes“A”and“B”.Makesurethatthehorizontalcenterlineofthese
holesislevel.Holes“C”and“D”mayalsobedrilledatthistimeoraftertheboilerishungonthewall.If
the 5/16” x 2” lag screws are used, drill 3/16” pilot holes.
6) Cut the opening/s in the wall for the vent system. The recommended hole diameter is 4-3/8” for
60/100mm coaxial pipe and 5-3/8” for 80/125mm pipe.
7) Attach the wall hanging hook using the 5/16” x 2” lag screws and washers, or other suitable anchors as
appropriate (Figure 5.2). Make sure the hook is level.
8) Hangtheboileronthewallhookasshowningure5.2.
9) IfnotalreadydoneinStep(4)locateanddrillholes“C”and“D”usingtheobroundslotsinthebottom
mountingange.Securethebottomangetothewallusingthe5/16”x2”lagscrews,orotherfastenersas
appropriate(gure5.2).
10)Verifythatthefrontoftheboilerisplumb.Ifitisnot,installwashersatholes“C”and“D”betweenthe
bottommountingangeandthewalltoadjust.
10) See Section VII (Venting) for instructions on attaching the vent system to the boiler.
B. Floor Mounting
ThisboilermaybemountedontheoorusinganoptionalpedestalkitavailablefromCrown.Followthe
instructions provided with this kit to assemble the pedestal, and attach it to the boiler. When this pedestal is used,
theboilermaybeinstalleddirectlyonanon-carpetedcombustibleoor.
CAUTION
This boiler weighs approximately 133 pounds:
• Twopeoplearerequiredtosafelyliftthisboilerontothewallmountinghook.
• Makesurethatwallmountinghookisanchoredtoastructurecapableofsupportingthe
weightoftheboilerandattachedpipingwhenlledwithwater.Jurisdictionsinareas
subjecttoearthquakesmayhavespecialrequirementsforsupportingthisboiler.These
localrequirementstakeprecedenceovertherequirementsshownbelow.

7
Figure 5.1 Wall Mounting Hole Locations

8
Figure 5.2 Boiler Mounting/Hardware

9
VI Air for Ventilation
Airforcombustionmustalwaysbeobtaineddirectlyfromoutdoors,howeversufcientairforventilationmust
still be provided in the boiler room. Air for ventilation is required to keep various boiler components from over-
heating and is always obtained from indoors. To ensure an adequate ventilation air supply, perform the following
steps:
Step 1: Determinewhethertheboileristobeinstalledinaconnedspace-Aconnedspaceisdenedbythe
National Fuel Gas Code as having a volume less than 50 cubic feet per 1000 BTU/hr input of all appliances
installedinthatspace.Todeterminewhethertheboilerroomisaconnedspace:
1) Total the input of all appliances in the boiler room in thousands of BTU/hr. Round the result to the next
highest 1000 BTU/hr.
2) Find the volume of the room in cubic feet. The volume of the room in cubic feet is:
Length (ft) x width (ft) x ceiling height (ft)
In calculating the volume of the boiler room, consider the volume of adjoining spaces only if no doors are
installed between them. If doors are installed between the boiler room and an adjoining space, do not consider
the volume of the adjoining space, even if the door is normally left open.
3) Divide the volume of the boiler room by the input in thousands of BTU/hr. If the result is less than 50, the
boiler room is a connedspace.
Example:
A BWC120 and a water heater are to be installed in a room measuring 6ft – 3 in x 7ft with an 8 ft ceiling. The
water heater has an input of 30000 BTU/hr:
Total input in thousands of BTU/hr = (120000 BTU/hr + 30000 BTU/hr) / 1000 = 150 MBTU/hr
Volume of room = 6.25 ft x 7 ft x 8 ft = 350 ft3
350/150=2.33.Since2.33islessthan50,theboilerroomisaconnedspace.
Step 2a: If the boiler is to be placed in a connedspace, provide two openings into the boiler room, one near the
oorandoneneartheceiling.Thetopedgeoftheupperopeningmustbewithin12”oftheceilingandthebottom
edgeoftheloweropeningmustbewithin12”oftheoor(Fig6.1).Theminimumopeningdimensionis3inches.
• IftheBWCboileristheonlygas-burningapplianceintheboilerroom,theseopeningsmusteachhavea
minimum free area of 100 square inches.
• Ifothergas-burningappliancesareintheboilerroom,sizetheopeningsinaccordancewiththeappliance
manufacturer’sinstructionsortheNationalFuelGasCode.Minimumopeningfreeareais100square
inches even if opening requirements for other appliances are less.
WARNING
OUTDOOR COMBUSTION AIR MUST BE PIPED TO THE AIR INTAKE. NEVER PIPE COMBUSTION
AIR FROM AREAS CONTAINING CONTAMINATES SUCH AS SWIMMING POOLS AND LAUNDRY
ROOM EXHAUST VENTS. CONTAMINATED COMBUSTION AIR WILL DAMAGE THE BOILER
AND MAY CAUSE PROPERTY DAMAGE, PERSONAL INJURY OR LOSS OF LIFE.

10
Figure6.1:BoilerInstalledInAConnedSpace,VentilationAirFromInside
• Ifthetotalvolumeofboththeboilerroomandtheroomtowhichtheopeningsconnectislessthan50cubicfeet
per 1000 BTU/hr of total appliance input, install a pair of identical openings into a third room. Connect addi-
tional rooms with openings until the total volume of all rooms is at least 50 cubic feet per 1000 BTU/hr of input.
• The“freearea”ofanopeningtakesintoaccounttheblockingeffectofmesh,grills,andlouvers.Wherescreens
areused,theymustbenonerthan¼”(4x4)mesh.
Step 2b: If the boiler is to be placed in an unconnedspacethenaturalinltrationintotheboilerroomwill
provide adequate air for ventilation without additional openings into boiler room.

11
VII Venting
WARNING
FAILURE TO VENT THIS BOILER IN ACCORDANCE WITH THESE INSTRUCTIONS COULD CAUSE
FLUE GAS TO ENTER THE BUILDING RESULTING IN SEVERE PROPERTY DAMAGE, PERSONAL
INJURY, OR DEATH:
* Use only vent systems and materials explicitly permitted by Crown for use with this boiler.
* Do not attempt to mix components from different approved vent systems.
* Do not obtain combustion air from within the building.
* Do not install a barometric damper or drafthood on this boiler.
A. Vent System Design
There are four basic ways to vent this boiler:
• Horizontal (“Side Wall”) Concentric Venting - Vent system exits the building through an outside wall.
Concentricventingconsistsofa“pipewithinapipe”.Fluegasexitsthebuildingthroughtheinnerpipeand
combustion air is drawn into the boiler through the space between the inner and outer pipe.
• Horizontal (“Side Wall”) Twin Pipe Venting - Vent system exits the building through an outside wall.
Combustionairanduegasareroutedbetweentheboilerandoutdoorsusingseparatepipes.
• Vertical Concentric Venting - Vent system exits the building through the roof. Concentric venting consists of a
“pipewithinapipe”.Fluegasexitsthebuildingthroughtheinnerpipeandcombustionairisdrawnintotheboiler
through the space between the inner and outer pipe.
• Vertical Twin Pipe Venting-Ventsystemexitsthebuildingthrougharoof.Combustionairanduegasare
routed between the boiler and outdoors using separate pipes.
Allofthesesystemsareconsidered“directvent”becauseinallofthemairforcombustionisdrawndirectlyfrom
the outdoors into the boiler. A description of all of these venting options are shown in Tables 7.1 and 7.9. For clarity,
these vent options are numbered from 1 to 6. One of the vent option columns in Tables 7.1 or 7.9 must match the
planned vent and air intake system exactly. In addition, observe the following guidelines:
1) Approved vent systems - Use only one of the approved vent systems shown in Tables 7.4, 7.5 or explicitly approved
by Crown for use with this boiler in an installation manual supplement. These vent systems fall into three basic
categories:
• Concentric Vent System - The standard boiler is supplied with a concentric vent system having a maximum
usable length of 25” (Figure 1.1). For longer runs, additional straight lengths and elbows are available from
Crown. In some cases, larger diameter concentric pipe must be used. Each Crown concentric vent component
consistsofaninnerpipeofpolypropyleneandtheouterpipeofsteel.Integralgasketsoneachconcentrictting
provide a gas tight seal. A list of all Crown concentric vent components is shown in Table 7.4.
In this manual, concentric pipe sizes are called out in terms of the inner and outer pipe nominal diameters in
millimeters.Forexample,“60/100mm”pipeconsistsofa60mmexhaustpipeinsidea100mmdiameterouterpipe.
• Twin Pipe Stainless Vent Systems - Approved vent systems are made of a special stainless steel alloy (AL29-4C)
forprotectionagainstcorrosiveuegascondensate.Theyaredesignedtoprovideagastightsealatalljointsand
seamssothatuegasdoesnotenterthebuilding.Eachapprovedventsystemhasauniquemethodforinstallation
- do not attempt to mix components from different vent systems. A list of approved twin pipe vent systems is
shown in Table 7.5. Note that a special vent collar (Crown PN 230510) is required if the boiler is to be vented
with one of the approved stainless vent systems.
• CPVC/PVC Twin Pipe Vent System - A twin pipe venting option using a Crown CPVC/PVC vent kit is also
available. See the Crown CPVC/PVC installation manual supplement for kit part numbers and additional
information.
CAUTION
Moisture and ice may form on the surfaces around the vent termination. To prevent deterioration,
surfaces should be in good repair (sealed, painted, etc.).

12
2) Maximum Vent and Air Intake Lengths - The maximum length of the vent air intake piping depends upon the vent
option selected and the boiler size. See Table 7.1 or 7.9 for the maximum vent length. In horizontal vent systems,
thelengthsshowninTable7.1areinadditiontotherststandardelbowontopoftheboiler.Forverticalvent
systems, the maximum vertical vent lengths shown in Table 7.9 are in addition to two standard radius elbows. If more
elbows are desired, the maximum allowable vent length must be reduced by the amount shown in Table 7.8 for each
additionalelbowused.Terminationttingsarenevercounted,althoughthelengthoftheconcentricterminalsection
is counted.
Example:
A 60/100mm concentric vent system is planned for a horizontally vented BWC120 which has the following
components:
80/125 x 60/100mm Reducing Elbow (supplied with the boiler)
5ft Straight Pipe
90 elbow
1-1/2ft Straight Pipe
45Elbow
Uncut Terminal Section (supplied with the boiler)
The Vent Option #1 column in Table 7.1 describes a horizontal direct vent system using 60/100mm concentric vent
pipe. From this column, we see that a BWC120 may have a vent length of up to 18ft. The 90 degree reducing elbow
is not considered. The length of the terminal section (not including the plastic terminal itself) is approximately 22
1/2” (1.9ft) installed. From Table 7.8, we see that the equivalent length of the 60/100mm elbow is 4.5ft and that the
equivalent length of the 45 degree elbow is 4ft. The total equivalent length of the planned venting system is therefore:
5ft (Straight ) + 4.5ft (90 Elbow) + 1.5ft (Straight ) + 4 ft (45 Elbow) + 1.9ft (Uncut Terminal Section) = 16.9ft.
Since Table 7.1 shows a maximum allowable vent length of 18ft, the planned vent system length is acceptable.
3) Minimum Vent and Air Intake Lengths - Observe the minimum vent lengths shown in tables 7.1 and 7.9.
4) Permitted Terminals for Horizontal Venting:
• Vent Option 1 - The 60/100mm concentric vent terminal is supplied with the boiler as part of the standard vent
system.
• Vent Option 2-TheexhaustterminalisCrownPN230511.Theairintakettingisa90degreeelbowwitharodent
screen supplied by the installer. This elbow is made out of the same material as the rest of the air inlet system
(either galvanized or PVC) and is installed as shown in Figure 7.3.
• Vent Option 3 - Two terminals are permitted:
a) 80/125mm Concentric Vent Terminal (Crown PN 230531)
b) 80/125mm Snorkel Terminal (Crown PN 230540) . This terminal allows the vent system to exit the building
close to grade and go up the exterior wall far enough to provide adequate clearance between the terminal itself
and the snow line (Figure 7.7).
5) Horizontal Vent and Air Intake Terminal Location - Observe the following limitations on the vent terminal location
(alsoseeFigures7.6,7.7).Whenlocatingaconcentricterminal,observethelimitationsoutlinedbelowfor“vent
terminals”.
• Ventterminalsmustbeatleast1footfromanydoor,window,orgravityinletintothebuilding.
•Fortwinpipeterminals,maintainthecorrectclearanceandorientationbetweentheventandairintaketerminals.
The vent and air intake terminals must be at the same height and their center lines must be between 12 and 36
inches apart. Both terminals must be located on the same wall.
• Thebottomofallterminalsmustbeatleast12”abovethenormalsnowline.Innocaseshouldtheybelessthan
12” above grade level.
• Thebottomoftheventterminalmustbeatleast7feetaboveapublicwalkway.
•Donotinstalltheventterminaldirectlyoverwindowsordoors.
• Thebottomoftheventterminalmustbeatleast3feetaboveanyforcedairinletlocatedwithin10feet.
• USAOnly:Aclearanceofatleast4feethorizontallymustbemaintainedbetweentheventterminalandgas
meters, electric meters, regulators, and relief equipment. Do not install vent terminal over this equipment. In
Canada, refer to B149.1 Installation Code for clearance to meters, regulators and relief equipment.
• Donotlocatetheventterminalunderdecksorsimilarstructures.
• Topofventterminalmustbeatleast5feetbeloweves,softs,oroverhangs.Maximumdepthofoverhangis3ft.

13
TABLE 7.1: SUMMARY OF HORIZONTAL VENTING OPTIONS
VENT OPTION # 1 2 3
CLASSIFICATION USED IN THIS
MANUAL
HORIZONTAL
CONCENTRIC
HORIZONTAL
TWIN PIPE
HORIZONTAL
CONCENTRIC
ILLUSTRATED IN FIGURE 7.2 7.3 7.2
VENT PIPE PENETRATION
THROUGH STRUCTURE
WALL WALL WALL
AIR INTAKE PIPE PENETRATION
THROUGH STRUCTURE
WALL WALL WALL
VENT PIPE SIZE
60/100 mm
CONCENTRIC
3”
80/125 mm
CONCENTRIC
AIR INTAKE PIPE SIZE 3”
MAXIMUM LENGTH
VENT
BWC070 32ft
100ft 100ft
BWC090 32ft
100ft 100ft
BWC120 18ft
100ft 100ft
BWC151
100ft 100ft
INLET
BWC070 32ft
100ft 100ft
BWC090 32ft
100ft 100ft
BWC120 18ft
100ft 100ft
BWC151
100ft 100ft
MINIMUM LENGTH
VENT
BWC070 10in
10in 10in
BWC090 10in
10in 10in
BWC120 10in
10in 10in
BWC151
10in 10in
INLET
BWC070 10in
10in 10in
BWC090 10in
10in 10in
BWC120 10in
10in 10in
BWC151
10in 10in
VENT TERMINAL
60/100 mm
CONCENTRIC
CROWN
#230511
Crown 230531
CONCENTRIC
or 230540
SNORKEL
AIR INTAKE TERMINAL 3” 90 ELBOW
VENT MATERIAL
CROWN
60/100mm
VENT
COMPONENTS
SHOWN IN
TABLE 7.4a
(Note #1)
APPROVED
STAINLESS
STEEL VENT
SYSTEM
SHOWN IN
TABLE 7.5
CROWN
80/125mm VENT
COMPONENTS
SHOWN IN
TABLE 7.4b
AIR INTAKE MATERIAL
GALVANIZED
OR PVC
Note #1: In Vent Option #1, the 80/125mm concentric straight section (PN 230515) shown in Table 7.4a may be used between the
boilerandtherst80/125x60/100reducingelbow.Ifthisisdone,theoverallmaximumventlengthisstillrestrictedtothatshownfor
Vent Option #1 in Table 7.1 above.
Horizontal Terminal Clearance Requirements (continued):
• Ventterminalmustbeatleast6feetfromaninsidecorner.
• Undercertainconditions,waterintheuegasmaycondense,andpossiblyfreeze,onobjectsaroundthevent
terminalincludingonthestructureitself.Iftheseobjectsaresubjecttodamagebyuegascondensate,they
should be moved or protected.
• Ifpossible,installtheventandairintaketerminalsonawallawayfromtheprevailingwind.Reliableoperation
of this boiler cannot be guaranteed if these terminals are subjected to winds in excess of 40 mph.
•Airintaketerminalmustnotterminateinareasthatmightcontaincombustionaircontaminates,suchasnear
swimming pools. See Section IV for more information on possible contaminates.

14
FIGURE 7.2: HORIZONTAL CONCENTRIC VENTING
(VENT OPTION 1,3)
FIGURE 7.3: HORIZONTAL TWIN PIPE VENTING (VENT OPTION 2)

15
TABLE 7.4a: CROWN CONCENTRIC 60/100 VENT COMPONENTS
(VENT OPTION 1)
CROWN PN DESCRIPTION SIZE
USED ON
VENT
OPTION #
COMMENTS
230521
80/125 x 60/100mm REDUCING
ELBOW
80/125 x
60/100mm
1
INCLUDED WITH STANDARD
BWC070/090/120
230520 TERMINAL SECTION 60/100mm 1
INCLUDED WITH STANDARD
BWC070/090/120
230522 WALL GROMMET 60/100mm 1
INCLUDED WITH STANDARD
BWC070/090/120
230505 39” STRAIGHT 60/100mm 1 OPTIONAL - MAY NOT BE CUT
230504 78” STRAIGHT 60/100mm 1 OPTIONAL - MAY NOT BE CUT
230506 19 1/2” STRAIGHT 60/100mm 1 OPTIONAL - CAN BE CUT
230507 90 DEGREE ELBOW 60/100mm 1 OPTIONAL
230508 45 DEGREE ELBOW 60/100mm 1 OPTIONAL
230515 39” STRAIGHT 80/125mm 1 OPTIONAL - CAN BE CUT (Note #1)
Note#1:On60/100mmventsystems,thismayonlybeusedbetweentheboilerandtherst80/125x60/100Reducingelbow(seetext).
TABLE 7.4b: CROWN CONCENTRIC 80/125 VENT COMPONENTS
(VENT OPTIONS 3,6)
CROWN PN DESCRIPTION SIZE
USED ON
VENT
OPTION #
COMMENTS
230527 90 DEGREE EL (STANDARD) 80/125mm 3,6
230528 90 DEGREE EL (SWEEP) 80/125mm 3,6
230526 45 DEGREE EL 80/125mm 3,6
230517 19 1/2” STRAIGHT 80/125mm 3,6 CAN BE CUT
230515 39” STRAIGHT 80/125mm 3,6 CAN BE CUT
230518 39” STRAIGHT 80/125mm 3,6 MAY NOT BE CUT
230519 78” STRAIGHT 80/125mm 3,6 MAY NOT BE CUT
230525 TELESCOPING STRAIGHT 80/125mm 3,6 ADJUSTABLE FROM 12-1/2” TO 16-1/2
230531 HORIZONTAL TERMINAL 80/125mm 3
230540 SNORKEL KIT 80/125mm 3 (NOTE #1)
230532 VERTICAL TERMINAL 80/125mm 6 (NOTE #2)
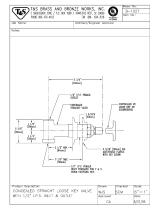
230533 FLAT ROOF FLASHING 80/125mm 6
230535 SLOPED ROOF FLASHING 80/125mm 6 (NOTE #3)
230530
SUPPORT ELBOW WITH
CHIMNEY CHASE BRACKET
80/125mm 6 (NOTE #4)
230536 SUPPORT BAND 80/125mm 3,6
Table 7.4b Notes:
1) Snorkel kit includes parts needed to offset terminal on exterior wall by up to 46”.
2)Verticalterminalcanbeusedwitheitheroftheroofashingslistedbeneathit.
3)Slopedroofashingsuitableforroofanglesbetween25and45degrees.
4) Used at base of vertical run inside unused masonry chimney.

16
6) Permitted Terminals for Vertical Venting -
• Vent Option 5 - A straight termination is installed in the end of the vent pipe. Vent manufacturer part numbers for these
screens are shown in Table 7.5. The air inlet terminal consists of a 180 degree elbow (or two 90 degree elbows) with a
rodent screen as shown in Figure 7.10.
• Vent Option 6 - Use Crown PN 230532 withtheappropriateashing(Table7.4b)
7) Vertical Vent Terminal Locations (Vent Options 5,6) - Observe the following limitations on the location of all vertical vent
terminals (see Figures 7.10, 7.11):
•Thetopoftheventpipemustbeatleast2feetaboveanyobjectlocatedwithin10feet.
•ForVentOption#5,theverticaldistancebetweentopoftheventandairinletterminalopeningsmustbeatleast12”.
•Thebottomoftheairinletterminalmustbeatleast12”abovethenormalsnowaccumulationthatcanbeexpectedon
theroof.TheterminalusedinVentOption#6hasaxeddistanceabovethestormcollarof19”.Ifagreaterdistanceis
needed to provide the clearance above the snow line, build a chase on the roof and mount the vertical terminal on top of
the chase.
•ForVentOption#5,theairintaketerminalmustbelocatedontheroofandmustbenofurtherthan24”horizontallyfrom
the exhaust pipe.
8) Wall thimbles – Wall thimbles are required where single wall vent pipe passes through combustible walls with less than
therequiredclearanceshowninTable4.2orasrequiredbylocalcodes.Stainlessventmanufacturer’swallthimblepart
numbersareshowninTable7.5.Notethatconcentricventhasa“zero”clearancetocombustiblesandthereforedoesnot
require the use of wall thimbles.
TABLE 7.5: PERMISSIBLE STAINLESS STEEL VENT SYSTEMS
AND PRINCIPLE VENT COMPONENTS
(VENT OPTIONS 2, 5)
MANUFACTURER
VENT
SYSTEM
SIZE COMPONENT PART NUMBER
HEAT FAB
SAF-T
VENT
EZ SEAL
3 BOILER COLLAR CROWN 230510
3 WALL THIMBLE HEAT FAB 7393, 7393GCS, 5391CI
3 HORIZONTAL TERMINAL CROWN 230511
3 VERTICAL TERMINAL HEAT FAB 9392
PROTECH
SYSTEMS
INC.
FASNSEAL
3 BOILER COLLAR CROWN 230510
3 WALL THIMBLE FSWT3
3 HORIZONTAL TERMINAL CROWN 230511
3 VERTICAL TERMINAL FSBS3
Z-FLEX
SVE
SERIES III
(“Z-VENT
III”)
3 BOILER COLLAR CROWN 230510
3 WALL THIMBLE 2SVSWTEF03
3 HORIZONTAL TERMINAL CROWN 230511
3 VERTICAL TERMINAL 24SVSTPF03
METAL-FAB
CORR/
GUARD
3 BOILER COLLAR CROWN 230510
3 WALL THIMBLE CGSWWPK(3”)
3 HORIZONTAL TERMINAL CROWN 230511
3 VERTICAL TERMINAL CGSWHTM(3”)
NOTES:
1)Seeventsystemmanufacturer’sliteratureforotherpartnumbersthatarerequiredsuchasstraightpipe,elbows,restopsandventsupports.
2) Crown 230510 collar replaces factory-mounted concentric collar (Figure 7.46).

17
FIGURE 7.6a: LOCATION OF VENT TERMINAL RELATIVE TO WINDOWS, DOORS, GRADE
FIGURE 7.6b: LOCATION OF VENT TERMINAL RELATIVE TO METERS AND FORCED AIR INLETS
FIGURE 7.6c: POSITIONING VENT TERMINAL UNDER OVERHANGS

18
9) Pitch of Horizontal Piping - Pitch all horizontal piping so that any condensate which forms in the piping will run
towards the boiler:
•PitchCrownhorizontalconcentricventing5/8”perfoot(53mm/m).
•PitchStainlesssteelventing1/4”perfoot(21mm/m).
10) Supporting Pipe - Vertical and horizontal sections of pipe must be properly supported:
•SupportCrownconcentricventingnearthefemaleendofeachstraightsectionofpipe.
Exception: Vertical runs of concentric pipe in an unused chinmey (Figure 7.36) need only be supported at the
terminal and at the base of the run.
•Supportstainlesssteelventingascalledforbytheventmanufacturer’sinstructions.
FIGURE 7.7: SNORKEL TERMINAL CONFIGURATION
/