Page is loading ...

Easy touch Easy warm
Thermostat Instruction
INSTALL

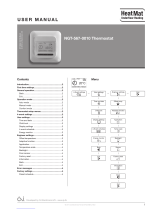
01 Thermostat description
03 Technical specification
04 Display symbols
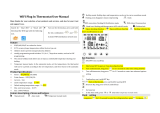
05 WiFi connectionOnly for T6100
06 Function & User operation
07 Advanced setting
09 Dimension
10 Installation and wiring instructions
08 Troubleshooting
02 Main functions of T6100
Table of Contents
01
01
01
02
03
05
10
12
12
13
APP for T6100

MAIN FUNCTIONS OF T6100
THERMOSTAT DESCRIPTION
Supply voltage: 85-265Vac 50/60Hz Maximum switching current: 15A
Holiday funcon
Time display
Hold funcon
Key-lock
Off me frost protecon
Floor high temperature protecon
Open window detecon funcon
TECHNICAL SPECIFICATION
IP rang: IP21Standby power: 2W Wire diameter: ≤2.5mm²
Reverse output funcon
Sensor selecon
DISPLAY SYMBOLS
T6100 is a smart thermostat used to control electric heang devices or valve actuator.
It will keep your home at comfortable temperature while minimizing energy use.
T6100 is a WiFi version for wireless-connecon. You can download the APP on your
smart phone to control your electric heang system wherever you are.
01 02
Frost symbol
Day indicator
Period indicator
Holiday le
Hold le
Clock
Degrees Celsius
Fahrenheit
Floor limit symbol
Advanced Setup
Hold parameter edit
Down
Up
WiFi
Key lock indicator
Floor Temp
Room Temp
Set
Flame symbol
Temperature
Program Parameter edit
Holiday Parameter edit
Clock Parameter edit
Confirm
Return
Power
℉
℃
TEMP
HIGH
SET
ROOM TEMP
FLOOR TEMP
HOLD
h
HOLIDAY
EDIT
SAT
FRITHU
WED
MON
TUE
SUN
WAKE
LEAVE RETURN
SLEEP
LEFT
HOLIDAY HOLD
SETUP

WIFI CONNECTIONION
Step 3: Click “Add Device”on the boom of the screen.
Step 5: Fill in the WiFi network password, click “confirm”.
Step 7: You can set the temperature, change the paern, switch on/off,
lock key or do other operaons on the main interface.
Step 1: Scan the QR code through a browser or download the
APP from Google Play or APP Store.
Step 2: Click the APP, then log in with the registered
phone number or email address.
Step 4: Check the thermostat WiFi flag to
make sure it is fast flashing. If not, operate
the thermostat according to the APP ps
unl it flashes quickly. Then click the
“Make sure WiFi is flashing quickly”
buon.
Step 6: Click “Done”aer the APP is connected to the
thermostat successfully or click “Share with family”.
03 04

Seng Key-lock can prevent children and others from switching thermostat parameters.
In normal med power ’on’ mode, press for 3 senconds to lock the thermostat and
again for 3 seconds to cancel.
Press to turn on/off
FUNCTION & USER OPERATION
On/Off
Temporarily override temperature
Set the Time
Key-lock
Note: When frost protecon mode is acve, the thermostat will maintain
the frost protecon temperature when in power ‘off’ mode.
In normal med power ‘on’ mode, press or to change the current
period temperature seng. The new set temperature will flash for 30
seconds. The thermostat will revert to the normal programmed
seng at the start of the next me period.
In normal med power ‘on’ mode, Press and the clock symbol will flash.
Press again to enter day set.
Press or to set day.
Press to confirm and enter hour set.
Press or to set hour.
Press to confirm and enter minute set.
Press or to set minute.
Press to confirm then press to revert to normal screen.
Note: The T6100W updates the me automacally when connected to the internet in the
condion that the APP agree to locate.
05 06

Holiday mode
Hold mode
In holiday mode, the T6100 will maintain the set temperature unl the holiday me ends.
In normal med power ‘ on ‘ mode,
press to enter seng.
Press or to select holiday.
Press to enter holiday days set.
Press or to set holiday days .
Press to enter holiday temperature seng.
Press or to set the holiday temperature
Press for confirmaon.
Note: Set the holiday days to zero or double press to cancel holiday mode.
The T6100 will maintain the ‘ hold temperature ‘ unl the hold period ends.
In normal med power ‘ on ‘ mode, press to enter seng.
Press or to select hold.
Press to enter hold ON/OFF.
Note: Set hold OFF or double press to cancel hold mode.
The weekly circulaon digital programming mode of T6100 is highly free. It uses 7 days as a circulaon. The
parameters are the same from Monday to Friday, Saturday and Sunday can be set separately.
Press or to set Hold ON.
Press to enter hold temperature seng.
Press or to set the hold temperature.
Press to confirm.
07 08
In normal med power ‘ on ‘ mode, press to enter seng.
Press or to select edit.
Press to enter day selecon.
Press or to select the day to be set.
Press to enter period selecon.
Press or to select the period to be set.
Press to enter start me set.
Program parameter setting

The thermostat can detect an open window by registering a rapid drop in temperature. With the
funcon enabled, the thermostats shuts off the heang for 15 minutes if an open window id
detected. It is energy saving and can protect the floor. When the window closed, please press for
twice then back to the regular program status. Notes: This funcon cannot be prohibited.
Open window detection
Period parameter table (inial value)
Mon----Fri 7:00 22 8:30 19
8:30 22
17:00 22 22:00 19
22:00 1917:00 228:00 22Sat
8:30 22 22:00 1917:00 228:00 22
Sun
Week Wake Leave Return Sleep
ADVANCED SETTING
Press or to select start me hour.
Press to enter minute set.
Press or to select start me minute.
Press to enter temperature set.
Press or to select temperature.
Press to confirm and move on to next me period.
Cauon: These are normally set by technicians during inial installaon.
In normal med power ‘on’ mode, press to enter seng.
Press or to select setup.
Press to enter advanced seng.
Each parameter can be accessed by pressing and adjust the values as required.(the default
values are recommended and changing these may adversely affect the way the thermostat works.)
09 10

1.Room sensor temperature calibraon: calibrate the temperature detected by room sensor.
2.Floor sensor temperature calibraon: calibrate the temperature detected by floor sensor.
3.Frost protecon: If the frost protecon funcon opened, the screen will display “ ” when
the thermostats are OFF, it will keep the room and floor at a lower temperature in order to protect
the pets and plants in your house. Also, it can keep your pipe from freeze broken when using the
water heang system.
4.Sensor selecon: The room sensor is used to control the room temperature. The floor sensor is
used to control the floor temperature. By using both of them, you can not only control the room
temperature but also avoid high floor temperature.
5.Floor temperature limitaon: When you choose both sensors, you can set the maximum floor
temperature value, system will stop heang if the floor temperature exceed this value.
6.Temperature unit: and can be selected.
7.Output delay: The shortest period me between heang and stop heang in the condion
when the temperature changes sharply.
8.Temperature deviaon control: The deviaon is 1. This means If you set a temperature value,
the heang temperature will be 1 lower than the set temperature. The system will stop heang
when the temperature are 1 higher than set temperature.
1
2
3
No. Name Default Ranges
Room temperature calibraon 0
0
ON
- 5-- 5
- 5-- 5
OFF/ON
Floor temperature calibraon
An-frozen funcon
4
5
6
7
8
9
11
10
5
02
30
5--15
00Built-in sensor
01Floor sensor
02Both sensors
20-50
00
01
00:0s
01:30s
03:90s
000.5
011
022
033
00no reset
01reset
An-frozen temperature
Sensor selecon
Floor temperature limit(both sensors)
Temperature unit
Output delay
Temperature deviaon control
Parameter Inializaon
Reverse output
00
1
00
OFF
OFF/ON
INTRODUCTION
PARAMETER
PARAMETER
1211

9.Reverse output: This funcon works for the cooling system. When the temperature are higher
than set temperature, the thermostat will disconnect the cooling system, otherwise, it will
connect the cooling system.
10.Parameter inializaon: All seng parameters are restored to default values.
Installation
TROUBLESHOOTING
DIMENSION (MM)
INSTALLATION AND WIRING INSTRUCTIONS
E1 = Built-in sensor short-circuit or disconnected.
E2 = Floor sensor short-circuit or disconnected.
Note: Should a sensor fault display, please connect us for assistance.
Fault Codes
Wire the back secon as shown in
the wiring diagram.
Loosen fixing screw on the base of
the thermostat and separate front
panel from back secon.
13 14
Step 1 Step 2
87
51
51
42
2616
60
87

mounted in a standard 86L×86W×35H(mm) wall box.
Replace front panel whilst ensuring
the pins engage properly in the
circuit board socket.
Fix the back secon to wall box
with screws provided.
Cauon: Ensure power is disconnected when wiring!
15
Step 3 Step 4
The T6100 series thermostat should be
NOTE:
Power Load
1
Wiring instructions
/