
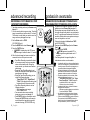
SC-D381
SC-D382
SC-D383
SC-D385
Videocámara
digital
manual del usuario
imagine las posibilidades
Gracias por adquirir este producto Samsung. Para
recibir un servicio más completo, registre
su producto en
www.samsung.com/global/register
Digital Video
Camcorder
user manual
imagine the possibilities
Thank you for purchasing this Samsung product.
To receive more complete service, please register
your product at
www.samsung.com/global/register

ii_ English Spanish _ii
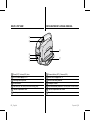
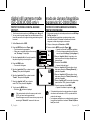
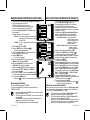
principales funciones de la
videocámara con miniDV
Función de transferencia digital
de datos con IEEE1394
Con la incorporación de IEEE 1394
(i.LINK™: i.LINK es un protocolo de
transferencia de datos serie y un
sistema de interconectividad que se
utiliza para transmitir datos DV), las
imágenes de video y fotográcas
se pueden transferir a una PC,
posibilitando la producción o edición
de diversas imágenes.
Interfaz USB para transferencia
de datos de imágenes digitales
(sólo SC-D383/D385)
Es posible transferir imágenes a la
computadora por medio de la interfaz
USB sin necesidad de una tarjeta
adicional.
Grabación fotográca en cinta
La grabación fotográca en cinta
posibilita la grabación de una imagen
fotográca en una cinta.
CCD de 680.000 píxeles
(sólo SC-D383/D385)
La videocámara incorpora CCD
de 680.000 píxeles. Las imágenes
fotográcas se pueden grabar en una
tarjeta de memoria.
Zoom digital 1200x
Permite ampliar la imagen hasta 1200
veces su tamaño original.
Ampliación de audio
Proporciona un sonido más potente
con las funcionalidades Real Stereo y
Audio Effect.
LCD TFT en color
El sistema de color de alta resolución
TFT de la pantalla LCD proporciona
imágenes claras y nítidas a la vez
que permite ver las grabaciones
inmediatamente.
Estabilizador digital de la imagen (DIS)
El DIS compensa los movimientos de
la mano reduciendo la inestabilidad de
las imágenes, especialmente cuando
estas últimas se graban con una gran
ampliación.
Efectos digitales diversos
Los efectos visuales permiten dar
a la grabación un aspecto especial
al permitir añadir diversos efectos
especiales.
Compensación de la luz de fondo (BLC)
La función BLC compensa el brillo que
puede aparecer detrás del objeto que
se graba.
Program AE
Program AE permite modicar la velocidad
y la apertura del obturador para que se
ajuste a la escena que se vaya a lmar.
Objetivo con zoom de gran potencia
El objetivo del zoom de gran potencia
permite a los usuarios ampliar
claramente el sujeto hasta 34x.
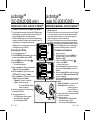
Función de cámara fotográfica
digital (sólo SC-D383/D385)
Utilizando la tarjeta de memoria,
puede fácilmente grabar y reproducir
imágenes fotográficas estándar.
Puede transferir imágenes fotográcas
estándar de la tarjeta de memoria a la
PC utilizando la interfaz USB.
Grabación de imágenes de video
en una tarjeta de memoria
(sólo SC-D383/D385)
La grabación de imágenes de video
posibilita la grabación de video en una
tarjeta de memoria.
Ranura de la tarjeta MMC/SD
(sólo SC-D383/D385)
La ranura para la tarjeta MMC/SD
puede utilizarse para tarjetas MMC
(Tarjetas Multimedia) y SD.
•
•
FUNCIONES DE LA NUEVA VIDEOCÁMARA CON MINIDV
key features of your
miniDV camcorder
Digital Data Transfer Function
with IEEE1394
By incorporating the IEEE 1394
(i.LINK™: i.LINK is a serial
data transfer protocol and
interconnectivity system, used to
transmit DV data) high speed data
transport port, both moving and
photo images can be transferred to
a PC, making it possible to produce
or edit various images.
USB Interface for Digital Image
Data Transfer (SC-D383/D385 only)
You can transfer images to a PC
using the USB interface without an
add-on card.
Tape Photo Recording on a Tape
Tape photo recording makes it
possible to record a photo image on
a tape.
680K pixel CCD
(SC-D383/D385 only)
Your camcorder incorporates a
680K pixel CCD. Photo images can
be recorded to a memory card.
1200x Digital Zoom
Allows you to magnify an image up
to 1200 times its original size.
Audio Enhancement
Provides more powerful sound with
the Real Stereo and Audio Effect
features.
Color TFT LCD
A high-resolution color TFT LCD
gives you clean, sharp images as
well as the ability to review your
recordings immediately.
Digital Image Stabilizer (DIS)
The DIS compensates for any hand
shaking, reducing unstable images
particularly at high magnication.
Various Visual Effects
The Visual Effects allow you to give
your lms a special look by adding
various special effects.
Back Light Compensation (BLC)
The BLC function compensates
for a bright background behind a
subject you're recording.
Program AE
The Program AE enables you to
alter the shutter speed and aperture
to suit the type of scene/action to
be lmed.
High Power Zoom Lens
Power Zoom lens allows users to
magnify the subject clearly up to 34x.
Digital Still Camera Function
(SC-D383/D385 only)
Using memory card, you can
easily record and playback
standard photo images.
You can transfer standard photo
images on the memory card to
your PC using the USB interface.
Moving Image Recording on a
Memory Card (SC-D383/D385 only)
Moving image recording makes
it possible to record video onto a
memory card.
MMC/SD card slot (SC-D383/D385 only)
MMC/SD card slot can use MMC
(Multi Media Cards) and SD cards.
•
•
FEATURES OF YOUR NEW MINIDV CAMCORDER

Spanish _iiiiii_ English
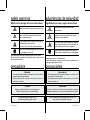
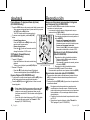
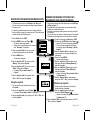
advertencias de seguridad
Signicado de los iconos y signos de este manual:
ADEVERTENCIA
Signica que existe riesgo de muerte o daños
personales serios
.
PRECAUCIÓN
Signica que existe riesgo potencial de lesiones
personales o daños materiales.
PRECAUCIÓN
Para reducir el riesgo de incendio, explosión, descarga
eléctrica o daños personales al utilizar la videocámara,
siga estas precauciones básicas de seguridad:
Signica sugerencias o páginas de referencia que
pueden resultar de utilidad al utilizar la videocámara.
Estos signos de advertencia se incluyen aquí para evitar daños
personales en usted y en otras personas.
Sígalos explícitamente. Después de leer esta sección, guárdelo en un
lugar seguro para referencia futura.
precauciones
Advertencia!
Esta videocámara debe conectarse siempre a una toma de CA
con conexión de toma de tierra.
No debe exponer las baterías a calor excesivo, a la luz directa
del sol ni al fuego, etc.
•
•
Precaución
Si la pila no se sustituye correctamente, se corre el riesgo de una explosión.
Reemplace la batería sólo por una igual o de especicaciones equivalentes.
Si se utiliza esta fuente de alimentación a 240V de CA,
debe utilizarse un adaptador adecuado.
safety warnings
What the icons and signs in this user manual mean :
WARNING
Means that death or serious personal injury is a risk.
CAUTION
Means that there is a potential risk for personal
injury or material damage.
CAUTION
To reduce the risk of re, explosion, electric shock,
or personal injury when using your
camcorder, follow these basic safety precautions:
Means hints or referential pages that may be helpful
when operating the camcorder.
These warning signs are here to prevent injury to you and others.
Please follow them explicitly. After reading this section, keep it in a safe
place for future reference.
precautions
Warning!
This camcorder should always be connected to an AC outlet with
a protective grounding connection.
Batteries shall not be exposed to excessive heat such as
sunshine, re or the like.
•
•
Caution
Danger of explosion if battery is incorrectly replaced.
Replace only with the same or equivalent type.
If this power supply is used at 240V ac,
a suitable plug adaptor should be used.

iv_ English Spanish _iv
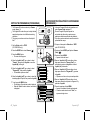
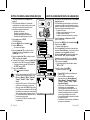
NOTAS REFERENTES A LA LIMPIEZA DEL CABEZAL DE VIDEO
Para asegurarse de que obtendrá una grabación normal y una imagen
clara es necesario limpiar regularmente los cabezales de video. Si
durante la reproducción hay un cuadrado que deforma la imagen o si
sólo se ve una pantalla azul, es posible que los cabezales de video estén
sucios. En caso de ser así, límpielos con una cinta de limpieza en seco.
No utilice una cinta de limpieza que contenga líquidos, podría dañar
los cabezales del video.
•
•
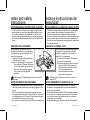
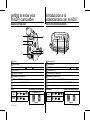
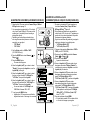
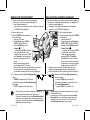
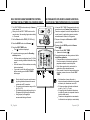
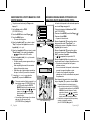
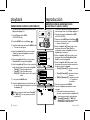
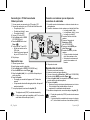
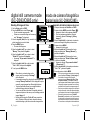
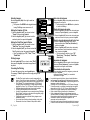
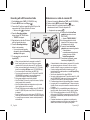
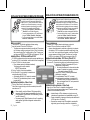
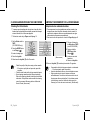
Gire cuidadosamente la pantalla como se indica
en la gura. Si se gira demasiado se puede
estropear la bisagra interior que conecta la
pantalla LCD a la videocámara.
1. Abra con el dedo la pantalla LCD formando
90 grados con la videocámara.
2.
Gírela al mejor ángulo para grabar o reproducir.
-
Si gira la pantalla LCD 180 grados para que
mire hacia adelante, puede cerrar la pantalla
LCD con la pantalla hacia afuera.
-
Esto resulta práctico durante las
operaciones de reproducción.
Consulte la página 31 para ajustar el brillo y el color de la
pantalla LCD.
AJUSTE DE LA PANTALLA LCD
notas e instrucciones de
seguridad
NOTAS REFERENTES A LA PANTALLA LCD
La luz directa del sol puede dañar la pantalla LCD, el interior
del objetivo. Tome imágenes del sol sólo con condiciones de luz
escasa, como al anochecer.
Para la fabricación de la pantalla LCD se ha empleado tecnología
de alta precisión. Sin embargo, pueden aparecer en ella puntitos
rojos, azules o verdes. Esta situación es normal y no afecta en
modo alguno a la foto grabada.
No agarre la videocámara sujetando la pantalla LCD o la batería.
•
•
•
NOTES REGARDING THE VIDEO HEAD CLEANING
To ensure normal recording and a clear picture, clean the video
heads regularly.If a square block-shape distorts playback, or only
a blue screen is displayed, the video heads may be dirty. If this
happens, clean the video heads with a dry type cleaning cassette.
Do not use a wet-type cleaning cassette. It may damage the video
heads.
•
•
Please rotate the LCD screen carefully as
illustrated. Over rotation may cause damage to
the inside of the hinge that connects the LCD
screen to the camcorder.
1. Open the LCD screen 90 degrees from the
camcorder with your nger.
2. Rotate it to the best angle to record or play.
-
If you rotate the LCD screen 180 degrees
so it is facing forward, you can close the
LCD screen with the display facing out.
-
This is convenient during playback
operations.
Refer to page 31 to adjust brightness and color of the LCD
screen.
ADJUSTING THE LCD SCREEN
notes and safety
instructions
NOTES REGARDING THE LCD SCREEN
Direct sunlight can damage the LCD screen, the inside of the the
Lens. Take pictures of the sun only in low light conditions, such as
at dusk.
The LCD screen has been manufactured using high precision
technology. However, there may be tiny dots (red, blue or green in
color) that appear on the LCD screen. These dots are normal and
do not affect the recorded picture in any way.
Do not pick up the camcorder by holding the LCD screen or battery pack.
•
•
•
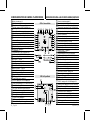
AV
DV
B
A
T
T
.
M
E
N
U
W
T
M
O
D
E
PO
W
E
R
C
H
G

Spanish _vv_ English
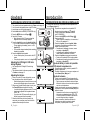
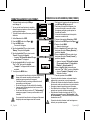
SERVICIO Y PIEZAS DE REPUESTO
No intente reparar la videocámara por sí solo.
La apertura o retirada de cubiertas puede exponerle a serios
voltajes u otros peligros.
Confíe las reparaciones a personal técnico cualicado.
Cuando se necesiten piezas de repuesto, asegúrese de que el
técnico utiliza piezas especicadas por el fabricante o que tengan
las mismas características que la pieza original.
Los repuestos no autorizados pueden producir incendios,
descargas eléctricas u otros peligros.
NOTAS REFERENTES A LA VIDEOCÁMARA
No deje la videocámara expuesta a temperaturas altas
(superiores a 60 °C o 140 °F). Por ejemplo, en un coche aparcado
al sol o expuesta directamente a la luz del sol.
No permita que la videocámara se moje. Mantenga la videocámara
alejada de la lluvia, del agua de mar y de cualquier otro tipo de
humedad. Si la videocámara se moja puede estropearse. En
algunas ocasiones, los daños causados por líquidos no pueden
repararse.
Una subida repentina de la temperatura puede producir
condensación en el interior de la videocámara.
- Cuando traslade la videocámara desde un lugar frío a uno cálido
(p. ej. desde el exterior al interior en invierno.)
-
Cuando se traslada la videocámara de un sitio templado a uno caliente
(por ejemplo, de un espacio interior a uno exterior en verano.)
Si el dispositivo de protección contra humedad (DEW) está
activado, abra el compartimento para el casete, retire la betería y
deje la videocámara durante al menos dos horas en un lugar seco
y templado.
•
•
•
•
•
•
•
•
•
NOTAS REFERENTES A LOS DERECHOS DE REPRODUCCIÓN
Para asegurarse de que obtendrá una grabación normal y una imagen
clara es necesario limpiar regularmente los cabezales de video. Si
durante la reproducción hay un cuadrado que deforma la imagen o si
sólo se ve una pantalla azul, es posible que los cabezales de video estén
sucios. En caso de ser así, límpielos con una cinta de limpieza en seco.
SERVICING & REPLACEMENT PARTS
Do not attempt to service this camcorder yourself.
Opening or removing covers may expose you to dangerous voltage
or other hazards.
Refer all servicing to qualied service personnel.
When replacement parts are required, be sure the service technician
has used replacement parts specied by the manufacturer and
having the same characteristics as the original part.
Unauthorized substitutions may result in re, electric shock or other
hazards.
NOTES REGARDING CAMCORDER
Do not leave the camcorder exposed to high temperatures
(above 60 °C or 140 °F). For example, in a parked car in the sun or
exposed to direct sunlight.
Do not let the camcorder get wet. Keep the camcorder away from
rain, sea water, and any other form of moisture. If the camcorder
gets wet, it may get damaged. Sometimes a malfunction due to
exposure to liquids cannot be repaired.
A sudden rise in atmospheric temperature may cause condensation
to form inside the camcorder.
- When you move the camcorder from a cold location to a warm
location (e.g. from outside to inside during the winter.)
- When you move the camcorder from a cool location to a hot
location (e.g. from inside to outside during the summer.)
If the (DEW) protection feature is activated, leave the camcorder
for at least two hours in a dry, warm room with the cassette
compartment opened and the battery pack removed.
•
•
•
•
•
•
•
•
•
NOTICES REGARDING COPYRIGHT
To ensure normal recording and a clear picture, clean the video heads
regularly. If a square block-shape distorts playback, or only a blue
screen is displayed, the video heads may be dirty. If this happens,
clean the video heads with a dry type cleaning cassette.
Spanish _vv_ English
SERVICIO Y PIEZAS DE REPUESTO
No intente reparar la videocámara por sí solo.
La apertura o retirada de cubiertas puede exponerle a serios
voltajes u otros peligros.
Confíe las reparaciones a personal técnico cualicado.
Cuando se necesiten piezas de repuesto, asegúrese de que el
técnico utiliza piezas especicadas por el fabricante o que tengan
las mismas características que la pieza original.
Los repuestos no autorizados pueden producir incendios,
descargas eléctricas u otros peligros.
NOTAS REFERENTES A LA VIDEOCÁMARA
No deje la videocámara expuesta a temperaturas altas
(superiores a 60 °C o 140 °F). Por ejemplo, en un coche aparcado
al sol o expuesta directamente a la luz del sol.
No permita que la videocámara se moje. Mantenga la videocámara
alejada de la lluvia, del agua de mar y de cualquier otro tipo de
humedad. Si la videocámara se moja puede estropearse. En
algunas ocasiones, los daños causados por líquidos no pueden
repararse.
Una subida repentina de la temperatura puede producir
condensación en el interior de la videocámara.
- Cuando traslade la videocámara desde un lugar frío a uno cálido
(p. ej. desde el exterior al interior en invierno.)
-
Cuando se traslada la videocámara de un sitio templado a uno caliente
(por ejemplo, de un espacio interior a uno exterior en verano.)
Si el dispositivo de protección contra humedad (DEW) está
activado, abra el compartimento para el casete, retire la betería y
deje la videocámara durante al menos dos horas en un lugar seco
y templado.
•
•
•
•
•
•
•
•
•
NOTAS REFERENTES A LOS DERECHOS DE REPRODUCCIÓN
Para asegurarse de que obtendrá una grabación normal y una imagen
clara es necesario limpiar regularmente los cabezales de video. Si
durante la reproducción hay un cuadrado que deforma la imagen o si
sólo se ve una pantalla azul, es posible que los cabezales de video estén
sucios. En caso de ser así, límpielos con una cinta de limpieza en seco.
SERVICING & REPLACEMENT PARTS
Do not attempt to service this camcorder yourself.
Opening or removing covers may expose you to dangerous voltage
or other hazards.
Refer all servicing to qualied service personnel.
When replacement parts are required, be sure the service technician
has used replacement parts specied by the manufacturer and
having the same characteristics as the original part.
Unauthorized substitutions may result in re, electric shock or other
hazards.
NOTES REGARDING CAMCORDER
Do not leave the camcorder exposed to high temperatures
(above 60 °C or 140 °F). For example, in a parked car in the sun or
exposed to direct sunlight.
Do not let the camcorder get wet. Keep the camcorder away from
rain, sea water, and any other form of moisture. If the camcorder
gets wet, it may get damaged. Sometimes a malfunction due to
exposure to liquids cannot be repaired.
A sudden rise in atmospheric temperature may cause condensation
to form inside the camcorder.
- When you move the camcorder from a cold location to a warm
location (e.g. from outside to inside during the winter.)
- When you move the camcorder from a cool location to a hot
location (e.g. from inside to outside during the summer.)
If the (DEW) protection feature is activated, leave the camcorder
for at least two hours in a dry, warm room with the cassette
compartment opened and the battery pack removed.
•
•
•
•
•
•
•
•
•
NOTICES REGARDING COPYRIGHT
To ensure normal recording and a clear picture, clean the video heads
regularly. If a square block-shape distorts playback, or only a blue
screen is displayed, the video heads may be dirty. If this happens,
clean the video heads with a dry type cleaning cassette.

02_ English Spanish _02
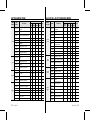
contenido
INTRODUCCIÓN A
LA VIDEOCÁMARA
CON MINIDV
06
PREPARACIÓN
12
AJUSTE INICIAL:
AJUSTE DEL MENÚ
SYSTEM
(SISTEMA)
24
06 Componentes de la videocámara
con miniDV
07 Vistas frontal y lateral izquierda
08 Vista lateral izquierda
09 Vistas superior y lateral derecha
10 Vistas posterior e inferior
11 Utilización del mando a distancia
(sólo SC-D382/D385)
12 Utilización de la empuñadura y
tapa del objetivo
13 Instalación de la pila de botón
14 Utilización de la batería
17
Conexión de una fuente de alimentación
18
Funcionamiento básico de la
videocámara con miniDV
19
Indicadores de pantalla en los modos
Camera (Cam)/Player
20
Indicadores de pantalla en los
modos M.Cam/M.Player (M.Play)
(sólo SC-D383/D385)
21
Utilización del botón Pantalla ( )
22 Utilización del Joystick
22
Utilización del menú rápido con el joystick
24 Ajuste del reloj
(Clock set (Ajuste Reloj))
25 Ajuste de aceptación de mando
a distancia inalámbrico (Remote)
(sólo SC-D382/D385)
26 Ajuste del sonido de pitido
(Beep Sound (Sonido Beep))
27 Ajuste del sonido del obturador
(Shutter Sound (Sonido obtur))
28 Selección del idioma de OSD
(Language)
29 Visualización de la demostración
(Demonstration (Demostración))
contents
GETTING TO KNOW
YOUR MINIDV
CAMCORDER
06
PREPARATION
12
INITIAL SETTING:
SYSTEM MENU
SETTING
24
06 What is included with your miniDV
camcorder
07 Front & Left view
08 Left side view
09 Right & top view
10 Rear & bottom view
11 Using the remote control
(SC-D382/D385 only)
12 Using the hand strap & lens cover
13 Installing the button-type battery
14 Using the battery pack
17 Connecting a power source
18
Basic miniDV camcorder operation
19 Screen indicators in Camera/
Player modes
20
Screen indicators in M.Cam/M.Player
modes (SC-D383/D385 only)
21 Using the display ( )button
22 Using the Joystick
22 Handling quick menus with the
joystick
24 Setting the clock (Clock set)
25 Setting the wireless remote
control acceptance (Remote)
(SC-D382/D385 only)
26 Setting the beep sound
(Beep Sound)
27 Setting the shutter sound
(Shutter Sound)
28 Selecting the OSD language
(Language)
29 Viewing the demonstration
(Demonstration)

Spanish _0303_ English
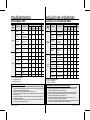
AJUSTE INICIAL:
AJUSTE DEL
MENÚ DISPLAY
(PANTALLA)
GRABACIÓN
BÁSICA
34
GRABACIÓN
AVANZADA
44
30
Ajuste de la guía (Guideline (Guía))
31 Ajuste de la pantalla LCD (LCD Bright
(Brillo LCD)/LCD Color (Color LCD))
32 Visualización de la fecha y hora
(Date/Time (Fecha/Hora))
33 Ajuste de la pantalla de TV
(TV display (Pantalla TV))
34 Inserción/expulsión de un casete
34 Técnicas diversas de grabación
35 Realización de la primera grabación
36 Grabación sencilla para principiantes
(Modo (EASY.Q)
37 Acercamiento y alejamiento del zoom
38 Búsqueda rápida de una
escena(Ajuste de la memoria cero)
(sólo SC-D382/D385)
39 Autograbación utilizando el mando
a distancia (Ajuste de Self Timer
(Temporizador)) (sólo SC-D382/D385)
40 Revisión y búsqueda de una grabación
41
Utilización de fundido de entrada y de salida
42 Auto focus (Enfoque autom.)/manual
focus (Foco m.)
43 Ajuste de velocidad del obturador y
la exposición
44 Selección del modo de grabación
y de audio (
(Rec Mode & Audio Mode
(
Modo Grab y Modo Audio))
45 Eliminación del ruido del viento
(WindCut Plus (Filtro viento))
46 Selección de la función de estéreo
real (Real Stereo)
47 Ajuste de exposición automática de
programa (Program AE)
49 Ajuste del balance de blanco
(White Balance (White Bal.))
51 Aplicación de efectos visuales
(Visual Effect (Efectos visuales))
53
Ajuste del modo 16:9 panorámico (16:9 Wide)
54
Utilización de la macro telescópica (Macro)
INITIAL SETTING:
DISPLAY MENU
SETTING
BASIC RECORDING
34
ADVANCED
RECORDING
44
30 Setting the guideline (Guideline)
31 Adjusting the
LCD screen
(LCD Bright/LCD Color)
32
Displaying the date/time (Date/Time)
33 Setting the tv display (TV display)
34 Inserting/ejecting a cassette
34 Various recording techniques
35 Making your rst recording
36
Recording with ease for beginners
(EASY.Q mode)
37 Zooming in and out
38 Searching quickly for a desired
scene (Setting the zero memory)
(SC-D382/D385 only)
39 Self record using the remote
control (Setting the Self Timer)
(SC-D382/D385 only)
40 Reviewing and searching a
recording
41 Using the fade on and off
42 Auto focus / manual focus
43
Setting the shutter speed & exposure
44
Selecting the record mode & audio
mode (Rec Mode & Audio Mode)
45
Cutting off wind noise (WindCut Plus)
46 Selecting the real stereo function
(Real Stereo)
47
Setting the program ae (Program AE)
49 Setting the white balance (White
Balance)
51 Applying visual effects
(Visual Effect)
53 Setting the 16:9 wide mode
(16:9 Wide)
54 Using the tele macro (
Macro)

04_ English Spanish _04
55 Ajuste del estabilizador digital de la
imagen (DIS)
56 Utilización del modo de compen-
sación de la luz de fondo (BLC)
57
Acercamiento y alejamiento del zoom con
Zoom Digital (Digital Zoom (Zoom digital))
58 Utilización de Colour Nite (C.Nite)
59 Utilización de la luz (Light (Luz)
(sólo SC-D382/D383/D385)
60 Grabación de una imagen fotográca
en una grabación fotográca cinta a cinta
61
Búsqueda de una imagen fotográca en
una cinta (Photo Search (Búsq. Foto))
62 Reproducción de una cinta en la
pantalla LCD
63
Diferentes funciones en el modo Player
65 Mezcla de audio (sólo SC-D382/D385)
66 Reproducción de audio mezclado
(Audio Select (Selec. Audio))
67 Efecto de audio
68 Reproducción de cinta en una
pantalla de TV
70 Copia de una cinta de videocámara
en una cinta de video
71 Utilización de la función VOICE+
72 Utilización de la tarjeta de memoria
(tarjeta de memoria utilizable)
(no suministrada)
73 Estructura de carpetas y archivos en
la tarjeta de memoria
75 Ajuste del número de archivo
(File No (Archivo No.))
76 Captura de imagen de foto (JPEG)
en la tarjeta de memoria
77
Visionado de imágenes fotográcas (JPEG)
78 Protección contra borrado accidental
(Protect (Protección))
79 Borrado de imágenes fotográcas e
imágenes de video (Delete (Eliminar))
81 Formateo de la tarjeta de memoria
(Format (Formato))
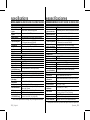
REPRDUCIÓN
62
CONEXIÓN
68
FUNCIÓN
DE CÁMARA
FOTOGRÁFICA
DIGITAL
(sólo SC-D383/D385)
72
contenido
55 Setting the digital image stabilizer
(DIS)
56 Using back light compensation mode
(BLC)
57 Zooming in and out with digital zoom
(Digital Zoom)
58 Using the color nite (
C.Nite)
59 Using the light (Light)
(SC-D382/D383/D385 only)
60 Recording a photo image on a tape
-tape photo recording
61 Searching for a photo image on a
tape (Photo Search)
62 Playing back a tape on the LCD
screen
63 Various functions while in
Player
mode
65 Audio dubbing (
SC-D382/D385 only)
66
Dubbed audio playback (Audio Select)
67 Audio effect
68 Tape playing back on a TV screen
70 Copying a camcorder tape onto a
video tape
71 Using the
VOICE
+
function
72 Using a memory card
(usable memory card) (not supplied)
73 Structure of folders and les
on the memory card
75 Setting the le number (File No.)
76 Taking a photo image (
JPEG)
on the memory card
77 Viewing photo images (
JPEG)
78
Protection from accidental erasure
(Protect)
79
Deleting photo images and moving
images (Delete)
81 Formatting a memory card (Format)
PLAYBACK
62
CONNECTION
68
DIGITAL STILL
CAMERA MODE
(SC-D383/D385 ONLY)
72
contents

Spanish _0505_ English
82 Grabación de imágenes de video
(MPEG) en una tarjeta de memoria
84 Reproducción de imágenes de video
(MPEG) en la tarjeta de memoria
(M.Play select (Selec.M.Play))
85 Grabación de una imagen de una
cinta como imagen fotográca
86 Copia de una imagen fotográca
desde una cinta a una tarjeta de
memoria (Photo Copy (Copia Foto))
87 Marcación de imágenes para impre
-
sión (Print Mark (Marca))
88 Impresión de imágenes
– uso de
pictbridgeTM
90 Conexiones para la transferencia de
datos estándar ieee1394 (i.Link)-DV
92 Utilización de la interfaz USB
94 Selección del dispositivo USB
(USB Connect (Conexión USB))
95 Instalación del software
(programa DV Media Pro)
96 Conexión a una PC
98 Después de nalizar una grabación
98 Cintas de casete utilizables
99 Limpieza y mantenimiento de la
videocámara
100 Utilización de la videocámara
con miniDV en el extranjero
101 Solución de problemas
103 Ajustes de las opciones del menú
105
PICTBRIDGE™
(sólo SC-D383/D385)
TRANSFERENCIA DE
DATOS IEEE 1394
INTERFAZ USB
(sólo SC-D383/D385)
92
MANTENIMIENTO
98
SOLUCIÓN DE
PROBLEMAS
ESPECIFICACIONES
82 Recording moving images (MPEG)
on a memory card
84 Playing the moving images (
MPEG)
on a memory card (M.Play select)
85 Recording an image from a tape as a
photo image
86 Copying a photo image from a tape
to a memory card (Photo Copy)
87 Marking images for printing
(Print Mark)
88 Printing your pictures – using the
pictbridge
TM
90 Transferring ieee1394 (I.Link) –
DV standard data connections
92 Using USB Interface
94 Selecting the
USB device
(USB Connect)
95 Installing the software
(DV Media Pro program)
96 Connecting to a
PC
98 After nishing a recording
98 Usable cassette tapes
99 Cleaning and maintaining the
camcorder
100 Using your mini
DV camcorder
abroad
101 Troubleshooting
103 Setting menu items
105
PICTBRIDGE™
(SC-D383/D385 ONLY)
IEEE 1394 DATA
TRANSFER
USB INTERFACE
(SC-D383/D385 ONLY)
92
MAINTENANCE
98
TROUBLESHOOTING
SPECIFICATIONS

06_ English Spanish _06
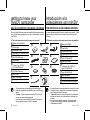
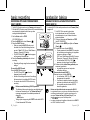
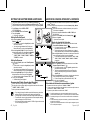
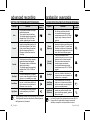
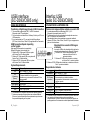
COMPONENTES DE LA VIDEOCÁMARA CON MINIDV
La nueva videocámara digital incluye los siguientes accesorios. Si falta
alguno de ellos en la caja, llame al centro de atención al cliente de
Samsung.
✪
El aspecto exacto de cada elemento puede variar entre modelos.
El contenido puede variar dependiendo de la región de ventas.
Los componentes y accesorios se encuentran disponibles
en el Servicio técnico de Samsung.
*(Opcional): este es un accesorio opcional. Para adquirirlo,
póngase en contacto con el distribuidor de Samsung más
cercano.
No se incluye la tarjeta de memoria. Consulte la página
72 para ver las tarjetas de memoria compatibles con la
videocámara con miniDV.
•
•
•
•
introducción a la
videocámara con miniDV
1
Batería (IA-BP80W)
2
Adaptador de CA
(tipo AA-E9)
3
Cable de Audio/Video
4
Cable USB (sólo SC-D383/D385)
5
CD de software
(sólo SC-D383/D385)
6
Manual del usuario
7
Pila de botón para el mando
a distancia (Tipo: CR2025)
(sólo SC-D382/D385)
8
Mando a distancia
(sólo SC-D382/D385)
9
Tapa del objetivo
10
Correa de la tapa del objetivo
Funda de transporte* (Opcional)
11
WHAT IS INCLUDED WITH YOUR MINIDV CAMCORDER
Your new Digital Video camcorder comes with the following accessories.
If any of these items is missing from your box, call Samsung’s Customer
Care Center.
✪
The exact appearance of each item may vary by model.
The contents may vary depending on the sales region.
Parts and accessories are available at your local Samsung
dealer.
*(Option) : This is an optional accessory. To buy this one,
contact your nearest Samsung dealer.
A memory card is not included. See page 72 for memory
cards compatible with your miniDV camcorder.
•
•
•
•
getting to know your
miniDV camcorder
1
Battery pack (IA-BP80W)
2
AC power adapter
(AA-E9 type)
3
Audio/Video Cable
4
USB cable (SC-D383/D385 only)
5
Software CD
(SC-D383/D385 only)
6
User manual
7
Button-type Battery for Remote
Control (Type: CR2025)
(SC-D382/D385 only)
8
Remote Control
(SC-D382/D385 only)
9
Lens Cover
10
Lens Cover Strap
Carrying Case* (Option)
11
1 2 3
4 5 6
7 8 9
10
11

Spanish _0707_ English
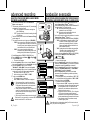
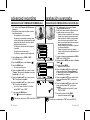
VISTAS FRONTAL Y LATERAL IZQUIERDA
1
Lente
2
Sensor del mando a distancia (sólo SC-D382/D385)
3
Luz (sólo SC-D382/D383/D385)
4
Interruptor OPEN
5
Botón EASY Q
➥
página 36
6
Botón Pantalla ( )
7
Pantalla LCD TFT
8
Micrófono interno
Tenga cuidado de no cubrir el micrófono interno ni el objetivo
durante la grabación.
PRECAUCIÓN
FRONT & LEFT VIEW
1
Lens
2
Remote sensor (SC-D382/D385 only)
3
Light (SC-D382/D383/D385 only)
4
OPEN switch
5
EASY Q button
➥
page 36
6
Display ( ) button
7
TFT LCD screen
8
Internal microphone
Be careful not to cover the internal microphone and lens
during recording.
CAUTION
OPEN
5
6
7
8
1
2
3
4

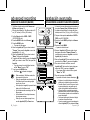
08_ English Spanish _08
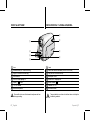
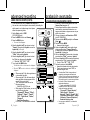
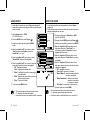
VISTA LATERAL IZQUIERDA
introducción a la
videocámara con miniDV
Cuando cierre el panel LCD con la pantalla LCD hacia arriba,
la función del Joystick (
/
/
/
) funciona de forma inversa.
1
Botón MENU
2
Joystick (
/
/
/
/ Selec.), (W/T)
➥
página 23
3
Botón Iniciar/Parar grabación
4
Tapa de terminales (terminal AV/DV)
5
Parlante incorporado
6
Interruptor de Selección (CARD-TAPE) (sólo SC-D383/D385)
7
Batería
8
Interruptor de liberación de la batería (BATT.)
LEFT SIDE VIEW
getting to know your
miniDV camcorder
When you close LCD panel with the LCD screen facing out,
Joystick (
/
/
/
) function works reversely.
1
MENU button
2
Joystick (
/
/
/
/ Select ), (W/T)
➥
page 23
3
Recording start/stop button
4
Jack cover (AV/DV jack)
5
Built-in speaker
6
Select (CARD-TAPE) switch (SC-D383/D385 only)
7
Battery pack
8
Battery release (BATT.) switch
A
V
DV
B
A
T
T
.
M
E
N
U
W
T
M
O
D
E
PO
W
ER
C
H
G
5
7
4
1
2
3
8
6
BA
TT
.
C
H
G
MODE
TAPECARD
(SC-D383/D385 only)

Spanish _0909_ English
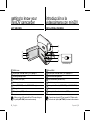
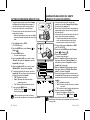
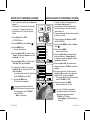
VISTAS SUPERIOR Y LATERAL DERECHA
1
Palanca deZoom (W/T) / Volumen (VOL)
2
Botón PHOTO
➥
página 60, 76
3
Botón Iniciar/Parar grabación
4
Interruptor POWER
5
Tapa de terminales (terminal DC IN, USB (sólo SC-D383/D385))
6
Tapa del compartimento del casete
7
Empuñadura
RIGHT & TOP VIEW
1
Zoom (W/T) / Volume (VOL) lever
2
PHOTO button
➥
page 60, 76
3
Recording start/stop button
4
POWER switch
5
Jack cover (DC IN, USB (SC-D383/D385 only) jack)
6
Cassette compartment cover
7
Hand strap
M
O
D
E
AV
D
V
PO
W
ER
C
H
G
VOL
4
5
6
7
1
2
3

10_ English Spanish _10
introducción a la
videocámara con miniDV
VISTAS POSTERIOR E INFERIOR
Terminales
SC-D383/
D385
AV DV DC IN USB
SC-D381/
D382
AV DV DC IN
Tarjetas de memoria utilizables (2 GB máx.)
sólo SC-D383/D385
MMC/SD
1
Terminal de AV
2
Botón MODE
3
Indicador de modo (modo Camera (Cámara) ( ) / Player ( ))
4
Terminal DC IN
5
Terminal de DV (IEEE1394)
6
Indicador de carga (CHG)
7
Terminal USB (sólo SC-D383/D385)
8
Ranura de tarjeta de memoria (sólo SC-D383/D385)
9
Oricio del trípode
getting to know your
miniDV camcorder
REAR & BOTTOM VIEW
Jacks
SC-D383/
D385
AV DV DC IN USB
SC-D381/
D382
AV DV DC IN
Usable Memory Cards (2GB Max)
SC-D383/D385 only
MMC/SD
1
AV jack
2
MODE button
3
Mode indicator (Camera ( ) / Player ( ) mode)
4
DC IN Jack
5
DV (IEEE1394) jack
6
Charging (CHG) indicator
7
USB jack (SC-D383/D385 only)
8
Memory card slot (SC-D383/D385 only)
9
Tripod receptacle
98
AV
MODE
DC IN
DV
POWER
CHG
1
4
5
6
7
3
2

Spanish _1111_ English
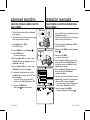
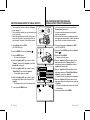
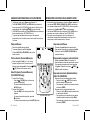
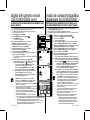
UTILIZACIÓN DEL MANDO A DISTANCIA (SÓLO SC-D382/D385)
1
Botón PHOTO
➥
página 60, 76
2
Botón REC
3
Botón SELF TIMER
➥
página 39
4
Botón ZERO MEMORY
➥
página 38
5
Botón PHOTO SEARCH
➥
página 61
6
Botón A.DUB
➥
página 65
7
Botón
(AR)
8
Botón
(REB)
9
Botón
(REPR.)
10
Botón (-) / (+) (Dirección)
➥
página 64
11
Botón PANTALLA
( )
12
Botón W/T (Zoom)
13
Botón X2
➥
página 64
14
Botón DATE/TIME
15
Botón (LENTO)
16
Botón (PAUSA)
17
Botón
(PARAR)
18
Botón F. ADV
➥
página 64
Los botones del mando a distancia funcionan igual que los de
la videocámara con miniDV.
USING THE REMOTE CONTROL (SC-D382/D385 ONLY)
1
PHOTO button
➥
page 60, 76
2
REC button
3
SELF TIMER button
➥
page 39
4
ZERO MEMORY button
➥
page 38
5
PHOTO SEARCH button
➥
page 61
6
A.DUB button
➥
page 65
7
(FF)
b
utton
8
(REW)
b
utton
9
(PLAY)
b
utton
10
(-) / (+) (Direction) button
➥
page 64
11
DISPLAY
( ) button
12
W/T (Zoom) button
13
X2
button
➥
page 64
14
DATE/TIME button
15
(
S
LOW) button
16
(PAUSE)
b
utton
17
(STOP)
b
utton
18
F. ADV button
➥
page 64
The buttons on the remote control function the same as those
on the miniDV camcorder.
1
2
3
4
5
6
7
8
9

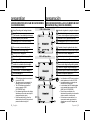
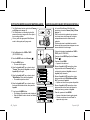
12_ English Spanish _12
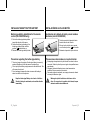
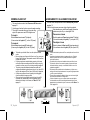
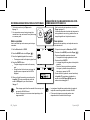
Es muy importante asegurarse de que la empuñadura esté
correctamente ajustada antes de empezar la grabación.
La empuñadura permite:
Mantener la videocámara en una posición estable y cómoda.
Coloque la mano en una posición en la que pueda fácilmente
accionar el botón Iniciar/Parar grabación, el botón PHOTO y la
palanca del Zoom.
Empuñadura
Ajuste de la empuñadura
1.
Inserte la empuñadura en su
enganche situado en la parte
frontal de la videocámara y tire de
su extremo a través del enganche.
2.
Introduzca su mano en la empuñadura
y ajuste la longitud a su gusto.
3. Cierre la empuñadura.
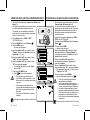
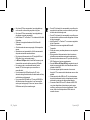
Tapa del objetivo
Colocación de la tapa
del objetivo
4. Enganche la tapa del objetivo con
su correa como se indica en la
ilustración.
5.
Enganche la correa de la tapa
del objetivo a la empuñadura y
ajústela siguiendo los pasos según
se describe para la empuñadura.
6. Cierre la empuñadura.
Colocación de la tapa del objetivo tras
utilizar la videocámara
Presione los botones de ambos lados de la tapa del
objetivo e insértela en el objetivo de la videocámara.
•
•
preparación
UTILIZACIÓN DE LA EMPUÑADURA Y TAPA DEL OBJETIVO
Esta sección proporciona información sobre la utilización de la
videocámara miniDV: como sobre la forma de utilizar los accesorios
suministrados, la forma de cambiar la batería, la forma de configurar el
funcionamiento y los indicadores de la pantalla en cada modo.
It is very important to ensure that the hand strap has been correctly
adjusted before you begin your recording.
The hand strap enables you to:
Hold the camcorder in a stable, comfortable position.
Put your hand in a position where you can easily operate the
Recording start/stop button, PHOTO button, and the Zoom lever.
Hand Strap
Adjusting the Hand Strap
1.
Insert the hand strap into the hand
strap hook on the front side of the
camcorder and pull its end through
the hook.
2. Insert your hand into the hand strap
and adjust its length for your convenience.
3. Close the hand strap.
Lens Cover
Attaching the Lens Cover
4. Hook up the lens cover with the
lens cover strap as illustrated.
5. Hook up the lens cover strap to the
hand strap, and adjust it following
the steps as described for the hand
strap.
6. Close the hand strap.
Installing the Lens Cover after
Operation
Press buttons on both sides of the lens cover, then
attach it to the camcorder lens.
•
•
preparation
USING THE HAND STRAP & LENS COVER
This section provides information on using this miniDV camcorder:
such as how to use the provided accessories, how to charge the battery,
how to set up the operation and screen indicators in each mode.
OPEN
1 2 3
4 5 6

Spanish _1313_ English
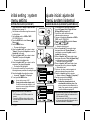
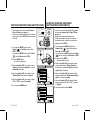
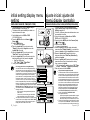
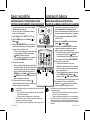
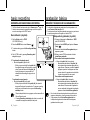
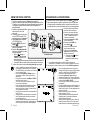
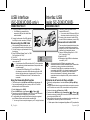
INSTALACIÓN DE LA PILA DE BOTÓN
Instalación de la batería de botón para el mando a
distancia (sólo SC-D382/D385)
1. Tire del soporte de la batería de botón
hacia la dirección de la echa.
2.
Coloque la pila de botón en su soporte,
con el terminal positivo ( ) hacia arriba.
3. Reinserte el soporte de la pila de botón.
Precauciones relacionadas con la pila de botón
Existe peligro de explosión si la pila de botón se coloca de forma
incorrecta. Cambie la pila sólo por una igual o de especicaciones
equivalentes.
No agarre la batería utilizando pinzas u otras herramientas
metálicas. Esto provocará un cortocircuito.
Para evitar riesgos de explosión, no recargue, desmonte, caliente
ni sumerja la batería en agua.
Mantenga la pila de botón fuera del alcance de los
niños. So se produce la ingestión de la batería, busque
asistencia médica inmediatamente.
•
•
•
ADVERTENCIA
INSTALLING THE BUTTON-TYPE BATTERY
Button-type battery installation for the remote
control (SC-D382/D385 only)
1. Pull out the button-type battery holder
toward the direction of the arrow.
2. Position the button-type battery in the
button-type battery holder, with the
positive ( ) terminal face up.
3. Reinsert the button-type battery holder.
Precaution regarding the button-type battery
There is a danger of explosion if button-type battery is incorrectly
replaced. Replace only with the same or equivalent type.
Do not pick up the battery using tweezers or other metal tools. This
will cause a short circuit.
Do not recharge, disassemble, heat or immerse the battery in
water to avoid the risk of explosion.
Keep the button-type Battery out of reach of children.
Should a battery be swallowed, seek medical attention
immediately.
•
•
•
WARNING

14_ English Spanish _14
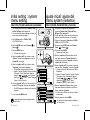
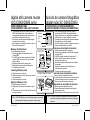
Utilice sólo la batería IA-BP80W.
Es posible que la batería esté un poco cargada en el momento de la compra.
Asegúrese de cargar la batería antes de empezar a utilizar la
videocámara con miniDV.
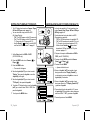
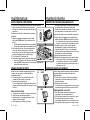
Inserción / Extracción de la batería
1. Abra la pantalla LCD como se muestra en la gura.
2. Inserte la batería en su ranura hasta que emita un
chasquido suave.
Asegúrese de que la marca de la palabra
(SAMSUNG) esté hacia fuera con la videocámara
colocada como se muestra en la gura.
3.
Deslice el interruptor de liberación de BATT. y saque la batería.
Deslice suavemente el interruptor de liberación
BATT. en la dirección que se muestra en la gura.
La batería adicional está disponible en el
distribuidor local de Samsung.
Si no va a utilizar la videocámara con miniDV
durante un tiempo, retire la batería de la misma.
•
•
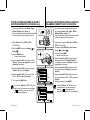
Carga de la batería
1.
Deslice hacia abajo el interruptor POWER para
encender.
2. Inserte la batería en la videocámara.
3. Abra la tapa de los terminales y conecte el adaptador
de CA al terminal de DC IN.
4.
Conecte el adaptador de CA a una toma de corriente.
5.
Una vez cargada, desconecte el adaptador de
alimentación de CA al terminal de entrada CC DC IN de la
videocámara.
Incluso en el caso de que se deje apagado el
interruptor de encendido, la batería se seguirá
descargando si se deja insertada en la videocámara.
Se recomienda adquirir una o más baterías para poder utilizar la
videocámara con miniDV de forma continua.
•
•
•
•
•
•
UTILIZACIÓN DE LA BATERÍA
preparación
Utilice únicamente baterías aprobadas por Samsung. No utilice baterías
de otros fabricantes. De lo contrario, existe peligro de sobrecalentamiento,
incendio o explosión. Samsung no se hace responsable de problemas que
se produzcan debido al uso de baterías no aprobadas.
Use the IA-BP80W battery pack only.
The battery pack may be charged a little at the time of purchase.
Be sure to charge the battery pack before you start using your
miniDV camcorder.
Inserting / Ejecting the battery pack
1. Open the LCD screen as shown in the gure.
2. Insert the battery pack into the battery pack slot until
it softly clicks.
Make sure that word mark (SAMSUNG) is facing out
while the camcorder is placed as shown in the gure.
3. Slide the BATT. release switch and pull out the
battery pack.
Gently slide the BATT. release switch in the
direction as shown in the gure.
Additional battery packs are available at your
local Samsung dealer.
If the miniDV camcorder will not be in use for a while,
remove the battery pack from the miniDV camcorder.
•
•
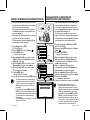
Charging the Battery Pack
1.
Slide the POWER switch downwards to turn off the power.
2. Insert the battery pack to the camcorder.
3. Open the jack cover and connect the AC power
adaptor to the DC IN jack.
4. Connect the AC power adaptor to a wall socket.
5. Once charged, disconnect the AC power adaptor
from the DC IN jack on your camcorder.
Even with the power switched off, the battery pack
will still discharge if it is left inserted in the camcorder.
It is recommended that you purchase one or more additional battery
packs to allow continuous use of your miniDV camcorder.
•
•
•
•
•
•
USING THE BATTERY PACK
preparation
Use only Samsung-approved battery packs. Do not use batteries from
other manufacturers. Otherwise, there is a danger of overheating, re or
explosion. Samsung is not responsible for problems occured due to using
unapproved batteries.
P
O
W
E
R
B
A
T
T
.
P
O
W
E
R
B
A
T
T
.
P
O
W
E
R
C
H
B
A
T
T
.
BATT.
P
O
W
E
R
C
H
B
A
T
T
.
Insert
Eject

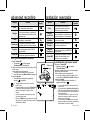
Spanish _1515_ English
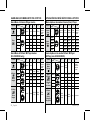
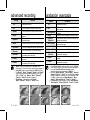
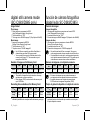
Tiempos de carga, grabación con la batería
totalmente cargada
(con zoom funcionan do, LCD abierta, etc.)
Los tiempos medidos que se muestran en la tabla están basados
en el modelo SC-D385. (Los tiempos para SC-D381/D382/D383/
D385 son casi los mismos.)
El tiempo es sólo para referencia. Las cifras que se muestran en
la tabla han sido medidas en un entorno de prueba de Samsung y
pueden diferir del uso real.
El tiempo de grabación se acorta enormemente en un ambiente
frío. Los tiempos de grabación continuada que se dan en este
manual de instrucciones están medidos empleando una batería
completamente cargada a 25 °C (77 °F). Conforme la temperatura
y las condiciones ambientales varíen, el tiempo restante de la
batería puede diferir de los tiempos de grabación continuos
facilitados en las instrucciones.
•
•
•
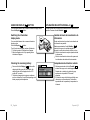
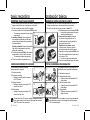
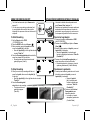
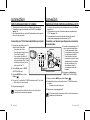
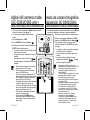
Indicador de carga
El color del indicador LED indica el estado de
alimentación o de carga.
Si la batería está completamente cargada, el
indicador de carga aparece de color verde.
Si está cargando la batería, el indicador de
carga aparece de color naranja.
Si se produce un error mientras se recarga
la batería, el indicador de carga parpadea en
naranja.
•
•
•
•
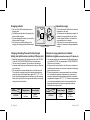
Charging, Recording Times with a fully charged
battery pack (with no zoom operation, LCD open, etc.)
Measured times shown in the table are based on model SC-D385.
(Times for SC-D381/D382/D383/D385 are almost the same.)
The time is only for reference. Figures shown in the table are
measured under Samsung’s test environment, and may differ from
your actual use.
The recording time shortens dramatically in a cold environment.
The continuous recording times in the operating instructions are
measured using a fully charged battery pack at 25 °C (77 °F). As
the environmental temperature and conditions vary, the remaining
battery time may differ from the approximate continuous recording
times given in the instructions.
•
•
•
Charging indicator
The color of the LED indicates the power or
charging state.
If the battery pack has been fully charged, the
charge indicator is green.
If you are charging the battery, the color of the
charge indicator is orange.
If an error occurs while the battery pack in
charging, the charging indicator blinks orange.
•
•
•
•
Charging time Recording time
IA-BP80W
Approx.
1hr 20min
Approx.
1hr 20min
Battery
Time
Tiempo de carga
Tiempo de
grabación
IA-BP80W
Aprox.
1h. 20min.
Aprox.
1h. 20min.
Batería
Tiempo
AV
MODE
DC IN
DV
POWER
CHG
P
OWER
CHG
<Charging indicator>

16_ English Spanish _16
preparación
El tiempo disponible de grabación continuada
depende de:
El tipo y la capacidad de la batería que use.
La temperatura ambiental.
La frecuencia con que se emplee el zoom.
El tipo de uso (videocámara/cámara/con pantalla LCD, etc.).
Es aconsejable disponer de varias baterías.
Para comprobar la carga restante de la batería, mantenga
presionado el botón Pantalla ( ).
➥
página 21
- El tiempo de carga variará dependiendo del nivel de
batería restante.
•
•
•
•
•
•
•
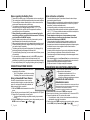
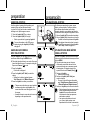
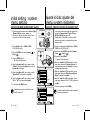
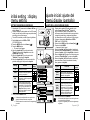
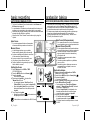
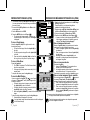
Indicador de carga de la batería
El indicador de carga de la batería muestra la cantidad de energía
restante.
a. Completamente cargada
b. 20~40% de uso
c. 40~80% de uso
d. 80~95% de uso
e. Completamente descargada (parpadea)
(La videocámara se apagará inmediatamente, cambie
la batería lo antes posible.)
Gestión de la batería
La batería debe recargarse a una temperatura ambiente de entre 0
°C (32 °F) y 40 °C (104 °F).
La vida útil y la capacidad de la batería se verán reducidas si se
utiliza en ambientes con temperaturas inferiores a 0 °C (32 °F)
o si se deja durante largos periodos expuesta a temperaturas
superiores a los 40 °C (104 °F) incluso si está cargada por completo.
No ponga la batería cerca de una fuente de calor
(un fuego o un calefactor, por ejemplo).
No desmonte la batería ni la someta a manipulaciones, presiones ni al calor.
No permita que se produzca un cortocircuito entre los polos + y –
de la batería. Podrían producirse pérdidas o calentamiento, lo cual
podría ocasionar sobrecalentamiento o un incendio.
•
•
•
•
•
preparation
The amount of continuous recording time available
depends on:
The type and capacity of the battery pack you are using.
Ambient temperature.
How often the zoom function is used.
Type of use (camcorder/camera/With LCD screen etc.)
It is recommended that you have several batteries available.
To check the remaining battery charge, press and hold the
Display ( ) button.
➥
page 21
The charging time will vary depending on the remaining
battery level.
•
•
•
•
•
•
•
Battery Level Display
The battery level display indicates the amount of power remaining in
the battery pack.
a. Fully charged
b. 20~40% used
c. 40~80% used
d. 80~95% used
e. Completely used (Blinking)
(The Camcorder will turn off soon, change the battery
as soon as possible.)
Battery Pack Management
The battery pack should be recharged in an environment between
0 °C (32 °F) and 40°C (104 °F).
The life and capacity of the battery pack will be reduced if it is
used in temperatures below 0 °C (32 °F) or left in temperatures
above 40 °C (104 °F) for a long period of time, even when it is fully
recharged.
Do not put the battery pack near any heat source
(i.e. re or a heater).
Do not disassemble, apply pressure to, or heat the battery pack.
Do not allow the + and – terminals of the battery pack to be
short-circuited. It may cause leakage, heat generation, induce
overheating or re.
•
•
•
•
•
(Blinking)
Page is loading ...
Page is loading ...
Page is loading ...
Page is loading ...
Page is loading ...
Page is loading ...
Page is loading ...
Page is loading ...
Page is loading ...
Page is loading ...
Page is loading ...
Page is loading ...
Page is loading ...
Page is loading ...
Page is loading ...
Page is loading ...
Page is loading ...
Page is loading ...
Page is loading ...
Page is loading ...
Page is loading ...
Page is loading ...
Page is loading ...
Page is loading ...
Page is loading ...
Page is loading ...
Page is loading ...
Page is loading ...
Page is loading ...
Page is loading ...
Page is loading ...
Page is loading ...
Page is loading ...
Page is loading ...
Page is loading ...
Page is loading ...
Page is loading ...
Page is loading ...
Page is loading ...
Page is loading ...
Page is loading ...
Page is loading ...
Page is loading ...
Page is loading ...
Page is loading ...
Page is loading ...
Page is loading ...
Page is loading ...
Page is loading ...
Page is loading ...
Page is loading ...
Page is loading ...
Page is loading ...
Page is loading ...
Page is loading ...
Page is loading ...
Page is loading ...
Page is loading ...
Page is loading ...
Page is loading ...
Page is loading ...
Page is loading ...
Page is loading ...
Page is loading ...
Page is loading ...
Page is loading ...
Page is loading ...
Page is loading ...
Page is loading ...
Page is loading ...
Page is loading ...
Page is loading ...
Page is loading ...
Page is loading ...
Page is loading ...
Page is loading ...
Page is loading ...
Page is loading ...
Page is loading ...
Page is loading ...
Page is loading ...
Page is loading ...
Page is loading ...
Page is loading ...
Page is loading ...
Page is loading ...
Page is loading ...
Page is loading ...
Page is loading ...
Page is loading ...
Page is loading ...
-
 1
1
-
 2
2
-
 3
3
-
 4
4
-
 5
5
-
 6
6
-
 7
7
-
 8
8
-
 9
9
-
 10
10
-
 11
11
-
 12
12
-
 13
13
-
 14
14
-
 15
15
-
 16
16
-
 17
17
-
 18
18
-
 19
19
-
 20
20
-
 21
21
-
 22
22
-
 23
23
-
 24
24
-
 25
25
-
 26
26
-
 27
27
-
 28
28
-
 29
29
-
 30
30
-
 31
31
-
 32
32
-
 33
33
-
 34
34
-
 35
35
-
 36
36
-
 37
37
-
 38
38
-
 39
39
-
 40
40
-
 41
41
-
 42
42
-
 43
43
-
 44
44
-
 45
45
-
 46
46
-
 47
47
-
 48
48
-
 49
49
-
 50
50
-
 51
51
-
 52
52
-
 53
53
-
 54
54
-
 55
55
-
 56
56
-
 57
57
-
 58
58
-
 59
59
-
 60
60
-
 61
61
-
 62
62
-
 63
63
-
 64
64
-
 65
65
-
 66
66
-
 67
67
-
 68
68
-
 69
69
-
 70
70
-
 71
71
-
 72
72
-
 73
73
-
 74
74
-
 75
75
-
 76
76
-
 77
77
-
 78
78
-
 79
79
-
 80
80
-
 81
81
-
 82
82
-
 83
83
-
 84
84
-
 85
85
-
 86
86
-
 87
87
-
 88
88
-
 89
89
-
 90
90
-
 91
91
-
 92
92
-
 93
93
-
 94
94
-
 95
95
-
 96
96
-
 97
97
-
 98
98
-
 99
99
-
 100
100
-
 101
101
-
 102
102
-
 103
103
-
 104
104
-
 105
105
-
 106
106
-
 107
107
-
 108
108
-
 109
109
-
 110
110
-
 111
111


Ask a question and I''ll find the answer in the document
Finding information in a document is now easier with AI
in other languages
- español: Samsung SC-D383 Manual de usuario
Related papers
-
Samsung SC-MM12SBL User manual
-
-
-
-
Samsung VP-D385 User manual
-
Samsung VP-M2200S User manual
-
Samsung SC-X110 L User manual
-
-
-
Other documents
-
Ingo Hello Kitty HEC-050N User guide
-
Ingo Devices Hello Kitty HEC-050N Owner's manual
-
AgfaPhoto APDV-1005 User manual
-
DXG DXG-A80V HD User manual
-
-
Hitachi DZ-HV1074 Owner's manual
-
-
 Cobra Digital DVC4000 User manual
-
-
