Page is loading ...

26
EN
Advanced Weather Station
with Thermo-hydro Sensor
Model: WMR100TH
USER MANUAL
WMR100TH_EN.indd 26 5/11/07 4:40:20 PM

1
EN
Advanced Weather Station
with Thermo-hydro sensor
Model: WMR100TH
USER MANUAL
CONTENTS
Introduction .................................................................2
Packing Contents .......................................................2
Thermo-Hydro Sensor (THGR810) .......................... 2
Accessories - Sensors ............................................. 2
Overview ......................................................................3
LCD Display .............................................................5
Getting Started ............................................................7
Set up Base Station .................................................7
Set up Sensor ............................................................8
Batteries ................................................................... 9
Set Channel ..........................................................10
Base Station ..............................................................10
Change Display / Setting ........................................ 10
Clock Reception ......................................................10
Clock / Calendar ....................................................... 11
Clock Alarm .............................................................12
Moon Phase ..............................................................12
Auto Scanning Function ......................................... 13
Weather Forecast .................................................... 13
Temperature and Humidity ..................................... 13
Temperature and Humidity Trend ......................... 15
Comfort Level ........................................................ 15
Wind Direction / Speed ............................................ 16
UVI / Barometer / Rainfall ........................................ 17
UV Index ................................................................ 18
Barometer .............................................................. 18
Rainfall .................................................................... 19
Weather Alarms ........................................................ 19
Connection to PC ..................................................... 20
Backlight ................................................................... 20
Reset ......................................................................... 20
Troubleshooting ....................................................... 20
Precautions .............................................................. 21
Specifications ........................................................... 22
About Oregon Scientific .......................................... 24
EU-Declaration of Conformity ................................. 24
FCC Statement ......................................................... 24
Declaration of Conformity ...................................... 25
WMR100TH_EN.indd 1 5/11/07 4:38:40 PM

2
EN
INTRODUCTION
Thank you for selecting the Oregon Scientific
TM
Weather
Station (WMR100TH).
The base station is compatible with other sensors. To
purchase additional sensors, please contact your local
retailer.
Sensors with this logo
are compatible with this unit.
NOTE Please keep this manual handy as you use
your new product. It contains practical step-by-step
instructions, as well as technical specifications and
warnings you should know about.
PACKAGING CONTENTS
1 x USB Cable
1 x 6V Adapter
4 x UM-3 / AA
The “Virtual Weather Station” software and manual are
available for download at this address:
http://www2.oregonscientific.com/assets/software/
wmr100.exe
THERMO-HYDRO SENSOR (THGR810)
1 x Wall mount
bracket
1 x Table
stand
2 x UM-4 / AAA
ACCESSORIES – SENSORS
This product can work with up to 10 sensors at any one
time to capture outdoor temperature, relative humidity
or UV readings in various locations. Optional wireless
WMR100TH_EN.indd 2 5/11/07 4:38:53 PM

3
EN
remote sensors such as those listed below can be
purchased separately. For more information, please
contact your local retailer.
• Thermo-hygro THGR800 (3-Ch)
• UV UVN800
• Rain Gauge PCR800
• Wind sensor WTGR800
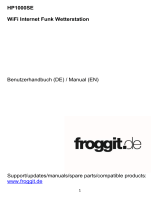
OVERVIEW
1
2
3
4
5
1. MEMORY / ON/OFF: Read the max / min
memory record; activate / deactivate alarms
2. ALARM: View and set alarms for barometer,
temperature, humidity, rainfall and wind speed
3. MODE: Switch between the different display modes
/ settings
4. Rotating dial: Rotate left or right to increase or
decrease the values of the selected reading
5. SELECT: Switch between the different areas
1
3
2
4
5
6
7
1. AC adapter socket
2. RESET: Returns unit to default settings
WMR100TH_EN.indd 3 5/11/07 4:39:16 PM

4
EN
3. SEARCH: Searches for sensors or for the radio-
controlled clock signal
4. UNIT: Selects unit of measurement
5. Battery compartment
6. WMR100 only – EU / UK radio signal
7. USB connector
1. LCD display (the THGN810 does not have an LCD
screen): Shows the channel number, temperature
and humidity readings, and comfort level
2. LED status indicator
4
1
2
3
1. RESET hole
2. °C / °F switch (THGN810 does not have this switch)
3. CODE switch
4. Battery compartment
WMR100TH_EN.indd 4 5/11/07 4:39:19 PM

5
EN
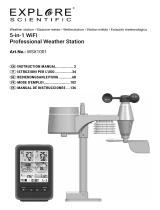
LCD DISPLAY
1
2
3
4
5
6
7
8
1. Weather Forecast Area
2. Temperature / Heat Index / Wind Chill Area
3. Wind Speed / Wind Direction Area
4. UVI / Barometer / Rainfall Area
5. Clock / Alarm / Calendar / Moon Phase Area
6. AC adapter icon - displays when unplugged
7. Low battery icon for base station
8. Humidity / Dew Point Area
Temperature / Heat Index / Wind Chill Area
1
2
3
4
5
6
7
8
9
1. Temperature trend
2. Wind Chill level - temperature is showing
3. Heat Index level - temperature is showing
4. HI / LO temperature, HI Heat Index and LO Wind
Chill alarms are set
5. Selected area icon
6. Indoor / Outdoor channel temperature and humidity
is displayed
7. MAX / MIN temperature
8. Outdoor sensor battery is low
9. Temperature (°C / °F)
WMR100TH_EN.indd 5 5/11/07 4:39:21 PM

6
EN
Wind Speed / Wind Direction Area
(Wind sensor optional)
1
2
3
4
5
6
7
1. Wind speed levels: AVERAGE / MAX / GUST
2. Wind speed level indicator
3. Outdoor wind sensor battery is low
4. Wind speed level description
5. Gust wind or wind speed reading (m / s, kph, mph or
knots)
6. HI gust wind alarm is set
7. Wind direction display
UVI / Barometer / Rainfall Area
(Rain sensor and UV sensor optional)
1
2
3
4
7
8
9
5
6
10
1. UVI / barometer / rainfall readings is showing
2. Outdoor UV / rain sensor battery is low
3. UV / barometer / rainfall alarm is set
4. Rain rate is showing
5. UVI / barometric pressure (mmHg, inHg or mb / hPa)
/ rainfall readings (in / hr or mm / hr)
6. UVI level indicator
7. Accumulated rainfall is showing
8. Past 24hrs rainfall is showing
9. Altitude is showing
10. UVI / barometric pressure / rainfall historical bar
chart display
WMR100TH_EN.indd 6 5/11/07 4:39:24 PM

7
EN
Clock / Alarm / Calendar / Moon Phase Area
1
2
3
4
5
6
1. Clock radio reception
2. Alarm 1 and 2 are displayed and set
3. Timestamp is displayed
4. Offset time zone
5. Moon phase
6. Time / date / calendar
Humidity / Dew Point Area
1
2
3
4
5
6
1. Dew point level - Temperature is showing
2. HI / LO humidity and Dew Point alarms are set
3. Comfort levels
4. Humidity trend
5. MAX / MIN humidity
6. Humidity reading
GETTING STARTED
SET UP BASE STATION
NOTE Install batteries in the remote sensor before the
base station matching the polarities (+ and -).
For continuous use, please install the AC adapter. The
batteries are for back-up use only.
NOTE Please make sure the socket-outlet is installed
near the equipment and is easily accessible.
WMR100TH_EN.indd 7 5/11/07 4:39:27 PM

8
EN
Install the base station batteries (4 x UM-3 / AA)
matching the polarity + and -. Press RESET after each
battery change.
NOTE Do not use rechargeable batteries. It is
recommended that you use alkaline batteries with this
product for longer performance.
The battery icon indicator
may appear in the
following areas:
AREA MEANING
Weather
Forecast Area
Battery in the base station is low.
will show when AC adapter is
disconnected.
Temperature
/ Heat Index /
Wind Chill Area
The displayed channel indicates
the outdoor sensor for which
battery is low.
Wind Speed /
Wind Direction
Area
Battery in the wind sensor is low.
UVI / Barometer
/ Rainfall Area
Battery in the UV / Rain sensor
is low.
SET UP SENSOR
To set up sensor:
1. Slide battery door open.
2. Insert the batteries, matching the polarity (+ and -).
3. Use CODE to select the channel.
4. THGR810 only - Set the temperature unit.
5. Place the sensor near the main unit. Press RESET
on the sensor. Then, press the approriate main unit
WMR100TH_EN.indd 8 5/11/07 4:39:34 PM

9
EN
button (as specified in the main unit manual) to
initiate signal sending between the sensor and the
main unit.
6. Close the sensor battery compartment.
7. Secure the sensor in the desired location using the
wall mount or table stand.
For best results:
• Place the sensor out of direct sunlight and moisture.
• Do not place the sensor more than 100 m (30 ft)
from the main (indoor) unit.
• Position the sensor so that it faces the main (indoor)
unit, minimizing obstructions such as doors, walls,
and furniture.
• Place the sensor in a location with a clear view to the
sky, away from metallic or electronic objects.
• Position the sensor close to the main unit during cold
winter months as below-freezing temperatures may
affect battery performance and signal transmission.
The transmission range may vary depending on many
factors. You may need to experiment with various
locations to get the best results.
Wireless ranges can be impacted by a variety of factors
such as extremely cold temperatures. Extreme cold
may temporarily reduce the effective range between the
sensor and the base station. If the unit’s performance
fails due to low temperature, the unit will resume proper
functioning as the temperature rises to within the normal
temperature range (i.e. no permanent damage will occur
to the unit due to low temperatures).
BATTERIES
Insert batteries before first use, matching the polarity (+
and -) as shown in the battery compartment. For best
results, install batteries in the remote sensor before the
main unit. Press RESET after each battery change.
NOTE It is recommended that you use alkaline batteries
with this product for longer performance and lithium
batteries in below freezing temperatures (0°C / 32°F).
Do not use rechargeable batteries.
shows on the THGR810 when the batteries are
low.
WMR100TH_EN.indd 9 5/11/07 4:39:41 PM

10
EN
SET CHANNEL
Set the channel by adjusting the CODE switch to one of
the following settings.
CHANNEL NUMBER SWITCH SETTING
1
2
3
4
5
6
7
8
9
10
10 Other switch settings
(Not recommend)
BASE STATION
CHANGE DISPLAY / SETTING
To change the display and settings, use the following
buttons on the rotating dial: SELECT, MEMORY /
ON/OFF, MODE and ALARM.
In addition, the UNIT
and SEARCH buttons
located at the bottom of
the base station allows
pre-setting of the remote
sensor channels and the
measurement units for
display.
TIP To exit from the setting mode, push any button.
Alternatively, the base station will automatically exit after
30 seconds.
CLOCK RECEPTION
This product is designed to synchronize its calendar
clock automatically once it is brought within range of a
radio signal:
WMR100:
• DCF-77 generated from Frankfurt, Germany for
Central Europe
• MSF-60 generated from Anthorn, England
WMR100TH_EN.indd 10 5/11/07 4:39:55 PM

11
EN
The radio signal range is 1500 km (932 miles).
WMR100A:
• WWVB-60 generated from the atomic clock in Fort
Collins, Colorado
The radio signal range is 3219 km (2000 miles).
WMR100 only - slide the EU / UK switch to the appropriate
setting based on your location. Press RESET whenever
you change the selected setting.
The reception icon will blink when it is searching for a
signal. If the radio signal is weak it can take up to 24
hours to get a valid signal reception.
indicates the status of the clock reception signal.
ICON MEANING
Time is synchronized.
Receiving signal is strong
Time is not synchronized.
Receiving signal is weak
To enable (and force a signal search) / disable the clock
radio reception (clock synchronization):
1. Press SELECT to navigate to the Clock / Calendar /
Alarm Area.
will show next to the Area.
2. Press and hold SEARCH.
appears when it is enabled.
NOTE For best reception, the base station should be
placed on a flat, non-metallic surface near a window
in an upper floor of your home. The antenna should
be placed away from electrical appliances and not be
moved around when searching for a signal.
CLOCK / CALENDAR
To manually set the clock:
(You only need to set the clock and calendar if you have
disabled the clock radio reception.)
1. Press SELECT to navigate to the Clock Area.
will show next to the Area.
2. Press and hold MODE to change the clock setting.
The setting will blink.
3. Rotate the dial left or right to decrease or increase
the setting value.
4. Press MODE to confirm.
5. Repeat steps 1 to 5 to set the time zone offset hour
(+ / -23 hours), 12 / 24 hour format, hour, minute,
year, date / month format, month, date and weekday
language.
NOTE If you enter +1 in the time zone setting, this will
give you your regional time plus 1 hour.
NOTE The weekday is available in English, French,
German, Italian or Spanish.
WMR100TH_EN.indd 11 5/11/07 4:39:57 PM

12
EN
To change the clock display:
1. Press SELECT to navigate to the Clock Area.
will show next to the Area.
2. Press MODE to toggle between:
• Clock with Seconds
• Clock with Weekday
• Calendar
CLOCK ALARM
The clock has 2 alarms that can be set to sound with
a beep.
ICON MEANING
Alarm 1 or 2 is displayed
Alarm 1 or 2 is activated
No icons No alarm is set
To set an alarm:
1. Press SELECT to navigate to the Clock Area.
will show next to the Area.
2. Press ALARM to toggle between alarm 1
and
alarm 2
display.
3. When you’ve selected the alarm you wish to
change, press and hold ALARM. The alarm setting
will blink.
4. Rotate the dial left or right to change the setting.
5. Press ALARM to confirm.
To activate / deactivate an alarm:
1. Press SELECT to navigate to the Clock Area.
will show next to the Area.
2. Press ALARM to toggle between alarm 1
and
alarm 2
.
3. Press MEMORY /
ON/OFF to activate or
deactivate the alarm.
or appears when the
alarm is activated.
MOON PHASE
The Calendar must be set for this feature to work (see
Clock / Calendar section).
ICON DESCRIPTION
New moon
Waxing crescent
First quarter
Waxing gibbous
WMR100TH_EN.indd 12 5/11/07 4:40:01 PM

13
EN
Full moon
Waning gibbous
Third quarter
Waning crescent
AUTO SCANNING FUNCTION
To activate the outdoor temperature and humidity
auto-scan function:
1. Press SELECT to navigate to the Temperature or
Humidity Area.
will show next to the Area.
2. Press and hold MODE to activate auto-scan. The
temperature and humidity display will scroll from
indoor to ch1 through to ch10.
3. Press MEMORY /
ON/OFF or MODE or ALARM
to stop the auto-scan.
NOTE Channel 1 is used for the outdoor temperature
and humidity sensor in the remote wind sensor.
Additional temperature and humidity sensors can use
other channels.
WEATHER FORECAST
The weather display in the top part of the screen shows
the current weather and the weather forecast for the next
12-24 hours within a 30-50 km (19-31 mile) radius.
Weather Forecast Area
ICON DESCRIPTION
Sunny
Partly cloudy
Cloudy
Rainy
Snowy
TEMPERATURE AND HUMIDITY
The weather station displays indoor and outdoor
readings for:
1. Current, minimum and maximum temperatures and
relative humidity.
WMR100TH_EN.indd 13 5/11/07 4:40:05 PM

14
EN
2. Comfort level indicator and trend line.
3. Heat index, wind chill and dew point level.
The weather station can connect up to 10 remote
sensors.
shows which remote sensor’s data you are viewing.
appears when indoor data is displayed.
The timestamp records the date and time when storing
the temperature and humidity readings in memory.
To select the temperature measurement unit:
Press UNIT (at the bottom of the base station) to select
°C / °F.
NOTE The unit of all temperature related displays will
be changed simultaneously.
To view readings from indoor / outdoor sensors
(1-10) for temperature and humidity:
1. Press SELECT to navigate select the Temperature
or Humidity Area.
will show next to the Area.
2. Rotate the dial left or right to select the channel.
To view minimum and maximum temperature or
humidity:
1. In the Temperature or Humidity Area, press MODE
repeatedly to cycle through the readings for:
• Current Temperature
• Heat Index
• Wind Chill
• Dew Point
• Humidity
2. For each of the above readings, press MEMORY
/
ON/OFF repeatedly to toggle respectively
between:
• Current / MAX / MIN temperature
• Current / MAX heat index
• Current / MIN wind chill
• Current / MAX / MIN dew point
• Current / MAX / MIN humidity
The timestamp is displayed accordingly in the Clock
Area.
To clear the memories and timestamp for the
temperature, heat index, wind chill, humidity and
dew point readings:
In the Temperature or Humidity Area, press and hold
MEMORY /
ON/OFF to clear the readings.
WMR100TH_EN.indd 14 5/11/07 4:40:06 PM

15
EN
To change the high / low temperature, heat index,
wind chill, humidity and dew point alarms:
1. In the Temperature or Humidity Area, press ALARM
repeatedly to toggle between high / low alarms for
temperature, heat index, wind chill, humidity and
dew point readings.
2. Press and hold ALARM to enter the alarm setting.
3. Rotate the dial left or right to set the desired values.
4. Press ALARM to confirm the setting.
To activate / deactivate the high / low temperature,
heat index, wind chill, humidity and dew point
alarms:
1. In the Temperature or Humidity Area, press ALARM
repeatedly to select the desired alarm.
2. Press MEMORY /
ON/OFF to activate or
deactivate the alarm.
NOTE The dew point advises at what temperature
condensation will form. The wind chill factor is based on
the combined effects of temperature and wind speed.
TEMPERATURE AND HUMIDITY TREND
The trend lines are shown next to the temperature and
humidity readings. The trend is shown as follows:
TREND ICON DESCRIPTION
Rising
Steady
Falling
COMFORT LEVEL
The Comfort Zone icon indicates how comfortable the
climate is based on current temperature and humidity
measurements:
ICON DESCRIPTION
Comfortable
Neutral
Uncomfortable
WMR100TH_EN.indd 15 5/11/07 4:40:08 PM

16
EN
WIND DIRECTION / SPEED
The base station provides
wind speed and wind
direction information.
To read the wind direction
find the compass point the
is pointing to.
The timestamp records the date and time when storing
the wind speed readings.
NOTE Wind sensor optional.
To select the wind speed unit:
Press UNIT (at the bottom of the base station) to switch
between:
• Metres per second (m / s)
• Kilometers per hour (kph)
• Miles per hour (mph)
• Knots (knots)
The wind level is shown by a series of icons:
ICON LEVEL DESCRIPTION
N/A <2 mph (<4km/h)
Light 2-8 mph (3~13 km/h)
Moderate 9-25 mph (~14-41 km/h)
Strong 26-54 mph (~42-87 km/h)
Storm >55 mph (>88 km/h)
To display the AVERAGE and GUST wind:
1. Press SELECT to navigate to the Wind Speed and
Wind Direction Area.
will show next to the Area.
2. Press MODE to toggle between AVERAGE and
GUST wind readings.
To display the maximum speed and direction for
gust wind:
In the Wind Speed and Wind Direction Area, press
MEMORY /
ON/OFF to toggle between wind speed
/ MAX GUST wind readings. The timestamp is displayed
accordingly in the Clock Area.
To clear the memories and timestamp for the wind
readings:
In the Wind Speed and Wind Direction Area, press and
hold MEMORY /
ON/OFF to clear the readings.
To change the high gust wind speed alarm:
1. In the Wind Speed and Wind Direction Area, press
WMR100TH_EN.indd 16 5/11/07 4:40:11 PM

17
EN
and hold ALARM to enter the high gust wind alarm
setting.
2. Rotate the dial left or right to set the desired values.
3. Press ALARM to confirm the settings.
To activate / deactivate the high gust wind speed
alarm:
1. In the Wind Speed and Wind Direction Area, press
ALARM repeatedly to select the desired alarm.
2. Press MEMORY /
ON/OFF to activate or
deactivate the alarm.
UVI / BAROMETER / RAINFALL
The weather station works with one UV sensor and
one rain gauge. The station is capable of storing and
displaying the hourly history data for the last 10 hours
of UV index, and 24 hours of rainfall and barometric
pressure readings.
NOTE Rain sensor and UV sensor optional.
UVI BAROMETER RAINFALL
The bar chart display shows the current and historical
data for the UV index, barometric pressure and rainfall
readings.
To view the UV / Barometer / Rainfall readings:
1. Press SELECT to navigate to the UV / Barometer /
Rainfall Area.
will show next to the Area.
2. Press MODE to toggle between UVI / Barometer
/ Rainfall readings. The corresponding icon will
appear:
UVI BAROMETER RAINFALL
3. Rotate the dial left or right to view the historical data
for the selected area. The corresponding historical
readings are showing.
NOTE The number shown in the HR icon indicates how
long ago each measurement was taken (e.g. 2 hours
ago, 3 hours ago, etc.).
To select the measurement unit for the barometer or
rainfall readings:
In the UV / Barometer / Rainfall Area, press UNIT (at the
bottom of the base station) to switch between:
WMR100TH_EN.indd 17 5/11/07 4:40:14 PM

18
EN
• For barometer: Millimeters of mercury (mmHg),
inches of mercury (inHg), millibars per hectopascal
(mb / hpa).
• For rainfall: Millimeters (mm), inches (in), inches per
hour (in / hr) or millimeters per hour (mm / hr).
UV INDEX
The UV index levels are as follows:
UV INDEX DANGER
LEVEL
ICON
0-2 Low
3-5 Moderate
6-7 High
8-10 Very high
11 and above Extremely high
To change the high UV alarm:
1. In the UV / Barometer / Rainfall Area and UVI
reading display. Press and hold ALARM to enter the
high UV alarm setting.
2. Rotate the dial left or right to set the desired values.
3. Press ALARM to confirm the settings.
To activate / deactivate the high UV alarm:
1. In the UV / Barometer / Rainfall Area and UVI
reading display, press ALARM repeatedly to select
the desired alarm.
2. Press MEMORY /
ON/OFF to activate or
deactivate the alarm.
BAROMETER
To change the barometer alarm:
1. In the UV / Barometer / Rainfall Area and Barometer
reading display. press and hold ALARM to enter the
Barometer alarm setting.
2. Rotate the dial left or right to set the desired values.
3. Press ALARM to confirm the settings.
To activate / deactivate the barometer alarm:
1. In the UV / Barometer / Rainfall Area and Barometer
reading display, press ALARM repeatedly to select
the desired alarm.
2. Press MEMORY /
ON/OFF to activate or
deactivate the alarm.
To set the altitude level compensation for the
Barometer readings:
1. In the UV / Barometer / Rainfall Area and Barometer
reading display. Press and hold MODE to enter the
altitude setting.
2. Rotate the dial left or right to set the desired values.
3. Press MODE to confirm the setting.
WMR100TH_EN.indd 18 5/11/07 4:40:16 PM

19
EN
RAINFALL
To view the current hour, accumulated or last 24
hours rainfall history:
In the UV / Barometer / Rainfall Area and Rainfall reading
display, press MEMORY /
ON/OFF repeatedly to
toggle between current, past 24 hours or accumulated
rainfall. The clock line will change to display the start
time when the accumulated rainfall is displayed. The
icon
appears and the start date is showing.
To toggle between rainfall & rain rate display:
In the UV / Barometer / Rainfall Area and Rainfall reading
display, press and hold MODE.
To reset the accumulated rainfall and timestamp:
In the UV / Barometer / Rainfall Area and Rainfall reading
display. Press and hold MEMORY /
ON/OFF to reset
the accumulated rainfall to ‘0’ and to set the timestamp
to current date and time.
To change the HI rainfall rate alarm:
1. In the UV / Barometer / Rainfall Area and Rainfall
reading display, press and hold ALARM to enter the
Rainfall alarm setting.
2. Rotate the dial left or right to set the desired values.
3. Press ALARM to confirm the settings.
To activate / deactivate the HI rainfall rate alarm:
1. In the UV / Barometer / Rainfall Area and Rainfall
reading display, press ALARM repeatedly to select
the desired alarm.
2. Press MEMORY /
ON/OFF to activate or
deactivate the alarm.
WEATHER ALARMS
Weather alarms are used to alert you of certain weather
conditions. Once activated, the alarm will go off when a
certain criterion is met.
Alarms can be set for:
• Indoor and outdoor high/low temperatures, dew point
and high/low humidity
• High Heat Index
• High Gust Wind
• Low wind chill
• High UV
• Pressure drop
• High rain rate
See the relevant section for how to set the alarm.
To silence any alarm: Press any button or rotate the
dial.
WMR100TH_EN.indd 19 5/11/07 4:40:16 PM
/