Samsung SCH-R220 GreatCall User manual
- Category
- Mobile phones
- Type
- User manual

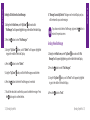
Welcome to the GreatCall
®
Family.
Thank you for choosing the Jitterbug
®
. At GreatCall, we’ve made it easy for you to
stay connected to friends and family with the simplicity of the Jitterbug, our 24-hour
service professionals, and our innovative Apps designed to keep you connected,
safe and healthy. This helpful guide contains all the information you need to start
using your new cell phone. And if you have any questions or need assistance, you
can count on us to be here for you day and night.
Best Regards,
Your friends at GreatCall
For additional information about GreatCall, visit www.greatcall.com.

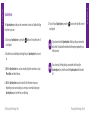
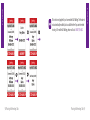
Table of Contents
Table of Contents
Table of Contents I2 Table of Contents
Table of Contents
Activate Your Jitterbug ............................................................................. 1
Section 1: Getting Started ....................................................................... 9
How To Use This Guide ..................................................................................... 10
Key Items In The Jitterbug Box ..........................................................................11
Using The Battery .............................................................................................12
Installing And Removing The Battery ................................................................12
• To Install The Battery The First Time: ..........................................................12
• To Install The Battery Cover: ......................................................................13
• To Remove The Battery:.............................................................................13
Charging The Battery ........................................................................................ 15
• Using The Battery Charger: ........................................................................15
Battery Level Indicator .....................................................................................16
The Front Of Your Jitterbug ...............................................................................18
The Back Of Your Jitterbug ................................................................................20
The Inside Of Your Jitterbug .............................................................................22
How To Read The Inside Display .......................................................................24
Using Your Jitterbug For The First Time...............................................................26

Table of Contents
Table of Contents
Table of Contents IIIII Table of Contents
• Turning Your Jitterbug On: .........................................................................26
• Your Main Screen: ....................................................................................27
• Making Your First Call: ..............................................................................32
• To Turn Your Jitterbug Off: .........................................................................33
Personalize Your Jitterbug .................................................................................34
Operator Assistance ......................................................................................... 36
• To Call An Operator: .................................................................................. 37
Getting More Information ................................................................................. 38
GreatCall Customer Service ..............................................................................39
Emergency 911 Service .................................................................................... 40
• To Make An Emergency Call: .....................................................................40
Section 2: Placing And Receiving Calls .................................................. 43
Placing A Call ................................................................................................... 44
• Dialing Manually: .....................................................................................44
• Using An Operator To Make A Call: ............................................................45
• Using Your Phone Book To Make A Call: .....................................................46
Speakerphone .................................................................................................48
Answering A Call ..............................................................................................50
• Answering A Call When Your Jitterbug Is Closed: ........................................51
• Receiving A Call When Your Jitterbug Is Open: ...........................................52
Ending A Call ...................................................................................................52
Ignoring A Call .................................................................................................52
• To Ignore A Call When Your Jitterbug Is Closed: ..........................................52
• To Ignore A Call When Your Jitterbug Is Open: ............................................53
Vibrate Mode ................................................................................................... 54
Adjusting The Ringer Volume ............................................................................54
Adjusting The Earpiece Speaker Volume ........................................................... 56
Call Waiting .....................................................................................................56
Section 3: Phone Book .......................................................................... 61
Adding, Changing and Deleting Numbers .........................................................62
• OPTION 1: Use The Operator .....................................................................63
• OPTION 2: Using mygreatcall.com .............................................................64
– Create A New Member Account: ................................................................64
• OPTION 3: On Your Jitterbug ...................................................................... 66
– Adding A Contact Directly On Your Jitterbug: ..............................................66
– Modifying A Contact Directly On Your Jitterbug: .........................................68

Table of Contents
Table of Contents
Table of Contents VIV Table of Contents
– Deleting A Contact Directly On Your Jitterbug : ............................................70
Section 4: Call History ........................................................................... 73
Using Call History To See Recent Calls ..............................................................74
• To Review Call History: .............................................................................. 74
Returning Missed Calls And Redialing ..............................................................76
Section 5: Settings ................................................................................ 79
Using Your Settings ..........................................................................................80
Selecting The Color Of The Inside Display .........................................................81
Changing Ring Tones ........................................................................................83
Turning The Start-Up GreatCall Jingle On And Off ..............................................85
• Turning The Jingle Off: ...............................................................................85
• Turning The Jingle On: ............................................................................... 86
Section 6: Voice Dial .............................................................................. 89
Using Voice Dial ...............................................................................................90
Section 7: Voice Mail ............................................................................. 93
Setting Up Voice Mail ....................................................................................... 94
Changing Your Voice Mail Greeting ................................................................... 95
Letting You Know That You Have Voice Mail Messages ......................................96
Listening To Voice Mail Messages .....................................................................97
Listening To Saved Voice Mail Messages ..........................................................98
Section 8: Jitterbug
SimpleText ............................................................101
Using Jitterbug
SimpleText Service .................................................................. 102
Receive A New Text Message ..........................................................................103
Read A New Text Message ..............................................................................104
Reply To A Text Message ................................................................................. 105
Saving And Deleting A Text Message ..............................................................107
• Saving A Text Message:...........................................................................107
• Deleting A Text Message: ........................................................................109
– Deleting A New Text Immediately After Reading: ...................................... 109
– Deleting An Old Text From Your Saved Messages .....................................112
Sending A New Text Message .........................................................................113
Modes For Creating Your Own Text Message ..................................................117
• 123 Mode...............................................................................................117
• ABC Mode ..............................................................................................118
• Abc-S Mode ............................................................................................118

Table of Contents
Table of Contents
Table of Contents VIIVI Table of Contents
• Abc-W Mode ...........................................................................................119
• abc Mode ...............................................................................................119
Section 9: Jitterbug
Camera .................................................................121
Taking A Photo With Your Jitterbug .................................................................122
Viewing A Photo On Your Jitterbug ..................................................................123
Deleting A Photo On Your Jitterbug .................................................................124
Sending A Photo From Your Jitterbug ..............................................................125
Receiving A Photo On Your Jitterbug ...............................................................127
Section 10: Bluetooth
®
........................................................................129
About Bluetooth ............................................................................................130
Using Your Jitterbug With Your Bluetooth Headset ..........................................131
Turning The Bluetooth Feature On Your Jitterbug On And Off ...........................131
• Turning The Bluetooth Feature On: ..........................................................131
• Turning The Bluetooth Feature Off: .......................................................... 133
Setting Your Bluetooth Headset To Pairing Mode ............................................134
Setting Your Jitterbug To Pairing Mode ...........................................................136
Answering A Call When Paired With Your Bluetooth Headset ........................... 140
Ending A Call When Paired With Your Bluetooth Headset ................................140
• To End A Call When Your Jitterbug Is Open: .............................................. 140
• To End A Call When Your Jitterbug Is Closed: ............................................140
Health And Safety Information ............................................................143
The Fine Print ....................................................................................... 191
Your Customer Agreement ................................................................... 207

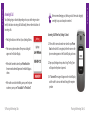
Activation
Activation 1
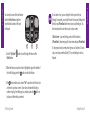
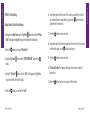
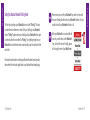
Activate Your Jitterbug
This guide will give you all the information you need to operate your Jitterbug.
Before you get started, please make sure you activate your new phone using the
instructions on the next pages. Once activated, this helpful guide will provide
moreinformationaboutthefeaturesandbenetsavailableonyourJitterbug.
Important: Please do not turn your phone on until you are instructed to do so in
the activation process.
Activation

Activation
Activation
Activation 32 Activation
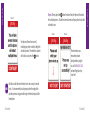
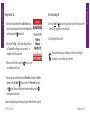
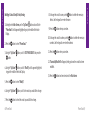
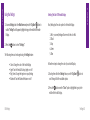
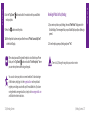
Step 3: The website or an operator will guide you through the activation process.
At some point, you will be instructed to insert the battery and turn on your
Jitterbug. To turn on your Jitterbug, simply press the
on
off
button. Once powered
on, you will see screen 1:
Screen 1
When ready, the website or operator
will instruct you to press the button.
Important: Please ensure you keep
your phone OPEN until activation is
complete.
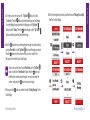
There are ve simple steps required to activate your Jitterbug phone.
Important: Please do not turn on your phone until a representative or the website
instructs you to do so. If you’ve turned it on, please turn it off until instructed
otherwise.
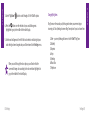
Step 1: Locate your serial number as you will need it to set up the phone. You
cannditeitheronthesideofyourJitterbugbox,orontheActivationCardyou
received in the Jitterbug box. It will look like this, featuring an 18 digit number:
Step 2: You can set up your phone in one of two ways:
1. From your home phone or another phone, call us at 1-866-482-1424.
2. Visit us at www.greatcall.com/activate and click on the
Activate a product
icon.
MEID-DEC:
123456789012345678

Activation
Activation
Activation 54 Activation
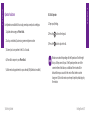
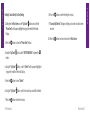
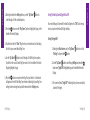
Screen 2
Activation could take several minutes or in rare cases up to several
hours. It is recommended you charge your phone throughout the
activation process using your wall charger to eliminate any possible
interruptions.
Your phone will now show screen 2,
indicating your phone is ready to begin the
activation process. The website or operator
will instruct you to press the button.
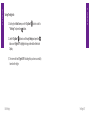
Step 4: After you press the button the second time, the phone will continue
the activation process. You will see several screens until your phone is activated
and ready to use.
If for some reason you
encounter any issues
during activation, just give
us a call at 1-866-482-1424
and we will get you set up
in no time!
Screen 3 Screen 4

Activation
Activation
Activation 76 Activation
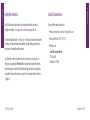
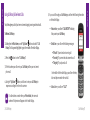
Step 5: Hit the button one last time to begin using your Jitterbug Plus!
Now that your Jitterbug is ready to go, we encourage you to set up a
mygreatcall.com account. On mygreatcall.com, you can pay your bill online, view
your minute usage, add helpful apps and services, and even add phone numbers
into your Jitterbug Phone Book. Phone numbers will automatcially update and
appear right in your phone!
Mygreatcall.com is your online home for everything you need to get the most out
of your new Jitterbug Plus cell phone. To set up your account, visit
www.mygreatcall.com and follow the online instructions.

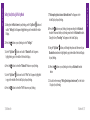
Section 1
Section 1
Getting Started 98 Getting Started
Section 1
Getting Started
This section explains how to start using your Jitterbug phone.
Topics
•HowToUseThisGuide
•KeyItemsInTheJitterbugBox
•UsingTheBattery
•InstallingAndRemovingTheBattery
•ChargingTheBattery
•BatteryLevelIndicator
•TheFrontOfYourJitterbug
•TheBackOfYourJitterbug
For additional support, visit us online at www.greatcall.com/support.
•TheInsideOfYourJitterbug
•HowToReadTheInsideDisplay
•UsingYourJitterbugForTheFirstTime
•PersonalizeYourJitterbug
•OperatorAssistance
•GettingMoreInformation
•GreatCallCustomerService
•Emergency911Service

Section 1
Section 1
Getting Started 1110 Getting Started
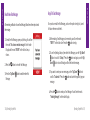
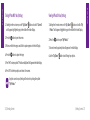
How To Use This Guide
This “How-To Guide” is divided into 10 sections that describe the features of
your Jitterbug and how to use them in a few simple steps. We recommend that
you read the entire guide and keep it handy for easy reference.
You can also skip directly to the section you’re looking for by using the Table of
Contents on page I, the purple side tabs on each page or the Index on page 225.
Throughout this guide, we have included the following illustrations, images and
symbols to highlight useful information:
Afewfeaturesinthisguidemightbetrickyforarsttimecellphoneuser.Ifyou
need assistance, please give us a call anytime, 24 hours a day, seven days a
week, at 1-800-733-6632 or visit www.greatcall.com.
1 2 3
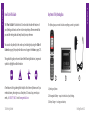
Key Items In The Jitterbug Box
The Jitterbug box you received includes everything you need to get started:
1. Jitterbug cell phone.
2. Rechargeable Battery – snaps into the back of your Jitterbug.
3. Battery Charger – to charge your battery.

Section 1
Section 1
Getting Started 1312 Getting Started
Using The Battery
TheJitterbugRechargeableBatteryisdesignedtodeliveranefcientchargeto
your Jitterbug for up to 25 days of standby time or 5 hours of talk time.
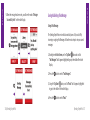
Installing And Removing The Battery
To Install The Battery The First Time:
1. With the Samsung logo facing up, slide the battery into the back of your
Jitterbug so the gold contacts on the side of thebattery connect with the gold
pins inside the phone.
2. Push the battery into place.
To Install The Battery Cover:
1. Place the cover over the back of the phone so
the hinges align with the slots near the top
of the phone.
2. Push on the cover while sliding it up towards
the top of the phone, inserting the hinges into the slots.
3. Press down on the cover around all sides ensuring the cover snaps into
place.
To Remove The Battery:
1. If the phone is on, turn it off by opening your Jitterbug and holding down the
on
off
button until the GreatCall logo appears. The phone will then turn off.

Section 1
Section 1
Getting Started 1514 Getting Started
2. Turn the phone over. At the bottom of the
battery cover you will see an arrow.
3. Towards the top of the cover, there is a
ridge, under the speaker holes. Push down
just below this ridge and then slide down,
in the direction of the arrow. Remove the cover.
4.Toremovethebattery,simplyslideangernailinthegrooveatthetopofthe
battery, and gently pull the battery out.
The Jitterbug Rechargeable Battery must be fully charged before using
thephoneforthersttime.Werecommendaninitialchargeofupto
12 hours. Failure to do so may damage your battery. If you use your
Jitterbug without charging the battery, and it is critically low, it will turn
itself off.
Charging The Battery
Your Jitterbug can be charged with the included Battery Charger or with the
Car Charger that can be purchased by visiting www.greatcall.com/jitterbug/
accessories.
Using The Battery Charger:
1. A Battery Charger is included in the box with your
Jitterbug.
2. Plug the large end of the Battery Charger into a standard
wall outlet (110/220 VAC).
3. Plug the smaller end into the Power Connector. You’ll see
a “Charging” message on the Outside Display.
4. When the battery is fully charged, you’ll see a “Charging Completed”
message on the Outside Display. Please reference Section 1, page 18 for more
information on the Outside Display.

Section 1
Section 1
Getting Started 1716 Getting Started
Battery Level Indicator
Jitterbug phones remind you to charge your battery. Reminders appear on the
Inside Display with the following messages:
• Battery Low – a low battery alert and a message will tell you that your battery
is beginning to get low.
• Battery Critical – a low battery alert and a message will appear when the
battery has approximately 20% of battery life remaining.
JitterbugbatterieshavebeendesignedspecicallyfortheJitterbug
phone. Using other batteries could damage your Jitterbug and may void
your warranty.
You can easily check the remaining charge on the Jitterbug battery by
navigating to the Phone Info menu and pressing the button to view.
Please reference Section 1, page 28 for more information on Phone Info.
The Jitterbug Plus features a standby time of up to 25 days. Talk time is
approximately 5 hours. Common factors that affect battery performance
include text messaging, taking or sending pictures, usage of 5Star
Urgent Response service and making calls. Always make sure to charge
your phone when not in use.

Section 1
Section 1
Getting Started 1918 Getting Started
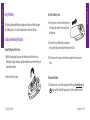
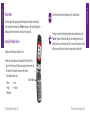
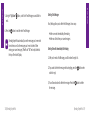
The Front Of Your Jitterbug
3. Internal Antenna
2. Volume Button
1. Indicator Light
5. 3.5mm Headset Jack
4. Camera
7. Power Connector and
Accessory Connector
6. Outside Display
1. Indicator Light– the area just above the outer display screen will light up for
incoming calls or when the phone is fully charged. The following list outlines
the Indicator Light and what each one means:
•The Indicator Light is on when the battery is completely charged.
•The IndicatorLightashescontinuallytoindicatethefollowing:
•Amissedcall•AmissedTextMessage•AnewVoiceMailMessage
2. Volume Button – adjusts the ringer volume or the earpiece speaker volume
during a call. To silence the ringer during an incoming call, press the volume
button.
3. Internal Antenna – connects with the cellular network so you can use your
Jitterbug.
4. Camera – allows you to take a picture with your Jitterbug.
5. Headset Jack – connect to a headset to listen to calls
6. Outside Display – indicates when you have an incoming call or message.
7. Power Connector and Accessory Connector – links the Battery Charger and
several accessories to your Jitterbug.

Section 1
Section 1
Getting Started 2120 Getting Started
The Back Of Your Jitterbug
2. Battery Cover
1. External Speaker
3. Lanyard Connector
1. External Speaker – delivers loud and clear sound.
2. Battery Cover – protects the battery and the back of your Jitterbug.
3. Lanyard Connector – makes it easy to attach a lanyard or wrist strap to carry
your Jitterbug.
To purchase a Jitterbug lanyard or any other Jitterbug accessory, visit us
online at www.greatcall.com/jitterbug/accessories.

Section 1
Section 1
Getting Started 2322 Getting Started
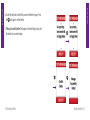
The Inside Of Your Jitterbug
1. Earpiece Speaker
2. Inside Display
6. On/Off Button
5. “Yes” Button
7. “No” Button
3. Up/Down Button
4. Speakerphone Button
1. Earpiece Speaker – lets you hear the caller loud and clear.
2. Inside Display – shows all the information you need to operate your Jitterbug.
3. Up/Down Button – for navigating between screens on the Inside Display.
4.
Spkr
Speakerphone Button – for sharing conversations with others nearby,
or hands-free calling.
5. Button – allows you to answer “Yes” to questions or commands on the Inside
Display.
6.
on
off
On/Off Button – turns your Jitterbug on and off.
7. Button – allows you to answer “No” to questions or commands on the
Inside Display.

Section 1
Section 1
Getting Started 2524 Getting Started
How To Read The Inside Display
Throughout this guide, the screen on the inside of your Jitterbug is referred to as
the Inside Display. The following diagram explains the areas of the Inside Display
and how to use them, using the Phone Book as an example.
1. Feature Area
2. Detail Area
3. Action Line
4. Additional
Information Exists
1. Feature Area–thetopoftheInsideDisplayistheFeatureArea.Itidentiesthe
feature you are using. For example, when you are in the Phone Book, you will
see “PHONE BOOK” in the Feature Area.
2. Detail Area – the middle of the Inside Display provides the details of each
feature. For example, information such as detailed entries from your Phone
Book, will appear in this area.
3. Action Line – the bottom of the Inside Display is the Action Line where
questions or commands are displayed. You can respond by pressing
the or buttons.
4. Additional Information Exists – the small arrows at the top and bottom of
the Inside Display indicate when information is available before or after the
current screen. Use the “Up/Down” button to scroll through entries.
If you are ever not sure what to do, simply press or buttons to
answer the question in the Action Line at the bottom of the Inside Display.

Section 1
Section 1
Getting Started 2726 Getting Started
Using Your Jitterbug For The First Time
If you have not activated your Jitterbug, please refer to page 1 before
turning your Jitterbug on.
Turning Your Jitterbug On:
1. Open your Jitterbug.
2. Press the
on
off
button in the upper right corner of the keypad until your Jitterbug
turns on and the GreatCall logo appears on the Inside Display.
3. When you hear a dial tone, your Jitterbug has service and is ready to use.
If a connection is not possible, a “No Service” message will appear on the
Outside Display and a dial tone will not be heard.
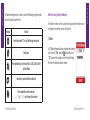
Your Main Screen:
For your convenience, each time you turn your Jitterbug
on, you will see the Main Screen as shown in the following
diagram:
The Main Screen will display your Jitterbug phone
number at the top of the screen as shown in the
following screen as, “My # 800-733-6632.”
The Main Screen is where you access the features on your
Jitterbug. Your Jitterbug is designed with the following six
features installed in your phone:
1. Phone Book – store up to 50 of the names and numbers that you call most
often. Operators can even set-up the Phone Book for you. Please reference
Section 3, page 61 for more information.

Section 1
Section 1
Getting Started 2928 Getting Started
2. Call History – an easy way to review your last ten incoming, outgoing and
missedcalls,listedwiththemostrecentrst. Please reference Section 4,
page 73 for more information.
3. Phone Info – gives you the following important points of information about your
Jitterbug.
•Myphonenumber
•Batterylife
•Signalstrength
•Approximateminutesusedpermonth
4. Settings – the following items can be changed from within the Settings
feature.
•Colors:ChangethecoloroftheInsideDisplay
•JingleON:TurntheGreatCallstart-upJingleonoroff
•RingTones:ChangetheringtoneonyourJitterbug
•Bluetooth:TurntheBluetoothfeatureonoroff
Please reference Section 5, page 79 for more information.
5. Camera– this is where you will take photos that will be automatically stored
in My Photos. See section 9, page 121 for more information.
6. My Photos – an easy way to view, delete or send photos. See section 9, page
125 for more information.
Approximate minutes used per month shows your estimated minute
usage each month. This time resets at the beginning of your monthly
billing cycle.
Page is loading ...
Page is loading ...
Page is loading ...
Page is loading ...
Page is loading ...
Page is loading ...
Page is loading ...
Page is loading ...
Page is loading ...
Page is loading ...
Page is loading ...
Page is loading ...
Page is loading ...
Page is loading ...
Page is loading ...
Page is loading ...
Page is loading ...
Page is loading ...
Page is loading ...
Page is loading ...
Page is loading ...
Page is loading ...
Page is loading ...
Page is loading ...
Page is loading ...
Page is loading ...
Page is loading ...
Page is loading ...
Page is loading ...
Page is loading ...
Page is loading ...
Page is loading ...
Page is loading ...
Page is loading ...
Page is loading ...
Page is loading ...
Page is loading ...
Page is loading ...
Page is loading ...
Page is loading ...
Page is loading ...
Page is loading ...
Page is loading ...
Page is loading ...
Page is loading ...
Page is loading ...
Page is loading ...
Page is loading ...
Page is loading ...
Page is loading ...
Page is loading ...
Page is loading ...
Page is loading ...
Page is loading ...
Page is loading ...
Page is loading ...
Page is loading ...
Page is loading ...
Page is loading ...
Page is loading ...
Page is loading ...
Page is loading ...
Page is loading ...
Page is loading ...
Page is loading ...
Page is loading ...
Page is loading ...
Page is loading ...
Page is loading ...
Page is loading ...
Page is loading ...
Page is loading ...
Page is loading ...
Page is loading ...
Page is loading ...
Page is loading ...
Page is loading ...
Page is loading ...
Page is loading ...
Page is loading ...
Page is loading ...
Page is loading ...
Page is loading ...
Page is loading ...
Page is loading ...
Page is loading ...
Page is loading ...
Page is loading ...
Page is loading ...
Page is loading ...
Page is loading ...
Page is loading ...
Page is loading ...
Page is loading ...
Page is loading ...
Page is loading ...
Page is loading ...
Page is loading ...
Page is loading ...
Page is loading ...
Page is loading ...
Page is loading ...
-
 1
1
-
 2
2
-
 3
3
-
 4
4
-
 5
5
-
 6
6
-
 7
7
-
 8
8
-
 9
9
-
 10
10
-
 11
11
-
 12
12
-
 13
13
-
 14
14
-
 15
15
-
 16
16
-
 17
17
-
 18
18
-
 19
19
-
 20
20
-
 21
21
-
 22
22
-
 23
23
-
 24
24
-
 25
25
-
 26
26
-
 27
27
-
 28
28
-
 29
29
-
 30
30
-
 31
31
-
 32
32
-
 33
33
-
 34
34
-
 35
35
-
 36
36
-
 37
37
-
 38
38
-
 39
39
-
 40
40
-
 41
41
-
 42
42
-
 43
43
-
 44
44
-
 45
45
-
 46
46
-
 47
47
-
 48
48
-
 49
49
-
 50
50
-
 51
51
-
 52
52
-
 53
53
-
 54
54
-
 55
55
-
 56
56
-
 57
57
-
 58
58
-
 59
59
-
 60
60
-
 61
61
-
 62
62
-
 63
63
-
 64
64
-
 65
65
-
 66
66
-
 67
67
-
 68
68
-
 69
69
-
 70
70
-
 71
71
-
 72
72
-
 73
73
-
 74
74
-
 75
75
-
 76
76
-
 77
77
-
 78
78
-
 79
79
-
 80
80
-
 81
81
-
 82
82
-
 83
83
-
 84
84
-
 85
85
-
 86
86
-
 87
87
-
 88
88
-
 89
89
-
 90
90
-
 91
91
-
 92
92
-
 93
93
-
 94
94
-
 95
95
-
 96
96
-
 97
97
-
 98
98
-
 99
99
-
 100
100
-
 101
101
-
 102
102
-
 103
103
-
 104
104
-
 105
105
-
 106
106
-
 107
107
-
 108
108
-
 109
109
-
 110
110
-
 111
111
-
 112
112
-
 113
113
-
 114
114
-
 115
115
-
 116
116
-
 117
117
-
 118
118
-
 119
119
-
 120
120
-
 121
121
-
 122
122


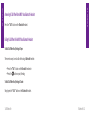
Samsung SCH-R220 GreatCall User manual
- Category
- Mobile phones
- Type
- User manual
Ask a question and I''ll find the answer in the document
Finding information in a document is now easier with AI
Related papers
-
GreatCall Jitterbug 5 Owner's manual
-
GreatCall Jitterbug J User manual
-
Samsung SM-T807PTSASPR User manual
-
-
GreatCall SCH-R220 GreatCall Quick start guide
-
-
-
-
-
Other documents
-
-
-
 Jitterbug FLIP User manual
-
-
-
-
KYOCERA Jitterbug Touch Quick start guide
-
-
-
