Roland SP-404SX User manual

Category
Sequencer
Type
User manual
Deutsch Français Italiano Español Português NederlandsEnglish
2
Features
Quick and Easy Sampling!
Sample anywhere, anytime using the built-in mic and battery power.
Line and mic inputs are also available.
Killer E ects Onboard!
Create a signature sound using the 29 DSP e ects including the standard  lter, delay and unique
e ects such as voice transformer and looper FX.
E ects switch seamlessly during live performance.
Realtime Performance!
3 non-slip control knobs, 12 trigger pads, and an extra Sub Pad for rapid repeat triggering in
realtime.
Create Your Own Tracks!
Record patterns in realtime with the Pattern Sequencer, complete with quantize mode including
shu e feels.
SD Card Memory!
Get sampling right away with the included SD card. Expand using up to 32GB SDHC.
Easily import audio  les from your computer and assign samples to the pads using the included
software (Mac/PC) (p. 22).
Copyright © 2009 ROLAND CORPORATION
All rights reserved. No part of this publication may be reproduced in any form without the written permission of ROLAND
CORPORATION.
Before using this unit, carefully read the sections entitled: “USING THE UNIT SAFELY” (p. 51) and “IMPORTANT NOTES” (p. 52). These sections provide
important information concerning the proper operation of the unit. Additionally, in order to feel assured that you have gained a good grasp
of every feature provided by your new unit, Owners manual should be read in its entirety. The manual should be saved and kept on hand as a
convenient reference.
3
Deutsch Français Italiano Español Português NederlandsEnglish
Contents
Features . . . . . . . . . . . . . . . . . . . . . . . . . . . . . . . . . . .2
Panel Descriptions . . . . . . . . . . . . . . . . . . . . . . . . .4
About Batteries . . . . . . . . . . . . . . . . . . . . . . . . . . . .6
Basic Operation 7
Before You Start . . . . . . . . . . . . . . . . . . . . . . . . . . .8
Connecting the SP-404SX to Your Speakers . . . . . . . . . . . 8
Turning the Power On . . . . . . . . . . . . . . . . . . . . . . . . . . . . . . . . 9
Inserting an SD card . . . . . . . . . . . . . . . . . . . . . . . . . . . . . . . . . 10
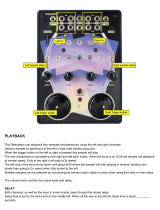
Playing Sounds . . . . . . . . . . . . . . . . . . . . . . . . . . .11
Playing Samples . . . . . . . . . . . . . . . . . . . . . . . . . . . . . . . . . . . . 11
Applying Eects . . . . . . . . . . . . . . . . . . . . . . . . . . . . . . . . . . . . 13
Playing Patterns . . . . . . . . . . . . . . . . . . . . . . . . . . . . . . . . . . . . . 14
Adjusting the Tempo . . . . . . . . . . . . . . . . . . . . . . . . . . . . . . . . 15
Recording Samples— Basic Operation . . . . .16
STEP 1: Connecting Equipment . . . . . . . . . . . . . . . . . . . . . . 16
STEP 2: Sampling . . . . . . . . . . . . . . . . . . . . . . . . . . . . . . . . . . . . 18
Deleting a Sample . . . . . . . . . . . . . . . . . . . . . . . . . . . . . . . . . . 21
Importing Wave Files from Your Computer .22
Advanced Operation 23
Playing an External Input Sound . . . . . . . . . . .24
Adjusting the Volume of the EXT SOURCE . . . . . . . . . . . . 24
Recording Samples— Advanced Operation 25
About the Available Sampling Times . . . . . . . . . . . . . . . . . 25
Specifying the Type of Data to Create when Sampling 25
Starting Sampling Automatically (Auto Sampling) . . . . 25
Sampling with a Specied Tempo . . . . . . . . . . . . . . . . . . . . 26
Using a Count-in . . . . . . . . . . . . . . . . . . . . . . . . . . . . . . . . . . . . 26
Resampling . . . . . . . . . . . . . . . . . . . . . . . . . . . . . . . . . . . . . . . . . 26
Editing a Sample . . . . . . . . . . . . . . . . . . . . . . . . . .27
Setting a Sample’s Volume . . . . . . . . . . . . . . . . . . . . . . . . . . . 27
Adjusting the Playback Region of a Sample . . . . . . . . . . 27
Deleting an Unwanted Portion (Truncate) . . . . . . . . . . . . 29
Changing a Sample’s BPM . . . . . . . . . . . . . . . . . . . . . . . . . . . 30
Changing the Length of a Sample without
Changing the Pitch (Time Modify) . . . . . . . . . . . . . . . . . . . 30
Deleting All Samples . . . . . . . . . . . . . . . . . . . . . . . . . . . . . . . . 30
Exchanging Samples between Two Pads . . . . . . . . . . . . . 31
Copying a Sample to Another Pad . . . . . . . . . . . . . . . . . . . 31
Pattern Sequencer . . . . . . . . . . . . . . . . . . . . . . . .32
Recording a Pattern . . . . . . . . . . . . . . . . . . . . . . . . . . . . . . . . . 32
Deleting a Pattern . . . . . . . . . . . . . . . . . . . . . . . . . . . . . . . . . . . 34
Deleting All Patterns . . . . . . . . . . . . . . . . . . . . . . . . . . . . . . . . 34
Exchanging the Patterns of Two Pads . . . . . . . . . . . . . . . . 34
Copying a Pattern to Another Pad . . . . . . . . . . . . . . . . . . . 34
About SD Card . . . . . . . . . . . . . . . . . . . . . . . . . . . .35
Formatting an SD card . . . . . . . . . . . . . . . . . . . . . . . . . . . . . . 35
Exporting WAVE Files . . . . . . . . . . . . . . . . . . . . . . . . . . . . . . . . 35
Importing WAVE Files . . . . . . . . . . . . . . . . . . . . . . . . . . . . . . . 36
Saving Backup Data
(Backup Save) . . . . . . . . . . . . . . . . . . . . . . . . . . . . . . . . . . . . . . . 37
Loading Backup Data
(Backup Load) . . . . . . . . . . . . . . . . . . . . . . . . . . . . . . . . . . . . . . . 37
Deleting Backup Data
(Backup Delete) . . . . . . . . . . . . . . . . . . . . . . . . . . . . . . . . . . . . . 37
About the Protect Function . . . . . . . . . . . . . . . . . . . . . . . . . . 38
Other Functions . . . . . . . . . . . . . . . . . . . . . . . . . .39
List of Functions . . . . . . . . . . . . . . . . . . . . . . . . . . . . . . . . . . . . 39
Adjusting the Input Gain . . . . . . . . . . . . . . . . . . . . . . . . . . . . 39
Adjusting the Output Gain . . . . . . . . . . . . . . . . . . . . . . . . . . 39
Restoring the Factory Settings (Factory Reset) . . . . . . . . 40
Display Illumination and Sleep Settings . . . . . . . . . . . . . . 40
Checking the Version Number . . . . . . . . . . . . . . . . . . . . . . . 40
Appendix 41
Eect List . . . . . . . . . . . . . . . . . . . . . . . . . . . . . . . . .42
Eect Limit Mode . . . . . . . . . . . . . . . . . . . . . . . . . . . . . . . . . . . 42
Error Message List . . . . . . . . . . . . . . . . . . . . . . . .45
Troubleshooting . . . . . . . . . . . . . . . . . . . . . . . . . .45
About MIDI . . . . . . . . . . . . . . . . . . . . . . . . . . . . . . .47
MIDI Implementation Chart . . . . . . . . . . . . . . . . . . . . . . . . . 48
Specications . . . . . . . . . . . . . . . . . . . . . . . . . . . .49
Index . . . . . . . . . . . . . . . . . . . . . . . . . . . . . . . . . . . .50
USING THE UNIT SAFELY . . . . . . . . . . . . . . . . . . .51
IMPORTANT NOTES . . . . . . . . . . . . . . . . . . . . . . .52
4
Panel Descriptions
1
2
3
4
5
6
7
8
9
10
11
12
13
14
15
Name Description Page
1
[VOLUME] knob
This adjusts the volume.
p. 9
2
[CTRL 1]–[CTRL 3] knobs
These knobs control e ect parameters.
You can also use each knob to make the following settings.
p. 13
CTRL 1
The starting location of a sample
The playback time of a sample
p. 29
p. 30
CTRL 2
The BPM (tempo) of the pattern
The ending location of a sample
p. 15
p. 28
CTRL 3/MFX
The type of MFX
The sampling level
The volume of the sample
p. 13
p. 19
p. 27
3
PEAK indicator
Indicates the analog input level of the LINE IN jacks.
Adjust the volume of your connected equipment so that this indicator lights occasionally.
p. 19
4
E ect buttons
Use these buttons to select the e ect you want to use.
p. 13
5
Display
This shows information such as the BPM (tempo), the values of various settings, and error
messages (p. 45).
Display illumination
This will blink in synchronization with the patterns tempo.
During sampling, this will light red if the level of the audio signal is excessive.
p. 40
p. 19
6
[PATTERN SELECT] button Press this when you want to play or record a pattern. p. 14
[LENGTH] button Speci es the length of the pattern when recording a pattern. p. 32
[QUANTIZE] button Speci es quantization (automatic timing correction) when recording a pattern. p. 32
7
[DEL] button Deletes a sample or pattern. p. 21
[REC] button Starts/stops sampling or pattern recording. p. 18
[RESAMPLE] button Applies an e ect to the sound of a sample and resamples the result. p. 26
[CANCEL] button
Cancels an operation such as sampling, pattern playback, or recording.
By pressing this button four times in rapid succession, you can stop all sounds that are
currently playing.
p. 12
[REMAIN] button
Makes the display indicate the remaining time available for sampling.
In addition, you can hold down this button and press a pad to specify the sample to which
you want to apply an e ect, or to specify the sample whose settings you want to edit (modify
current pad).
p. 25
p. 13
[MARK] button Use this button when you want to play only a portion of a sampled sound. p. 27
5
Deutsch Français Italiano Español Português NederlandsEnglish
Name Description Page
8
Pads [1]–[12]
When you press these pads, you’ll hear the samples that are assigned to the pads.
If the [PATTERN SELECT] button is lit, the pads will select patterns.
p. 11
p. 14
9
[START/END/LEVEL] button
Use this button when you want to change the playback start/end points of a sample or to
adjust its volume.
p. 27
[TIME/BPM] button Use this button when you want to specify a sample’s playback time or BPM (tempo). p. 15
[TAP TEMPO] button
You can change the tempo by pressing this button several times at the desired timing.
To temporarily stop the production of sound, hold down the [FUNC] button while you press
the [TAP TEMPO] (PAUSE) button.
p. 15
p. 12
10
[LO-FI] button Switches the samples playback quality (standard/lo- ). p. 12
[STEREO] button Speci es whether you’ll be sampling in monaural or in stereo. p. 18
[GATE] button
Switches between Gate playback (the sample will play only while you hold down the pad)
and Trigger playback (the sample will alternate between play and stop each time you press
the pad).
p. 12
[LOOP] button
Switches between Loop playback (the sample will play repeatedly) and One-Shot playback
(the sample will play only once).
p. 12
[REVERSE] button Switches to Reverse playback, in which the sample will play backward. p. 12
11
[BANK] buttons
Use these buttons to switch between sample or pattern banks.
p. 11
12
[FUNC] button
Use this button to make various settings.
p. 39
13
[HOLD] pad This pad allows you to have a sample keep playing even after you take your  nger o the pad. p. 12
[EXT SOURCE] pad This pad plays the sound of the external (line or mic) input. p. 24
[SUB PAD] pad This pad plays the sample of the pad you struck most recently. p. 12
14
[MIC] button
This button switches the mic input on/o .
p. 17
15
Internal mic
This is the SP-404SX’s built-in mic. If you connect your own mic (sold separately) to the MIC
jack of the top panel, this internal mic will not function.
p. 17
16 17 18 19 20 21 22 23 24 25 26
Name Description Page
16
PHONES jack
You can connect stereo headphones here to listen to the same sound as from LINE OUT jacks.
p. 8
17
SD card slot
Insert an SD card here. There is a cover on the SD card slot, and this cover is fastened in place
with a screw when the SP-404SX is shipped from the factory. Remove the screw as described
in “Remove the card lock screw to detach the card cover!” (p. 10).
p. 10
18
[MIC LEVEL] knob
This adjusts the volume of the SP-404SX’s internal mic or a mic connected to the MIC jack.
p. 19
19
MIC IN jack
You can connect a mic (separately sold) to this jack.
p. 17
20
Functional ground terminal
If necessary, connect this terminal to an external electrical ground.
p. 8
21
DC IN jack
Connect the included AC adaptor here.
p. 8
22
[POWER] switch
This turns the power on/o .
p. 9
23
MIDI IN jacks
You can connect a MIDI device to this connector.
p. 47
24
LINE IN jacks
Here you can connect your portable music player or other audio source device from which
you want to sample.
p. 16
25
LINE OUT connector
Connect your ampli ed speakers or mixer system here.
p. 8
26
Security slot ( )
http://www.kensington.com/
6
About Batteries
Remove the battery compartment cover located on the bottom of the SP-
404SX, and insert the batteries in the correct polarity (direction) as marked
inside the battery compartment. Then close the cover securely.
NOTE
Battery handling
Incorrect handling of batteries, rechargeable batteries, or a battery charger can cause leakage, overheating,  re, or explosion. Before use, you must read and strictly
observe all of the precautions that accompany the batteries, rechargeable batteries, or battery charger.
When using rechargeable batteries and a charger, use only the combination of rechargeable batteries and charger speci ed by the battery manufacturer.
When turning the unit upside-down, get a bunch of newspapers or magazines, and place them under the four corners or at both ends to prevent damage to the
buttons and controls. Also, you should try to orient the unit so no buttons or controls get damaged.
When the batteries run low
When the batteries run low, the display’s illumination will turn o , and the dot in the lower right of the display and
the [FUNC] button will start blinking. If the batteries run down completely, Lo appears in the display and no further
operations will be possible. If this occurs, replace the batteries immediately.
MEMO
When the remaining battery capacity decreases, the sound may be distorted when the [VOLUME] knob is in certain
positions. If this occurs, replace the batteries.
Types of Batteries That Can be Used
with the SP-404SX
You can use the following types of batteries
with the SP-404SX.
Do not use any other type of batteries.
Alkaline AA SIZE Dry Battery
Ni-MH AA SIZE Rechargeable Battery
Specifying the type of batteries used
You’ll need to specify the type of batteries youre using
(alkaline or Ni-MH rechargeable). The SP-404SX will
calculate its remaining battery power based on the setting
you make here.
1. While holding down the [FUNC] button, turn on
the power.
2. Turn the [CTRL 3] knob to specify the type of
batteries youre using.
The [REC] button will blink when you turn the knob.
Value Description
AL
Alkaline dry battery
ni
Ni-MH rechargeable battery
3. Press the [REC] button to con rm the setting.
MEMO
This setting will be remembered even while the power
is turned o .
Checking the Remaining Battery
Power
1. Make sure that the [PATTERN SELECT] button is
unlit.
If it’s lit, press the [PATTERN SELECT] button to turn it o .
2. Press the [REMAIN] button.
While you hold down the button, the remaining battery
power is indicated by the number of BANK buttons that
are lit. If only the BANK [A/F] button is lit, it’s time to
replace the batteries. A while after this indication, the
display will indicate Lo, and it will no longer be possible
to operate the SP-404SX.
MEMO
When the power is on with the AC adaptor connected,
all of the [BANK] buttons will be lit.
About Sleep Mode
If you’ve selected the S LP (sleep) setting in “Display
illumination and sleep settings” (p. 40), all of the SP-404SX’s
buttons will go out when it has not been operated for ap-
proximately  ve minutes, and it will enter Sleep mode. This
will extend the battery life when operating on batteries.
Specifying the type of batteries used
Deutsch Français Italiano Español Português NederlandsEnglish
Basic Operation
8
Before You Start
Connecting the SP-404SX to Your Speakers
Make sure that the SP-404SX and your ampli ed speakers (which we’ll simply call speakers”) are powered o , and then make
connections as shown below.
Ampli ed speakers
(sold separately)
Audio cables
(sold separately)
AC adaptor
LINE OUT jacks DC IN jack
LINE IN jacks
If you’re using headphones
(sold separately), connect them
here.
Place the AC adaptor so the side with
the indicator (see illustration) faces
upwards and the side with textual
information faces downwards.
The indicator will light when you plug
the AC adaptor into an AC outlet.
NOTE
To prevent malfunction and/or damage to speakers or other devices, always turn down the volume, and turn o the power
on all devices before making any connections.
About Functional Ground Terminal
Depending on the circumstances of a particular setup, you may experience a discomforting sensation, or perceive that the
surface feels gritty to the touch when you touch this device, mics connected to it, or the metal portions of other objects.
This is due to an in nitesimal electrical charge, which is absolutely harmless. However, if you are concerned about this,
connect the ground terminal (see  gure) with an external ground. When the unit is grounded, a slight hum may occur,
depending on the particulars of your installation. If you are unsure of the connection method, contact the nearest Roland
Service Center, or an authorized Roland distributor, as listed on the “Information page.
Unsuitable places for connection
Water pipes (may result in shock or electrocution)
Gas pipes (may result in  re or explosion)
Telephone-line ground or lightning rod (may be dangerous in the event of lightning)
9
Deutsch Français Italiano Español Português NederlandsEnglish
Turning the Power On
NOTE
Once the connections have been completed, turn on power to your various devices in the order speci ed. By turning on
devices in the wrong order, you risk causing malfunction and/or damage to speakers and other devices.
1. Minimize the volume of the SP-404SX and your speakers.
Turn the SP-404SX’s [ VOLUME] knob all the way to the left.
2. Turn the SP-404SX’s [ POWER] switch ON.
NOTE
This unit is equipped with a protection circuit. A brief interval (a few seconds) after power up is required before the unit will
operate normally.
3. Turn on the power of your speakers.
4. Adjust the volume.
While striking the pads of the SP-404SX to produce sound, slowly turn the [VOLUME] knob toward the right, and adjust the
volume on the SP-404SX and on your speakers.
Turning the Power O
1. Minimize the volume of the SP-404SX and your speakers.
2. Turn o the power of your speakers.
3. Turn the SP-404SX’s [POWER] switch OFF.
10
Inserting an SD card
If you insert a commercially available SD card into the SP-404SX, you’ll be able to sample for longer times.
This section explains how to insert an SD card; however, when you purchase the SP-404SX, an SD card containing the factory-
set preload data is already inserted, so the procedure described here won’t be necessary.
Remove the card lock screw to detach the card cover!
When the SP-404SX is shipped, the card cover is locked by a screw installed at
the location marked “CARD LOCK” on the bottom panel. To remove the card
cover, you must  rst use a Phillips screwdriver to remove the CARD LOCK screw.
The screw was placed there for stability during transportation from the factory;
you can discard it without reusing it.
NOTE
Take care that the screw you removed is not accidentally swallowed by small children.
When turning the unit upside-down, get a bunch of newspapers or magazines, and place them under the four corners or at both ends to prevent damage to
the buttons and controls. Also, you should try to orient the unit so no buttons or controls get damaged.
Never insert or remove an SD card while this unit’s power is on. Doing so may corrupt the unit’s data or the data on the SD card.
1. Remove the card cover from the front panel.
2. Insert the SD card into the slot, and replace the cover.
Carefully insert the SD card all the way in—until it is  rmly in place.
SD cards usable with the SP-404SX
The SP-404SX supports SDHC/SD cards up to a capacity of 32 GB.
Preparing an SD card for use
Before you can use a commercially available SD card with the SP-404SX, you must format it as described in “Formatting an
SD card” (p. 35). However, do not format the SD card that was included with the SP-404SX. All of the preload data on the
card will disappear if you format the included SD card.
The SD card must be unlocked!
The SP-404SX will be unable to function properly if the SD card is locked. (“LoC will appear
in the display.) Make sure that the SD card is not locked.
Card must be
unlocked!
Removing an SD card
1. Press the SD card inward.
2. Grasp the card and pull it out toward yourself.
11
Deutsch Français Italiano Español Português NederlandsEnglish
Playing Sounds
Playing Samples
What’s a sample?
Samples are pieces of sampled (recorded) sound together with their loop settings, etc. That are assigned to the twelve
pads. You can play a sample by pressing the corresponding pad [1]–[12].
When you press a pad, its sample will play. The pad
will light red while the sample is playing.
What’s a sample bank?
A sample bank is a set of twelve samples assigned to the pads. The SP-404SX has ten sample banks, A–J.
Use the [A/F]–[E/J] buttons to switch the sample
bank. To select bank F, Press the [A/F] button twice
so it starts blinking.
How many samples can play simultaneously?
The SP-404SX can play 12 monaural samples or 6 stereo samples simultaneously.
While resampling (p. 26), the maximum is 4 monaural or 2 stereo samples.
The SD card inserted when the SP-404SX is shipped from the factory has samples assigned to pads [1]–[12] of sample banks
[A]–[F]. You’ll probably want to start by listening to these.
1. Make sure that the [PATTERN SELECT] button is extinguished.
If it is lit, press the button to turn it o .
2. Press the BANK [A/F] button so the button is lit.
If the button is blinking, bank F is selected. Press
the [A/F] button once again so it lights steadily.
1212
3. Press a pad to play its sample.
That pad will blink while its sample is playing.
You can press two or more pads to play them simultaneously.
Try playing samples using the functions described below.
Holding a sample
While holding down a pad, press the [ HOLD] pad to make the sample
continue playing even after you release the pad. To stop the sample,
press the pad once again.
Playing the sound of the external input
This pad plays the sound from the LINE IN jacks or mic input (p. 24).
Repeated strikes
When you press the [ SUB PAD] pad, the same sample as the previously
pressed pad will play. This makes it easy to use both hands to play rapid
notes in succession.
Holding a sample
While holding down a pad, press the [
HOLD] pad to make the sample
continue playing even after you release the pad. To stop the sample,
press the pad once again.
Playing the sound of the external input
This pad plays the sound from the LINE IN jacks or mic input (p. 24).
When you press the [
SUB PAD] pad, the same sample as the previously
pressed pad will play. This makes it easy to use both hands to play rapid
notes in succession.
Viewing or editing the sample settings
These buttons indicate the sample settings of the pad you pressed most recently (the current pad”).
You can change the sample settings by pressing these buttons
* With the factory settings, the samples in banks A–F of the included SD card are protected, and cannot be edited.
For details on how to turn o the protect setting, refer to About the Protect Function” (p. 38).
Button When lit When not lit
LO-FI Play back with a lo- sound Play back with the standard sound
GATE Sample playback will stop when you release the pad Sample playback will continue even if you release the pad
LOOP Play back repeatedly (looped) Play back once (not looped)
REVERSE Play backward Play normally
Pausing the sound ( PAUSE)
Hold down the [FUNC] button and press the [TAP TEMPO] (PAUSE) button; the sound
will pause, and button operations will be disabled except for the operation of resuming
playback.
To resume playback, once again hold down the [FUNC] button and press the [TAP TEMPO]
(PAUSE).
If the sound won’t stop!
If the sound won’t stop, Press the [ CANCEL] button four times in rapid succession. All of the
SP-404SX’s sounds will stop.
13
Deutsch Français Italiano Español Português NederlandsEnglish
Applying E ects
The SP-404SX contains 29 types of e ects. As an example, heres how to apply the “FILTER + DRIVE” to a sample.
1. Press a pad to play its sample.
2. Press the [FILTER + DRIVE] button.
Use these buttons to switch e ects (to switch an e ect o , get the button’s
light to go out). You can’t apply multiple e ects simultaneously.
You can use any of the following ways to change the e ect selected by
MFX.
Hold down the [MFX] button and turn the [CTRL 3] knob
Hold down the [MFX] button and press a pad [1]–[12] (MFX 1–12)
Hold down the [MFX] and [DJFX LOOPER] buttons and press a pad
[1]–[12] (MFX 13–24)
If the e ect buttons are o , pressing the [TAP
TEMPO] button will cause the button for the e ect
that was used most recently to blink, reminding
you which e ect was in use.
3. Turn the [CTRL 1]–[CTRL 3] knobs to adjust the e ect.
Knob Display Result
CTRL 1
Co F (CUTOFF)
Adjusts the  lters cuto frequency.
CTRL 2
rE S (RESONANCE)
Adjusts the  lters resonance.
CTRL 3
dr U (DRIVE)
Adjusts the amount of drive (distortion).
For details on each e ect, refer to “E ect List (p. 42).
Applying an e ect to multiple samples
Normally, the e ect will be applied only to the pad you pressed most recently. However, by making use of [ REMAIN]
button, you can set it so an e ect is applied to multiple samples.
While holding down [REMAIN] button, press the desired pads to have the
e ect be applied to each pad that is lit.
If you hold down the
[REMAIN] button and press
the button of the e ect you
want to use, the e ect will
be applied to all samples.
Applying an e ect only while you hold down the button ( EFFECT GRAB)
If you hold down the [TAP TEMPO] (EFFECT GRAB) button and press an e ect button, the
e ect will be applied only while you hold down that e ect button. This is a way to quickly
turn an e ect on/o in time with your performance.
Pre-specifying parameters for the
e ect you’ll use next
Hold down the [REMAIN] button and turn the
[CTRL 1]–[CTRL 3] knobs to edit the parameters.
When you next press an e ect button, that e ect
will be applied with the parameter values you
pre-speci ed.
14
Playing Patterns
What’s a pattern?
The SP-404SX lets you successively play several samples by pressing a pad, and create a song by recording this perfor-
mance. Such a succession of samples is called a pattern.
Pads to which a pattern is assigned will blink red.
When you press a blinking pad, the pattern will
play.
What is a pattern bank?
A “pattern bank” is a set of twelve patterns assigned to the pads. The SP-404SX has ten pattern banks, A–J.
Use the [A/F]–[E/J] buttons to switch pattern banks.
To select F, Press the [A/F] button twice so it starts
blinking.
On the factory-installed SD card, patterns are assigned to pads [1]–[12] of pattern banks [A]–[E]. You’ll probably want to start by
listening to these.
1. Press the [ PATTERN SELECT] button so its lit.
The display will indicate Pt n.
2. Press the BANK [A/F] button so the button is lit.
If the button is blinking, bank F is selected. Press
the [A/F] button once again so it lights steadily.
15
Deutsch Français Italiano Español Português NederlandsEnglish
3. Press a pad, and the pattern will play.
The pad will change from blinking to lit, and the
pattern will begin playing.
4. Press another pad to reserve the next pattern.
If you press another pad while a pattern is playing,
the pattern to play next will be reserved, and that
pad will blink. When the currently playing pattern has
nished playing, the reserved pattern will play.
If you hold down the [SUB PAD] pad and press a pad,
the pattern will change immediately.
5. Press the currently playing pad, and the pattern will stop playing.
Pattern playback will also
stop if you press the [CANCEL]
button.
MEMO
For details on how to create a pattern, refer to “Recording a Pattern (p. 32).
Adjusting the Tempo
Heres how to change the playback tempo of the pattern.
1. Press the [ TIME/BPM] button so it’s lit.
MEMO
If the [PATTERN SELECT] button is lit, you’ll be changing the pattern’s
tempo. If the [PATTERN SELECT] button is extinguished, you’ll be
changing the current samples tempo.
2. Turn the [CTRL 2] knob.
The display will indicate the tempo in terms of the BPM, and the pattern playback
tempo will change.
Permissible values for the BPM range from 40 up to 200. However, if the BPM is
within the 40–60 or 160–180 ranges, it can be set only in even-numbered values.
If the BPM is above 180, you can set it to either 180, 183, 186, 190, 193, 196, or
200.
You can also set the tempo by pressing the
[ TAP TEMPO] button several times at quarter note
intervals of the desired tempo.
3. Once you’ve speci ed the tempo, press the [TIME/BPM] button to turn it o .
What’s BPM?
This stands for Beats Per Minute, which is the number of quarter-note beats played in one minute.
16
Recording Samples— Basic Operation
STEP 1: Connecting Equipment
Connecting a Portable Music Player or Stereo
If you’re connecting your portable music player, stereo, or CD player, use audio cables to connect your devices output jacks
(LINE OUT jacks, AUX OUT jacks, etc.) to the SP-404SX’s LINE IN jacks.
Your stereo’s LINE
OUT jacks
Your portable music
player’s output jack
LINE IN jacks
A record player ( turntable) cannot be connected directly
to the SP-404SX. If you want to connect a record player,
you must use an audio amp that will accept a connection
from a record player, or use a phono equalizer between
the record player and the SP-404SX.
Audio amp
or
Phono equalizer
Caution when making connections
To prevent malfunction and/or damage to speakers or other devices, always turn down the volume, and turn o the power
on all devices before making any connections.
When connection cables with resistors are used, the volume level of equipment connected to the inputs (LINE IN) may be
low. If this happens, use connection cables that do not contain resistors.
17
Deutsch Français Italiano Español Português NederlandsEnglish
Connecting a Mic
To use a mic, connect it to the MIC IN jack, then press the [MIC] button so it’s lit.
MIC IN jack
Press the [MIC] button so its lit.
MEMO
If you’re not using a mic, leave this button
unlit.
Using the built-in mic
If you want to use the built-in mic, don’t
connect anything to the MIC IN jack.
The built-in mic won’t operate if a mic is
connected to the MIC IN jack.
Howling could be produced depending on the location of
mics relative to speakers. This can be remedied by:
1. Changing the orientation of the mic(s).
2. Relocating mic(s) at a greater distance from speakers.
3. Lowering volume levels.
Importing WAVE  les from your computer
By using the included “SP-404SX Wave Converter software, WAV or AIFF  les from your computer can be written to an SD
card and assigned to the pads of the SP-404SX.
For details, refer to “Importing Wave Files from Your Computer” (p. 22).
Use the “SP-404SX Wave Converter” software on
your computer to copy the data to SD card
Load the data from SD
card into the SP-404SX
Card reader (sold separately)
WAV
AIFF
18
STEP 2: Sampling
Here we’ll explain how to use Sampling to record to pad [1] of bank J.
1. Make sure that the [PATTERN SELECT] button is extinguished.
If it’s lit, press the button to turn it o .
2. Press the [ REC] button so the button is lit.
If you decide to
cancel sampling, Press the
[CANCEL] button.
3. Press the BANK [E/J] button so it’s blinking.
Press the BANK [E/J] button so it’s blinking.
If the button is lit, bank E is selected; press the [E/J] button
once again so it’s blinking.
Pads to which you can sample will blink.
4. Press the pad [1].
Pad [1] will light, and the [REC] button will blink.
5. Make STEREO setting.
Turn this o if you’re sampling in
monaural from a mic, etc.
How this a ects the sampling time
Sampling in monaural will give you approximately twice as much sampling time as stereo.
Monaural sampling also allows you to play twice as many samples simultaneously (12 monaural samples, or 6 stereo
samples).
19
Deutsch Français Italiano Español Português NederlandsEnglish
Applying an e ect while you sample
By pressing an e ect button at this time, you can sample the sound processed by the e ect.
MEMO
In this case, you can use the [CTRL 1] and [CTRL 2] knobs to adjust the e ect settings. Because the [CTRL 3] knob is used
to adjust the digital input level, it cannot be used to adjust the e ect settings.
In this case, you can use the [CTRL 1] and [CTRL 2] knobs to adjust the e ect settings. Because the [CTRL 3] knob is used
6. Adjust the recording level
6-1. Produce sound on the device that’s connected to the SP-404SX (if you’re using a mic, vocalize into the
mic).
6-2. Adjust the volume of the device (e.g., portable music player) connected to the SP-404SX so that the
PEAK indicator lights occasionally.
Adjust the volume of your audio source (e.g.,
portable music player)
MEMO
If the volume of your device is not adjustable,
and the PEAK indicator stays lit, set the SP-
404SX’s input gain to “-10 dB” as described on p. 39.
If you’re using a mic, turn the [ MIC
LEVEL] knob to adjust the level.
The PEAK indicator should
light occasionally
6-3. If the display illumination lights red, the internal digital input level is excessive; turn the [CTRL 3] knob
toward the left until the display does not illuminate red.
If this lights red, the digital input level is
too high!
Turn the [CTRL 3] knob all the way to the right, and then turn it
toward the left until the red illumination no longer appears.
Signal fl ow
LINE IN jacks
[CTRL 3]
knob
Display illumination
MIC IN jack
PEAK
indicator
Input Gain
Refer to p. 39
[MIC IN]
knob
Eff ects
Resampling
Analog signal Digital signal
Adjust so this
lights occasionally
If lit red, level
is too high!
20
7. Produce sound on the device that’s connected to the SP-404SX, and Press the [REC] button when you want to
start sampling.
[REC] button will light, and
sampling will begin.
NOTE
Never turn o the power while sampling is in progress. If you turn o the power, not only the sample being recorded but
also other samples may also be destroyed.
8. When you want to stop sampling, press the [REC] button.
[REC] button will go out, and
sampling will end.
If the display indicates F UL
In the following cases, the display will indicate FUL, and sampling will end automatically.
When there is no remaining free space on the SD card
When the sample currently being recorded exceeds 2 GB (approximately 180 minutes in stereo)
9. Press the pad [1] to play back the sound you just sampled.
If the sample included an unwanted portion
If there is unwanted sound or silence at the beginning or end of the sample, you can make settings so that only the
desired portion will be heard.
For details, refer toAdjusting the Playback Region of a Sample” (p. 27).
If you want to re-record the sample
Delete the sample as described in “Deleting a Sample” (p. 21) on the following page, and then re-record the sample.
  • Page 1 1
  • Page 2 2
  • Page 3 3
  • Page 4 4
  • Page 5 5
  • Page 6 6
  • Page 7 7
  • Page 8 8
  • Page 9 9
  • Page 10 10
  • Page 11 11
  • Page 12 12
  • Page 13 13
  • Page 14 14
  • Page 15 15
  • Page 16 16
  • Page 17 17
  • Page 18 18
  • Page 19 19
  • Page 20 20
  • Page 21 21
  • Page 22 22
  • Page 23 23
  • Page 24 24
  • Page 25 25
  • Page 26 26
  • Page 27 27
  • Page 28 28
  • Page 29 29
  • Page 30 30
  • Page 31 31
  • Page 32 32
  • Page 33 33
  • Page 34 34
  • Page 35 35
  • Page 36 36
  • Page 37 37
  • Page 38 38
  • Page 39 39
  • Page 40 40
  • Page 41 41
  • Page 42 42
  • Page 43 43
  • Page 44 44
  • Page 45 45
  • Page 46 46
  • Page 47 47
  • Page 48 48
  • Page 49 49
  • Page 50 50
  • Page 51 51
  • Page 52 52
  • Page 53 53
  • Page 54 54

Roland SP-404SX User manual

Category
Sequencer
Type
User manual

Ask a question and I''ll find the answer in the document

Finding information in a document is now easier with AI