Page is loading ...

DVD-VCR
CHT-350
Instruction Manual
www.samsungvcr.com
PAL/NTSC
00096Q DVD-CHT350/XSG-GB1 11/20/03 11:47 AM Page 1

GB
Contents
2
◆ Foreword
■ Safety Instructions......................................................................................... 5
■ Disc Type and Characteristics....................................................................... 6
◆ DVD-VCR Overviews
■ Front View of the DVD-VCR.......................................................................... 7
■ Rear View of the DVD-VCR........................................................................... 7
■ Infrared Remote Control................................................................................ 8
■ Display Indicators.......................................................................................... 9
■ Accessories................................................................................................... 9
◆ Connecting Your DVD-VCR
■ Deciding How to Connect DVD-VCR............................................................. 10
■ Connecting DVD-VCR to the TV using the Coaxial Cable ............................ 11
■ Connecting DVD-VCR to the TV using the RCA Cable................................. 11
■ Connecting Other Equipment to Your DVD-VCR.......................................... 12
■ Plug & Auto Set Up........................................................................................ 13
■ Tuning Your Television for the DVD-VCR..................................................... 14
■ Deck Control Keys......................................................................................... 15
■ Copying from DVD to VCR............................................................................ 16
■ Inserting Batteries in the Remote Control...................................................... 17
■ Setting the Date and Time............................................................................. 17
■ Menu Language............................................................................................. 18
◆ Setting Up Your DVD-VCR
■ Presetting the Stations Automatically............................................................ 19
■ Presetting the Stations Manually................................................................... 20
■ Clearing a Preset Station............................................................................... 21
■ Changing the Preset Station Table................................................................ 22
■ Selecting the RF OUT Sound Mode (B/G-D/K)............................................. 23
■ Setting the DVD-VCR Output Channel.......................................................... 23
■ Selecting the Colour Mode............................................................................ 24
■ NICAM........................................................................................................... 24
■ Intelligent Picture Control .............................................................................. 25
■ Auto Power off............................................................................................... 26
■ Selecting the Cassette Type.......................................................................... 27
■ Auto Repeat Play........................................................................................... 27
■ Displaying/Hiding On-Screen Information ..................................................... 28
◆ Recording Television Broadcasts
■ Selecting the Recording Speed..................................................................... 28
■ Protecting a Recorded Cassette.................................................................... 29
■ Recording a Programme Immediately........................................................... 29
■ Recording a Programme with Automatic Stop............................................... 30
■ Using the Timer Programming Feature......................................................... 31
■ Checking a Preset Recording........................................................................ 32
■ Cancelling a Preset Programme.................................................................... 32
00096Q DVD-CHT350/XSG-GB1 11/20/03 11:48 AM Page 2

GB
Contents (cont.)
3
◆ Playing Back
■ Playing a Cassette......................................................................................... 33
■ Adjusting Picture Alignment Automatically.................................................... 33
■ Adjusting Picture Alignment Manually........................................................... 33
■ Selecting the Audio Output Mode.................................................................. 34
■ Playing a Cassette in Slow Motion................................................................ 34
■ Playing a Sequence Frame by Frame........................................................... 35
■ Playing a Sequence at Variable Speeds....................................................... 35
■ Picture Search, Fast Forward/Rewind........................................................... 36
■ Searching for a Specific Sequence ............................................................... 36
■ Using the Tape Counter ................................................................................ 37
■ Connecting an RCA Audio/Video Input Cable............................................... 38
■ Using the Assemble Edit Function................................................................. 39
■ Recording from Another VCR or Camcorder................................................. 39
■ Audio Dubbing a Pre-recorded Cassette....................................................... 40
■ Using the TV Buttons on the Remote Control ............................................... 41
■ SQPB (Super VHS Quasi Playback)............................................................. 42
◆ DVD Functions
■ Choosing a Connection................................................................................. 43
■ Using the Setup Menu................................................................................... 44
■ Using the Disc Menu Language .................................................................... 45
■ Setting Up the Audio Language Features ..................................................... 46
■ Using the Subtitle Language ......................................................................... 46
■ Setting Up the Parental Control..................................................................... 47
■ Setting Up the Audio Options........................................................................ 48
■ Setting Up the Display Options...................................................................... 49
■ S-Video Connections (for DVD)..................................................................... 50
■ Special Playback Features............................................................................ 51
■ Using the Display Function (DVD/VCD/CD).................................................. 52
■ Repeat Play................................................................................................... 53
■ Program Play (CD)........................................................................................ 54
■ Random Play (CD) ........................................................................................ 54
■ SCREEN FIT Play......................................................................................... 55
■ Selecting the Audio Language (Using the Audio button)............................... 56
■ Selecting the Subtitle Language (Using the Subtitle button)......................... 56
■ Changing the Camera Angle......................................................................... 57
■ Using the BookMark Function (DVD/VCD).................................................... 58
■ Recalling a Marked Scene............................................................................. 58
■ Clearing a Mark............................................................................................. 58
■ Using the Zoom (DVD/VCD).......................................................................... 59
■ MP3 Play....................................................................................................... 60
■ MP3 Play (CD-R MP3 disc requirements)..................................................... 61
00096Q DVD-CHT350/XSG-GB1 11/20/03 11:48 AM Page 3

GB
Contents (cont.)
4
◆ Appendix A - Advanced Connections
■ Connecting the FM and AM antennas........................................................... 62
■ Connecting the Speakers.............................................................................. 63
■ LINE3 AUDIO Setting.................................................................................... 64
■ Speaker Volume Control ............................................................................... 64
■ Speaker setup ............................................................................................... 65
■ Dolby Pro Logic II decoder............................................................................ 67
■ SOUND mode/effect function........................................................................ 68
■ Listening to radio broadcasts......................................................................... 69
■ Presetting stations......................................................................................... 69
◆ Solving Problems
■ Technical Specifications................................................................................ 70
■ Problems and Solutions (VCR)...................................................................... 72
■ Troubleshooting Guide (DVD)....................................................................... 73
This product incorporates copyright protection technology that is protected by
method claims of certain U.S. patents and other intellectual property rights
owned by Macrovision Corpration and other rights owners. Use of this
copyright protection technology must by authorized by Macrovision
Corporized by Macrovision Corporation, and is intended for home and other
limited viewing uses only unless otherwise authorized by Macrovision
Corporation. Reverse engineering or disassembly is prohibited.
☛
➢
NoteImportantHold downPress/push
Symbols
1
1
1
= Step number
00096Q DVD-CHT350/XSG-GB1 11/20/03 11:48 AM Page 4

GB
Safety Instructions
5
The following illustrations represent precautions.
The lightning bolt is a warning sign alerting you to dangerous voltage inside the product.
DO NOT OPEN THE DVD-VCR. Refer to service personnel.
THIS DEVICE IS NOT FOR USE IN INDUSTRIAL
ENVIRONMENTS
Do NOT expose the DVD-VCR
to extreme temperature condi-
tions (below 5°C and above
40°C) or to extreme humidity
conditions (less than 10% and
more than 75%).
Do NOT expose the DVD-VCR
to direct sunlight.
Do NOT expose the DVD-VCR
to any liquids.
Do NOT place any objects on
the DVD-VCR or remote
control.
During a storm and/or light-
ning, unplug the DVD-VCR
from the mains socket and
aerial.
If the remote control is not
used for a long period of time,
remove the batteries and store
it in a cool, dry place.
00096Q DVD-CHT350/XSG-GB1 11/20/03 11:48 AM Page 5

Disc Type and Characteristics
GB
6
This DVD player is capable of playing the following types of discs with the corresponding logos :
* DO NOT play CD-ROM, CD-I and DVD-ROM in this player!
(CDGs play audio only, not graphics.)
* It may not be to play CD-R,CD-RW and DVD-R in all cases due to the type of disc or condition of the
recording.
DIGITAL
SOUND
STEREO
• PAL colour
system in U.K,
France,
Germany, etc.
• Dolby
Digital disc
• Digital
Audio disc
• Stereo
disc
• DTS disc
Disc Markings
Both the DVD player and the discs are coded by region. These regional codes must match in order for the
disc to play. If the codes do not match, the disc will not play.
The Region Number for this player is described on the rear panel of the player.
Playback Region Number
PAL
12 Cm
8 Cm
Single-sided
240 min.
Double-sided
480 min.
Single-sided
80 min.
Double-sided
160 min.
Audio
+
Video
Audio
+
Video
Audio
• DVD contains excellent sound
and video due to Dolby Digital
and MPEG-2 system.
• Various screen and audio
functions can be easily selected
through the on-screen menu.
• Video with CD sound, VHS
quality & MPEG-1 compression
technology.
• An LP is recorded as an analog
signal with more distortion. CD
is recorded as a Digital Signal
with better audio quality, less
distortion and less deterioration
of audio quality over time.
VIDEO-CD
AUDIO-CD
12 Cm
8 Cm
74 min.
20 min.
12 Cm
8 Cm
74 min.
20 min.
Disc Types
(Logos)
Recording
Types
Disc Size
Max.
Playing
Time
Characteristics
DVD
• NTSC broadcast
system in USA,
Canada, japan,
South Korea, etc.
NTSC
• ”DTS” and “DTS Digital Surround” are registered trademarks of Digital Theater Systems, Inc.
• Manufactured under license from Dolby Laboratories.
“Dolby”, “Pro Logic”, and the double-D symbol are trademarks of Dolby Laboratories.
• Playback
Region Number
~
00096Q DVD-CHT350/XSG-GB1 11/20/03 11:48 AM Page 6

GB
Front View of the DVD-VCR
Rear View of the DVD-VCR
7
VIDEO CASSETTE
COMPARTMENT
FM/AM
PROGRAMME
SELECTION
BUTTONS
PLAY/PAUSE
BUTTON
STOP
BUTTON
HEADPHON
JACK
REW/SKIP BACK
BUTTON
RECORD
BUTTON
EJECT BUTTON
F.F/SKIP NEXT
BUTTON
OPEN/CLOSE
BUTTON
DVD/VCR SELECT
BUTTON
COPY
BUTTON
SOUND
EFFECT
DVD DECK
STANDBY/ON
BUTTON
INPUT SELECT
VOLUME
SPEAKER OUT
COMPONENT
VIDEO OUT
S-VIDEO OUT
OPTICAL INPUT
COOLING FAN
AERIAL IN
CONNECTOR
LINE IN 1, 2, 3
RADIO FM
ANTENNA INPUT
RADIO AM
ANTENNA INPUT
OUT TO TV
CONNECTOR
LINE OUT TO TV
3
00096Q DVD-CHT350/XSG-GB1 11/20/03 11:48 AM Page 7

Infrared Remote Control
GB
8
1
2
3
4
5
6
7
8
9
10
11
12
13
14
15
16
17
18
19
20
21
22
23
24
25
26
27
28
29
30
31
32
33
34
35
36
37
38
39
40
41
1 STANDBY/ON
2 OPEN/CLOSE, EJECT
3 SPEAKER SELECT
4 TEST
5 MODE, REPEAT
6 ANGLE
7 TV VOLUME
8 TV SELECT
9 DVD, VCR, FM/AM, INPUT
SELECT
10 REWIND, SKIP BACK
11 STOP
12 DISPLAY
13 SETUP
14 UP
15 LEFT
16 ENTER
17 RECORD
18 MARK, INDEX
19 AUDIO
20 TITLE, SPEED
21 TV STANDBY/ON
22 MUTE
23 0-9
24 SOUND MODE
25 SOUND EFFECT
26 STEP
27 ZOOM/ATR
28 PROG/TRK
/
❷
29 AMP VOLUME
30 TV INPUT
31 FAST-FORWARD, SKIP
NEXT
32 PLAY/PAUSE
33 CLEAR
34 DISC MENU
35 RIGHT
36 DOWN
37 RETURN, A.DUB
38 SUBTITLE, TIMER
39 SCRREEN FIT, SVHS
40 TV/VCR
41 JOG/SHUTTLE
00096Q DVD-CHT350/XSG-GB1 11/20/03 11:48 AM Page 8

GB
Display Indicators
Accessories
9
You have just purchased a SAMSUNG Video Cassette Recorder (DVD-VCR).
Together with your DVD-VCR, you will find the following accessories in the box.
1 2 3 4 5 6 7 8 9 19 10 11
12 13 14 15 16 20 17
1 The DVD Deck is selected
2 A DVD, CD, VCD or SVCD is loaded
3 A disc with LPCM (Linear Pulse Code Modulation)
audio is loaded
4 A DVD with a Dolby Digital is loaded
5 A DVD with a DTS soundtrack is loaded
6 The time, counter position, time remaining or
current deck status is displayed
7 The current TV show or video is broadcast in Stereo
8 The Hi-Fi track of a VHS tape is playing
9 A Timer Recording is programmed or in progress.
If blinking there is an error.
10 Tape Speed
11 The VCR Deck is selected
12 The status of the DVD deck is graphically displayed
13 The DVD has multiple angles.
14 MP3
15 A MPEG Audio Disc is loaded.
16 The number to the right of the “T” symbol is the
current title number
17 The number to the right of the “C” symbol is the
current chapter number
18 VHS tape is inserted and the VCR Deck is active
19 NICAM Indicator
20 COPY mode Indicator
REMOTE CONTROL
AUDIO & VIDEO CABLE
OWNER’S INSTRUCTIONS
COAXIAL CABLE
BATTERIES
AM ANTENNA CABLE
FM ANTENNA CABLE
00096Q DVD-CHT350/XSG-GB1 11/20/03 11:48 AM Page 9

GB
Deciding How to Connect DVD-VCR
10
You must take into account various factors when connecting audio or video systems:
◆ Types of connectors available on your systems
◆ Systems connected permanently to the DVD-VCR (satellite receiver for example) or
temporarily (camcorder for example)
Your DVD-VCR is equipped with the following connectors.
Connector Location Type Direction Recommended Use
LINE
Rear Audio/Video RCA In/Out ◆ Television
◆ Other VCR
COMPONENT Rear RCA Out ◆ COMPONENT out (DVD only)
output
S-VIDEO Rear S-JACK Out ◆ S-Video out (DVD only)
output
OUT TO TV Rear 75 Ω Out ◆ Television
coaxial
IN FROM ANT. Rear 75 Ω In ◆ Aerial
coaxial ◆ Cable television network
◆ Satellite receiver
☛ Whenever you connect an audio or video system to your DVD-VCR, ensure that all
elements are switched off.
Refer to the documentation supplied with your equipment for detailed connection
instructions and associated safety precautions.
00096Q DVD-CHT350/XSG-GB1 11/20/03 11:48 AM Page 10

GB
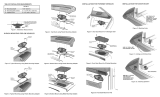
Connecting DVD-VCR to the TV using the Coaxial Cable
Connecting DVD-VCR to the TV using the RCA Cable
11
To receive television programmes a signal must be received from
one of the following sources:
◆ An outdoor aerial
◆ An indoor aerial
◆ A cable television network
◆ A satellite receiver
☛ Make sure that both the television and the DVD-VCR are
switched off
before connecting the cables.
1 Remove the aerial or network input cable from the television.
2 Connect this cable to the 75Ω coaxial socket marked on the
rear of your DVD-VCR.
3 Plug the coaxial cable supplied into the socket on your
DVD-VCR.
4 Plug the other end of the coaxial cable into the connector
previously used for the aerial on the television.
5 To obtain better quality pictures and sound on your television, you
can also connect your DVD-VCR to the television via the RCA
cable (see section below) if your television is equipped with this
type of connection.
You can connect your DVD-VCR to the television using the RCA cable if the appropriate input is available
on the television. You thus:
◆ Obtain better quality sound and pictures
◆ Simplify the setting up procedure of your DVD-VCR
☛
◆ Regardless of the type of connection chosen, you must always connect the coaxial cable supplied.
Otherwise, no picture will be visible on the screen when the DVD-VCR is switched off.
◆ Make sure that both the television and the DVD-VCR are switched off
before connecting the cables.
1 Connect the coaxial cable as indicated in the above section.
2 Connect one end of the RCA Audio/Video cable to the Video output and Audio L, R output socket on the rear
of the DVD-VCR.
3 Plug the other end into the appropriate connector on the television.
3
2
TV
4
Aerial
RF coaxial cable
2
3
TV
00096Q DVD-CHT350/XSG-GB1 11/20/03 11:48 AM Page 11

GB
12
Connecting Other Equipment to Your DVD-VCR
You can connect other audio and/or video equipment to your DVD-VCR in different ways. The following
illustrations give a few examples of the connection possibilities.
➢ The RCA input/output connectors on the rear of the DVD-VCR are used for equipment,
such as camcorders, VCRs or sound systems.
REAR OF THE DVD-VCR
Camcorder
VCR
Sound system
00096Q DVD-CHT350/XSG-GB1 11/20/03 11:48 AM Page 12

GB
Plug & Auto Set up
13
Your DVD-VCR will automatically set itself up when it is plugged
into the mains for the first time. TV stations will be stored in
memory. The process takes a few minutes. Your DVD-VCR will
then be ready for use.
1 Connect the coaxial cable as indicated on page 11.
(Connecting Your DVD-VCR to the TV Using the Coaxial Cable)
2 Plug the DVD-VCR into the mains.
Result: The LANGUAGE SET menu is displayed.
3 Select the required language by pressing the
or
❷
buttons.
4 Press ENTER to store the language selected.
Result: A message appears.
5 Press ENTER to start the auto scanning.
◆ The number of stations automatically stored by the DVD-VCR
depends on the number of stations that it has found.
6 Check the data and time. (see page 17)
7 On completion, press RETURN to exit the menu.
➢ Auto preset can be performed by pressing
■
(STOP) on
the VCR continuously for 5 seconds or more with no
tape inserted.
AUTO SET UP
PLEASE WAIT
60%
I
■■■■■■■■■■■■
-------I
RETURN
RETURN
➛❿
❷
CLOCK SET
12:01 1/JAN/2003
WED
TV
00096Q DVD-CHT350/XSG-GB1 11/20/03 11:48 AM Page 13

Tuning Your Television for the DVD-VCR
GB
14
You must tune your television for the DVD-VCR only if you are not
using a RCA cable
➢ To view pictures from your DVD-VCR when a RCA cable
is used, the television must be set to the audio/video
mode (AV).
1 Switch on the television.
2 Switch on the DVD-VCR by pressing STANDBY/ON on the front of
the DVD-VCR or STANDBY/ON on the remote control.
3 Select a programme position on the television to be reserved for
use with your DVD-VCR.
4 Insert the video cassette in the DVD-VCR. Check that the
DVD-VCR starts reading the cassette; if not, press
❿
II
button
.
5 Start a scan on your television or set the television to UHF
channel 36.
6 Fine tune the television until the pictures and sound are obtained
clearly.
7 If you cannot find the pictures and sound, or there is interference
from nearby channels, it may be necessary to change the setting
of the DVD-VCR output channel (see Setting the DVD-VCR
Output Channel on page 23 and Problems and Solutions on page
72).
8 When the picture and sound are perfectly clear, store this channel
at the desired programme position on the television.
Result: That programme is now reserved for use with your
DVD-VCR.
4
2
00096Q DVD-CHT350/XSG-GB1 11/20/03 11:48 AM Page 14

GB
Deck Control Keys
15
The DVD-VCR uses one set of controls to operate both decks. The
following keys are helpful in successfully controlling each deck.
1 STANDBY/ON Button
Press the STANDBY/ON button on the remote control or front
panel to turn on the DVD-VCR.
2 DVD Button
Press the DVD button on the remote control when you want to
control the DVD deck.
◆ The DVD indicator will light on the Front Panel Display to show
that the DVD deck is selected.
3 VCR Button
Press the VCR button on remote control when you want to control
the VCR deck.
◆ The VCR indicator will light on the Front Panel Display to show
that VHS deck is selected.
4 INPUT Button
Press the INPUT button repeatedly to cycle through all of your
input sources, including the Tuner (PR##), Line 1, Line 2 and Line
3 (rear AV input).
1
1
2
3
4
00096Q DVD-CHT350/XSG-GB1 11/20/03 11:48 AM Page 15

GB
16
Copying from DVD to VCR
The DVD-VCR allows you to copy the contents of a DVD to a VHS
tape with a press of the COPY button.
If the DVD you are attempting to copy is copy
protected, you will not be able to copy the disc. It is not
permitted to copy Macrovision® encoded DVDs.
1 Insert Disc
Insert the disc you wish to copy in the DVD deck and close the
drawer.
2 Insert VHS Tape
Insert a blank VHS videotape into the VCR deck.
3 Copy the DVD to VHS Tape
Press the COPY button on the DVD-VCR front panel.
◆ The DVD will go into Play mode and the VCR will go into Record
mode.
◆ If the DVD disc menu appears, you may need to press the PLAY
button manually to begin copying.
4 Stop the Copy Process
When the DVD is finished playing, press the VCR button on the
remote control and then press the STOP button to end the copy.
◆ You must stop the Copy process manually when the DVD movie
ends or the DVD may replay and record over and over again.
☛ The copy is only active PAL Disc system.
1
2
3
4
4
00096Q DVD-CHT350/XSG-GB1 11/20/03 11:48 AM Page 16

GB
17
Inserting Batteries in the Remote Control
Setting the Date and Time
You must insert or replace the batteries in the remote control when
you:
◆ Purchase the DVD-VCR
◆ Find that the remote control is no longer working
correctly
1 Push the tab in the direction of the arrow to release the battery
compartment cover on the rear of the remote control.
2 Insert two AA, R6 or equivalent batteries, taking care to respect
the polarities:
◆ + on the battery with + on the remote control
◆ – on the battery with – on the remote control
3 Replace the cover by aligning it with the base of the remote
control and pushing it back into place.
➢ Do not mix different battery types (manganese and
alkaline for example).
Your DVD-VCR contains a 24-hour clock and calendar used to:
◆ Automatically stop programme recording
◆ Preset your DVD-VCR to record a programme
automatically
You must set the date and time when:
◆ You purchase the DVD-VCR
☛ ◆ Do not forget to reset the time when you change
clocks from winter to summer time and vice versa.
1 Press SETUP on the remote control.
Result
: The MAIN MENU is displayed.
2 Press the corresponding
,
❷
or
➛
,
❿
buttons to select the
CLOCK SET option.
3 Press the ENTER button to select this option.
Result
: The
CLOCK SET menu is displayed.
4 Press
➛
or
❿
to select the hour, minutes, day, month and year.
Result
: The option selected flashes.
5 Press the
or
❷
buttons to increase or decrease the value.
Result
: The day of the week is displayed automatically.
➢ You can hold the
or
❷
buttons down to scroll more
quickly through the values.
6 On completion, press RETURN twice to exit the menu.
MAIN MENU
CLOCK SET
RETURN
❷
➛❿
ENTER
RETURN
➛❿
❷
CLOCK SET
12:00 1/JAN/2003
WED
1
00096Q DVD-CHT350/XSG-GB1 11/20/03 11:48 AM Page 17

GB
18
Menu Language
1 Open “MAIN MENU”
With the DVD in stop mode, press the SETUP button.
2 Set “Language”
Using the
,
❷
and
➛
,
❿
buttons, move the selection arrow to
Language set then press ENTER button.
3 Set menu Language
Move the selection bar to your desired Language, then press
ENTER button.
1
LANGUAGE SET
RETURN
❷
ENTER
MAIN MENU
LANGUAGE SET
RETURN
❷
➛❿
ENTER
❿
English
Français
Deutsch
Español
Italiano
Nederlands
00096Q DVD-CHT350/XSG-GB1 11/20/03 11:48 AM Page 18

GB
19
Presetting the Stations Automatically
☛ You do not need to preset the stations if you have already
set them automatically (see Plug & Auto Set Up on
page 13).
Your DVD-VCR contains a built-in tuner used to receive television
broadcasts.
You must preset the stations received through the tuner. This can
be done:
◆ Plug & Auto Set up (see page 13)
◆ Automatically
◆ Manually (see page 20)
You can store up to 80 stations.
1 Press the SETUP button on the remote control.
Result
: The MAIN MENU is displayed.
2 Press the corresponding
,
❷
or
➛
,
❿
buttons to select the
INSTALLATION option.
3 Press the ENTER button to select this option.
Result
: The INSTALLATION menu is displayed.
4 Press the corresponding
or
❷
buttons, until the AUTO SET
UP option is selected.
And then press the ENTER button to select this option.
Result
: A message appears, indicating that any channels
already preset on your DVD-VCR will be deleted.
5 Press ENTER to start the auto scanning.
Result
: ◆ The PLEASE WAIT indication flashes on the
television screen.
◆ The first frequency band is scanned and the first
station found is displayed and stored.
◆ The DVD-VCR then searches for the second station
and so on.
◆ When the automatic scanning procedure has
finished, the DVD-VCR switches automatically to
programme 1.
➢ The number of stations automatically stored by the DVD-
VCR depends on the number of stations that it has found.
6 If you wish to cancel the auto scanning before the end, press the
RETURN button three times to exit the menu.
➢ ◆ Once the auto scanning procedure has finished, some
stations may have been stored more than once; select
the stations with the best reception and delete the
ones no longer required (see page 21).
VCR
AUTO SET UP
PLEASE WAIT
2%
I--------------------I
RETURN
YOUR DATA WILL BE LOST
PRESS ENTER TO CONTINUE
RETURN TO EXIT
INSTALLATION
AUTO SET UP
MANUAL SET UP
TV SYSTEM :G
VCR OUTPUT CH :CH36
RETURN
❷
ENTER
MAIN MENU
INSTALLATION
RETURN
❷
➛❿
ENTER
00096Q DVD-CHT350/XSG-GB2 11/20/03 11:48 AM Page 19

GB
20
Presetting the Stations Manually
☛ You do not need to preset the stations manually if you
have already set them automatically.
1 Press the SETUP button on the remote control.
Result
: The MAIN MENU is displayed.
2 Press the corresponding
,
❷
or
➛
,
❿
buttons to select the
INSTALLATION option.
3 Press the ENTER button to select this option.
Result
: The INSTALLATION menu is displayed.
4 Press the corresponding
or
❷
buttons, until the MANUAL SET
UP option is selected.
5 Press the ENTER button to select a MANUAL SET UP option.
Result
: The TV STATION TABLE menu is displayed.
6 Press the
or
❷
buttons to select a programme number as
required.
7 Press the
❿
button to preset the station.
Result
: The MANUAL TUNING menu is displayed.
8 Press the
➛
or
❿
buttons to start scanning.
Result
: The frequency band is scanned and the first station
found is displayed.
9 Press the
or
❷
buttons until the NAME is selected.
The station name is set automatically from the broadcast signal.
10 To change the programme’s name, press the
❿
button.
Result
: The first letter of the name flashes.
11 To... Then...
Select a character Press the
or
❷
button until the
in the name required character is displayed
(letters, numbers or “-” character).
Move to the next or Press the
❿
or
➛
buttons
previous character respectively.
12 If you... Then...
Wish to store the ◆ Press the
or
❷
buttons until the MFT
station displayed is selected.
◆ Press the
➛
or
❿
buttons to adjust the
picture, if necessary.
◆ Press ENTER to store the station
Do not wish to ◆ Press the
or
❷
buttons until the
store the station
CH is selected.
displayed ◆ Press the
➛
or
❿
buttons to go on
scanning the frequency band and display
the next station
◆ Go back to the beginning of Step 12
13 Repeat this procedure from Step 6 onwards, until all the required
stations have been stored.
14 On completion, press the RETURN button three times to exit the
menu.
☛ You do not need to preset the stations manually if you
have already set them automatically.
VCR
INSTALLATION
AUTO SET UP
MANUAL SET UP
TV SYSTEM :G
VCR OUTPUT CH :CH36
RETURN
❷
ENTER
MAIN MENU
INSTALLATION
RETURN
❷
➛❿
ENTER
TV STATION TABLE
PR CH NAME
1
2
3
4
5
❷
❿
SWAPPING:ENTER
RETURN DELETE:CLEAR
MANUAL TUNING
PR : 1
CH : ---
MFT : -
NAME : ----
❷
➛ ❿
MEMORY:ENTER
RETURN
00096Q DVD-CHT350/XSG-GB2 11/20/03 11:48 AM Page 20
/