Page is loading ...

Contents
Printer parts . . . . . . . . . . . . . . . . . . . . . . . . . . . . . . . . . . . . . . . . . . . . . . . . . . . . . . . . . . . . . . . . . . . . . 2
Front . . . . . . . . . . . . . . . . . . . . . . . . . . . . . . . . . . . . . . . . . . . . . . . . . . . . . . . . . . . . . . . . . . . . . . . 2
Inside . . . . . . . . . . . . . . . . . . . . . . . . . . . . . . . . . . . . . . . . . . . . . . . . . . . . . . . . . . . . . . . . . . . . . . . 3
Back . . . . . . . . . . . . . . . . . . . . . . . . . . . . . . . . . . . . . . . . . . . . . . . . . . . . . . . . . . . . . . . . . . . . . . . . 3
Loading media . . . . . . . . . . . . . . . . . . . . . . . . . . . . . . . . . . . . . . . . . . . . . . . . . . . . . . . . . . . . . . . . . . . 4
Supported papers . . . . . . . . . . . . . . . . . . . . . . . . . . . . . . . . . . . . . . . . . . . . . . . . . . . . . . . . . . . . . 14
Print start position . . . . . . . . . . . . . . . . . . . . . . . . . . . . . . . . . . . . . . . . . . . . . . . . . . . . . . . . . . . . 15
Using the auto take-up reel unit . . . . . . . . . . . . . . . . . . . . . . . . . . . . . . . . . . . . . . . . . . . . . . . . . . . . . 16
Selecting media settings . . . . . . . . . . . . . . . . . . . . . . . . . . . . . . . . . . . . . . . . . . . . . . . . . . . . . . . . . . . 22
Removing the take-up roll . . . . . . . . . . . . . . . . . . . . . . . . . . . . . . . . . . . . . . . . . . . . . . . . . . . . . . . . . 22
Printing the amount of media remaining . . . . . . . . . . . . . . . . . . . . . . . . . . . . . . . . . . . . . . . . . . . 22
Cutting media . . . . . . . . . . . . . . . . . . . . . . . . . . . . . . . . . . . . . . . . . . . . . . . . . . . . . . . . . . . . . . . 23
Removing media . . . . . . . . . . . . . . . . . . . . . . . . . . . . . . . . . . . . . . . . . . . . . . . . . . . . . . . . . . . . . 25
Maintaining the printer . . . . . . . . . . . . . . . . . . . . . . . . . . . . . . . . . . . . . . . . . . . . . . . . . . . . . . . . . . . 27
Precautions . . . . . . . . . . . . . . . . . . . . . . . . . . . . . . . . . . . . . . . . . . . . . . . . . . . . . . . . . . . . . . . . . . 27
When to perform maintenance . . . . . . . . . . . . . . . . . . . . . . . . . . . . . . . . . . . . . . . . . . . . . . . . . . . 28
Cleaning platen heater and media edge plates . . . . . . . . . . . . . . . . . . . . . . . . . . . . . . . . . . . . . . . . 28
Print head maintenance . . . . . . . . . . . . . . . . . . . . . . . . . . . . . . . . . . . . . . . . . . . . . . . . . . . . . . . . 29
Checking ink status . . . . . . . . . . . . . . . . . . . . . . . . . . . . . . . . . . . . . . . . . . . . . . . . . . . . . . . . . . . 31
Ink cartridge part numbers . . . . . . . . . . . . . . . . . . . . . . . . . . . . . . . . . . . . . . . . . . . . . . . . . . . . . . 31
Shaking ink cartridges . . . . . . . . . . . . . . . . . . . . . . . . . . . . . . . . . . . . . . . . . . . . . . . . . . . . . . . . . 32
Replacing ink cartridges . . . . . . . . . . . . . . . . . . . . . . . . . . . . . . . . . . . . . . . . . . . . . . . . . . . . . . . . 32
Disposing of waste ink . . . . . . . . . . . . . . . . . . . . . . . . . . . . . . . . . . . . . . . . . . . . . . . . . . . . . . . . . 34
Disposing of used consumables . . . . . . . . . . . . . . . . . . . . . . . . . . . . . . . . . . . . . . . . . . . . . . . . . . 36
Ordering supplies and optional accessories . . . . . . . . . . . . . . . . . . . . . . . . . . . . . . . . . . . . . . . . . . . . . 36
Where to get help . . . . . . . . . . . . . . . . . . . . . . . . . . . . . . . . . . . . . . . . . . . . . . . . . . . . . . . . . . . . . . . . 37

2 | Printer parts
Printer parts
Note: Unless otherwise indicated, the illustrations in this manual show the SureColor
®
S40600, but the
instructions apply to all models.
Front
Media
loading lever
Control panel
AC inlets
LAN port
Cartridge check
lights
USB port
Front cover
Air filters
Left maintenance
cover
After heater
Lock
levers
Waste ink tank
Right roll core holder
Right maintenance
cover
Roll supports
Print drying
system*
Tension bar
Left roll core
holder
* Included with the SC-S60600 and optional for the SC-S40600/SC-S80600.
Ink cartridges
(one set for the
SC-S40600)

Inside | 3
Inside
Back
Fabric wiper unit
Flushing pad
Nozzle caps
(one set for the
SC-S40600)
Media edge
plate
Platen heater
Pressure rollers
Cutter groove
Left roll holder
Right roll holder
Handle
Roll supports
Drive switch
Lift levers
Pre-heater

4 | Loading media
Loading media
Follow the steps in this section to load media.
WARNING: The heaters and media holding plates may be hot; be careful to avoid burns. Heavy media rolls may
require two people for loading and removing.
1. Press the P power button to turn on the printer, if necessary, and wait until you see Load media
displayed on the LCD screen.
2. Open the front cover and raise the media loading lever.
3. Grasp the tabs on both media edge plates and slide the plates outward.

Loading media | 5
4. At the back of the printer, loosen the knob for the right roll holder and slide the roll holder outward.
5. Rotate the handle on the roll holder counterclockwise until it stops.
6. Slide the left roll holder to the media core size being loaded.

6 | Loading media
7. Fully tighten the knob on the left roll holder.
Note: Make sure to tighten the knob completely; otherwise, the roll holder may move during printing and
cause the media to feed incorrectly.
8.
Place the media you want to load on the roll supports.
Note: Load the roll based on the printable side.
Printable side out
Printable side in

Loading media | 7
9. Raise the left lift lever to position the roll for insertion.
10. Firmly insert the roll media into the left roll holder.
Note: If the outer diameter of the roll media is less than 5.5 inches (140 mm), you need to manually lift the
roll media to insert it into the roll holder.

8 | Loading media
11. Raise the right lift lever.
12. Push the right roll holder into the roll media.

Loading media | 9
Note: Make sure the roll holder is inserted into the roll core all the way by pushing in the roll holder twice.
Otherwise, media may not feed correctly and cause banding in your printouts.
13.
Fully tighten the knob on the roll holder.

10 | Loading media
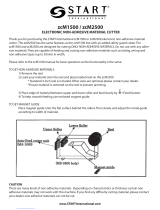
14. Rotate the handle until part A (shaded area) in the illustration below is fully inserted into the roll core.
Caution: To avoid damaging the roll holder, do not continue turning the handle after part A is fully inserted.
15.
Insert your media approximately 12 inches (30 cm) into the opening, then lower the media loading
lever.

Loading media | 11
16. Move to the front of the printer, grasp the media as shown, and raise the media loading lever.
17. Use one hand to pull the center of the media straight out until it is aligned with the bottom edge of the
label on the after heater.

12 | Loading media
Note: Do not use two hands to pull the media as this can cause the media to be skewed.
18. Lower the media loading lever to hold the media in place.
19. Lightly tap both ends of the media and check if there is a difference in tension between the left and
right sides. If there is a difference in tension, raise the media loading lever, adjust the looseness of the
media, and then lower the media loading lever.

Loading media | 13
20. Slide the media edge plates against the media. Adjust the position so that the edges of the media are
aligned with the center of the round holes in the plates.
Caution: To avoid damaging the print head, do not use the media edge plates with media that is more than
0.02 inch (0.4 mm) thick. Move the media holding plates to the edges of the platen when they are not in use.

14 | Supported papers
21. Close the front cover.
Note: To remove your media, follow the steps in this section in reverse order.
Supported papers
One of the key elements for achieving professional quality prints is selecting paper that is specifically
optimized for your printer. Epson offers a variety of canvas, fine art, photo and proofing papers, as well as
other media, for your printer. Most Epson professional media are available in sizes from small cut sheets to
wide-format rolls. Check the Epson Pro Imaging website at www.proimaging.epson.com or your Epson
Professional Imaging Authorized Reseller for available media.
The following papers are supported:
Always test samples of media in the printer before purchasing large quantities or printing large jobs. If you
use non-Epson paper or other media, you may need to adjust various settings and create special paper
configurations. See the online User’s Guide for details.
Roll paper
Roll core size 2 or 3 inches (50.8 to 76.2 mm)
Roll outer diameter Media feeding unit: Up to 9.8 inches (250 mm)
Auto take-up reel unit: Up to 7.9 inches (200 mm)
Media width 11.8 to 64.0 inches (300 to 1,626 mm)
Media thickness Up to 1 mm
Roll weight Up to 99 lb (45 kg)
Cut paper
Media width 11.8 to 64.0 inches (300 to 1,626 mm)
Media length 19.7 inches (500 mm) or longer
Media thickness Up to 1 mm

Print start position | 15
Print start position
You can adjust the starting position of the print area in your printouts.
Right print start position
The right print start position is dependent upon the
Media Size Check setting.
If
Media Size Check is turned on, the print start position is approximately 0.4 inch (10 mm) from the
right edge of the media when using the media edge plates, and 0.2 inch (5 mm) when not using the media
edge plates.
Note: You can adjust the print start position by changing the Print Start Position or Side Margin (Right) settings
from the setup menu.
If Media Size Check is turned off, the print start position is indicated on the after heater.
0.2 inch
(5 mm)
0.2 inch
(5 mm)

16 | Using the auto take-up reel unit
Top print start position
The top print start position is approximately 3.6 inches (92 mm) inside the printer from the cutter groove.
Using the auto take-up reel unit
The auto take-up reel unit automatically takes up media as it is printed, improving the efficiency of
unmanned operation. The auto take-up reel unit can take up media with the printed surface on either the
outside or inside of the roll.
Caution: Be careful not to get your hands caught in the media feeding unit or the auto take-up reel unit while the
printer is operating.
1.
Press the d button to feed the media down to the center of the after heater.
Note: Always use the d button to feed media. If you pull the media with your hand, it may twist during
take-up.
3.6 inches
(92 mm)

Using the auto take-up reel unit | 17
2. Loosen the core holder knobs and slide the core holders apart. Center the roll supports between the
roll holders.
3. Align the right roll core holder with the right edge of the media and tighten the knob.

18 | Using the auto take-up reel unit
4. Insert the roll core into the right holder.
Note: Use a roll core that is wider than the width of the media. This allows the media to be taken up without
protruding from the core.
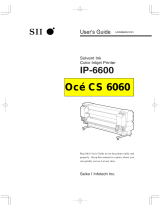
5.
Push the holder until part A (shaded area) in the illustration below is fully inserted into the roll core,
then tighten the knob.
Caution: Stop when part A is no longer visible. Do not push the holder too far in.

Using the auto take-up reel unit | 19
6. Trim the left and right corners of the media, leaving a straight section at the center about 4 to 8 inches
(10 to 20 cm) wide.
7. Cut a strip about 27.6 inches (70 cm) in length from the included paper tape and attach one end to
the center of the media using adhesive tape.
Note: You can also use commercially available tape or strips cut from media to attach your media to the roll
core. The paper tape or cut media strip should be about 0.8 to 1 inch (20 to 25 mm) wide and 27.6 inches
(70 cm) long.
10 in.
(25 cm)
10 in.
(25 cm)
4–8 in. (10–20 cm)
27.6 inches (70 cm)

20 | Using the auto take-up reel unit
8. Pull the other end of the tape straight down and attach it to the roll core using adhesive tape as shown.
Note: Make sure the tape is taut; otherwise the media may move during take-up.
To take-in with the printable side facing out
To take-in with the printable side facing in
/